Citroen C5 RHD 2015 (RD/TD) / 2.G Manual PDF
Manufacturer: CITROEN, Model Year: 2015, Model line: C5 RHD, Model: Citroen C5 RHD 2015 (RD/TD) / 2.GPages: 362, PDF Size: 32.4 MB
Page 71 of 362

69
Mirrors
Each fitted with an adjustable mirror glasses
providing the lateral rear ward vision necessary
for overtaking or parking. They can also be
folded.
Adjustment
With the ignition on:
F move control A to the right or to the left to
select the corresponding mirror,
F move control B in all four directions to
adjust,
F return control A to the central position.
Folding
F From outside; lock the vehicle using the
remote control or the key.
F From inside; with the ignition on, pull
control A rearwards.
If the mirrors are folded using control A , they
will not unfold when the vehicle is unlocked.
Control A must be pulled again.
Unfolding
F From outside; unlock the vehicle using the
remote control or the key.
F From inside; with the ignition on, pull
control A rearwards.
If the position is changed manually, a long
press on control A re-engages the mirror.
Door mirrors
The objects observed are, in reality,
closer than they appear.
Take this into account in order to
correctly judge the distance of vehicles
approaching from behind.
As a safety measure, the mirrors must
be adjusted to reduce the blind spot.
Demisting / defrosting of the door
mirrors is associated with that of
the rear screen.The folding and unfolding of the door
mirrors using the remote control can be
deactivated by a CITROËN dealer or a
qualified workshop.
Demisting - Defrosting
See the "Demisting - Defrosting the rear
screen" section.
3
Ease of use and comfort
Page 72 of 362

70
Automatic day/night model
In order to guarantee optimum visibility
during your manoeuvres, the mirror lightens
automatically when reverse gear is engaged. By means of a sensor, which measures the
light from the rear of the vehicle, this system
automatically and progressively changes
between the day and night uses.
It has an anti-dazzle system which darkens the
mirror glass: this reduces any driver discomfort
caused by the light beam of following vehicles,
the sun...In vehicles fitted with electrochromatic door
mirrors, the system has an on/off button and an
associated warning lamp.
On
F
With the ignition on, press on button 1 .
The warning lamp 2 comes on and the mirror
glass is in automatic mode.
Off
F Press on button 1 .
The warning lamp 2 goes off and the mirror
glass remains in its lightest definition.
Rear view mirror
Manual day/night model
Adjustment
F Adjust the mirror so that the glass is
directed correctly in the "day" position.
Day / night position
F Pull the lever to change to the "night" anti-
dazzle position.
F Push the lever to change to the normal
"day" position.
Adjustable mirror providing a central rear ward view.
Equipped with an anti-dazzle system, which darkens the mirror glass and reduces the nuisance to
the driver caused by the sun, headlamps from other vehicles...
Ease of use and comfort
Page 73 of 362
71
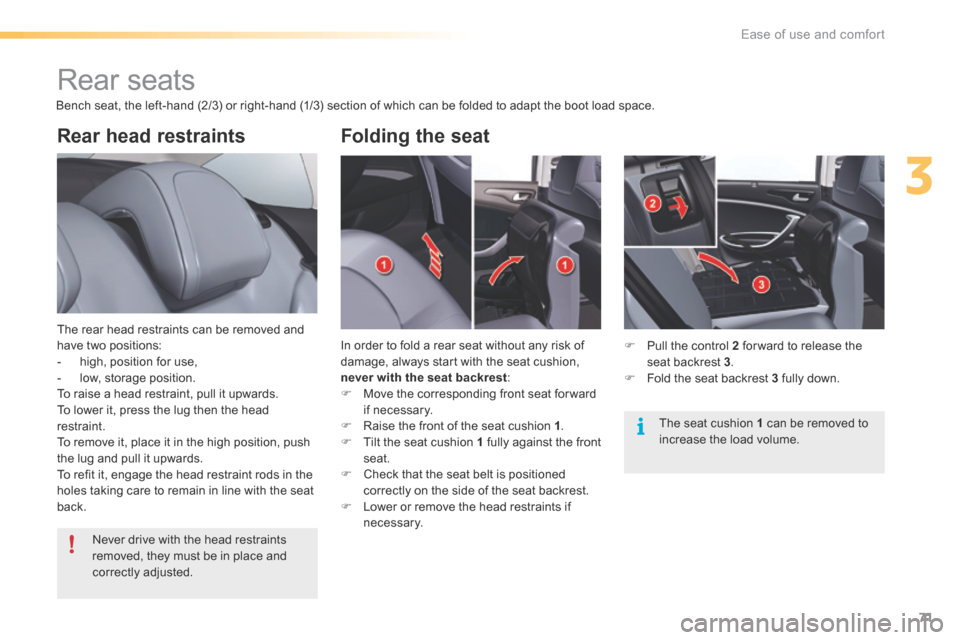
Rear head restraints
The rear head restraints can be removed and
have two positions:
- high, position for use,
- low, storage position.
To raise a head restraint, pull it upwards.
To lower it, press the lug then the head
restraint.
To remove it, place it in the high position, push
the lug and pull it upwards.
To refit it, engage the head restraint rods in the
holes taking care to remain in line with the seat
back.
Rear seats
Bench seat, the left-hand (2/3) or right-hand (1/3) section of which can be folded to adapt the boot load space.
In order to fold a rear seat without any risk of
damage, always start with the seat cushion,
never with the seat backrest:
F Move the corresponding front seat for ward
if necessary.
F Raise the front of the seat cushion 1 .
F Tilt the seat cushion 1 fully against the front
seat.
F Check that the seat belt is positioned
correctly on the side of the seat backrest.
F Lower or remove the head restraints if
necessary.
Folding the seat
F Pull the control 2 for ward to release the
seat backrest 3 .
F Fold the seat backrest 3 fully down.
Never drive with the head restraints
removed, they must be in place and
correctly adjusted. The seat cushion 1 can be removed to
increase the load volume.
3
Ease of use and comfort
Page 74 of 362
72
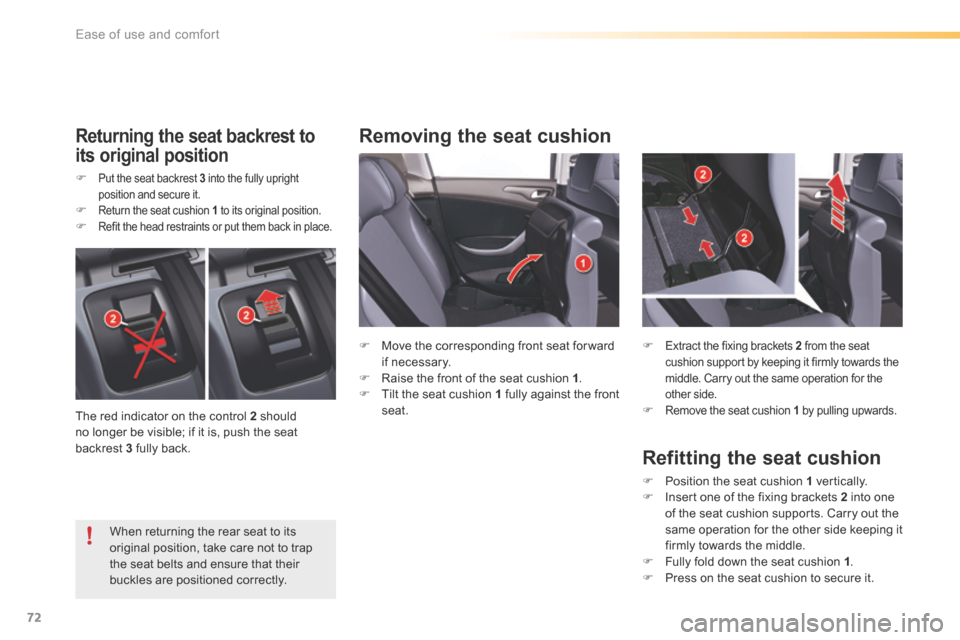
Removing the seat cushionReturning the seat backrest to
its original position
F Put the seat backrest 3 into the fully upright
position and secure it.
F Return the seat cushion 1 to its original position.F Refit the head restraints or put them back in place.
When returning the rear seat to its
original position, take care not to trap
the seat belts and ensure that their
buckles are positioned correctly. F
Move the corresponding front seat for ward
if necessary.
F Raise the front of the seat cushion 1 .
F Tilt the seat cushion 1 fully against the front
seat.
Refitting the seat cushion
F Position the seat cushion 1 vertically.
F Insert one of the fixing brackets 2 into one
of the seat cushion supports. Carry out the
same operation for the other side keeping it
firmly towards the middle.
F Fully fold down the seat cushion 1 .
F Press on the seat cushion to secure it.
The red indicator on the control 2 should
no longer be visible; if it is, push the seat
backrest 3 fully back. F
Extract the fixing brackets 2
from the seat
cushion support by keeping it firmly towards the
middle. Carry out the same operation for the
other side.
F Remove the seat cushion 1 by pulling upwards.
Ease of use and comfort
Page 75 of 362
73
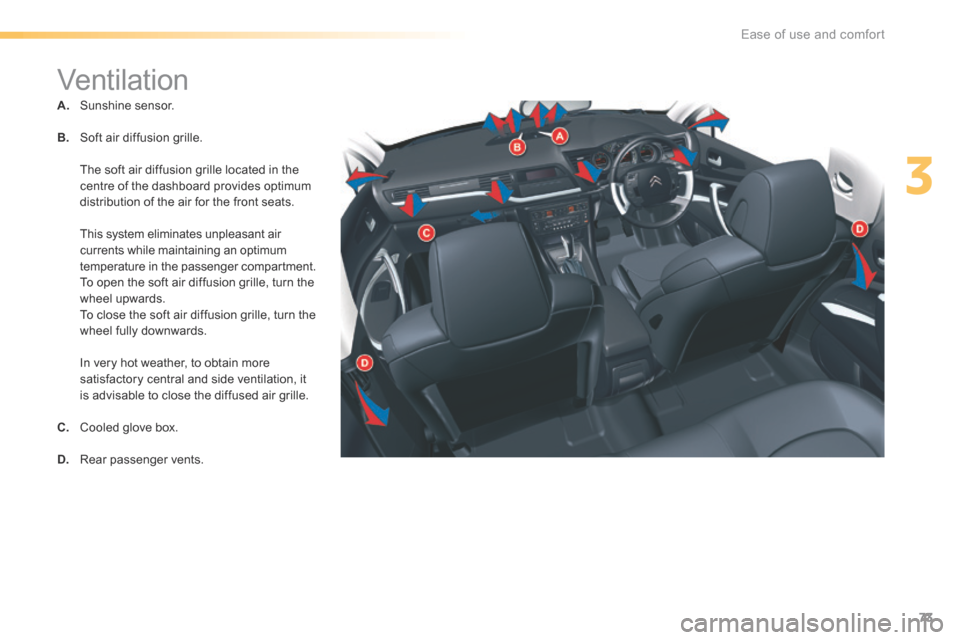
Ventilation
A. Sunshine sensor.
B. Soft air diffusion grille.
The soft air diffusion grille located in the
centre of the dashboard provides optimum
distribution of the air for the front seats.
This system eliminates unpleasant air
currents while maintaining an optimum
temperature in the passenger compartment.
To open the soft air diffusion grille, turn the
wheel upwards.
To close the soft air diffusion grille, turn the
wheel fully downwards.
In very hot weather, to obtain more
satisfactory central and side ventilation, it
is advisable to close the diffused air grille.
C. Cooled glove box.
D. Rear passenger vents.
3
Ease of use and comfort
Page 76 of 362
74
We recommend use of the automatic regulation
of the air conditioning.
It permits automatic and optimised control
of all of the following functions: air flow,
temperature in the passenger compartment
and air distribution, by means of various
sensors (ambient temperature, sunshine).
This eliminates any need for you to change
your settings other than the temperature value
displayed.
F Take care not to cover the sunshine
sensor A.
If you select the automatic mode
(by pressing the "AUTO" control) and leave
all of the vents open, optimum comfort will be
maintained and humidity and condensation will
be removed regardless of the exterior climatic
conditions.
The temperature in the passenger compartment
can only be lower than the ambient temperature
if the air conditioning is on.
In order to be effective, the air conditioning must
be used with the windows closed. If the vehicle
has been parked in the sun for a long period
and the interior temperature is very high, first
ventilate the passenger compartment with the
windows open for a few minutes, then close the
windows.
Heating, ventilation and air conditioning recommendations
To keep the air conditioning system in
good working order it is essential that it is
operated at least once a month.
The air conditioning uses engine power
during its operation. As a result, the fuel
consumption of the vehicle increases.
In certain cases of particularly arduous use
(e.g. towing the maximum load on a steep
gradient in high temperatures), switching off
the air conditioning saves engine power and
improves the towing capacity.
Air inlet
Check that the exterior grille for the air inlet,
at the bottom of the windscreen, is clean and
free of dead leaves, snow, etc.
When washing the vehicle using a high
pressure nozzle, avoid spraying at the air
inlet. Maximum comfort is obtained by means of
a good distribution of air in the passenger
compartment, both in the front and in the rear.
To obtain a uniform distribution of air, take
care not to block the exterior air intake grille
located at the base of the windscreen, the
vents, the air outlets under the front seats and
the air extractor located behind the flaps in
the boot.
The front and rear vents are fitted with
thumbwheels to adjust the air flow and
direction. We recommend that you leave all of
the vents open.
Dust filter / Odour filter
(active carbon)
There is a filter for excluding odours and
dust.
This filter must be changed in line with the
vehicle's servicing schedule. (Refer to the
maintenance and warranty guide).
Air conditioning
Air circulation
Ease of use and comfort
Page 77 of 362
75
Digital air conditioning (mono-zone)
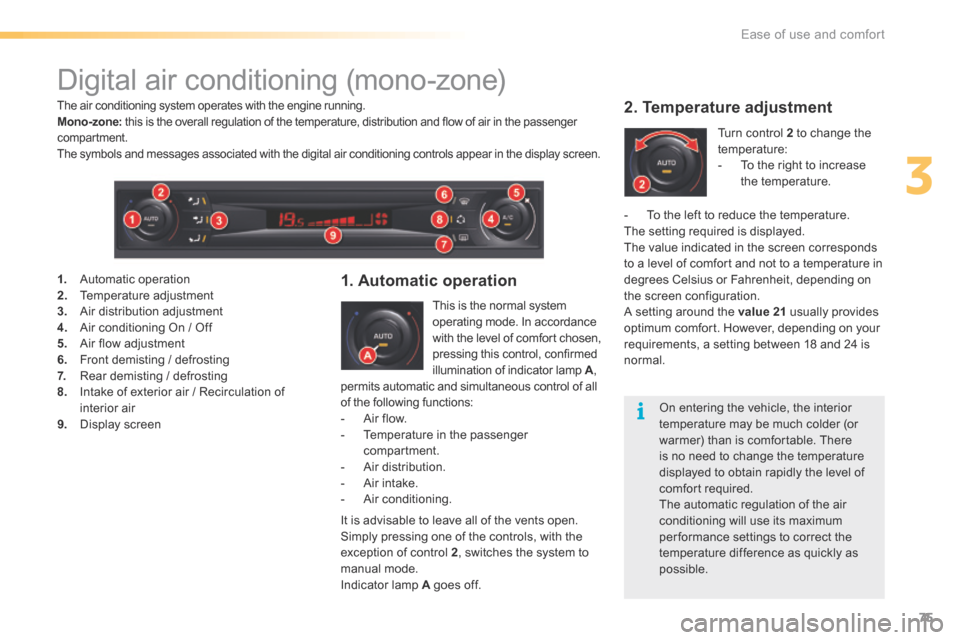
This is the normal system
operating mode. In accordance
with the level of comfor t chosen,
pressing this control, confirmed
illumination of indicator lamp A,
permits automatic and simultaneous control of all
of the following functions:
- Air flow.
- Temperature in the passenger
compartment.
- Air distribution.
- Air intake.
- Air conditioning.
1. Automatic operation
It is advisable to leave all of the vents open.
Simply pressing one of the controls, with the
exception of control 2 , switches the system to
manual mode.
Indicator lamp A goes off.
2. Temperature adjustment
Turn control 2 to change the
temperature:
- To the right to increase
the temperature.
1. Automatic operation
2. Temperature adjustment
3. Air distribution adjustment
4. Air conditioning On / Off
5. Air flow adjustment
6. Front demisting / defrosting
7. Rear demisting / defrosting
8. Intake of exterior air / Recirculation of
interior air
9. d isplay screen -
To the left to reduce the temperature.
The setting required is displayed.
The value indicated in the screen corresponds
to a level of comfort and not to a temperature in
degrees Celsius or Fahrenheit, depending on
the screen configuration.
A setting around the value 21 usually provides
optimum comfort. However, depending on your
requirements, a setting between 18 and 24 is
normal.
The air conditioning system operates with the engine running.
Mono-zone: this is the overall regulation of the temperature, distribution and flow of air in the passenger
compartment.
The symbols and messages associated with the digital air conditioning controls appear in the display screen.
On entering the vehicle, the interior
temperature may be much colder (or
warmer) than is comfortable. There
is no need to change the temperature
displayed to obtain rapidly the level of
comfort required.
The automatic regulation of the air
conditioning will use its maximum
per formance settings to correct the
temperature difference as quickly as
possible.
3
Ease of use and comfort
Page 78 of 362
76
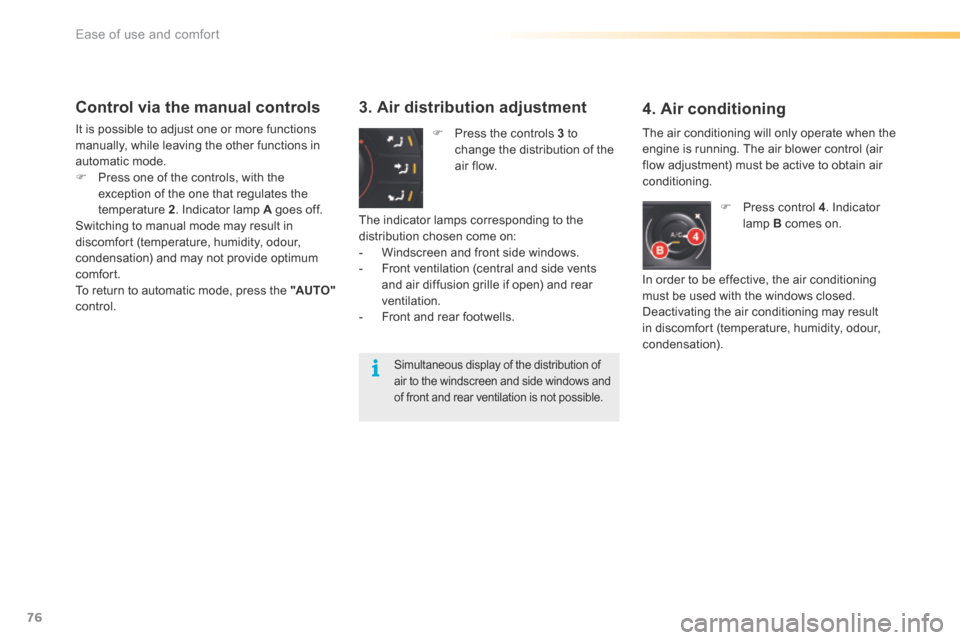
Control via the manual controls
It is possible to adjust one or more functions
manually, while leaving the other functions in
automatic mode.
F Press one of the controls, with the
exception of the one that regulates the
temperature 2. Indicator lamp A goes off.
Switching to manual mode may result in
discomfort (temperature, humidity, odour,
condensation) and may not provide optimum
comfort.
To return to automatic mode, press the "AUTO"
control.
3. Air distribution adjustment
F Press the controls 3 to
change the distribution of the
air flow.
4. Air conditioning
F Press control 4 . Indicator
lamp B comes on.
In order to be effective, the air conditioning
must be used with the windows closed.
Deactivating the air conditioning may result
in discomfort (temperature, humidity, odour,
condensation).
The indicator lamps corresponding to the
distribution chosen come on:
-
Windscreen and front side windows.
- Front ventilation (central and side vents
and air diffusion grille if open) and rear
ventilation.
- Front and rear footwells. The air conditioning will only operate when the
engine is running. The air blower control (air
flow adjustment) must be active to obtain air
conditioning.
Simultaneous display of the distribution of
air to the windscreen and side windows and
of front and rear ventilation is not possible.
Ease of use and comfort
Page 79 of 362
77
With Stop & Start, when demisting has
been activated, the STOP mode is not
available.
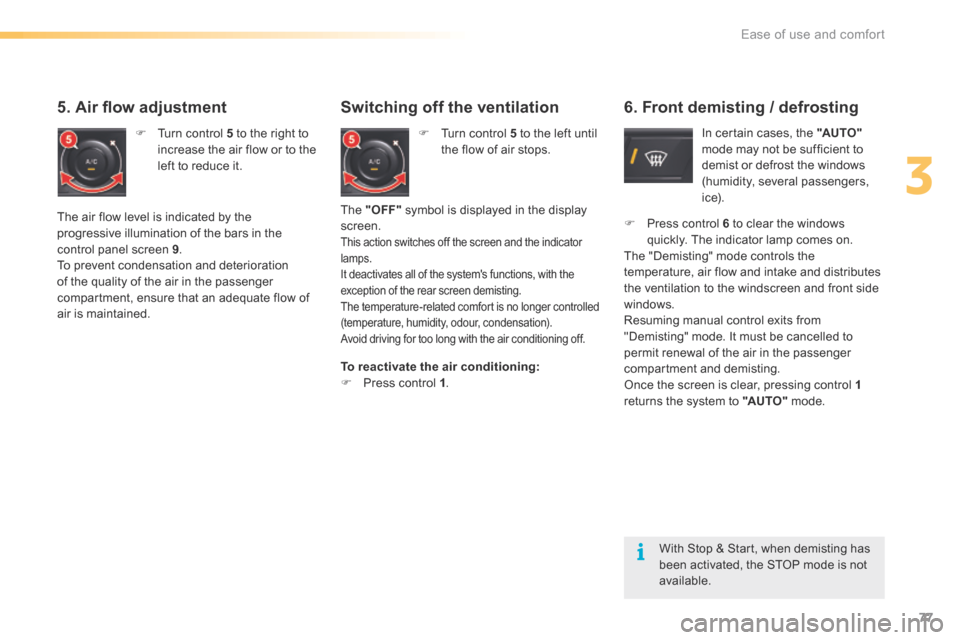
Switching off the ventilation
F Turn control 5 to the left until
the flow of air stops.
5. Air flow adjustment
F Turn control 5 to the right to
increase the air flow or to the
left to reduce it.
6. Front demisting / defrosting
In certain cases, the "AUTO"
mode may not be sufficient to
demist or defrost the windows
(humidity, several passengers,
i c e).
The "OFF" symbol is displayed in the display
screen.
This action switches off the screen and the indicator
lamps.
It deactivates all of the system's functions, with the
exception of the rear screen demisting.
The temperature-related comfort is no longer controlled
(temperature, humidity, odour, condensation).
Avoid driving for too long with the air conditioning off.
The air flow level is indicated by the
progressive illumination of the bars in the
control panel screen 9 .
To prevent condensation and deterioration
of the quality of the air in the passenger
compartment, ensure that an adequate flow of
air is maintained.
To reactivate the air conditioning:
F Press control 1 . F
Press control 6 to clear the windows
quickly. The indicator lamp comes on.
The "Demisting" mode controls the
temperature, air flow and intake and distributes
the ventilation to the windscreen and front side
windows.
Resuming manual control exits from
"Demisting" mode. It must be cancelled to
permit renewal of the air in the passenger
compartment and demisting.
Once the screen is clear, pressing control 1
returns the system to "AUTO" mode.
3
Ease of use and comfort
Page 80 of 362
78
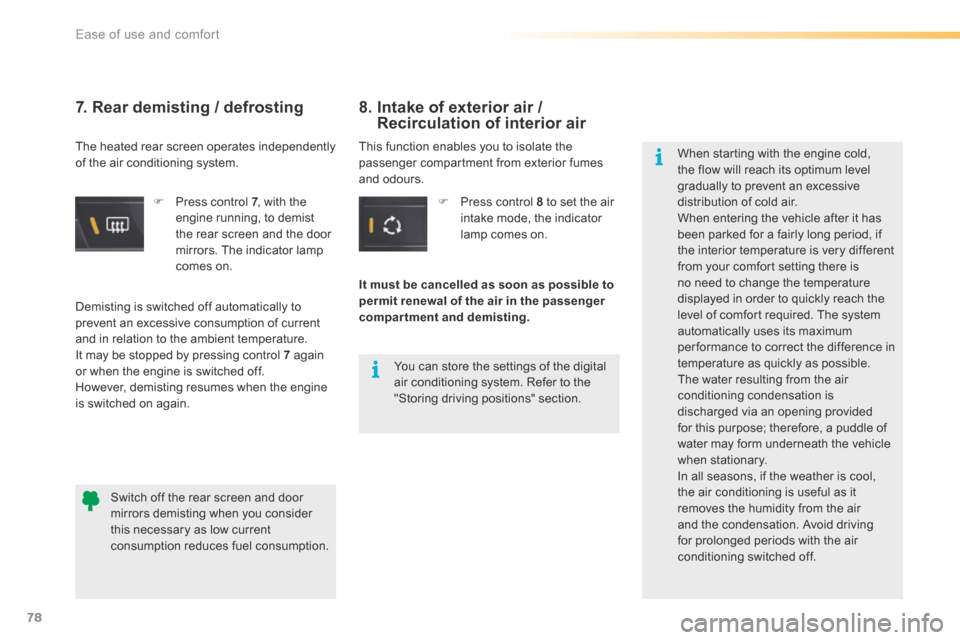
F Press control 7 , with the
engine running, to demist
the rear screen and the door
mirrors. The indicator lamp
comes on.
7. Rear demisting / defrosting
This function enables you to isolate the
passenger compartment from exterior fumes
and odours.
Switch off the rear screen and door
mirrors demisting when you consider
this necessary as low current
consumption reduces fuel consumption. F
Press control 8 to set the air
intake mode, the indicator
lamp comes on.
Demisting is switched off automatically to
prevent an excessive consumption of current
and in relation to the ambient temperature.
It may be stopped by pressing control 7 again
or when the engine is switched off.
However, demisting resumes when the engine
is switched on again. It must be cancelled as soon as possible to
permit renewal of the air in the passenger
compartment and demisting.
The heated rear screen operates independently
of the air conditioning system.
You can store the settings of the digital
air conditioning system. Refer to the
"Storing driving positions" section.When starting with the engine cold,
the flow will reach its optimum level
gradually to prevent an excessive
distribution of cold air.
When entering the vehicle after it has
been parked for a fairly long period, if
the interior temperature is very different
from your comfort setting there is
no need to change the temperature
displayed in order to quickly reach the
level of comfort required. The system
automatically uses its maximum
per formance to correct the difference in
temperature as quickly as possible.
The water resulting from the air
conditioning condensation is
discharged via an opening provided
for this purpose; therefore, a puddle of
water may form underneath the vehicle
when stationary.
In all seasons, if the weather is cool,
the air conditioning is useful as it
removes the humidity from the air
and the condensation. Avoid driving
for prolonged periods with the air
conditioning switched off.
8.
Intake of exterior air /
Recirculation of interior air
Ease of use and comfort