height Citroen C5 RHD 2015 (RD/TD) / 2.G Owner's Manual
[x] Cancel search | Manufacturer: CITROEN, Model Year: 2015, Model line: C5 RHD, Model: Citroen C5 RHD 2015 (RD/TD) / 2.GPages: 362, PDF Size: 32.4 MB
Page 66 of 362

64
Front seats
Manual adjustments
1. Adjustments to the height and angle of
the head restraint
To raise it, pull upwards.
To lower it, press on the release button A
and simultaneously on the head restraint
itself. The adjustment is correct when the
top edge of the head restraint is at the
same height as the top of the head. It is
also tilt adjustable.
To remove it, press the release button A ,
then pull it upwards. It may be necessary to
adjust the backrest angle.
2. Adjustment of the backrest angle
Operate the control and adjust the position
of the backrest to the front or to the rear.
3. Adjustment of the seat height
Raise or lower the control the number
of times required to obtain the desired
position.
4. Longitudinal adjustment of seat
Lift the control bar and adjust to the desired
position.
5. Adjustment of lumbar support
Turn the control and adjust to the desired
position.
6. Heated seat controls
The heated seats only operate when the
engine is running.
Seat consisting of a seat cushion, seat back and head restraint which can all be adjusted for optimum driving comfort.
For your safety, do not drive with the
head restraints removed; they must be
in place and correctly adjusted.Before moving the seat backwards,
ensure that there is nothing that might
prevent the full travel of the seat, so
as to avoid the risk of of jamming the
seat caused by the presence of objects
on the floor behind the seat or rear
passengers. If the seat jams, stop the
movement immediately.
Ease of use and comfort
Page 67 of 362

65
Electric adjustments
To adjust the electric seats, switch on the
ignition or start the engine if the vehicle has
gone into economy mode.
Seat adjustments are also possible for a short
period after opening one of the front doors or
switching off the ignition.
1. Adjustment of the seat height and
angle, and longitudinal position
Raise or lower the front of the control to
adjust the seat cushion angle.
Raise or lower the rear of the control to
raise or lower the seat.
Slide the control for wards or backwards to
move the seat for ward or back.
2. Adjustment of the backrest angle
Move the control for wards or backwards to
adjust the backrest angle.
3. Adjustment of the angle of the top of
the backrest
Move the control for wards or backwards to
adjust the angle of the top of the backrest. Before moving the seat backwards,
ensure that there is nothing that might
prevent the full travel of the seat, so
as to avoid the risk of of jamming the
seat caused by the presence of objects
on the floor behind the seat or rear
passengers. If the seat jams, stop the
movement immediately.
Move the control:
-
For wards or backwards to increase or
reduce the lumbar support.
- Upwards or downwards to raise or lower
the lumbar support zone.
4.
Adjustment of lumbar support
This function allows you to independently
adjust the height and level of lumbar
support.
3
Ease of use and comfort
Page 68 of 362

66
Head restraint height and angle
adjustments
(electric seats)
F To adjust the angle of the head restraint,
push back or pull for ward section B of the
head restraint until you reach the desired
position.
F To raise it, pull upwards.
F To lower it, press on the control C to
release it, and simultaneously on the head
restraint itself.
F To remove it, press on the control C to
release it, then pull it upwards.
Heated seats control
With the engine running, the front seats can
operate separately.
F Use the corresponding adjustment dial,
placed on the outer side of each front seat,
to switch on and select the level of heating
required:
0: Off.
1 : Low.
2 : Medium.
3 : High. This function provides the driver with a back
massage. It only operates when the engine is
running.
F
Press on button A .
The warning lamp comes on and the massage
function is activated for a period of 1 hour.
During this time, massage is per formed in
cycles of 6 minutes (4 minutes of massage
followed by 2 minutes break). In total, the
system will per form 10 cycles.
After 1 hour, the function is deactivated.
The warning lamp goes out.
Massage function
Deactivation
You can deactivate the massage function at
any time by pressing on button A .
Ease of use and comfort
Page 70 of 362

68
Steering wheel adjustment
F First, adjust the driver's seat to the most
suitable position.
F When stationary , lower the lever A to
release the steering wheel adjustment.
F Adjust for height and reach.
F Raise the lever to lock the steering wheel
adjustment.
The steering wheel can be adjusted for height and reach to adapt the driving position to the size of
the driver.
Adjustment
a
s a safety precaution, these
operations must only be carried out
while the vehicle is stationary.
After locking, if you press firmly on the
steering wheel, a slight click may be
heard.
Ease of use and comfort
Page 94 of 362

92
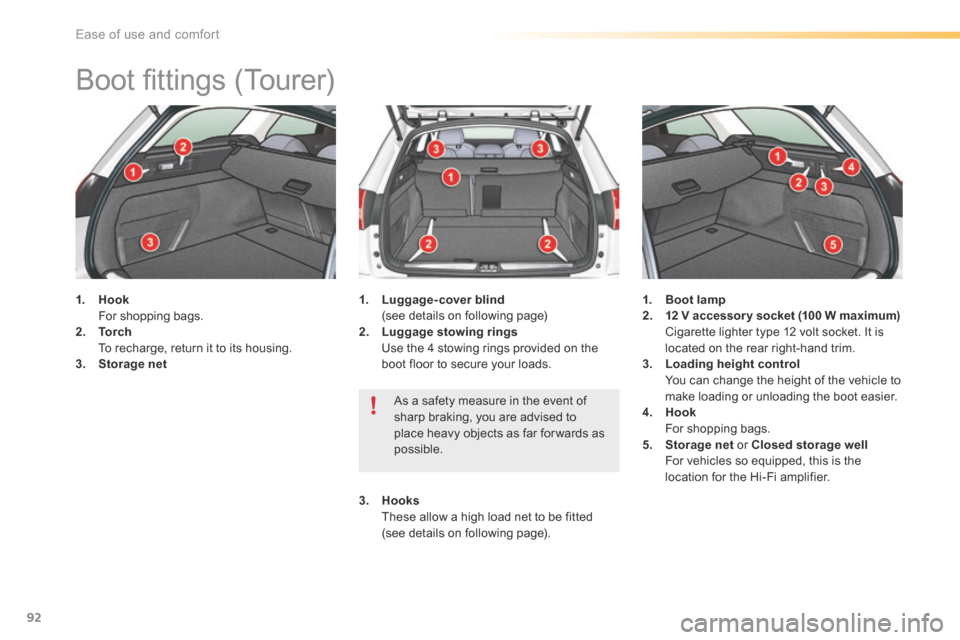
Boot fittings (Tourer)
1. Hook
For shopping bags.
2. To r c h
To recharge, return it to its housing.
3. Storage net 1.
Luggage-cover blind
(see details on following page)
2. Luggage stowing rings
Use the 4 stowing rings provided on the
boot floor to secure your loads. 1.
Boot lamp
2. 12 V accessor y socket (100 W maximum)
Cigarette lighter type 12 volt socket. It is
located on the rear right-hand trim.
3. Loading height control
You can change the height of the vehicle to
make loading or unloading the boot easier.
4. Hook
For shopping bags.
5. Storage net or Closed storage well
For vehicles so equipped, this is the
location for the Hi-Fi amplifier.
As a safety measure in the event of
sharp braking, you are advised to
place heavy objects as far for wards as
possible.
3. Hooks
These allow a high load net to be fitted
(see details on following page).
Ease of use and comfort
Page 136 of 362

134
"Hydractive III +" electronic suspension
The suspension automatically and instantly
adjusts to different driving styles and to
the profile of the road, providing the best
compromise between occupant comfort and
vehicle road holding.
The system alternates between soft and firm
suspension settings, maximising comfort at the
same time as constantly ensuring the highest
level of safety. It also automatically corrects
ride height, according to the vehicle load and
driving conditions.
In addition, the "Hydractive III +" system
allows you to choose between two modes of
suspension.
A change of suspension mode can be made
either when the vehicle is moving or when
stationary, by pressing button A.
Display in the instrument panel
The suspension mode selected is displayed in
the instrument panel screen.
Normal mode
This mode favours soft damping for
maximum comfort.
If the speed authorised for a
particular position is exceeded, the
vehicle reverts automatically to the
normal road position.
SPORT mode
This mode favours dynamic driving.
The warning lamp on button A comes
on in addition to the message in the
instrument panel screen.
SPORT mode is retained when you
switch off the engine.
Vehicle positions
Position changes may only be made when
the engine is running.
The adjustable ground clearance meets all
types of situation. Apart from a few specific
situations, the vehicle should be in the Normal
position.
F Press once on one of the adjustment
controls.
The change in position is indicated by a
message on the instrument panel screen.
Driving
Page 143 of 362

141
Manual headlamp
adjustment
To avoid dazzling other road users, the height
of the halogen bulb headlamps must be
adjusted according to the load in the vehicle.
0. 1 or 2 people in the front seats.
-. 3 people.
1. 5 people.
-. Intermediate setting.
2. 5 people + maximum authorised loads.
-. Intermediate setting.
3. Driver + maximum authorised loads.
Automatic adjustment of directional
headlamps
The system then places your headlamps in the
lowest position. If a fault occurs, this warning lamp
comes on in the instrument panel,
accompanied by an audible signal
and a message in the instrument
panel screen.
Initial setting is position "0" .To avoid causing a nuisance to other road
users, this system corrects the height of the
xenon headlamp beams automatically and
when stationary, depending on the load in
the vehicle.
Do not touch the xenon bulbs. Contact
a CITROËN dealer or a qualified
workshop.
Travelling abroad
If planning to use your vehicle in a
country that drives on the other side
of the road, we recommend that
you contact a CITROËN dealer or a
qualified workshop to check whether
the headlamps need to be adjusted to
avoid dazzling on-coming drivers.
5
Visibility
Page 156 of 362

154
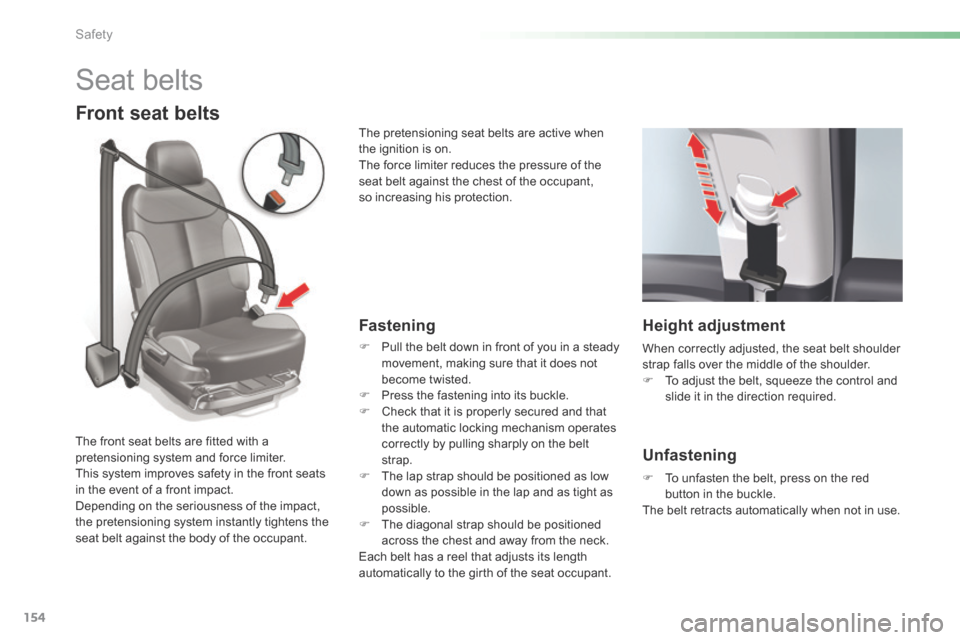
Seat belts
Front seat belts
Fastening
F Pull the belt down in front of you in a steady
movement, making sure that it does not
become twisted.
F Press the fastening into its buckle.
F Check that it is properly secured and that
the automatic locking mechanism operates
correctly by pulling sharply on the belt
strap.
F The lap strap should be positioned as low
down as possible in the lap and as tight as
possible.
F The diagonal strap should be positioned
across the chest and away from the neck.
Each belt has a reel that adjusts its length
automatically to the girth of the seat occupant.
The front seat belts are fitted with a
pretensioning system and force limiter.
This system improves safety in the front seats
in the event of a front impact.
Depending on the seriousness of the impact,
the pretensioning system instantly tightens the
seat belt against the body of the occupant. The pretensioning seat belts are active when
the ignition is on.
The force limiter reduces the pressure of the
seat belt against the chest of the occupant,
so increasing his protection.
Height adjustment
When correctly adjusted, the seat belt shoulder
strap falls over the middle of the shoulder.
F
To adjust the belt, squeeze the control and
slide it in the direction required.
Unfastening
F To unfasten the belt, press on the red
button in the buckle.
The belt retracts automatically when not in use.
Safety
Page 171 of 362

169
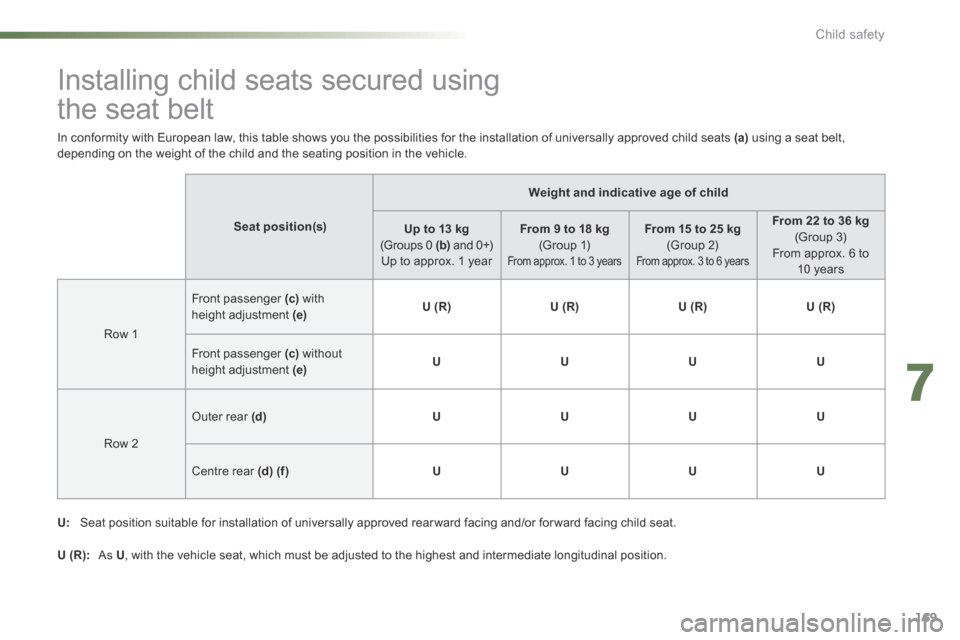
Installing child seats secured using
the seat belt
Seat position(s)Weight and indicative age of child
Up to 13 kg
(Groups 0 (b) and 0+)
Up to approx. 1 year From 9 to 18 kg
(Group 1)
From approx. 1 to 3 years
From 15 to 25 kg (Group 2)
From approx. 3 to 6 years
From 22 to 36 kg (Group 3)
From approx. 6 to 10 years
Row 1 Front passenger
(c) with
height adjustment (e) U (R)
U (R)U (R)U (R)
Front passenger (c) without
height adjustment (e) U
UUU
Row 2 o
uter rear (d) UUUU
Centre rear (d) (f ) UUUU
In conformity with European law, this table shows you the possibilities for the installation of universally approved child seats (a)
using a seat belt,
depending on the weight of the child and the seating position in the vehicle.
U: Seat position suitable for installation of universally approved rear ward facing and/or for ward facing child seat.
U (R): as U, with the vehicle seat, which must be adjusted to the highest and intermediate longitudinal position.
7
Child safety
Page 176 of 362

174
ISOFIX child seat recommended by CITROËN and type
approved for your vehicle
RÖMER BabySafe Plus ISOFIX (size category E)
Group 0+: up to 13 kg
Installed in the rear ward facing position using an ISOFIX base which is attached to the rings A .
The base has a support leg, adjustable for height, that must be in contact with the floor of the vehicle.
This child seat can also be secured using a seat belt. In this case, only the shell is used and is attached to the vehicle seat using the three-point sea belt.
RÖMER Duo Plus ISOFIX (size category B1 )
Group 1: from 9 to 18 kg
Installed in the for ward facing position.
Fitted with an upper strap to be secured to the upper ring B or C ,
referred to as the TOP TETHER.
Three seat body angles: sitting, reclining, lying.
This child seat can also be used on seats which are not fitted with ISOFIX mountings. In this case, it must be attached to the vehicle seat using the three-point seat belt.
Follow the instructions for fitting the child seat given in the seat manufacturer's installation guide.
Child safety