engine coolant CITROEN C6 2005 Owners Manual
[x] Cancel search | Manufacturer: CITROEN, Model Year: 2005, Model line: C6, Model: CITROEN C6 2005Pages: 223, PDF Size: 4.26 MB
Page 25 of 223
Downloaded from www.Manualslib.com manuals search engine 19
GENERAL
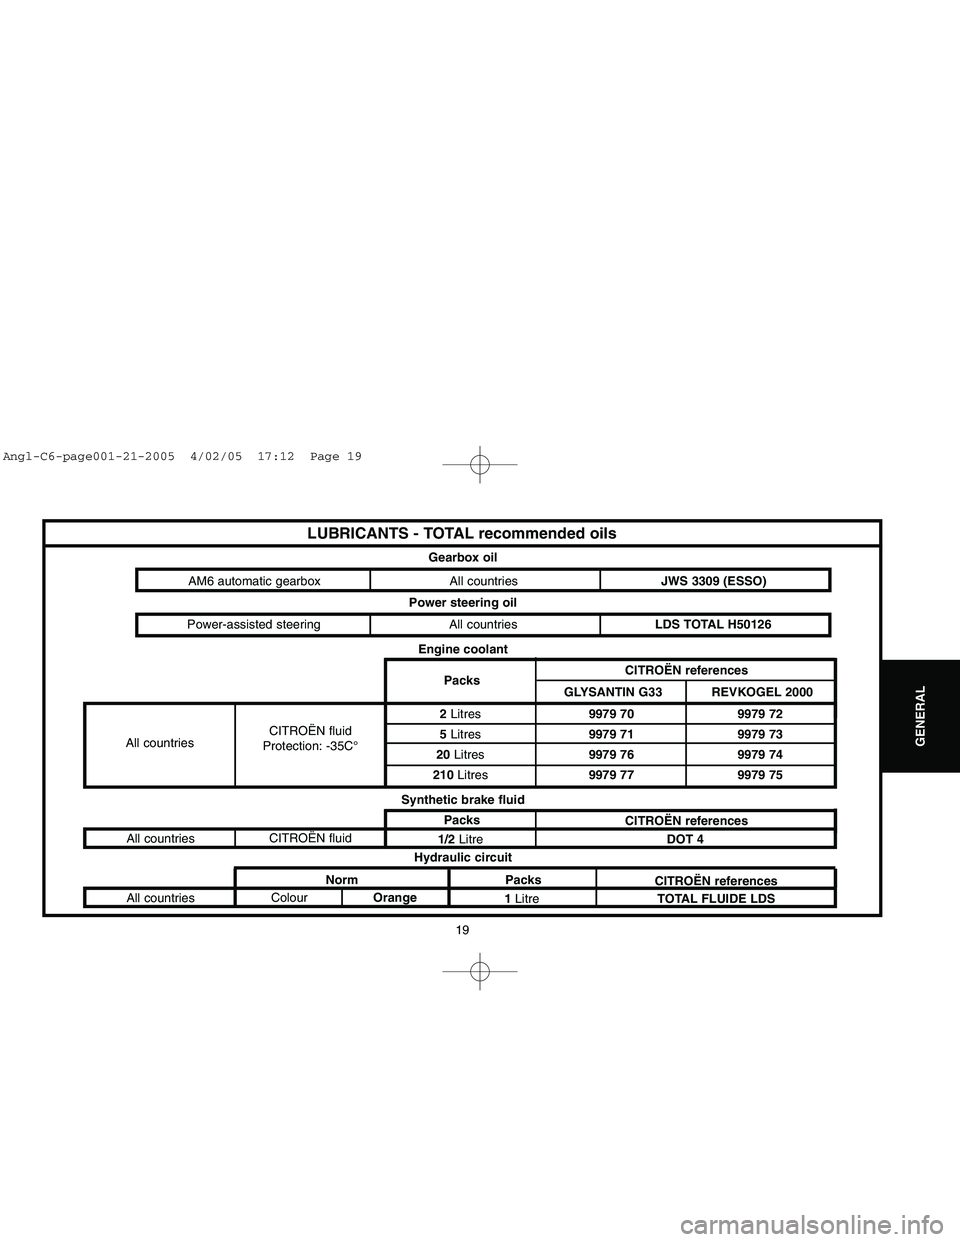
LUBRICANTS - TOTAL recommended oils
Gearbox oil
Engine coolant
All countriesCITROËN fluid
Protection: -35C°2Litres
5Litres
20 Litres
210Litres9979 70
9979 71
9979 76
9979 779979 72
9979 73
9979 74
9979 75 PacksCITROËN references
REVKOGEL 2000 GLYSANTIN G33 AM6 automatic gearbox All countriesJWS 3309 (ESSO)
Synthetic brake fluidAll countriesCITROËN fluid
1/2Litre
DOT 4 Packs
CITROËN references Power steering oil
Power-assisted steering All countriesLDS TOTAL H50126
Hydraulic circuit
All countriesColour
1Litre
TOTAL FLUIDE LDS Packs
CITROËN references Norm
Orange
Angl-C6-page001-21-2005 4/02/05 17:12 Page 19
Page 34 of 223
Downloaded from www.Manualslib.com manuals search engine 28
ENGINE
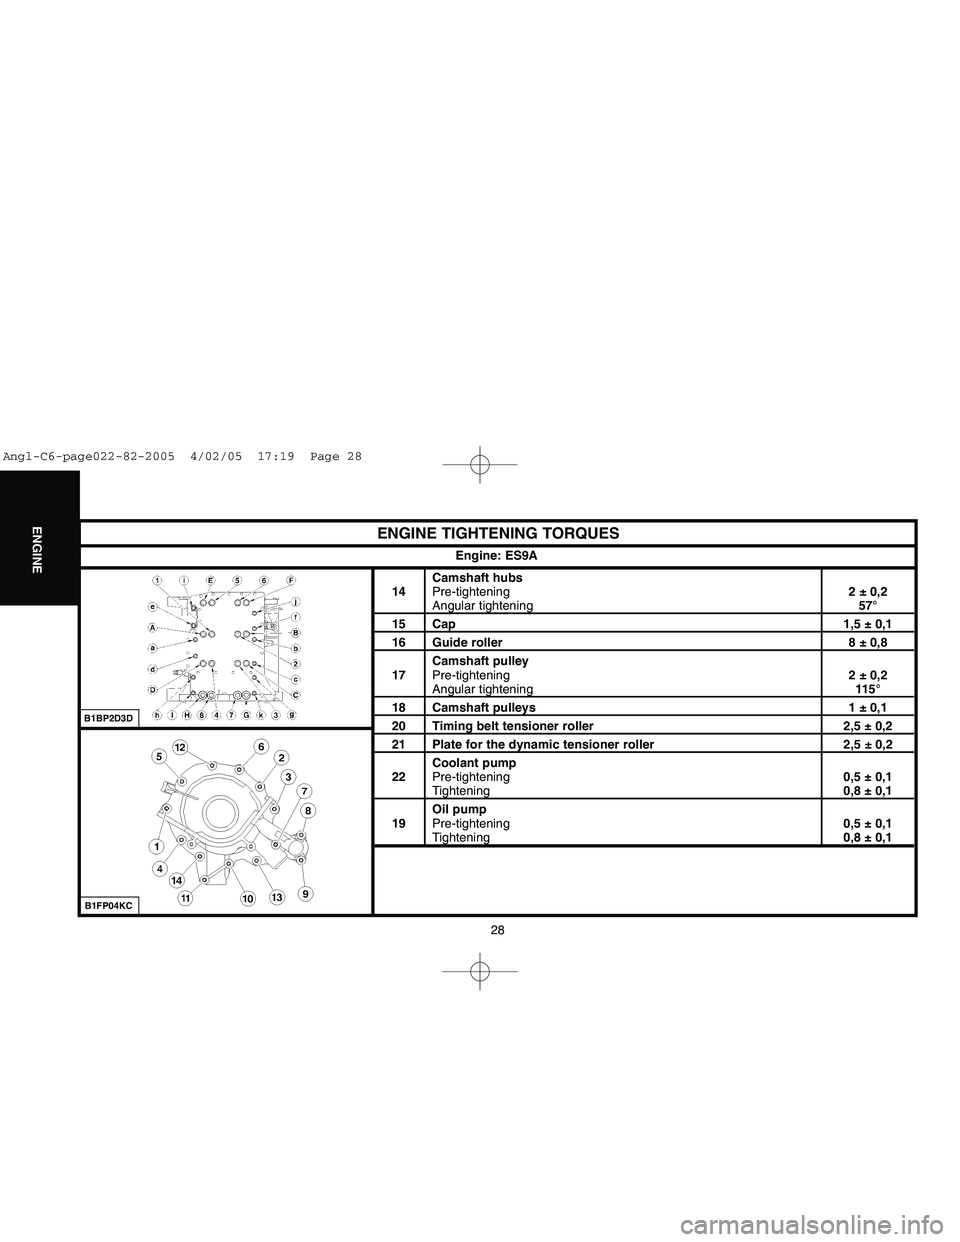
ENGINE TIGHTENING TORQUES
Camshaft hubs
14Pre-tightening2 ± 0,2Angular tightening57°
15 Cap 1,5 ± 0,116 Guide roller 8 ± 0,8
Camshaft pulley
17Pre-tightening2 ± 0,2
Angular tightening11 5 °
18 Camshaft pulleys 1 ± 0,120 Timing belt tensioner roller 2,5 ± 0,221 Plate for the dynamic tensioner roller 2,5 ± 0,2
Coolant pump
22Pre-tightening0,5 ± 0,1
Tightening0,8 ± 0,1
Oil pump
19Pre-tightening0,5 ± 0,1Tightening0,8 ± 0,1 Engine: ES9A
B1FP04KCB1BP2D3D
Angl-C6-page022-82-2005 4/02/05 17:19 Page 28
Page 39 of 223
Downloaded from www.Manualslib.com manuals search engine 33
ENGINE
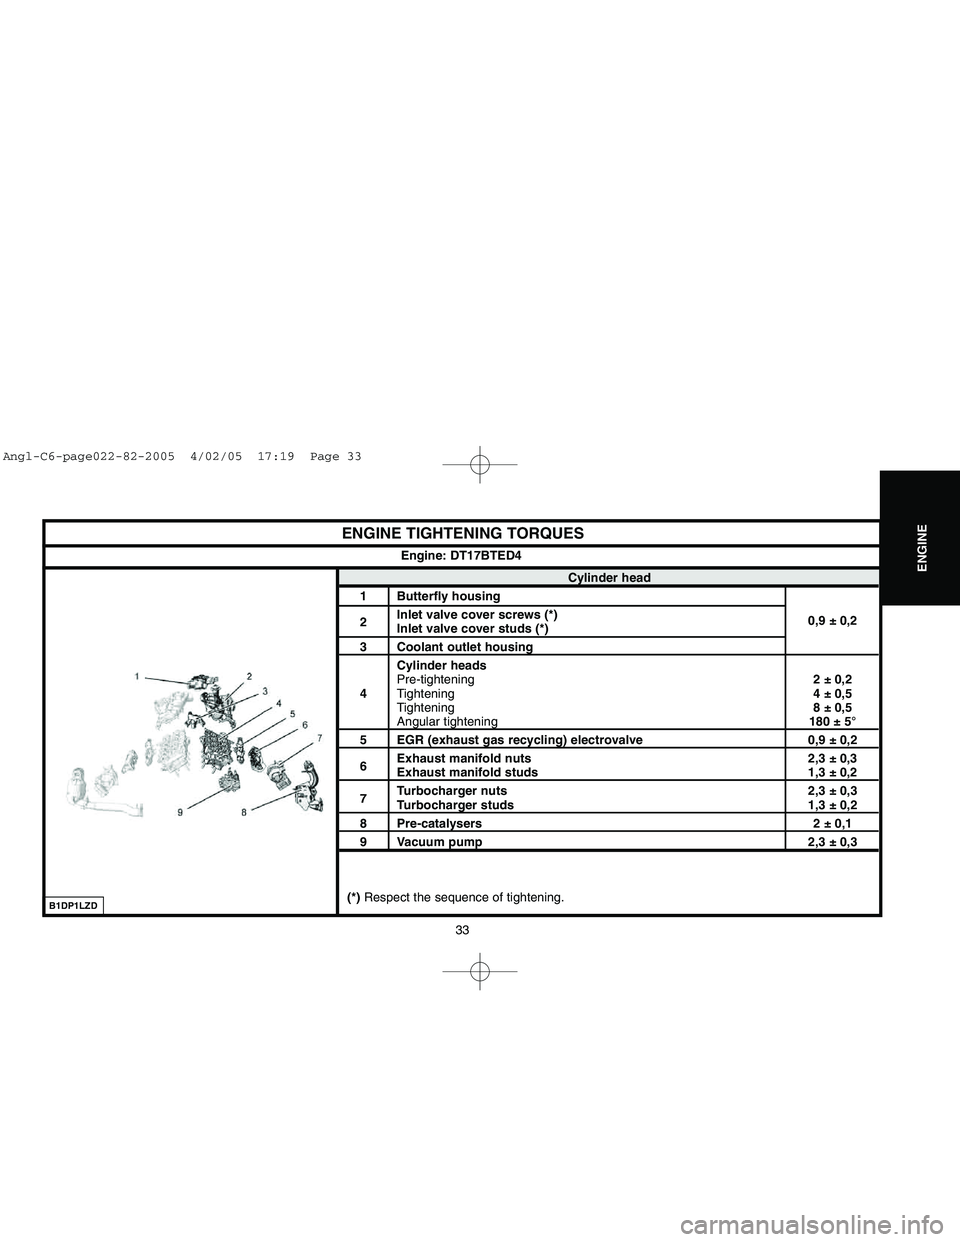
ENGINE TIGHTENING TORQUES
Cylinder head
1 Butterfly housing
2Inlet valve cover screws (*)
Inlet valve cover studs (*)0,9 ± 0,2
3 Coolant outlet housing
Cylinder heads
Pre-tightening2 ± 0,2
4Tightening4 ± 0,5
Tightening8 ± 0,5
Angular tightening180 ± 5°
5 EGR (exhaust gas recycling) electrovalve 0,9 ± 0,2
6Exhaust manifold nuts 2,3 ± 0,3
Exhaust manifold studs 1,3 ± 0,2
7Turbocharger nuts 2,3 ± 0,3Turbocharger studs 1,3 ± 0,2
8 Pre-catalysers 2 ± 0,19 Vacuum pump 2,3 ± 0,3
(*) Respect the sequence of tightening.Engine: DT17BTED4
B1DP1LZD
Angl-C6-page022-82-2005 4/02/05 17:19 Page 33
Page 41 of 223
Downloaded from www.Manualslib.com manuals search engine 35
ENGINE
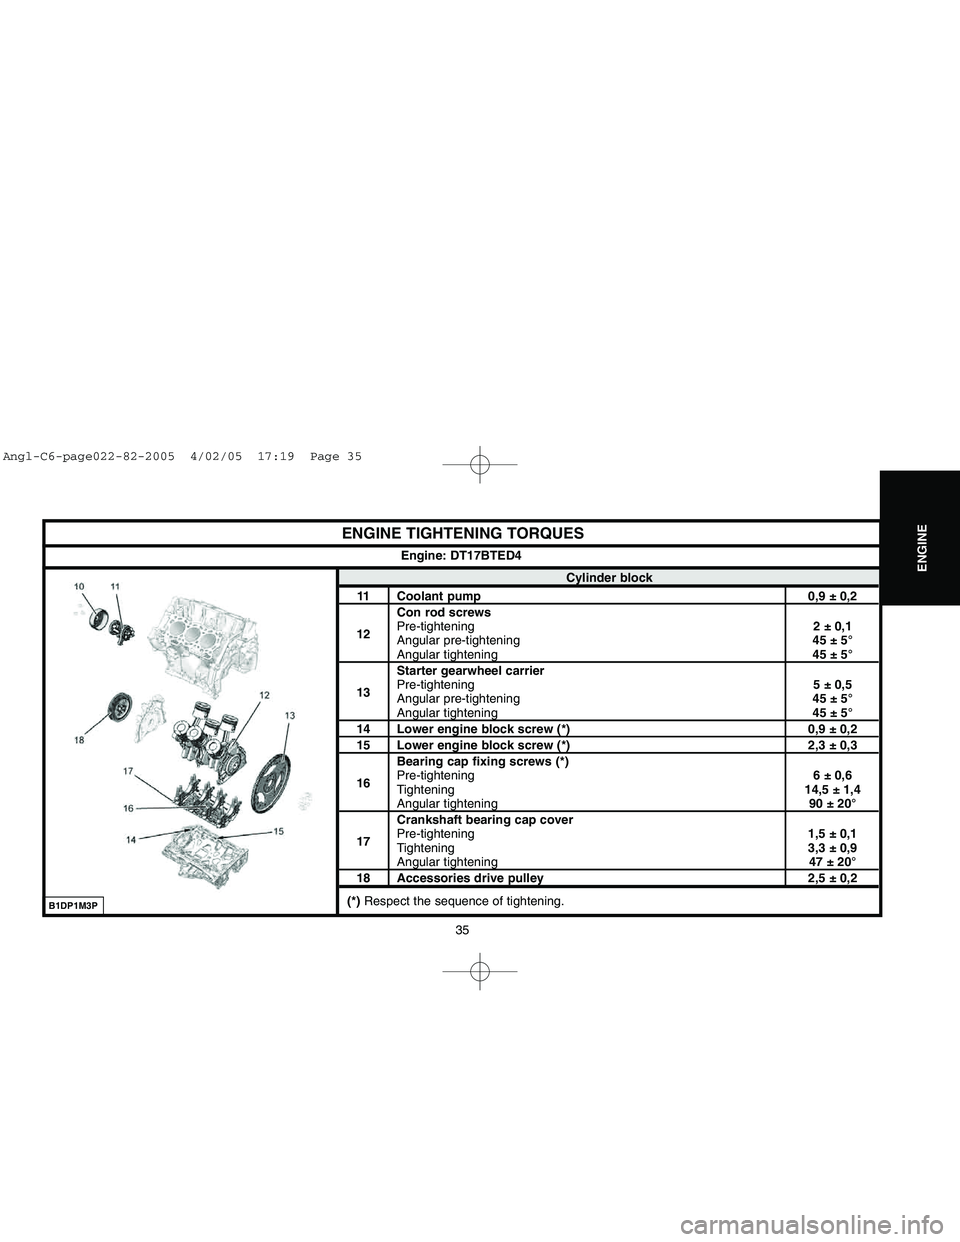
ENGINE TIGHTENING TORQUES
Cylinder block
11 Coolant pump 0,9 ± 0,2
Con rod screws
12Pre-tightening2 ± 0,1
Angular pre-tightening 45 ± 5°
Angular tightening45 ± 5°
Starter gearwheel carrier
13Pre-tightening5 ± 0,5
Angular pre-tightening 45 ± 5°Angular tightening45 ± 5°
14 Lower engine block screw (*) 0,9 ± 0,215 Lower engine block screw (*) 2,3 ± 0,3
Bearing cap fixing screws (*)
16Pre-tightening6 ± 0,6
Tightening14,5 ± 1,4
Angular tightening90 ± 20°
Crankshaft bearing cap cover
17Pre-tightening1,5 ± 0,1
Tightening3,3 ± 0,9Angular tightening 47 ± 20°
18 Accessories drive pulley 2,5 ± 0,2
(*) Respect the sequence of tightening.Engine: DT17BTED4
B1DP1M3P
Angl-C6-page022-82-2005 4/02/05 17:19 Page 35
Page 43 of 223
Downloaded from www.Manualslib.com manuals search engine 37
ENGINE
ENGINE TIGHTENING TORQUES
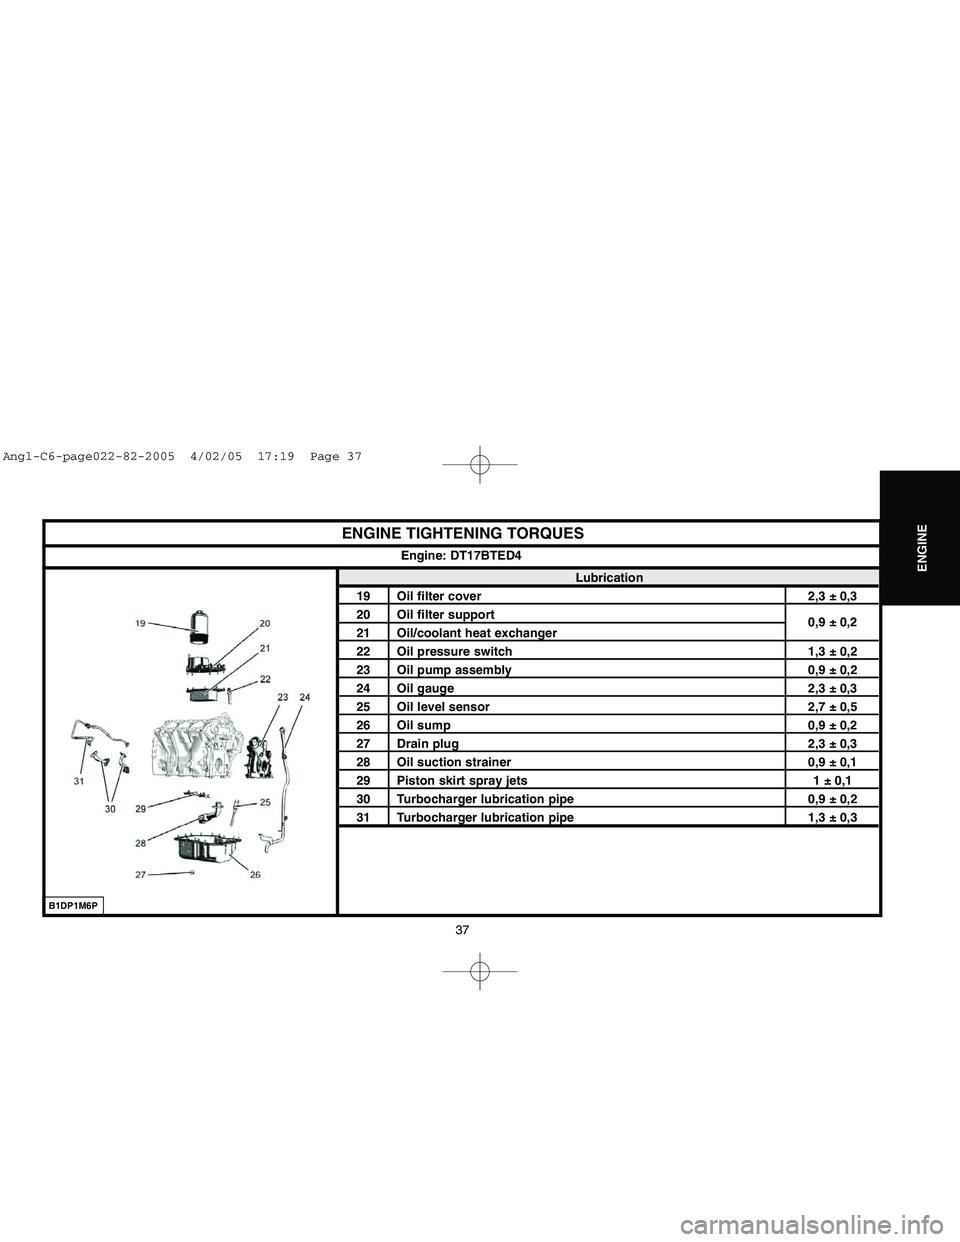
Lubrication
19 Oil filter cover 2,3 ± 0,3
20 Oil filter support
0,9 ± 0,221 Oil/coolant heat exchanger22 Oil pressure switch 1,3 ± 0,223 Oil pump assembly 0,9 ± 0,224 Oil gauge 2,3 ± 0,325 Oil level sensor 2,7 ± 0,526 Oil sump 0,9 ± 0,227 Drain plug 2,3 ± 0,328 Oil suction strainer 0,9 ± 0,129 Piston skirt spray jets 1 ± 0,130 Turbocharger lubrication pipe 0,9 ± 0,231 Turbocharger lubrication pipe 1,3 ± 0,3Engine: DT17BTED4
B1DP1M6P
Angl-C6-page022-82-2005 4/02/05 17:19 Page 37
Page 54 of 223
![CITROEN C6 2005 Owners Manual Downloaded from www.Manualslib.com manuals search engine 48
ENGINE
B1BP3BSD
AUXILIARY EQUIPMENT DRIVE BELT
Engine: ES9A
Tool.
[1] 2 mmdiameter peg: (-).0188-Q1
Removing.
Remove:
- The under-engine sou CITROEN C6 2005 Owners Manual Downloaded from www.Manualslib.com manuals search engine 48
ENGINE
B1BP3BSD
AUXILIARY EQUIPMENT DRIVE BELT
Engine: ES9A
Tool.
[1] 2 mmdiameter peg: (-).0188-Q1
Removing.
Remove:
- The under-engine sou](/img/9/57744/w960_57744-53.png)
Downloaded from www.Manualslib.com manuals search engine 48
ENGINE
B1BP3BSD
AUXILIARY EQUIPMENT DRIVE BELT
Engine: ES9A
Tool.
[1] 2 mmdiameter peg: (-).0188-Q1
Removing.
Remove:
- The under-engine sound-deadening.
- The front RH wheel.
- The RH splash-shield.
- The air duct (linking the air distributor heat exchanger).
Compress the dynamic tensioner roller (1)to free the pegging hole at "a".
Peg the dynamic tensioner roller at "a", using tool [1].
WARNING: Do not compress the dynamic tensioner roller completely (risk
of damage).
WARNING: Mark the direction of fitting of the auxiliary equipment drive belt
if for re-use.
Disengage the auxiliary equipment drive belt from the various pulleys, commencing
at "b"(coolant pump pulley).
Remove:
- The screws (2)and (4).
- The dynamic tensioner roller (1).
- The auxiliary equipment drive belt (3).
ESSENTIAL: Check that the tensioner and guide rollers as well as the
coolant pump can turn freely (without play, without tight spots and without
projections of grease).
Angl-C6-page022-82-2005 4/02/05 17:19 Page 48
Page 60 of 223

Downloaded from www.Manualslib.com manuals search engine 54
ENGINE
CHECKING AND SETTING THE VALVE TIMING
Engine: ES9A
Setting the valve timing (continued).
Refitting.
Check that the camshafts and the crankshaft are correctly pegged.
Check that the rollers and the coolant pump pulley are turning freely (no tightness).
Loosen the camshaft pulley screws by a 1/4 turn.
Make sure that the pulleys are turning freely on the camshaft hub.
Turn the camshaft pulleys in a clockwise direction, to end of slots.
WARNING: Respect the direction of fitting of the belt: Facing the timing, the inscriptions on
the belt should be readable the correct way up.
Fit the timing belt on the crankshaft pinion.
Position the tool [6].
Position the timing belt in the following sequence (belt well tensioned):
- The roller (26), the pulley (18), the pulley (17).
WARNING: Keep the timing belt well tensioned.
- Refit the guide roller (16), tighten to 8 ± 0,8 m.daN.
Position the timing in the following sequence:
- The camshaft pulleys (15)and (14), the tensioner roller (24), the coolant pump pulley and the
guide roller (27).
NOTE: When positioning the belt on the camshaft pulleys, turn these clockwise so as to engage the
next tooth. The angular displacement of the pulleys should not be more than the equivalent of one
tooth.
B1EP15VDB1BP2BLC
Angl-C6-page022-82-2005 4/02/05 17:19 Page 54
Page 67 of 223
![CITROEN C6 2005 Owners Manual Downloaded from www.Manualslib.com manuals search engine 61
ENGINE
CHECKING AND SETTING THE VALVE TIMING
Engine: DT17BTED4
Tools.
[1] Kit of plugs: (-).0188-T
[2]Flywheel setting peg (double damping f CITROEN C6 2005 Owners Manual Downloaded from www.Manualslib.com manuals search engine 61
ENGINE
CHECKING AND SETTING THE VALVE TIMING
Engine: DT17BTED4
Tools.
[1] Kit of plugs: (-).0188-T
[2]Flywheel setting peg (double damping f](/img/9/57744/w960_57744-66.png)
Downloaded from www.Manualslib.com manuals search engine 61
ENGINE
CHECKING AND SETTING THE VALVE TIMING
Engine: DT17BTED4
Tools.
[1] Kit of plugs: (-).0188-T
[2]Flywheel setting peg (double damping flywheel): (-).0195.K Toolkit 0188-T
[3]Camshaft setting pegs: (-).0195.H Toolkit 0188-T
[4]Belt compressure spring: (-).0188.K
[5]Coolant pump pulley peg: (-).0195.C
[6]Lifting bracket: (-).0195.N
IMPERATIVE: Respect the safety and cleanliness requirements.
WARNING: Before disconnectng the battery, partially open the door windows.
Removing.
IMPERATIVE: Respect the safety and cleanliness requirements specific to High pressure Diesel injection (HDi) engines.
Remove the engine cover.
Disconnect the negative terminal of the battery.
Raise and support the front of the vehicle.
Remove:
- The under-engine sound-deadening.
- The front RH wheel.
- The front RH splash-shield (see corresponding operation).
Angl-C6-page022-82-2005 4/02/05 17:19 Page 61
Page 68 of 223
Downloaded from www.Manualslib.com manuals search engine 62
ENGINE
CHECKING AND SETTING THE VALVE TIMING
Engine: DT17BTED4
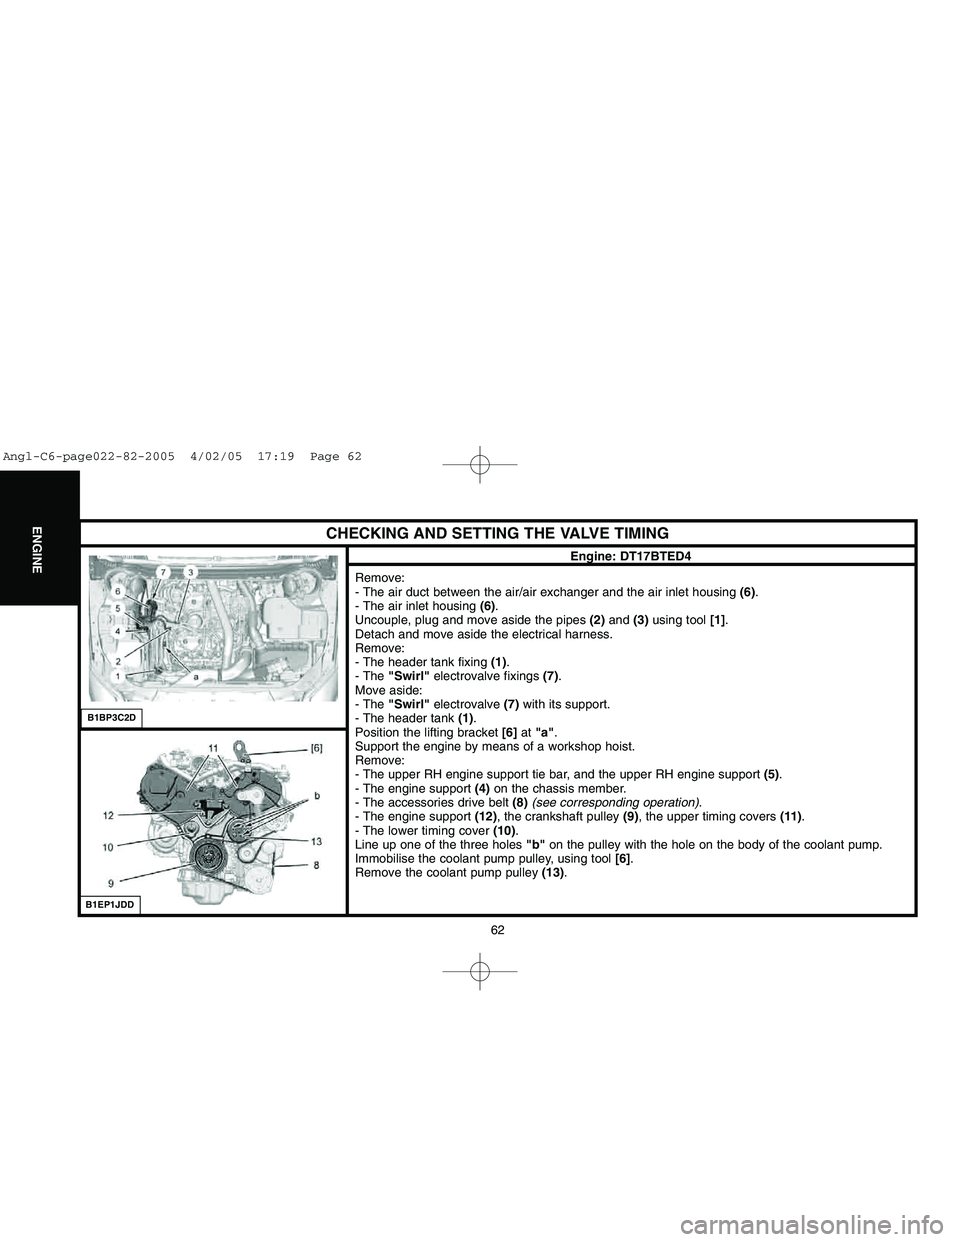
Remove:
- The air duct between the air/air exchanger and the air inlet housing (6).
- The air inlet housing (6).
Uncouple, plug and move aside the pipes (2)and (3)using tool [1].
Detach and move aside the electrical harness.
Remove:
- The header tank fixing (1).
- The "Swirl"electrovalve fixings (7).
Move aside:
- The "Swirl"electrovalve (7)with its support.
- The header tank (1).
Position the lifting bracket [6]at "a".
Support the engine by means of a workshop hoist.
Remove:
- The upper RH engine support tie bar, and the upper RH engine support (5).
- The engine support (4)on the chassis member.
- The accessories drive belt (8)(see corresponding operation).
- The engine support (12), the crankshaft pulley (9), the upper timing covers (11).
- The lower timing cover (10).
Line up one of the three holes "b"on the pulley with the hole on the body of the coolant pump.
Immobilise the coolant pump pulley, using tool [6].
Remove the coolant pump pulley (13).
B1BP3C2DB1EP1JDD
Angl-C6-page022-82-2005 4/02/05 17:19 Page 62
Page 70 of 223
![CITROEN C6 2005 Owners Manual Downloaded from www.Manualslib.com manuals search engine 64
ENGINE
CHECKING AND SETTING THE VALVE TIMING
Engine: DT17BTED4
Peg the camshafts, using tools [3]at "h"and "g".
Slacken:
- The 3 screws (15) CITROEN C6 2005 Owners Manual Downloaded from www.Manualslib.com manuals search engine 64
ENGINE
CHECKING AND SETTING THE VALVE TIMING
Engine: DT17BTED4
Peg the camshafts, using tools [3]at "h"and "g".
Slacken:
- The 3 screws (15)](/img/9/57744/w960_57744-69.png)
Downloaded from www.Manualslib.com manuals search engine 64
ENGINE
CHECKING AND SETTING THE VALVE TIMING
Engine: DT17BTED4
Peg the camshafts, using tools [3]at "h"and "g".
Slacken:
- The 3 screws (15)of the camshaft pulley (23).
- The 3 screws (17)of the camshaft pulley (18).
- The screw (21)of the tensioner roller (20).
Remove the timing belt (22).
Checks.
IMPERATIVE: Just before refitting, carry out the checks below.
Check that the rollers (16), (20)and (19)and the coolant pump (14)can turn freely (without play
and without any tight spot).
Check that there are no signs of oil leaks (from the crankshaft and camshaft seals).
Check that there are no signs of coolant leaks (from the coolant pump).
Replace components that are faulty (if necessary).
Refitting.
Reposition the timimg belt on the crankshaft pinion (24).
Hold the timing belt (22)in position, using tool [4].
Tighten the screws (15)and (17)by hand.
Turn the camshaft pulleys (23)and (18)clockwise, to place them at the end of slots.
B1EP1JFDB1EP1JGC
Angl-C6-page022-82-2005 4/02/05 17:19 Page 64