ground clearance Citroen C6 2007 1.G Owner's Manual
[x] Cancel search | Manufacturer: CITROEN, Model Year: 2007, Model line: C6, Model: Citroen C6 2007 1.GPages: 216, PDF Size: 7.57 MB
Page 6 of 216

II
99
1
8
2
3
7
9
10
1617
465
11
14
13
12
15
1819
IN BRIEF
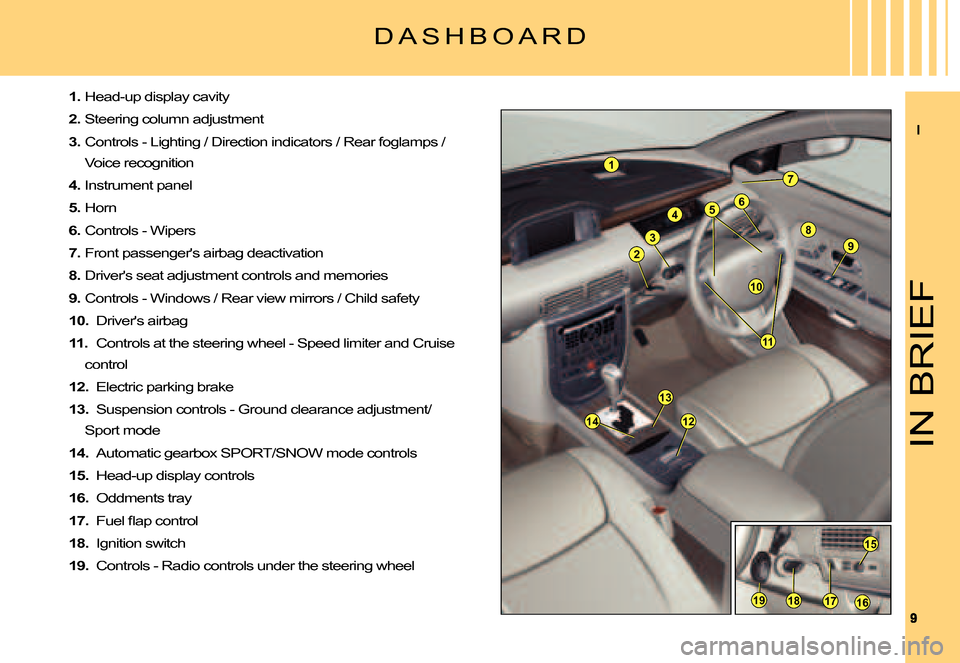
1. Head-up display cavity
2. Steering column adjustment
3. Controls - Lighting / Direction indicators / Rear foglamps /
Voice recognition
4. Instrument panel
5. Horn
6. Controls - Wipers
7. Front passenger's airbag deactivation
8. Driver's seat adjustment controls and memories
9. Controls - Windows / Rear view mirrors / Child safe ty
10. Driver's airbag
11. Controls at the steering wheel - Speed limiter and Cruise
control
12. Electric parking brake
13. Suspension controls - Ground clearance adjustment/
Sport mode
14. Automatic gearbox SPORT/SNOW mode controls
15. Head-up display controls
16. Oddments tray
17. �F�u�e�l� �fl� �a�p� �c�o�n�t�r�o�l
18. Ignition switch
19. Controls - Radio controls under the steering wheel
D A S H B O A R D
Page 100 of 216

102
III
G R O U N D C L E A R A N C E A D J U S T M E N T
Position changes may only be made when the engine is running.
The ground clearance is adjusted automatically. You can however modify the vehicle height in certain �s�p�e�c�i�fi� �c� �c�a�s�e�s�.
To change the position
Press once on one of the adjust-ment controls. The change of posi-tion is indicated at the start of the adjustment by:A message orA
Temporary display of the initial position with the symbol for the position requested.Note: You are recommended to avoid any changing of position while you have your foot on the brake.
Viewing of the position of the vehicle
On completion of the adjustmentyou see either a message or an illustration of the position attained by the vehicle, with the appropriate symbol.
Page 101 of 216

103
III
G R O U N D C L E A R A N C E A D J U S T M E N T
AUTOMATIC CORRECTION OF GROUND CLEARANCE
Your vehicle has active suspension with variable damping which is electronically controlled. This automatically regu-lates the ground clearance according to the vehicle speed and the road surface conditions.
Limits on access to the posi-tions
Maximum height:
Impossible if speed > 10 km / h �(�6� �m�p�h�)�.
Intermediate position:
Impossible if speed > 40 km / h �(�2�4� �m�p�h�)�.
Normal road position: Always permitted.
Minimum height:
Impossible if speed > 10 km / h �(�6� �m�p�h�)�.Note: If the speed authorised for a particular position is exceeded, the vehicle reverts automatically to the normal road position.
Signalling of a requested position not authorised
On the display:
The display indicates for a short time, via a message or by hatching on the requested position, that the adjustment is impossible.
The vehicle remains in the position that is authorised and the display �c�o�n�fi� �r�m�s� �t�h�i�s� �p�o�s�i�t�i�o�n�.
Automatic variation of ground clearanceIf the speed Ifexceeds110 km / h(68 mph�)�,� �o�n� �a� �g�o�o�d� �r�o�a�d�,� �t�h�e� ground clearance is lowered.
The vehicle reverts to the normal road position if the road dete-riorates or if the speed comes �b�e�l�o�w� �9�0� �k�m� �/� �h� �(�5�6� �m�p�h�)�.When the vehicle is stationary the ground clearance is low-ered to the parking position.
Page 154 of 216

157
VI
4
Before positioning the jack, always adjust the vehicle's ground clearance to the “maximum height” position and retain this adjustment for as long as the jack is under the veh icle (do not use the hydraulic adjustments).
Never get underneath the vehicle if it is supported only by the jack.
�T�h�e� �j�a�c�k� �a�n�d� �a�l�l� �t�h�e� �t�o�o�l�s� �a�r�e� �d�e�s�i�g�n�e�d� �s�p�e�c�i�fi� �c�a�l�l�y� �f�o�r� �u�s�e� on your particular vehicle. Do not use them for any other applications.
Have the original wheel repaired and refitted as so on as possible.
It is essential not to exceed a speed of 80 km/h (50 mph) on your spare wheel.
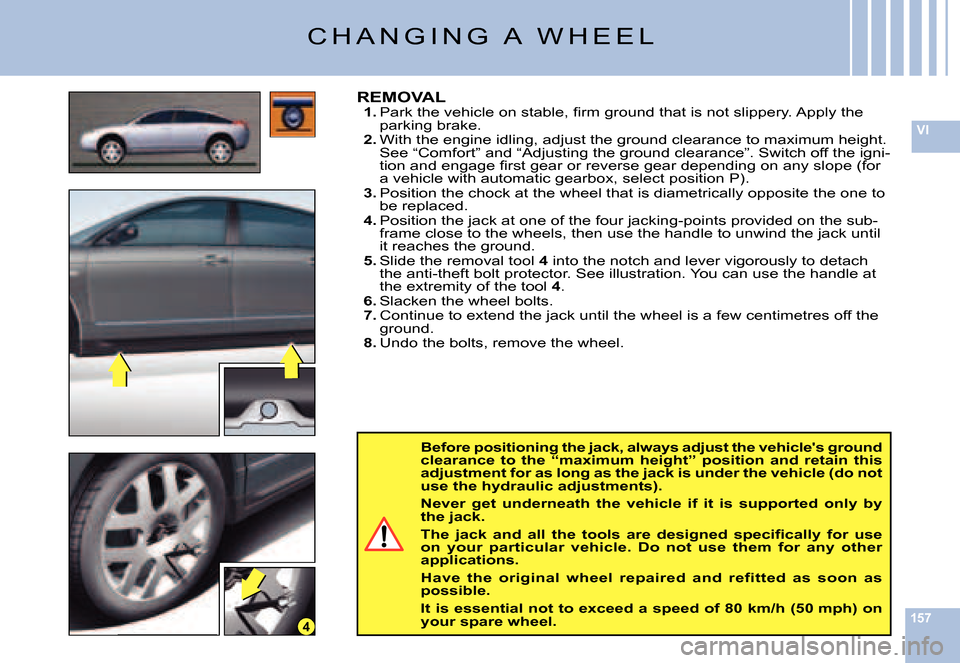
REMOVAL1. �P�a�r�k� �t�h�e� �v�e�h�i�c�l�e� �o�n� �s�t�a�b�l�e�,� �fi� �r�m� �g�r�o�u�n�d� �t�h�a�t� �i�s� �n�o�t� �s�l�i�p�p�e�r�y�.� �A�p�p�l�y� �t�h�e� parking brake.2. With the engine idling, adjust the ground clearance to maximum height. See “Comfort” and “Adjusting the ground clearance”. Switch off the igni-�t�i�o�n� �a�n�d� �e�n�g�a�g�e� �fi� �r�s�t� �g�e�a�r� �o�r� �r�e�v�e�r�s�e� �g�e�a�r� �d�e�p�e�n�d�i�n�g� �o�n� �a�n�y� �s�l�o�p�e� �(�f�o�r� �a� �v�e�h�i�c�l�e� �w�i�t�h� �a�u�t�o�m�a�t�i�c� �g�e�a�r�b�o�x�,� �s�e�l�e�c�t� �p�o�s�i�t�i�o�n� �P�)�.3. Position the chock at the wheel that is diametrically opposite the one to be replaced.4. Position the jack at one of the four jacking-points provided on the sub-frame close to the wheels, then use the handle to unwind the jack until it reaches the ground.5. Slide the removal tool 4 into the notch and lever vigorously to detach the anti-theft bolt protector. See illustration. You can use the handle at the extremity of the tool 4.6. Slacken the wheel bolts.7. Continue to extend the jack until the wheel is a few cen timetres off the ground.8. Undo the bolts, remove the wheel.
C H A N G I N G A W H E E L
Page 155 of 216

158
VI
It is essential not to exceed a speed of 80 km/h (50 mph) on your spare wheel.
�T�h�e� �w�h�e�e�l� �b�o�l�t�s� �a�r�e� �s�p�e�c�i�fi� �c� �t�o� �t�h�e� �t�y�p�e� �o�f� �w�h�e�e�l�.
�I�f� �t�h�e� �t�y�p�e� �o�f� �w�h�e�e�l� �i�s� �c�h�a�n�g�e�d�,� �c�h�e�c�k� �w�i�t�h� �y�o�u�r� �C�I�T�R�O��N� �d�e�a�l�e�r� that the wheel bolts are compatible with the new wheels.
Note: take care to note down the code number engrav ed on the head of the anti-theft bolt socket. This will enable you to obtain replacement anti-theft bolt sockets from a dealership.
WHEEL FOR TEMPORARY USE
If your vehicle is equipped with a spare wheel for temporary use �o�n�l�y�,� �w�h�e�n� �fi� �t�t�i�n�g� �i�t� �i�t� �i�s� �n�o�r�m�a�l� �t�o� observe that the wheel bolts do not come to bear on the wheel rim.
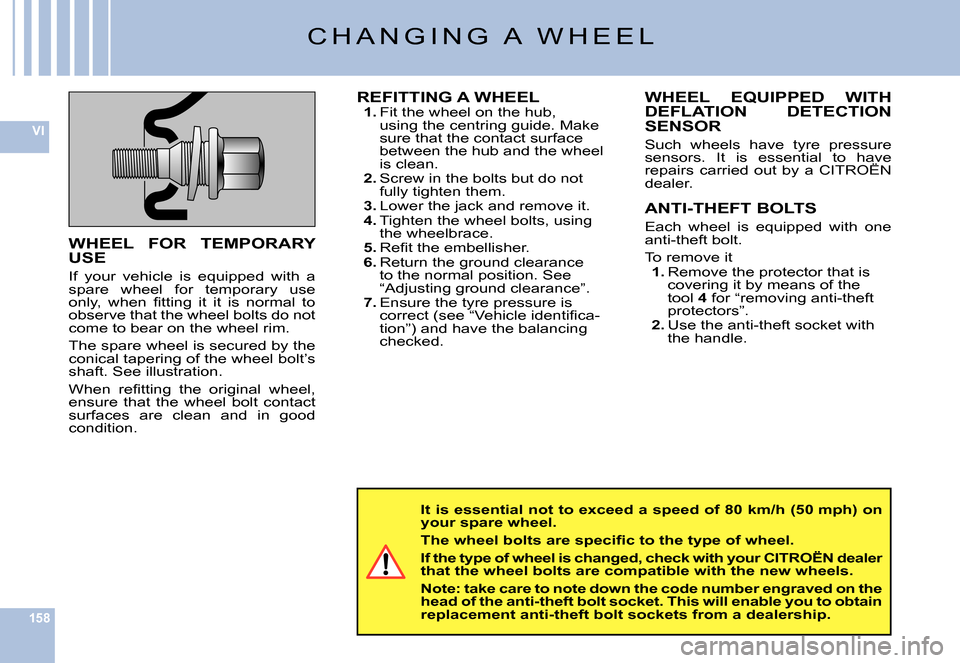
The spare wheel is secured by the conical tapering of the wheel bolt’s shaft. See illustration.
�W�h�e�n� �r�e�fi� �t�t�i�n�g� �t�h�e� �o�r�i�g�i�n�a�l� �w�h�e�e�l�,� ensure that the wheel bolt contact surfaces are clean and in good condition.
REFITTING A WHEEL1. Fit the wheel on the hub, using the centring guide. Make sure that the contact surface between the hub and the wheel is clean.2. Screw in the bolts but do not fully tighten them.3. Lower the jack and remove it.4. Tighten the wheel bolts, using the wheelbrace.5. �R�e�fi� �t� �t�h�e� �e�m�b�e�l�l�i�s�h�e�r�.6. Return the ground clearance to the normal position. See “Adjusting ground clearance”.7. Ensure the tyre pressure is �c�o�r�r�e�c�t� �(�s�e�e� �“�V�e�h�i�c�l�e� �i�d�e�n�t�i�fi� �c�a�-�t�i�o�n�”�)� �a�n�d� �h�a�v�e� �t�h�e� �b�a�l�a�n�c�i�n�g� checked.
WHEEL EQUIPPED WITH DEFLATION DETECTION SENSOR
Such wheels have tyre pressure sensors. It is essential to have repairs carried out by a CITROËN dealer.
ANTI-THEFT BOLTS
Each wheel is equipped with one anti-theft bolt.
To remove it1. Remove the protector that is covering it by means of the tool 4 for “removing anti-theft protectors”.2. Use the anti-theft socket with the handle.
C H A N G I N G A W H E E L