Citroen C6 2011 1.G Owner's Manual
Manufacturer: CITROEN, Model Year: 2011, Model line: C6, Model: Citroen C6 2011 1.GPages: 216, PDF Size: 10.31 MB
Page 131 of 216
129
IV
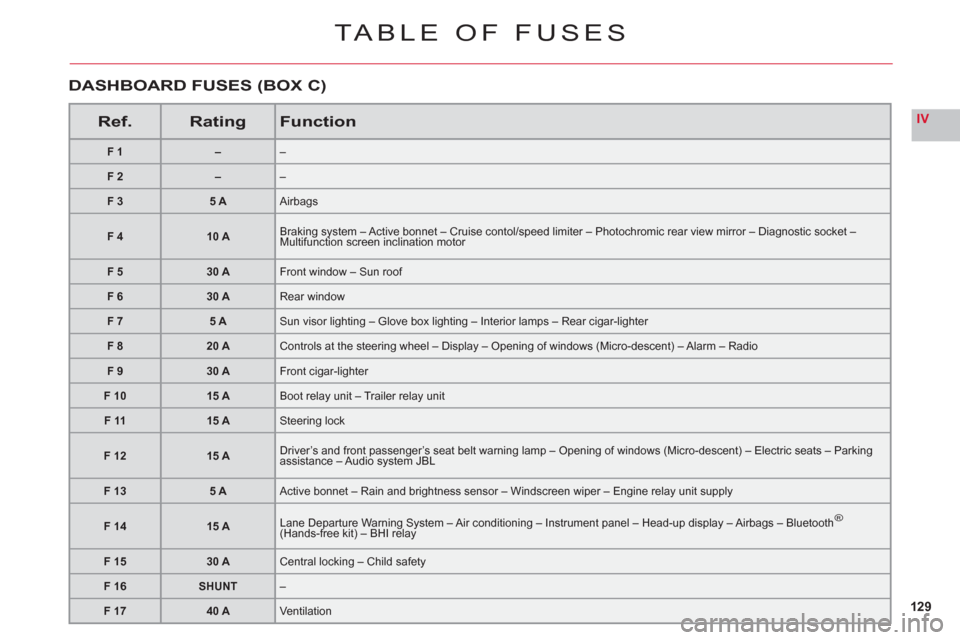
TABLE OF FUSES
Ref.RatingFunction
F1––
F2––
F 35 AAirbags
F 410 ABraking system – Active bonnet – Cruise contol/speed limiter – Photochromic rear view mirror – Diagnostic socket –Multifunction screen inclination motorgygy
F 530 AFront window – Sun roof
F 630 ARear window
F 75 ASun visor lighting – Glove box lighting – Interior lamps – Rear cigar-lighter
F 820 AControls at the steering wheel – Display – Opening of windows (Micro-descent) – Alarm – Radio
F 930 AFront cigar-lighter
F 1015 ABoot relay unit – Trailer relay unit
F 1115 ASteering lock
F1215 ADriver’s and front passenger’s seat belt warning lamp – Opening of windows (Micro-descent) – Electric seats – Parkingassistance – Audio system JBL
F 135 AActive bonnet – Rain and brightness sensor – Windscreen wiper – Engine relay unit supply
F 1415 ALane Departure Warning System – Air conditioning – Instrument panel – Head-up display – Airbags – Bluetooth®(Hands-free kit) – BHI relaygyg
F 1530 ACentral locking – Child safety
F 16SHUNT–
F 1740 AVentilation
DASHBOARD FUSES (BOX C)
Page 132 of 216
130
IV
FUSES
UNDER THE BONNET
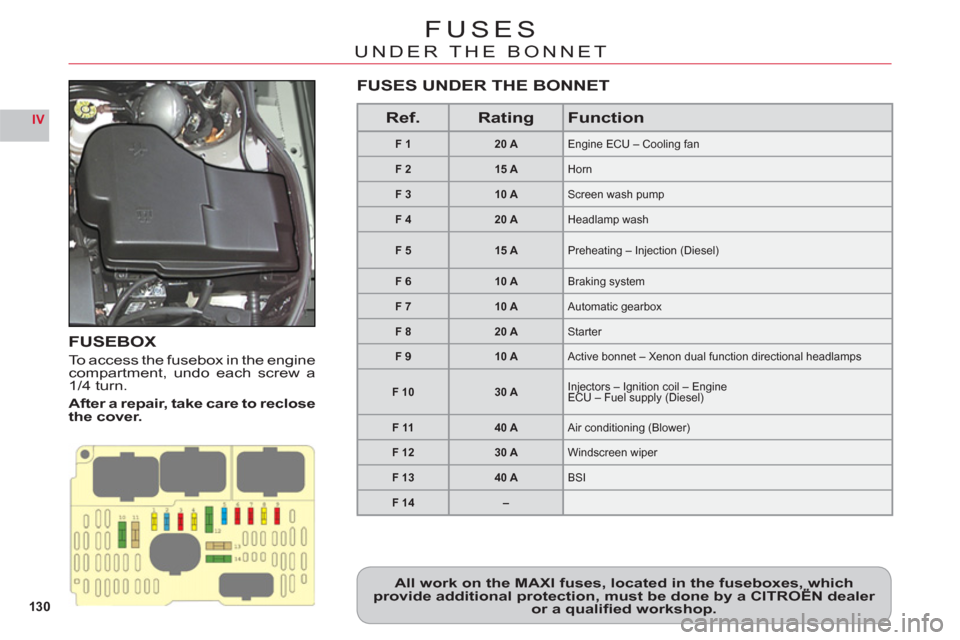
FUSEBOX
To access the fusebox in the enginecompartment, undo each screw a
1/4 turn.
After a re
pair, take care to reclose
the cover.
All work on the MAXI fuses, located in the fuseboxes, whichprovide additional protection, must be done by a CITROËN dealer ,,
or a qualifi ed workshop.
Ref.RatingFunction
F120 AEngine ECU – Cooling fan
F215 AHorn
F 310 AScreen wash pump
F 420 AHeadlamp wash
F 515 APreheating – Injection (Diesel)
F 610 ABraking system
F710 AAutomatic gearbox
F 820 AStarter
F 910 AActive bonnet – Xenon dual function directional headlamps
F 1030 AInjectors – Ignition coil – Engine ECU – Fuel supply (Diesel)jgjg
F 1140 AAir conditioning (Blower)
F 1230 AWindscreen wiper
F 1340 ABSI
F 14–
FUSES UNDER THE BONNET
Page 133 of 216
131
IV
53412
G36G37G38G39G40
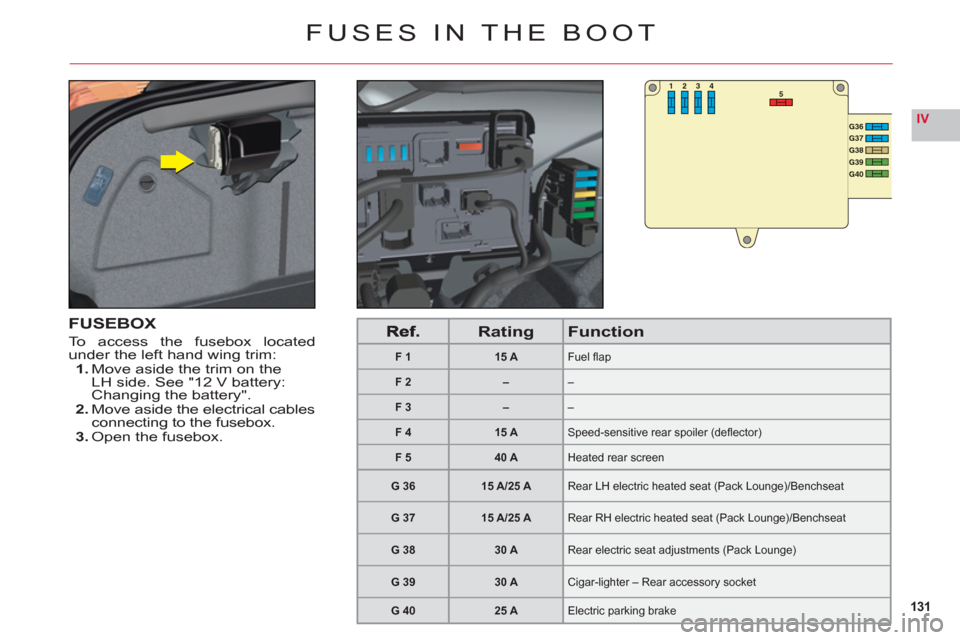
FUSES IN THE BOOT
FUSEBOX
To access the fusebox locatedunder the left hand wing trim:1. Move aside the trim on theLH side. See "12 V battery:Changing the battery".2. Move aside the electrical cablesconnecting to the fusebox.3. Open the fusebox.
RatingFunction
F 115 AFuel fl ap
F 2––
F 3––
F 415 ASpeed-sensitive rear spoiler (defl ector)
F 540 AHeated rear screen
G 3615 A/25 ARear LH electric heated seat (Pack Lounge)/Benchseat
G 3715 A/25 ARear RH electric heated seat (Pack Lounge)/Benchseat
G 3830 ARear electric seat adjustments (Pack Lounge)
G 3930 ACigar-lighter – Rear accessory socket
G 4025 AElectric parking brake
Page 134 of 216
132
IV
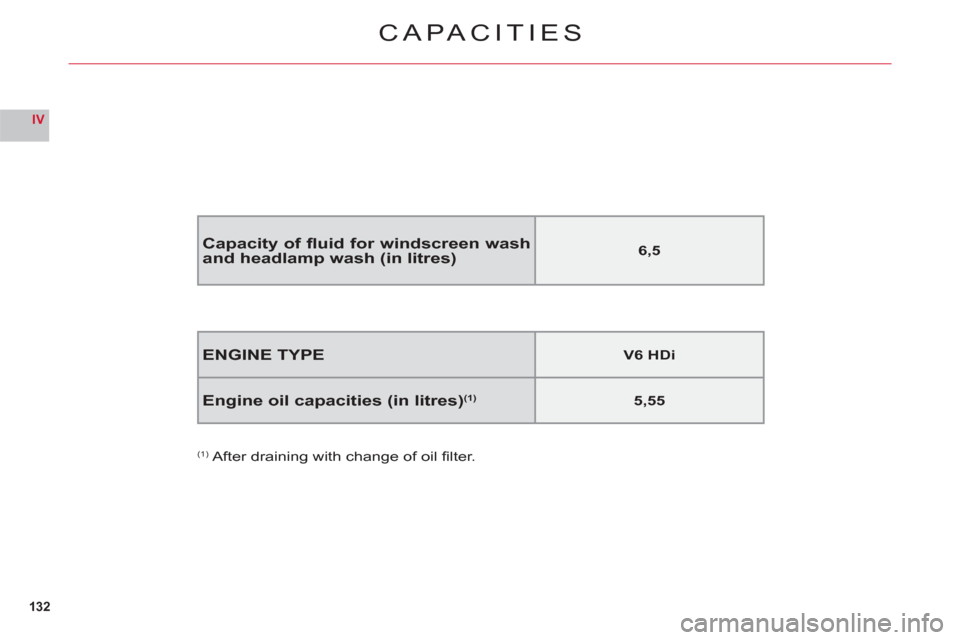
CAPACITIES
ENGINE TYPEV6 HDi
Engine oil capacities (in litres)(1)5,55
(1) After draining with change of oil fi lter.
Capacity of fl uid for windscreen wash and headlamp wash (in litres)6,5
Page 135 of 216
133
VA
A
FUEL
If you should put in fuel that is not suitable for your vehicle'sengine type, it is imperative to have the tank drained beforeyou start the engine again.
While you are refuelling, theengine must be stopped and the
ignition switched off.
When you are seeking to fi ll your
tank, do not persist after the
third cut-off; that could cause
your vehicle to malfunction.
Fuel must be added in quantitiesof more than 5 litres to be recog-
nised by the fuel gauge.
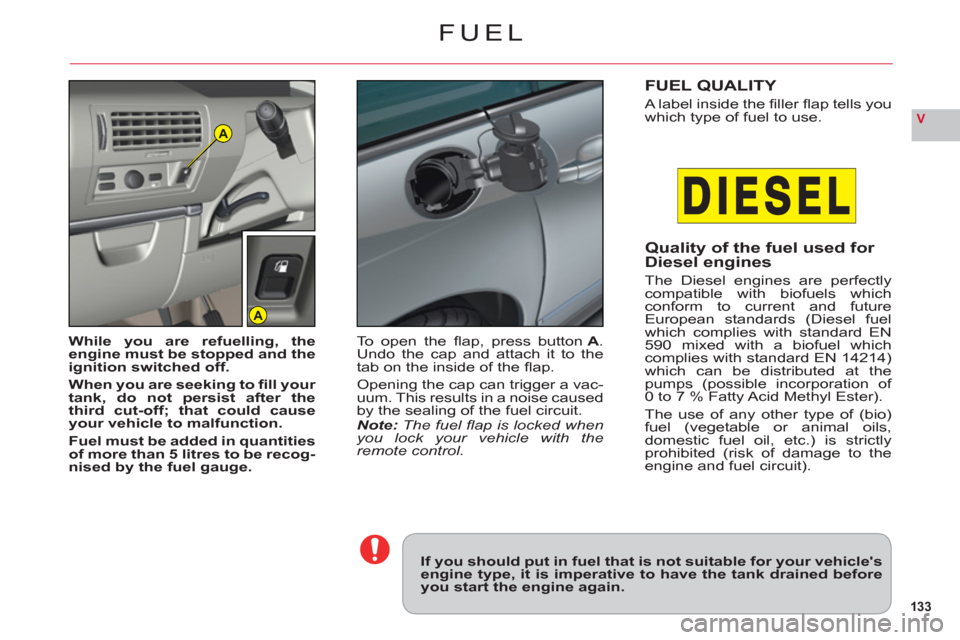
To open the fl ap, press button A. Undo the cap and attach it to the
tab on the inside of the fl ap.
Opening the cap can trigger a vac-uum. This results in a noise caused
by the sealing of the fuel circuit.Note: The fuel fl ap is locked when you lock your vehicle with the remote control.
FUEL QUALITY
A label inside the fi ller fl ap tells you
which type of fuel to use.
Quality of the fuel used for Diesel engines
The Diesel engines are perfectlycompatible with biofuels whichconform to current and futureEuropean standards (Diesel fuel
which complies with standard EN
590 mixed with a biofuel whichcomplies with standard EN 14214)which can be distributed at thepumps (possible incorporation of0 to 7 % Fatty Acid Methyl Ester).
The use of an
y other type of (bio)fuel (vegetable or animal oils,
domestic fuel oil, etc.) is strictlyprohibited (risk of damage to theengine and fuel circuit).
Page 136 of 216
134
V
DEF
ACB
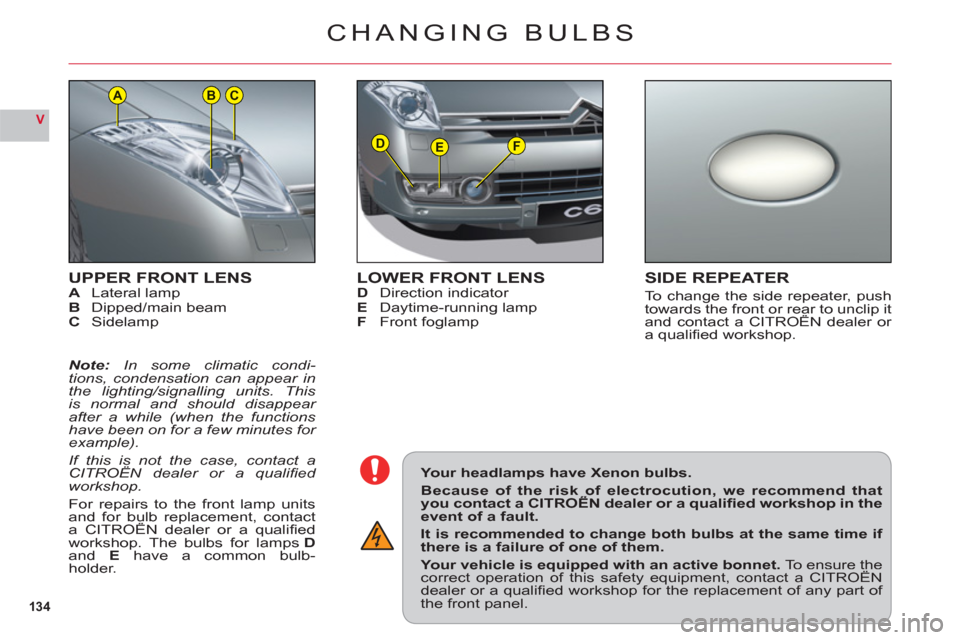
UPPER FRONT LENSALateral lampBDipped/main beamC Sidelamp
Note:In some climatic condi-tions, condensation can appear inthe lighting/signalling units. This is normal and should disappear
after a while (when the functions have been on for a few minutes for example).
If this is not the case, contact aCITROËN dealer or a qualifi ed ,
workshop.
For repairs to the front lamp unitsand for bulb replacement, contacta CITROËN dealer or a qualifi edp,
workshop. The bulbs for lampsDandE have a common bulb-holder.
CHANGING BULBS
Your headlamps have Xenon bulbs.
Because of the risk of electrocution, we recommend thatyou contact a CITROËN dealer or a qualifi ed workshop in the,
event of a fault.
It is recommended to change both bulbs at the same time if there is a failure of one of them.
Your vehicle is equipped with an active bonnet. To ensure thecorrect operation of this safety equipment, contact a CITROËNqpp
dealer or a qualifi ed workshop for the replacement of any part of the front panel.
LOWER FRONT LENSDDirection indicatorEDaytime-running lampFFront foglamp
SIDE REPEATER
To change the side repeater, pushtowards the front or rear to unclip itand contact a CITROËN dealer or p
a qualifi ed workshop.
Page 137 of 216
135
V
A
B
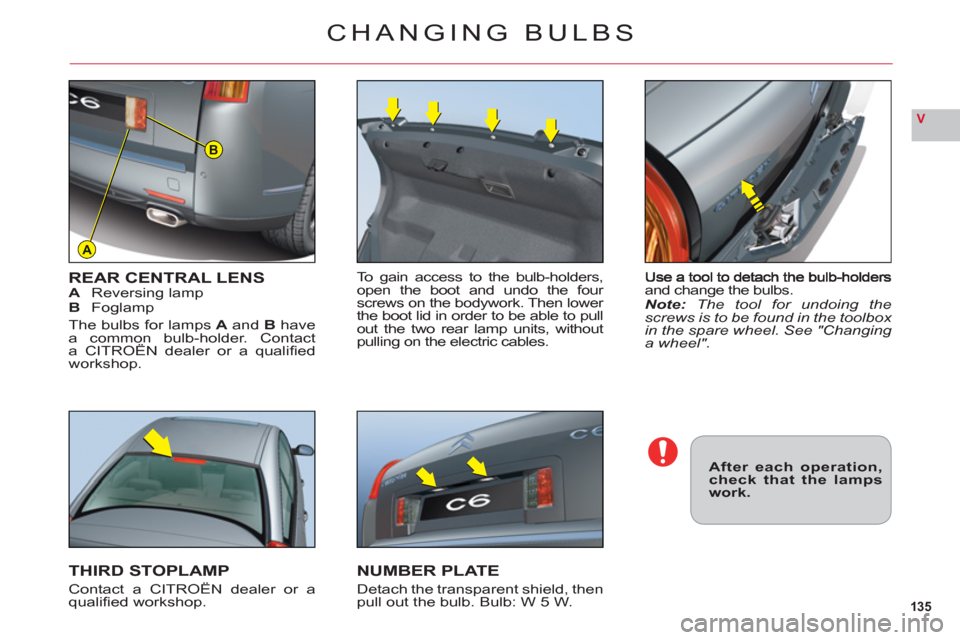
and change the bulbs.Note: The tool for undoing thescrews is to be found in the toolbox in the spare wheel. See "Changing a wheel".
REAR CENTRAL LENSAReversing lampBFoglamp
The bulbs for lam
ps Aand Bhavea common bulb-holder. Contact
a CITROËN dealer or a qualifi ed
wor
kshop.
THIRD STOPLAMP
Contact a CITROËN dealer or aqualifi ed workshop.To
gain access to the bulb-holders, open the boot and undo the four
screws on the bodywork. Then lower
the boot lid in order to be able to pull out the two rear lamp units, without
pulling on the electric cables.
NUMBER PLATE
Detach the transparent shield, then pull out the bulb. Bulb: W 5 W.
After each operation,check that the lampswork.
CHANGING BULBS
Page 138 of 216
136
V
A
BC
D
CHANGING BULBS
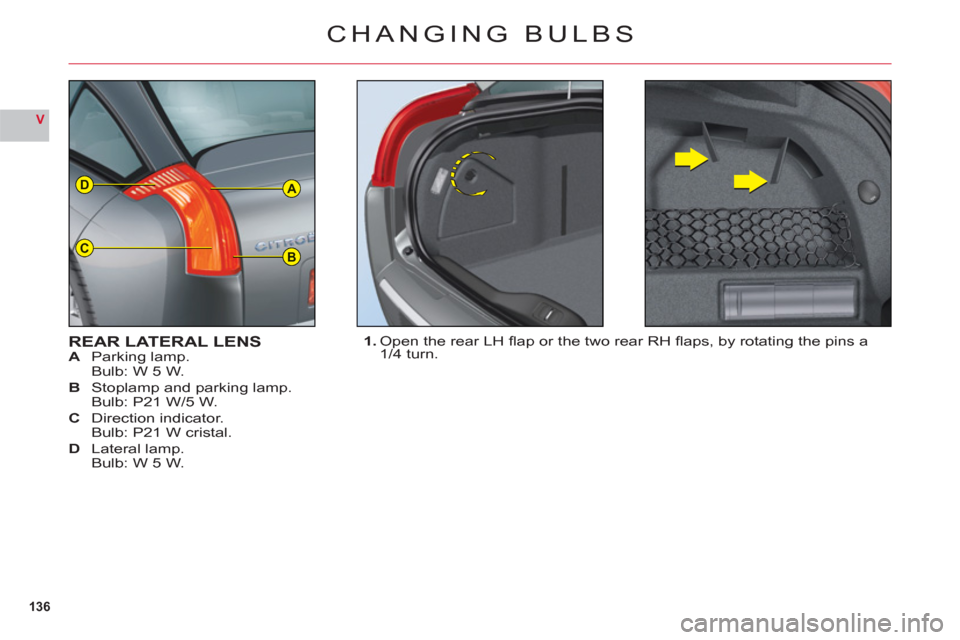
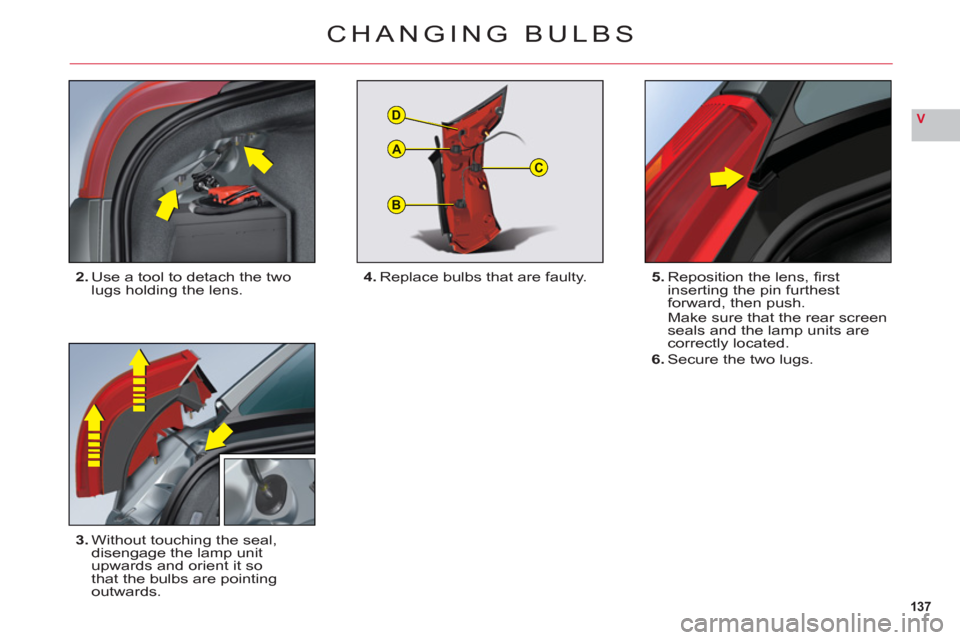
REAR LATERAL LENSA Parking lamp.
Bulb: W 5 W.
B Stoplamp and parking lamp.
Bulb: P21 W/5 W.
C Direction indicator.
Bulb: P21 W cristal.
DLateral lamp.
Bulb: W 5 W.
1. Open the rear LH fl ap or the two rear RH fl aps, by rotating the pins a
1/4 turn.
Page 139 of 216
137
V
B
C
D
A
CHANGING BULBS
2.Use a tool to detach the twolugs holding the lens.
3.Without touching the seal,
disengage the lamp unit
upwards and orient it so
that the bulbs are pointingoutwards.5.
Reposition the lens, fi rst
inserting the pin furthest forward, then push.Make sure that the rear screen seals and the lamp units arecorrectly located.
6. Secure the two lugs.
4.Replace bulbs that are faulty.
Page 140 of 216
138
V
A
SAFETY RECOMMENDATIONS
It is recommended that towbar installation and removal bedone by a CITROËN dealer or a qualifi ed workshop.
If you are towing another vehicle, the latter must be free-wheeling (gearbox in neutral).
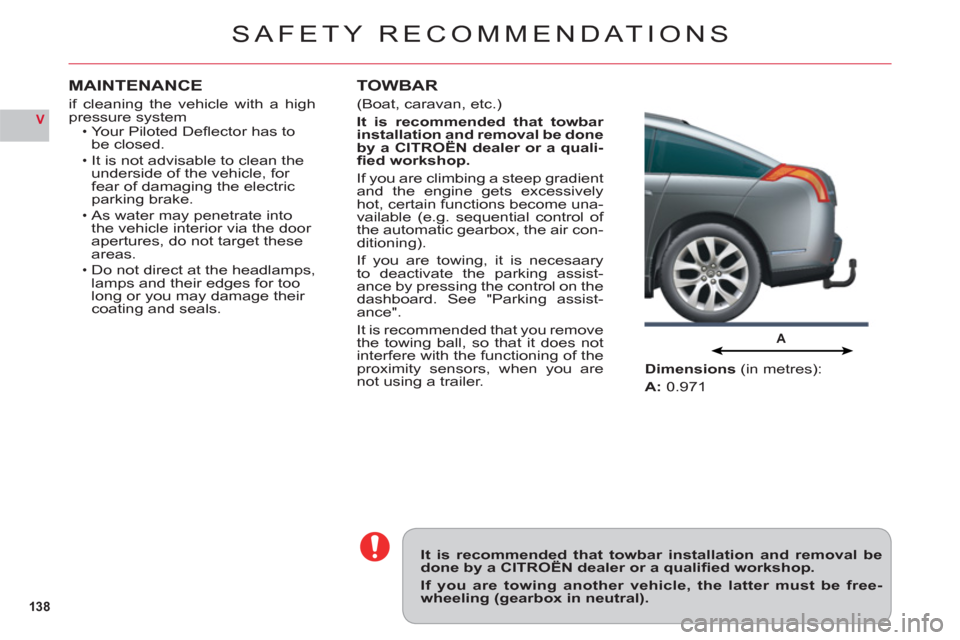
Dimensions(in metres):
A:0.971
TOWBAR
(Boat, caravan, etc.)
It is recommended that towbar installation and removal be done
by a CITROËN dealer or a quali-fi ed workshop.
If you are climbing a steep gradient
and the engine gets excessively
hot, certain functions become una-
vailable (e.g. sequential control of
the automatic gearbox, the air con-
ditioning).
If you are towing, it is necesaary
to deactivate the parking assist-
ance by pressing the control on the
dashboard. See "Parking assist-ance".
It is recommended that
you remove
the towing ball, so that it does not
interfere with the functioning of the
proximity sensors, when you are
not using a trailer.
MAINTENANCE
if cleaning the vehicle with a highpressure system
Your Piloted Defl ector has to be closed.
It is not advisable to clean the
underside of the vehicle, for fear of damaging the electricparking brake.As water may penetrate into
the vehicle interior via the door
apertures, do not target these areas.
Do not direct at the headlamps,
lamps and their edges for too
long or you may damage their coating and seals.
ï
ï
ï
ï