rear view mirror Citroen C6 2011 1.G Owner's Manual
[x] Cancel search | Manufacturer: CITROEN, Model Year: 2011, Model line: C6, Model: Citroen C6 2011 1.GPages: 216, PDF Size: 10.31 MB
Page 4 of 216
2
CONTENTS
DRIVING
I
FA M I L I A R I SAT I ON
4-22II23-81
Exterior.................................................r4
Opening.............................................5-6
Interior..................................................r7
Dashboard.........................................8-9
Getting started.............................10�®12
Visibility..............................................13
Ventilation ........................................... 14
Monitoring.....................................15-16
Ensure the safety of passengers........17
Driving .........................................18�®20
Eco-driving....................................21-22
Remote control..............................23-24
Keys....................................................25
Anti-intrusion alarm.......................26-27
Steering lock - Ignition - Starter.........r28
Driving - Starting the engine..............29
Instrument panel.........................30�®36
Warning lamps ..............................31-32
Head-up display ............................37-38
Multifunction displays..................39�®43
Tr i p c o m p u t e r..............................r44�®49
Signalling .....................................50�®52
Xenon dual-function directional
headlamps .......................................
53
Wipers...........................................54-55
Windows .............................................56
Steering column adjustment -
Seat belt height adjustment ...............57
Front seats....................................58-59
Memorisation......................................60
Seat belts warning lamp.....................61
Rear view mirrors........................62�®64
Gearbox.......................................65�®68
Cruise control................................69-70
Speed limiter.................................r71-72
Electronic stability programme ..........73
Brakes .................................................74
Electric parkin
g brake...................75 -76
Speed sensitive rear spoiler...............77
Parking assistance........................78-79
Lane departure warning system........80
Diesel particle fi lter............................r81
Page 10 of 216
8
1
12
6
8
14
13
2
3
5
7910
155
16
1718
4
11
IN BRIE
F
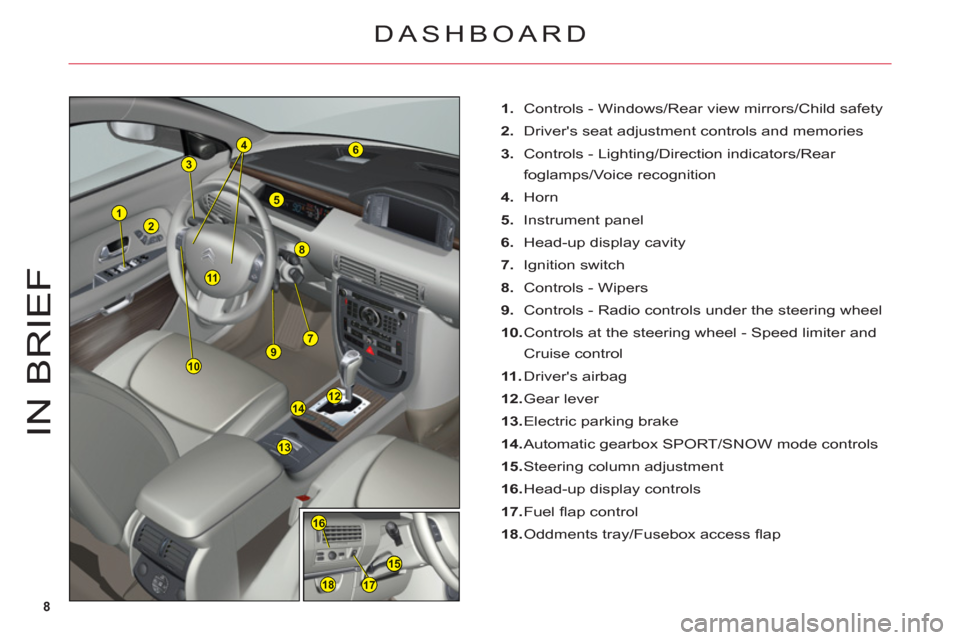
1. Controls - Windows/Rear view mirrors/Child safety
2.Driver's seat adjustment controls and memories
3.
Controls - Lighting/Direction indicators/Rear
fo
glamps/Voice recognition
4.Horn
5.Instrument panel
6. Head-up display cavity
7. Ignition switch
8. Controls - Wipers
9. Controls - Radio controls under the steering wheel
10. Controls at the steering wheel - Speed limiter and
Cruise control
11 .Driver's airbag
12. Gear lever
13.
Electric parking brake
14. Automatic gearbox SPORT/SNOW mode controls
15.
Steering column adjustment
16. Head-up display controls
17. Fuel
fl ap control
18. Oddments tray/Fusebox access fl ap
DASHBOARD
Page 12 of 216
10
A
B
C
EFD
G21
IN BRIE
F
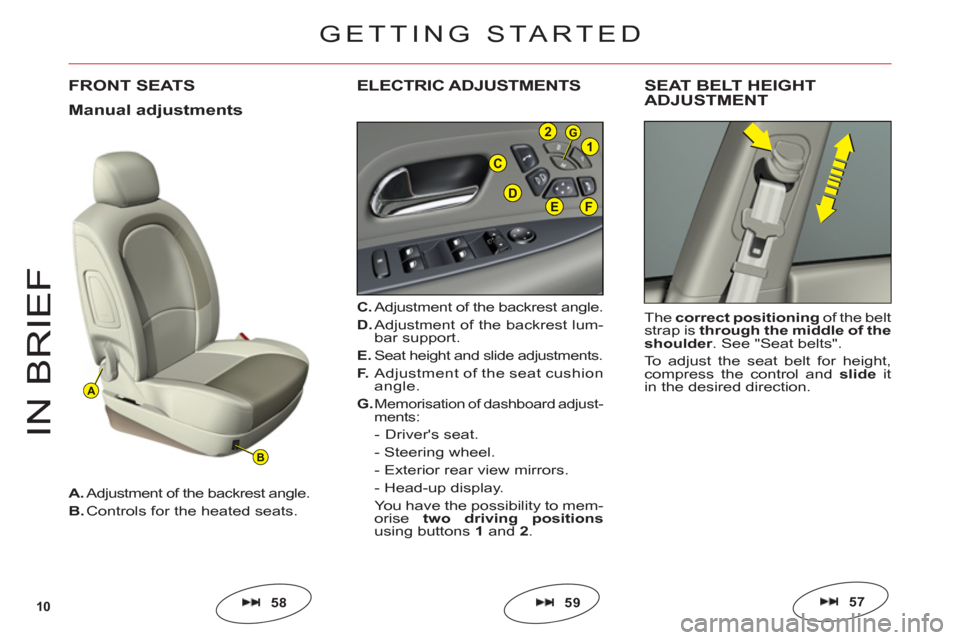
FRONT SEATS
C.Adjustment of the backrest angle.
D. Adjustment of the backrest lum-bar support.
E.Seat height and slide adjustments.
F. Adjustment of the seat cushion
angle.
G
.Memorisation of dashboard adjust-ments:
- Driver's seat.
-
Steering wheel.
- Exterior rear view mirrors.
- Head-up displa
y.
You have the possibility to mem-orisetwo driving positionsusing buttons 1 and 2.
ELECTRIC ADJUSTMENTS
A. Adjustment of the backrest angle.
B.Controls for the heated seats.
5859
GETTING STARTED
Thecorrect positioningof the belt strap is through the middle of the
shoulder. See "Seat belts".
To a djust the seat belt for height, compress the control and slideit
in the desired direction.
SEAT BELT HEIGHTADJUSTMENT
57
Manual adjustments
Page 13 of 216
11
12
IN BRIE
F
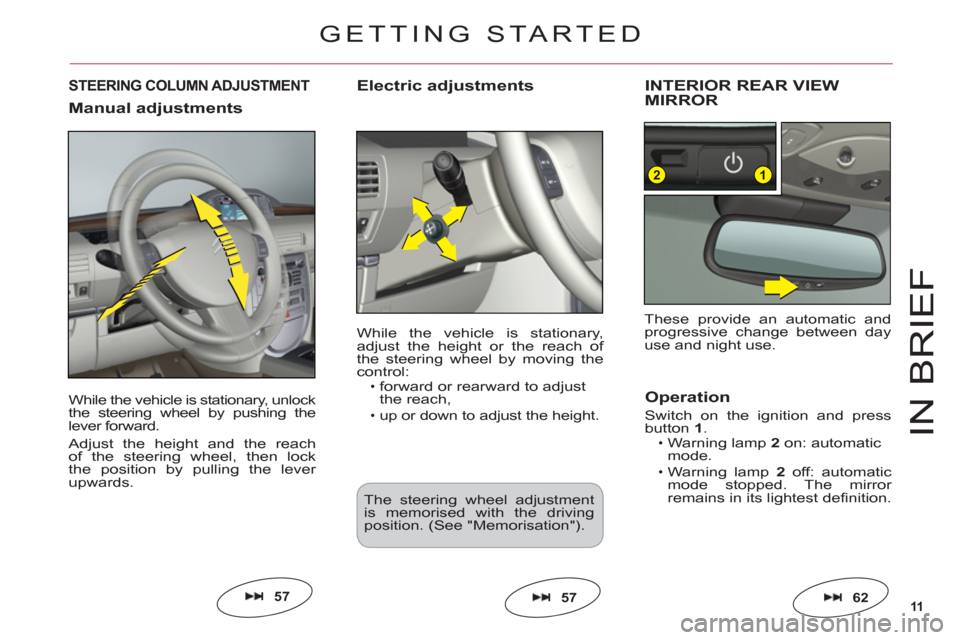
While the vehicle is stationary, unlock
the steering wheel by pushing thelever forward.
Adjust the height and the reach
of the steering wheel, then lock
the position by pulling the lever upwards.
STEERING COLUMN ADJUSTMENT
57
While the vehicle is stationary,
adjust the height or the reach of
the steering wheel by moving the control:forward or rearward to adjust
the reach,up or down to adjust the height.
•
•
Electric adjustmentsINTERIOR REAR VIEW MIRROR
62
The steering wheel adjustment is memorised with the driving position. (See "Memorisation").
57
These provide an automatic and progressive change between day use and night use.
Operation
Switch on the ignition and pressbutton 1.Warning lamp2 on: automaticmode.Warning lamp2 off: automaticmode stopped. The mirror
remains in its lightest defi nition.
ï
ï
GETTING STARTED
Manual adjustments
Page 14 of 216
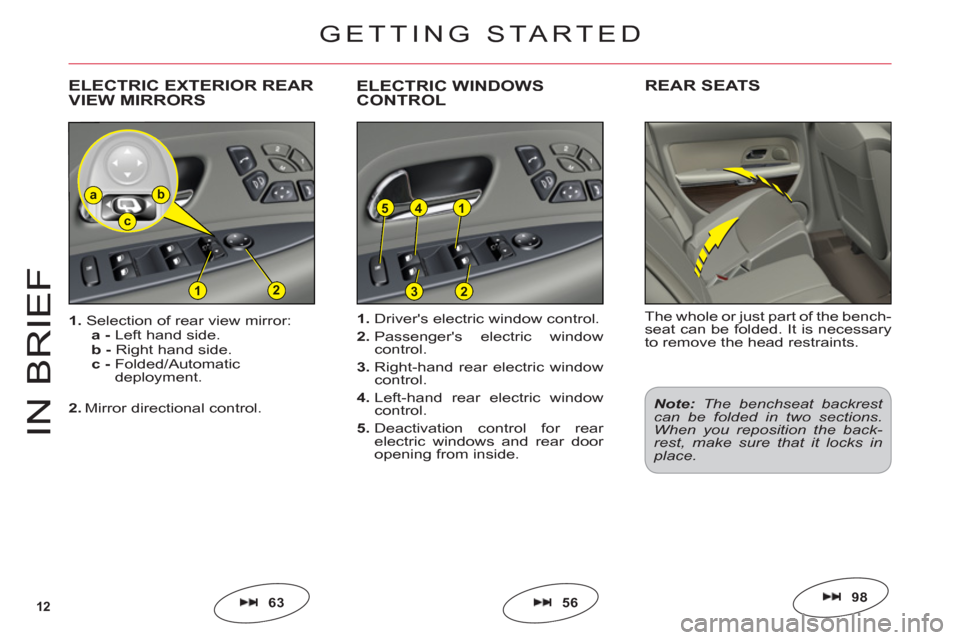
12
154
212
ba
c
3
IN BRIE
F
5663
1.Driver's electric window control.
2.Passenger's electric window control.
3.Right-hand rear electric window control.
4.Left-hand rear electric window control.
5.Deactivation control for rear electric windows and rear door
opening from inside. 1
. Selection of rear view mirror:a -Left hand side.
b -Right hand side.
c -
Folded/Automatic
deployment.
2.Mirror directional control.
ELECTRIC EXTERIOR REAR VIEW MIRRORSELECTRIC WINDOWSCONTROL
GETTING STARTED
The whole or just part of the bench-seat can be folded. It is necessaryto remove the head restraints.
REAR SEATS
98
Note:The benchseat backrest can be folded in two sections.When you reposition the back-rest, make sure that it locks inplace.
Page 16 of 216
14
IN BRIE
F
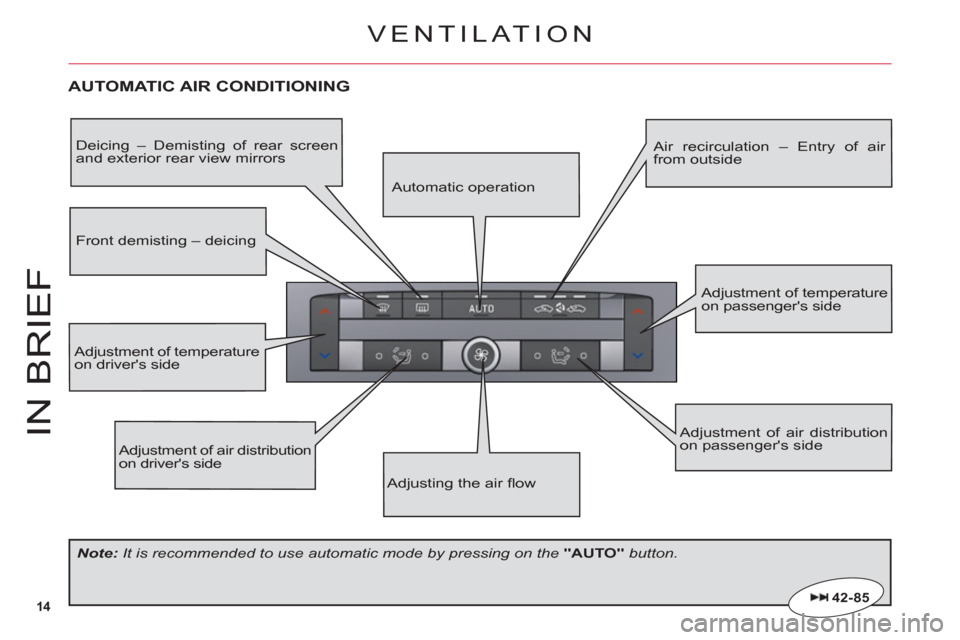
AUTOMATIC AIR CONDITIONING
Adjustment of air distribution on driver's side
Adjustment of air distribution on passenger's side
Adjustment of temperatureon driver's side
Adjustment of temperature on passenger's side
Automatic operation
Air recirculation – Entry of air from outsideDeicing – Demisting of rear screenand exterior rear view mirrors
Front demisting – deicing
Adjusting the air fl ow
Note:It is recommended to use automatic mode by pressing on the "AUTO"button.
42- 85
VENTILATION
Page 25 of 216
23
II
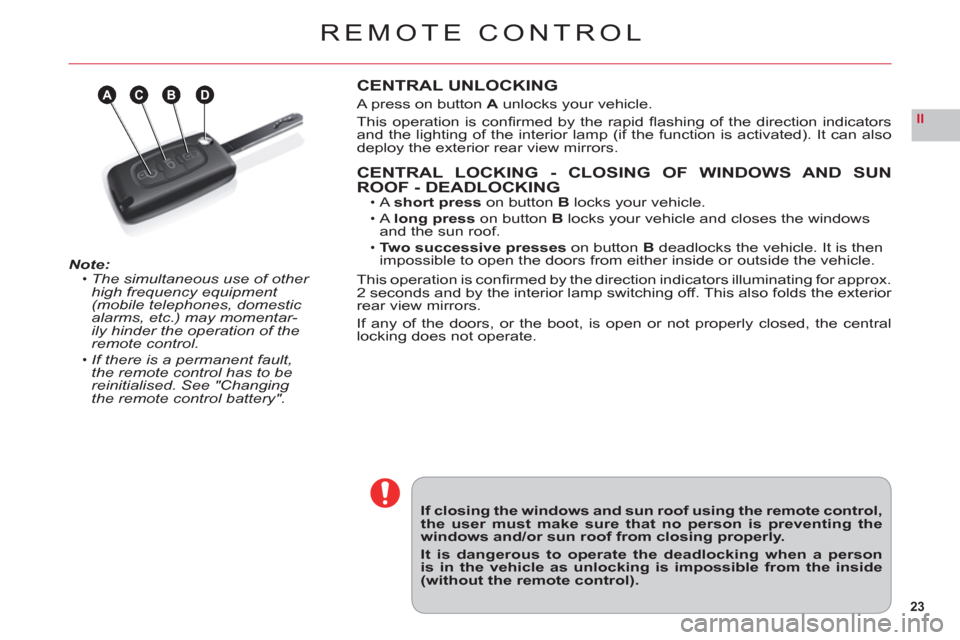
ABDC
REMOTE CONTROL
Note:The simultaneous use of other high frequency equipment (mobile telephones, domestic
alarms, etc.) may momentar-ily hinder the operation of the remote control.
If there is a permanent fault, the remote control has to bereinitialised. See "Changing the remote control battery".
•
•
CENTRAL UNLOCKING
A press on button A unlocks your vehicle.
This operation is confi rmed b
y the rapid fl ashing of the direction indicators
and the lighting of the interior lamp (if the function is activated). It can alsodeploy the exterior rear view mirrors.
CENTRAL LOCKING - CLOSING OF WINDOWS AND SUN
ROOF - DEADLOCKINGA short presson buttonB locks your vehicle.
Along presson buttonB locks your vehicle and closes the windows and the sun roof.Two successive presses on button Bdeadlocks the vehicle. It is then
impossible to open the doors from either inside or outside the vehicle.
This operation is confi rmed b
y the direction indicators illuminating for approx.
2 seconds and by the interior lamp switching off. This also folds the exterior
rear view mirrors.
If any of the doors, or the boot, is open or not properly closed, the centrallocking does not operate.
•
•
•
If closing the windows and sun roof using the remote control,the user must make sure that no person is preventing thewindows and/or sun roof from closing properly.
It is dangerous to operate the deadlocking when a personis in the vehicle as unlocking is impossible from the inside(without the remote control).
Page 53 of 216
51
II
A
SIGNALLING
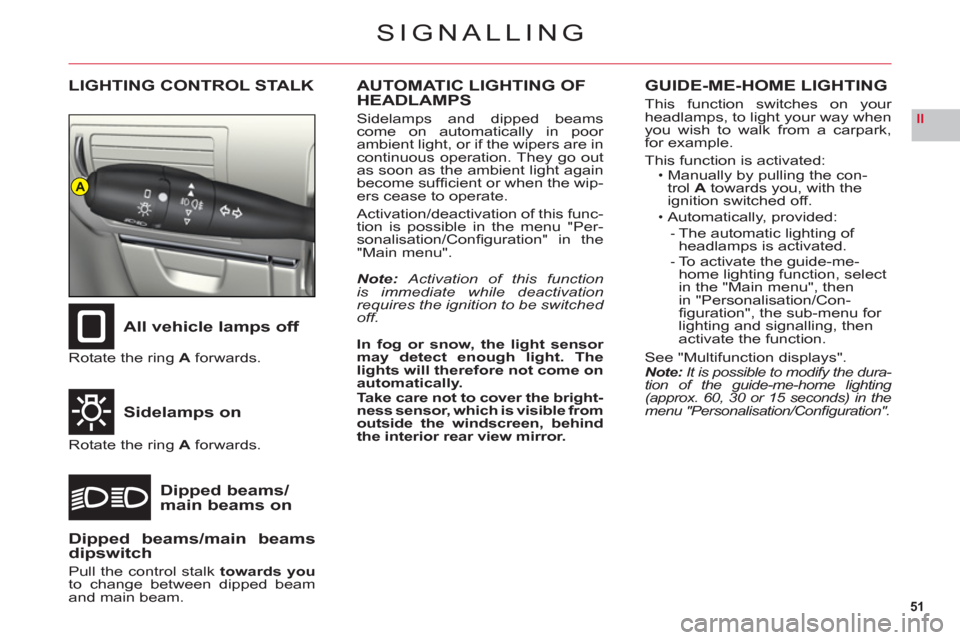
LIGHTING CONTROL STALK
All vehicle lamps off
Sidelam
ps on
Dipped beams/main beams on
Rotate the ring Aforwards.
Rotate the ring Aforwards.
AUTOMATIC LIGHTING OF
HEADLAMPS
Sidelamps and dipped beams come on automatically in poor
ambient light, or if the wipers are in continuous operation. They go out
as soon as the ambient light again
become suffi cient or when the wip-ers cease to operate.
Activation
/deactivation of this func-
tion is possible in the menu "Per-
sonalisation/Confi guration" in the "Main menu".
Note: Activation of this function is immediate while deactivation requires the ignition to be switched off.
In fo
g or snow, the light sensor may detect enough light. The lights will therefore not come on automatically.Take care not to cover the bright-
ness sensor, which is visible from
outside the windscreen, behind the interior rear view mirror.
GUIDE-ME-HOME LIGHTING
This function switches on your headlamps, to light your way whenyou wish to walk from a carpark,for example.
Thi
s function is activated:Manually by pulling the con-
trol Atowards you, with the
ignition switched off.Automatically, provided:
The automatic lighting of headlamps is activated.To activate the guide-me-
home lighting function, select
in the "Main menu", then
in "P
ersonalisation/Con-fi guration", the sub-menu for
lighting and signalling, thenactivate the function.
See "Multifunction displays".Note: It is possible to modify the dura-tion of the guide-me-home lighting (approx. 60, 30 or 15 seconds) in themenu "Personalisation/Confi guration".
•
•
-
-
Dipped beams/main beamsdipswitch
Pull the control stalk towards you
to change between dipped beamand main beam.
Page 56 of 216
54
II
WIPERS
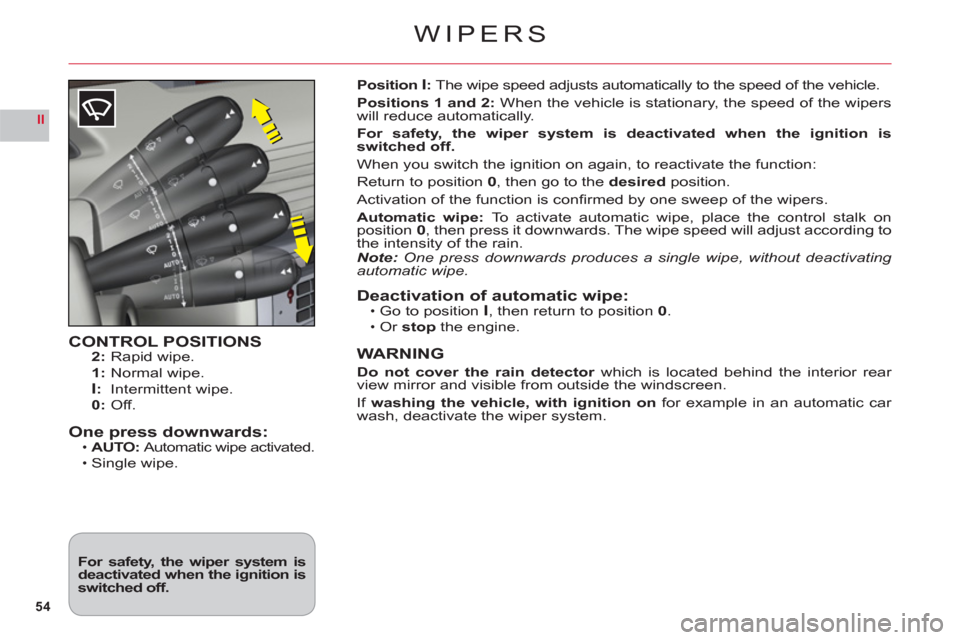
CONTROL POSITIONS2: Rapid wipe.
1: Normal wipe.I:Intermittent wipe.
0: Off.
One press downwards:AUTO:Automatic wipe activated.
Single wipe.
•
•
Position I:The wipe speed adjusts automatically to the speed of the vehicle.
Positions 1 and 2: When the vehicle is stationary, the speed of the wipers
will reduce automatically.
For safet
y, the wiper system is deactivated when the ignition is
switched off.
When you switch the ignition on again, to reactivate the function:
Return to position 0, then go to the desiredposition.
Activation of the function is confi rmed by one sweep of the wipers.
Automatic wipe: To activate automatic wipe, place the control stalk on
position 0, then press it downwards. The wipe speed will adjust according to
the intensity of the rain.Note: One press downwards produces a single wipe, without deactivating automatic wipe.
Deactivation of automatic wipe:Go to position I, then return to position0.
Or stop the engine.
WARNING
Do not cover the rain detectorwhich is located behind the interior rear rview mirror and visible from outside the windscreen.
If washing the vehicle, with ignition on for example in an automatic car
wash, deactivate the wiper system.
•
•
For safety, the wiper system isdeactivated when the ignition isswitched off.
Page 62 of 216
60
II
21
M
MEMORISAT ION
DRIVING POSITIONS MEMORISED VIA
BUTTONS 1 AND 2
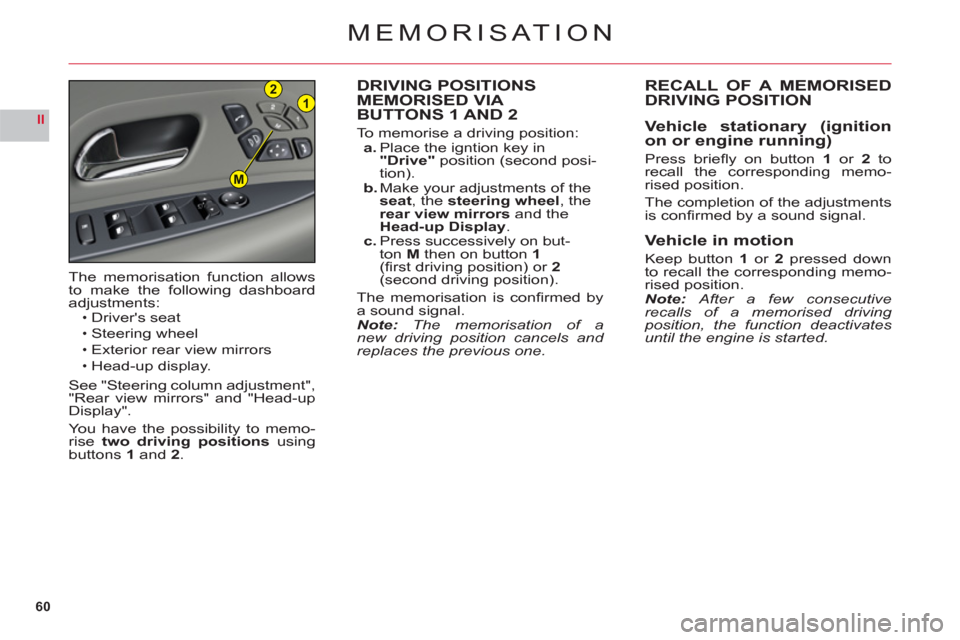
To memorise a driving position:a. Place the igntion key in "Drive"position (second posi-
tion).b. Make your adjustments of the
seat, the steering wheel, the
rear view mirrors and theHead-up Display.c. Press successively on but-
tonMthen on button1(fi rst driving position) or 2(second driving position).
The memorisation is confi rmed by
a sound signal.Note: The memorisation of a new driving position cancels and replaces the previous one. Th
e memorisation function allowsto make the following dashboard
adjustments:Driver's seat
Steering wheelExterior rear view mirrors
Head-up display.
See "Steering column adjustment","Rear view mirrors" and "Head-up
Display".
You have the possibility to memo-rise two driving positions usingbuttons1and2.
•
••
•
RECALL OF A MEMORISEDDRIVING POSITION
Vehicle stationary (ignition
on or engine running)
Press briefl y on button1 or 2 torecall the corresponding memo-rised position.
The completion of the adjustments
is confi rmed by a sound signal.
Vehicle in motion
Keep button 1or 2pressed down
to recall the corresponding memo-rised position.Note: After a few consecutiverecalls of a memorised driving position, the function deactivates until the engine is started.