display CITROEN C6 DAG 2012 Handbook (in English)
[x] Cancel search | Manufacturer: CITROEN, Model Year: 2012, Model line: C6 DAG, Model: CITROEN C6 DAG 2012Pages: 216, PDF Size: 10.27 MB
Page 33 of 216
31
II
INSTRUMENT PANEL
WARNING LAMPS
These warning lamps may be accompanied by a message and/or a sound signal
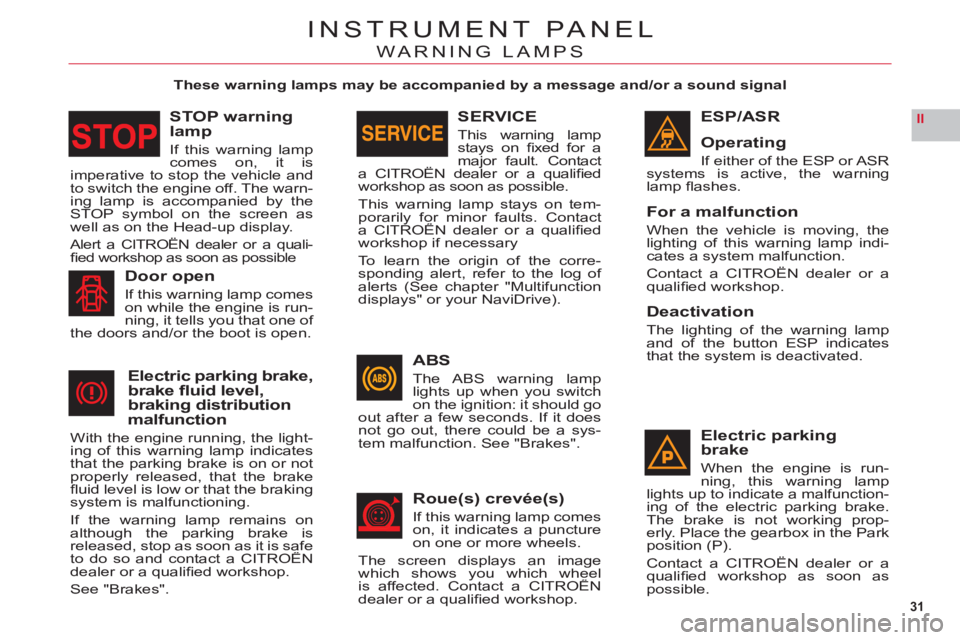
ESP/ASR
Operatin
g
If either of the ESP or ASR systems is active, the warning lamp fl ashes.
For a malfunction
When the vehicle is moving, the lighting of this warning lamp indi-cates a system malfunction.
Contact a CITROËN dealer or a qualifi ed workshop.
Deactivation
The lighting of the warning lamp and of the button ESP indicates
that the system is deactivated.
Electric parkingbrake
When the engine is run-ning, this warning lamp lights up to indicate a malfunction-
ing of the electric parking brake. The brake is not working prop-erly. Place the gearbox in the Park position (P).
Contact a CITROËN dealer or a qualifi ed workshop as soon as possible.
ABS
The ABS warning lamplights up when you switchon the ignition: it should goout after a few seconds. If it doesnot go out, there could be a sys-
tem malfunction. See "Brakes".
Roue(s) crevée(s)
If this warning lamp comes
on, it indicates a punctureon one or more wheels.
The screen displa
ys an imagewhich shows you which wheelis affected. Contact a CITROËNy
dealer or a qualifi ed workshop.
Door open
If this warning lamp comes
on while the engine is run-ning, it tells you that one of
the doors and/or the boot is open.
Electric parking brake,
brake fl uid level,
brakin
g distribution malfunction
With the engine running, the light-
ing of this warning lamp indicates
that the parking brake is on or not
properly released, that the brake fl uid level is low or that the braking system is malfunctioning.
If the warning lamp remains on although the parking brake is released, stop as soon as it is safe to do so and contact a CITROÀN ,p
dealer or a qualifi ed workshop.
See "Brakes".
SERVICE
This warning lampstays on fi xed for a
major fault. Contacta CITROËN dealer or a qualifi edj
workshop as soon as possible.
This warning lamp stays on tem-porarily for minor faults. Contacta CITROËN dealer or a qualifi edpy
workshop if necessary
To learn the origin of the corre-
sponding alert, refer to the log of
alerts (See chapter "Multifunction
displays" or your NaviDrive).
STOP warning lamp
If this warning lamp comes on, it is imperative to stop the vehicle and
to switch the engine off. The warn-ing lamp is accompanied by the STOP symbol on the screen as
well as on the Head-up display.
Alert a CITROËN dealer or a quali-fi ed workshop as soon as possible
Page 35 of 216

33
II
INSTRUMENT PANEL
An incorrect engine oil level can seriously damage your engine. See "Levels".
On switching on the ignition, theinstrument panel indicates:Firstly, in succession:
Maintenance indicator. See
"Maintenance indicator" (next
page).The engine oil level indicator.Secondly:
The total and trip mileagecounters.
•
-
-•
-
ENGINE OIL LEVEL INDICATOR
This display indicatesnormal
operation.
Flashing of "OIL" indicates an oil level that isbelow the minimum.
Check using the manual dipstick. See "Levels".
Check the engine oil level on hori-
zontal ground with the engine
having been switched off for at least 30 minutes.
Contact a CITROËN dealer or a qualifi ed workshop.
A fl ashing of "OIL – –"indicates amalfunctioning of the indicator.
Contact a CITROËN dealer or aqualifi ed workshop.
Page 36 of 216
34
II
INSTRUMENT PANEL
MAINTENANCE INDICATOR
It informs you when the next routine service is duein accordance with the vehicle servicing schedule in the Main-
tenance Guide. This information is dependent on two parameters: themileage covered, and the time elapsed sincethe last visit.
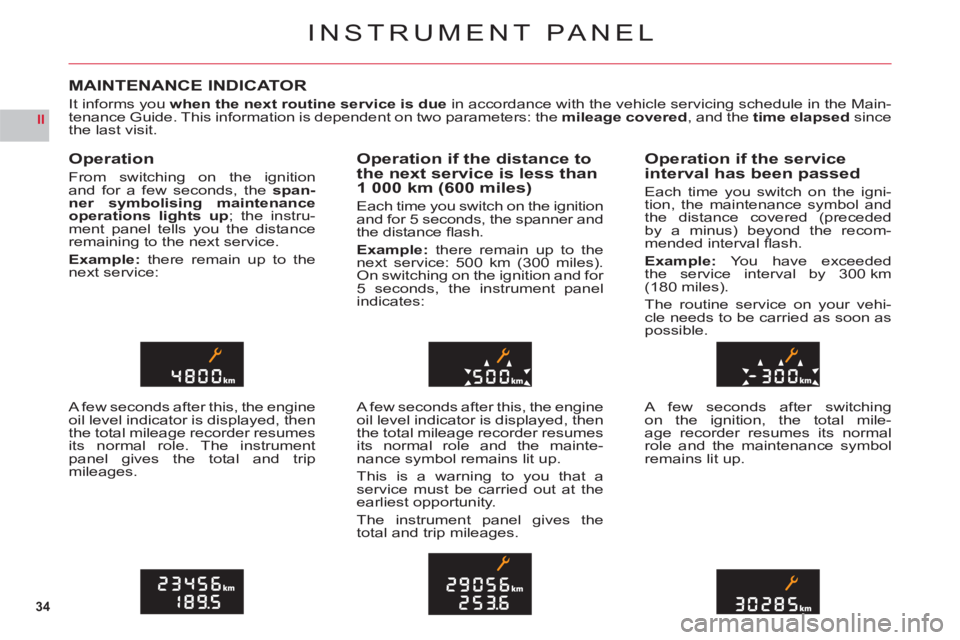
Operation
From switching on the ignition
and for a few seconds, thespan-
ner symbolising maintenanceoperations lights up; the instru-ment panel tells you the distanceremaining to the next service.
Example:there remain up to thenext service:
A few seconds after this, the engine
oil level indicator is displayed, then
the total mileage recorder resumesits normal role. The instrumentpanel gives the total and tripmileages.
Operation if the distance tothe next service is less than1 000 km (600 miles)
Each time you switch on the ignition
and for 5 seconds, the spanner and
th
e distance fl ash.
Example: there remain up to the
next service: 500 km (300 miles). On switching on the ignition and for 5 seconds, the instrument panel
indicates:
A few seconds after this, the engine oil level indicator is displayed, then
the total mileage recorder resumes its normal role and the mainte-
nance symbol remains lit up.
This is a warnin
g to you that a service must be carried out at the earliest opportunity.
The instrument panel
gives the
total and trip mileages.
Operation if the service
interval has been passed
Each time you switch on the igni-
tion, the maintenance symbol andthe distance covered (preceded
by a minus) beyond the recom-mended interval fl ash.
Example:Yo u have exceededthe service interval by 300 km(180 miles).
The routine service on your vehi-cle needs to be carried as soon aspossible.
A few seconds after switchingon the ignition, the total mile-
age recorder resumes its normalrole and the maintenance symbolremains lit up.
Page 37 of 216
35
II
00
00A
A
INSTRUMENT PANEL
Maintenance intervals
If you use your vehicle in particu-larly diffi cult conditions, it is essen-
tialto use the service schedule for "severe conditions" comprisingshorter intervals between services.See "Maintenance and WarrantyGuide".
Reset to zero
It is reset by your CITROËN dealer
or a qualifi ed workshop after eachservice. However, if you do your
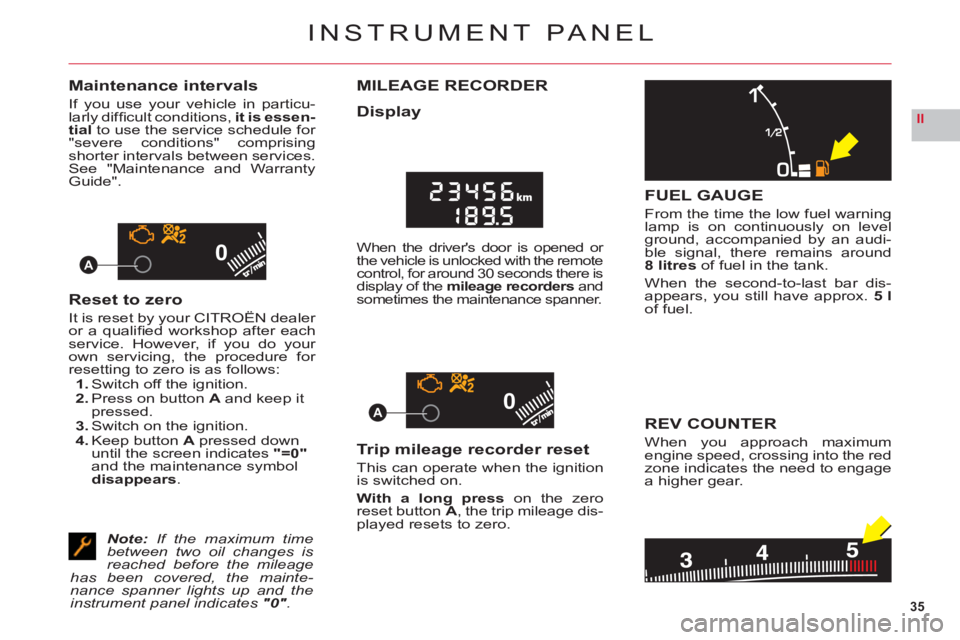
own servicing, the procedure for resetting to zero is as follows:1. Switch off the ignition.2. Press on button A and keep it pressed.3. Switch on the ignition.4. Keep buttonA pressed down until the screen indicates"=0"
and the maintenance symboldisappears.
Note:If the maximum time between two oil changes is reached before the mileage has been covered, the mainte-nance spanner lights up and the instrument panel indicates "0".
MILEAGE RECORDER
Display
When the driver's door is opened or
the vehicle is unlocked with the remote control, for around 30 seconds there is
display of the mileage recorders and sometimes the maintenance spanner.
Trip mileage recorder reset
This can operate when the ignition is switched on.
With a long press on the zero
reset buttonA, the trip mileage dis-
played resets to zero.
FUEL GAUGE
From the time the low fuel warninglamp is on continuously on levelground, accompanied by an audi-
ble signal, there remains around8 litresof fuel in the tank.
When the second-to-last bar dis-
appears, you still have approx. 5 lof fuel.
REV COUNTER
When you approach maximumengine speed, crossing into the redzone indicates the need to engage
a higher gear.
Page 38 of 216
36
II
B
AC
D
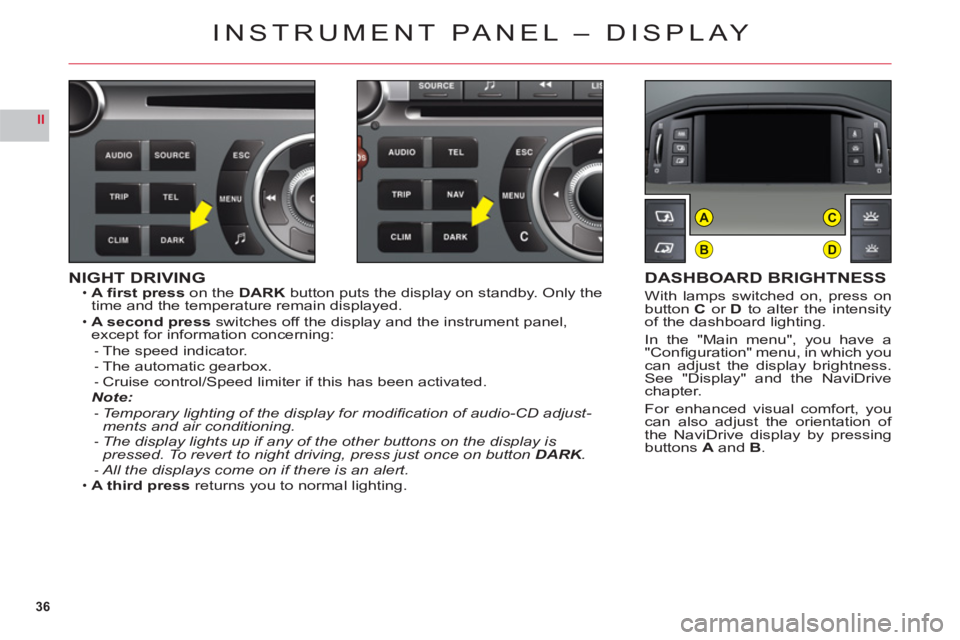
NIGHT DRIVINGA fi rst presson the DARK button puts the display on standby. Only the
time and the temperature remain displayed.
A second
pressswitches off the display and the instrument panel,except for information concerning:The speed indicator.The automatic gearbox.Cruise control/Speed limiter if this has been activated.Note:
Temporary lighting of the display for modifi cation of audio-CD adjust-ments and air conditioning.
The display lights up if any of the other buttons on the display is pressed. To revert to night driving, press just once on button DARK.KKAll the displays come on if there is an alert.
A third press returns you to normal lighting.
•
•
---
-
-
-
•
DASHBOARD BRIGHTNESS
With lamps switched on, press onbutton Cor Dto alter the intensityof the dashboard lighting.
In the "Main menu", you have a"Confi guration" menu, in which youcan adjust the display brightness.See "Display" and the NaviDrivechapter.
For enhanced visual comfort, youcan also adjust the orientation of
the NaviDrive display by pressingbuttonsA and B.
INSTRUMENT PANEL – DISPLAY
Page 39 of 216
37
II2
1
43
HEAD-UP DISPLAY
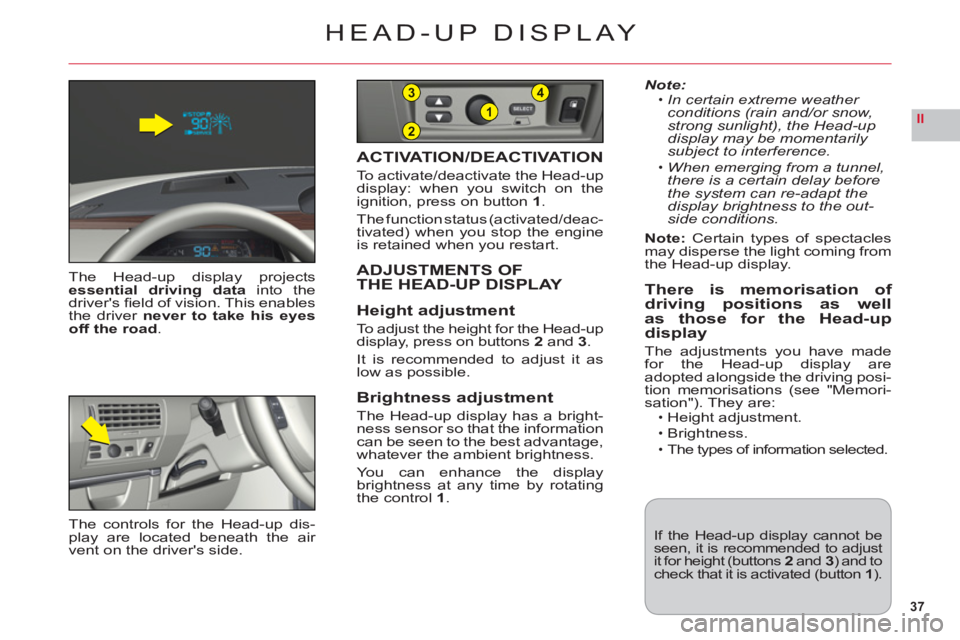
The Head-up display projectsessential driving datainto thedriver's fi eld of vision. This enablesthe driver never to take his eyesoff the road.
ACTIVATION/DEACTIVATION
To activate/deactivate the Head-up
display: when you switch on the
ignition, press on button 1.
The function status (activated/deac-
tivated) when you stop the engine
is retained when you restart.
ADJUSTMENTS OF THE HEAD-UP DISPLAY
Hei
ght adjustment
To a djust the height for the Head-up display, press on buttons 2 and3.
It is recommended to adjust it as low as possible.
Brightness adjustment
The Head-up display has a bright-
ness sensor so that the information can be seen to the best advantage,
whatever the ambient brightness.
You can enhance the display
brightness at any time by rotating
th
e control1.
Note:In certain extreme weather
conditions (rain and/or snow,strong sunlight), the Head-up display may be momentarily subject to interference.
When emerging
from a tunnel, there is a certain delay beforethe system can re-adapt thedisplay brightness to the out-side conditions.
Note: Certain types of spectaclesmay disperse the light coming from
the Head-up display.
There is memorisation of driving positions as well
as those for the Head-updisplay
The adjustments you have madefor the Head-up display are
adopted alongside the driving posi-
tion memorisations (see "Memori-sation"). They are:Height adjustment.
Brightness.
The types of information selected.
•
•
•
••
If the Head-up display cannot beseen, it is recommended to adjustit for height (buttons 2 and 3) and tocheck that it is activated (button1).
The controls for the Head-up dis-play are located beneath the air
vent on the driver's side.
Page 40 of 216
38
II
CB
DG
FE
A
i
HEAD-UP DISPLAY
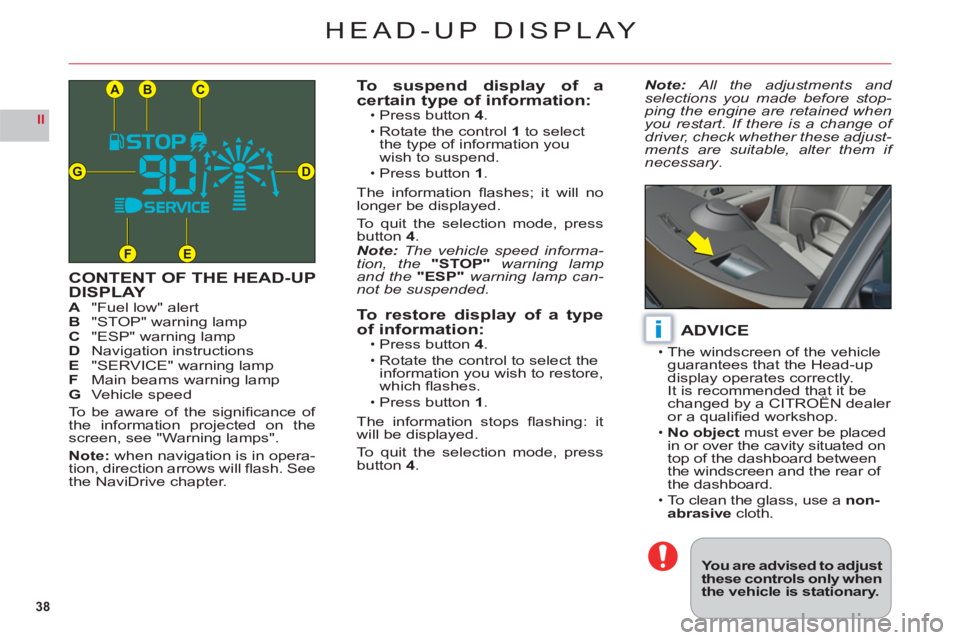
CONTENT OF THE HEAD-UPDISPLAYA"Fuel low" alertB"STOP" warning lampC "ESP" warning lampDNavigation instructionsE "SERVICE" warning lampFMain beams warning lampG Vehicle speed
To be aware of the signifi cance of
the information projected on thescreen, see "Warning lamps".
Note: when navigation is in opera-
tion, direction arrows will
fl ash. See
the NaviDrive chapter.
To suspend display of a certain type of information:Press button 4.
Rotate the control1 to select
the type of information you
wish to suspend.
Press button 1.
The information fl ashes; it will no longer be displayed.
To
quit the selection mode, press button4.Note: The vehicle speed informa-tion, the "STOP" warning lamp and the "ESP" warning lamp can-not be suspended.
To restore display of a type of information:Press button 4.
Rotate the control to select theinformation you wish to restore,
which fl ashes.
Press button 1.
The information stops fl ashing: it
will be displayed.
To quit the selection mode, press
button4.
•
•
•
•
•
•
ADVICE
The windscreen of the vehicle guarantees that the Head-up
display operates correctly. It is recommended that it be changed by a CITROËN dealer
or a qualifi ed workshop.
No ob
ject must ever be placed
in or over the cavity situated on
top of the dashboard between
th
e windscreen and the rear of
the dashboard.To clean the glass, use anon-abrasivecloth.
•
•
•
Note: All the adjustments and selections you made before stop-ping the engine are retained whenyou restart. If there is a change of
driver, check whether these adjust-ments are suitable, alter them if necessary.
You are advised to adjustthese controls only whenthe vehicle is stationary.
Page 41 of 216
39
II
1432
MULTIFUNCTION DISPLAYS
COLOUR SCREEN C
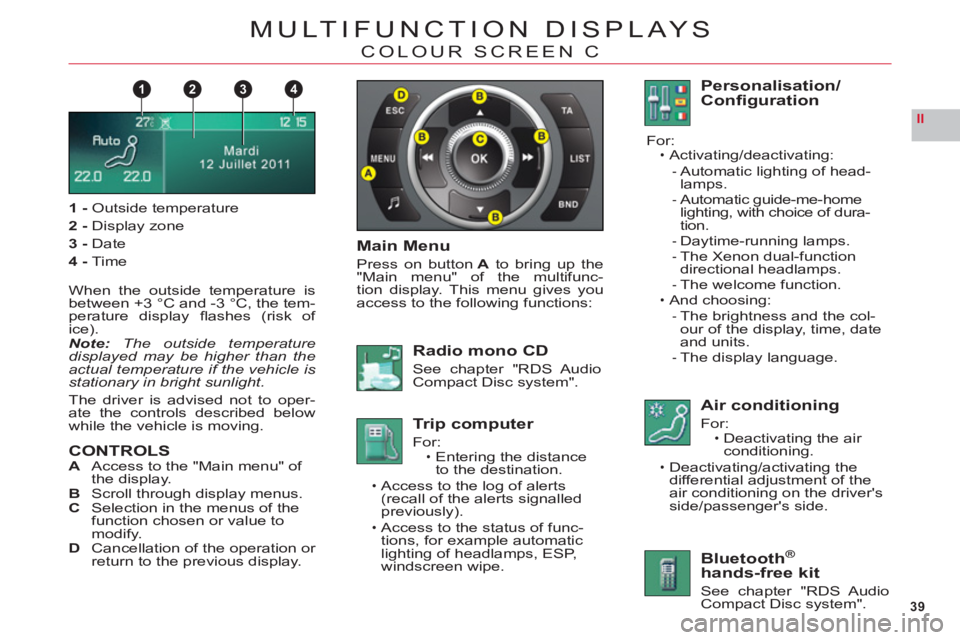
1-Outside temperature
2 -Display zone
3 -Date
4-Time
When the outside temperature is
between +3 °C and -3 °C, the tem-perature display fl ashes (risk of
ice).Note:The outside temperature
displayed may be higher than the
actual temperature i
f the vehicle is stationary in bright sunlight.
The driver is advised not to oper-
ate the controls described below
while the vehicle is moving.
CONTROLSA Access to the "Main menu" of
the display.B Scroll through display menus.C Selection in the menus of the
function chosen or value tomodify.DCancellation of the operation or
return to the previous display.
Main Menu
Press on buttonAto bring up the "Main menu" of the multifunc-
tion display. This menu gives you
access to the following functions:
Radio mono CD
See chapter "RDS AudioCompact Disc system".
Trip computer
For:Entering the distance
to the destination.
Access to the log of alerts(recall of the alerts signalled
previously).
Access to the status of func-
tions, for example automaticlighting of headlamps, ESP,
windscreen wipe.
•
•
•
Personalisation/Confi guration
For:Activating/deactivating:
Automatic lighting of head-lamps.Automatic guide-me-home
lighting, with choice of dura-
tion.Daytime-running lamps.
The Xenon dual-function
directional headlamps.The welcome function.And choosing:
The brightness and the col-
our of the display, time, dateand units.The display language.
•
-
-
--
-•
-
-
Air conditioning
For:Deactivating the air conditioning.
Deactivating/activating the
differential adjustment of the
air conditioning on the driver's side/passenger's side.
•
•
Bluetooth®
hands-free kit
See chapter "RDS Audio Compact Disc system".
Page 42 of 216
40
II
MULTIFUNCTION DISPLAYS
COLOUR SCREEN C
TRIP COMPUTER
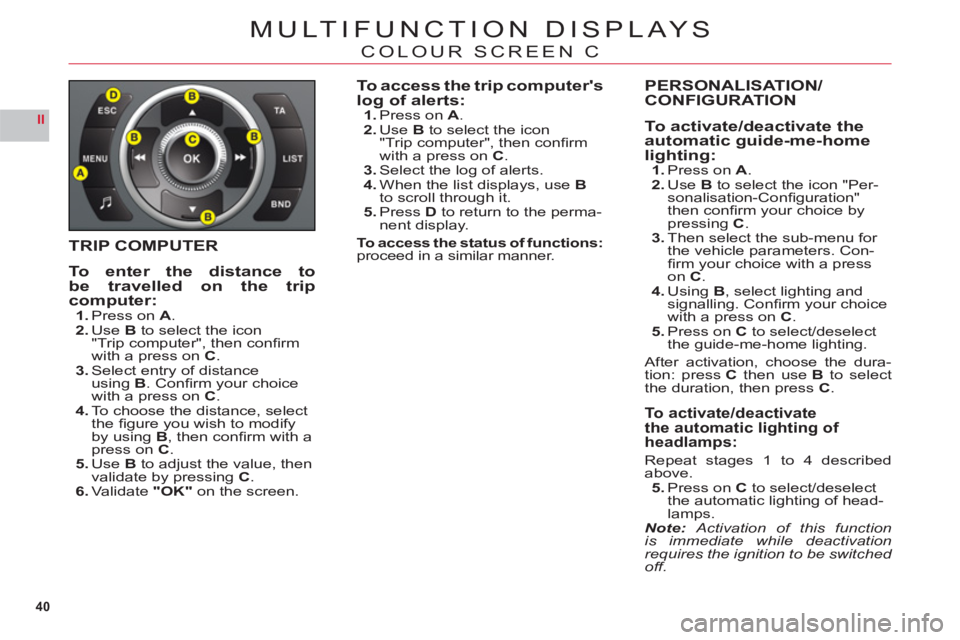
To enter the distance tobe travelled on the tripcomputer:1.Press on A.2.UseB to select the icon
"Trip computer", then confi rm
with a press onC.3.Select entry of distance
usingB. Confi rm your choice
with a press onC.4.To choose the distance, select
the fi gure you wish to modifyby using B, then confi rm with apress on C.5.UseB to adjust the value, then
validate by pressing C.6.Validate"OK" on the screen.
To access the trip computer's log of alerts:1. Press onA.2. Use Bto select the icon "Trip computer", then confi rm
with a press on C.3. Select the log of alerts.4. When the list displays, useBto scroll through it.5. Press D to return to the perma-
nent display.
To access the status of functions:proceed in a similar manner.
PERSONALISATION/
CONFIGURATION
To activate/deactivate the
automatic guide-me-home
lighting:1. Press on A.2. UseB to select the icon "Per-sonalisation-Confi guration"
then confi rm your choice bypressing C.3. Then select the sub-menu for
the vehicle parameters. Con-
fi rm your choice with a press onC.4. Using B, select lighting andsignalling. Confi rm your choice
with a press onC.5. Press on C to select/deselect
the guide-me-home lighting.
After activation, choose the dura-
tion: press Cthen use B to select
the duration, then press C.
To activate/deactivate the automatic lighting of
headlamps:
Repeat stages 1 to 4 describedabove.
5. Press on C to select/deselect
the automatic lighting of head-
lamps.Note: Activation of this functionis immediate while deactivationrequires the ignition to be switched off.
Page 43 of 216
41
II
MULTIFUNCTION DISPLAYS
COLOUR SCREEN C
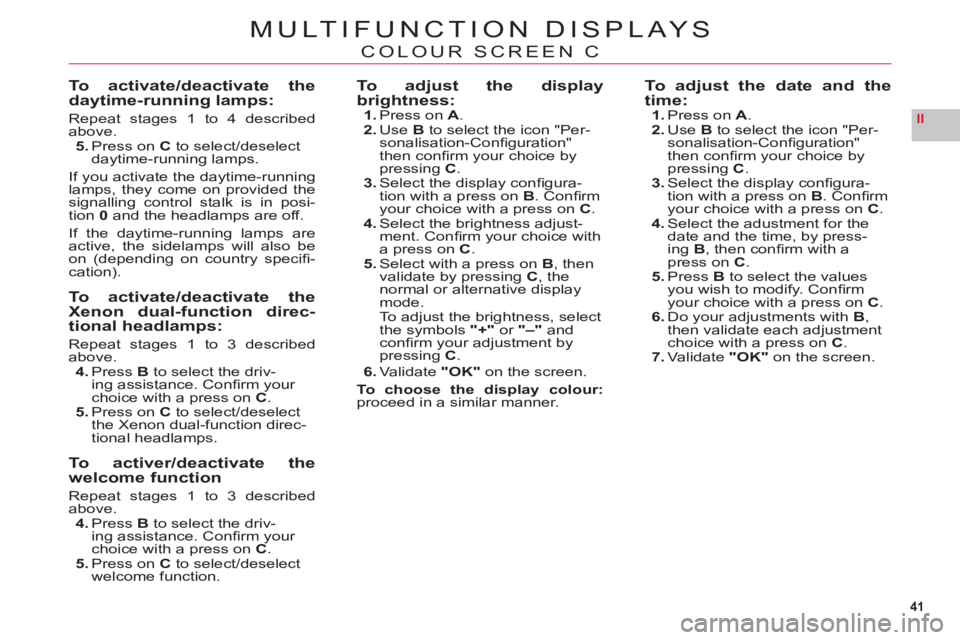
To activate/deactivate thedaytime-running lamps:
Repeat stages 1 to 4 describedabove.
5. Press on C to select/deselect
daytime-running lamps.
If you activate the daytime-runninglamps, they come on provided thesignalling control stalk is in posi-
tion 0and the headlamps are off.
I
f the daytime-running lamps are
active, the sidelamps will also be
on
(depending on country specifi -cation).
To activate/deactivate theXenon dual-function direc-
tional headlamps:
Repeat stages 1 to 3 describedabove.4.PressB to select the driv-ing assistance. Confi rm your choice with a press on C.5. Press on C to select/deselect
the Xenon dual-function direc-
tional headlamps.
To activer/deactivate the
welcome function
Repeat stages 1 to 3 describedabove.4. PressB to select the driv-ing assistance. Confi rm your choice with a press on C.5. Press on C to select/deselect
welcome function.
To adjust the display brightness:1. Press on A.2. Use Bto select the icon "Per-sonalisation-Confi guration"
then confi rm your choice bypressingC.3. Select the display confi gura-
tion with a press on B. Confi rm your choice with a press onC.4. Select the brightness adjust-
ment. Confi rm your choice with a press onC.5. Select with a press onB, then
validate by pressingC, the
normal or alternative displaymode.To adjust the brightness, select
the symbols"+" or "–" and confi rm your adjustment by
pressingC.
6. Validate "OK"on the screen.
To choose the display colour:proceed in a similar manner.
To adjust the date and the
time:1. Press on A.2. UseB to select the icon "Per-sonalisation-Confi guration"
then confi rm your choice bypressing C.3. Select the display confi gura-
tion with a press onB. Confi rmyour choice with a press on C.4. Select the adustment for the
date and the time, by press-
ing B, then confi rm with a press on C.5. PressBto select the values you wish to modify. Confi rmyour choice with a press on C.6. Do your adjustments with B,
then validate each adjustmentchoice with a press on C.7. Validate"OK" on the screen.