Hydraulic system Citroen CX 1974 1.G User Guide
[x] Cancel search | Manufacturer: CITROEN, Model Year: 1974, Model line: CX, Model: Citroen CX 1974 1.GPages: 394
Page 43 of 394
Downloaded from www.Manualslib.com manuals search engine 2
OPERATION No MA. 02 : I!‘orki//g OI/ hyc/rt/t/lic s\,s/vN/.
5. PRECAUTIONS TO BE TAKEN BEFORE WORKING ON THE HYDRAULIC SYSTEM :
a) (.~rvJuI/)~ CIVOII the area of work, the unions and the unit to be removed
Disconnect the lead from the negative terminal of the battery
Only use petrol or lead-free petrol for cleaning.
b ) I~~J/VNSO
the /)twsure in the circuits
- Place the vehicle in the G /arc B
position. stop the engine.
- Slacken the Pressure Requlator release screw.
Wait until the front of the car has reached the low position 6, PRECAUTIONS TO BE TAKEN DURING REMOVAL :
a) t3lnuk o!! the w~~tnl pi/~es with plugs, and rubber tubes with round pins of the correct diameter
b)
t3lmk of/ //IV op,c,/li,lg.s of components with pluqs of the correct diameter
NOTE : Plugs and pins must be carefully cleaned before insertion. 7.. CHECK OR TEST OF HYDRAULIC UNITS :
- Use 3654-T t~sf hc~~c-h equipped and designed for use with LHM fluid
This bench is /)ciitltc’d ~IY’~‘~/ and its accessories are marked in green.
- Never use the bench with another fluid or for testing components operating with another fluid (units of a (( D ))
car using LHS2 for instance ).
NOTE The (< Le Bozec )) pump used on test benches for checking DIESEL injectors can be resorted to for
testing components operating with LHM mineral fluid provided that the bench is cleaned first. 8. PRECAUTIONS TO BE TAKEN DURING REFITTING :
E steel pipes must be blown through with compressed air,
5 rubber tubes and joints must be washed in petrol or white spirit and then dried with compressed air,
= hydraulic units must also be cleaned with petrol or white spirit and blown through with compressed air.
NOTE Renew all joints and seals during refittinq .
b
) 12rlbrijicntim :
- Follow the indications as stated in the operations in the Manual..
- Joints and internal parts must be liqhtly oiled hefore fitting ( use mineral fluid LHM only )
L If parts in contact with hydraulic units have to be qreased use a mineral grease only ( as employed for
Cardan shafts or bearings ).
Page 44 of 394
Downloaded from www.Manualslib.com manuals search engine OPERATION No MA. 02 : I+ 4’ 0, “‘g 01, Ill<, l1\~c!).ollli(- s\‘sfell~. Op. MA. 02
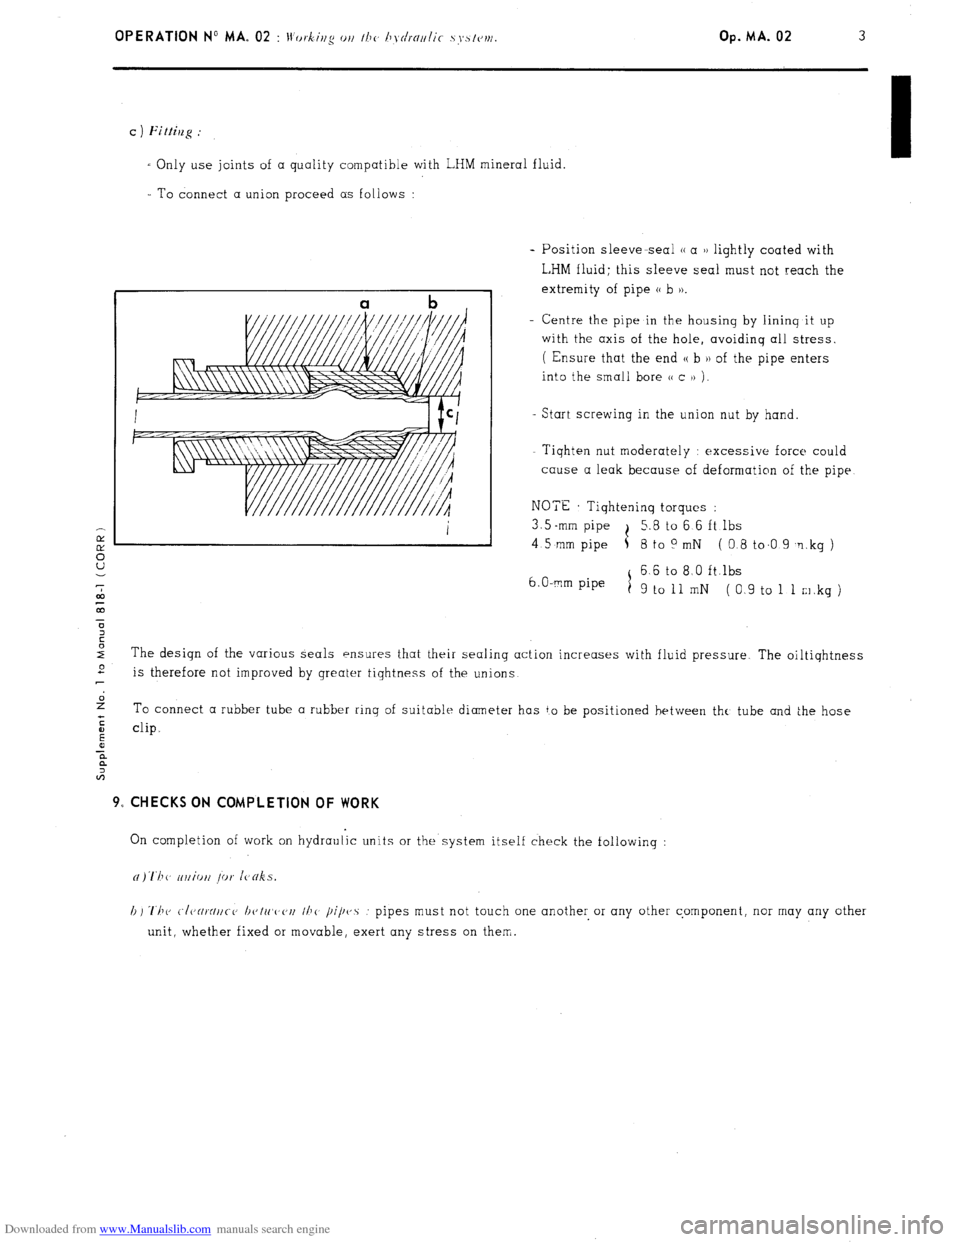
I To connect a union proceed as follows :
- Position sleeve-seal (( a u lightly coated with
L,HM fluid; this sleeve seal must not reach the
extremity of pipe (( b )).
- Centre the pipe in the housinq by lininq it up
with the axis of the hole, avoidinq all stress.
( Ensure that the end u b )I of the pipe enters
into the smali bore C< c )> j.
Start screwing in the union nut by hand.
- Tiqhten nut moderately : excessive force could
cause a leak because of deformation of the pipe
NOTE Tiqhteninq torques :
3.5 -mm pipe t 5.8 to 6 6 ft lbs
4 5 mm pipe 5 8 to 0 mN ( 0.8 to.0 9 ‘1 kg )
6 6 to 8 0 ft.lbs
6. O-mm pipe
1
9 to 11 mN (0 9 to 1 1 m.kg ) c ) Fittilzg :
I Only use joints of a quality compatible with LHM mineral fluid.
The design of the various seals ensures that their sealing action increases with fluid pressure The oiltiqhtness e
is therefore not improved by greater tiqhtness of the unions
2 To connect a rubber tube a rubber rinq of suitabie diameter has to be positioned between thr, tube and the hose
:
E clip.
0
x
a
A 9, CHECKS ON COMPLETION OF WORK
On completion of work on hydraulic units or the system itself check the followinq :
h) ‘1’11~ C./CJ~~~IIC-C, I~c,lrt,c,c,rt I/J<
pipvs : pipes must not touch one another or any other component, nor may any other
unit, whether fixed or movable, exert any stress on them.
Page 185 of 394
Downloaded from www.Manualslib.com manuals search engine TORQUE CONVERTER
I. CHARACTERISTICS
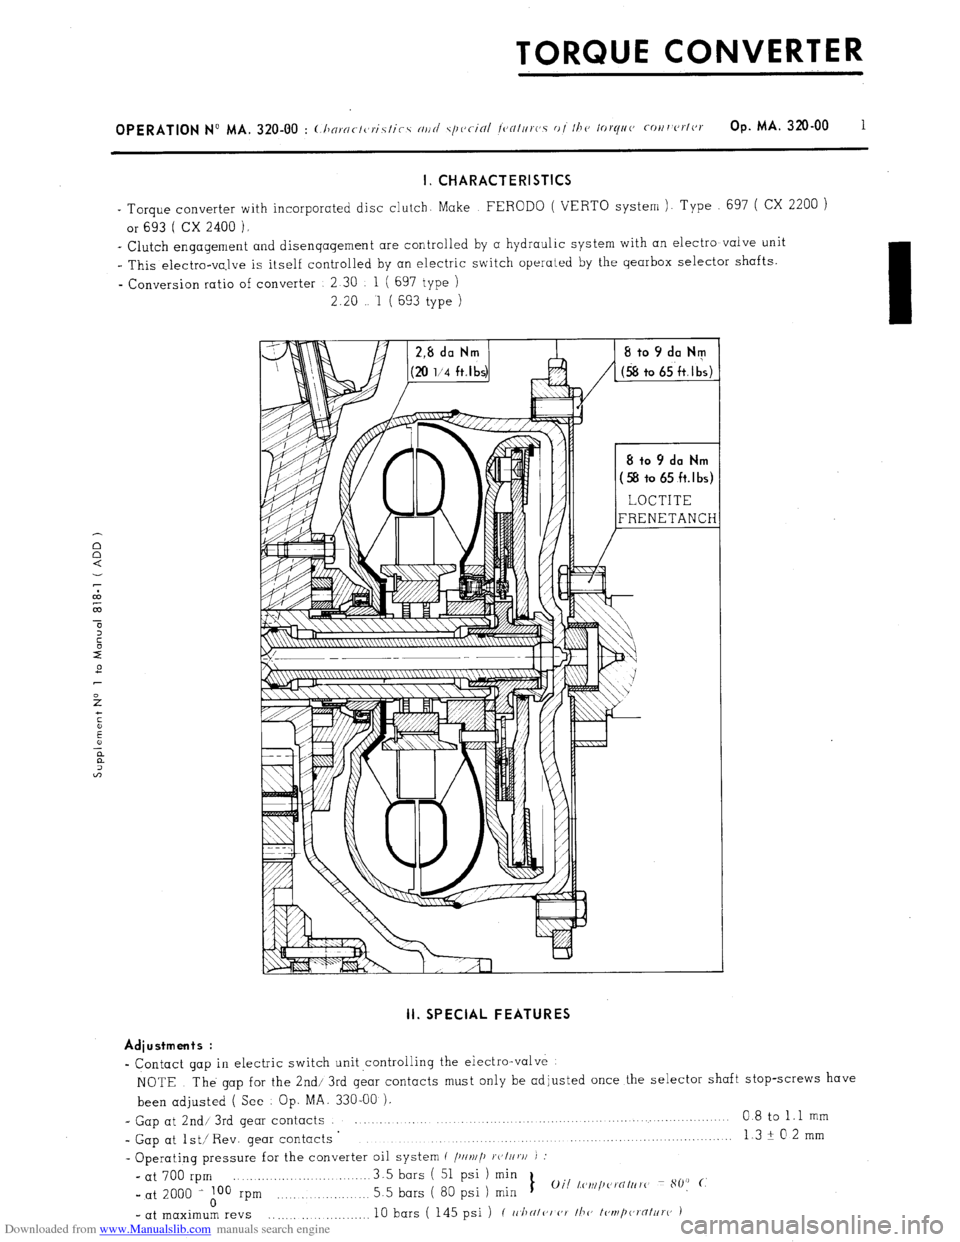
- Torque converter with incorporated disc clutch. Make FERODO ( VERTO system ). Type 697 ( CX 2200 )
or 693 ( CX 2400 ).
_ Clutch engagement and disengagement are controlled by a hydraulic system with an electro valve unit
I This electro-va,lve is itself controlled by an electric switch operated by the gearbox selector shafts.
- Conversion ratio of converter 2 30 1 ( 697 type )
2.20 1 ( 693 type ) II. SPECIAL FEATURES
Adiustments :
- Contact gap in electric switch unit ,controlling the electro-valve
NOTE The gap for the 2nd/ 3rd gear contacts must only be adjusted once the selector shaft stop-screws have
been adjusted ( See Op. MA. 330-00 ),
- Gap at 2nd/ 3rd gear contacts 0 8 to 1.1 mm
- Gap at lst/ Rev. gear contacts ’ 13+02mm
. . . . . . . . . . . . .._.......
- Operating pressure for the converter oil system c /)IIv//~ ~c,I//v/I J :
- at 700 rpm 3.5 bars ( 51 psi ) min
_ at 2000 i A00 rpm 5.5 bars ( 80 psi 1 min 1
Oil l,c~~~i/~~~i’NItrrc~ 80: (.
- at maximum revs .,......... 10 bars ( 145 psi ) ( II./IN/<‘I (‘7 /h(, I<,ml,(a,‘flt~ro )
Page 214 of 394
Downloaded from www.Manualslib.com manuals search engine 6 OPERATION No MA, 390.00 : C1 ,ararteristics
ad special fratuws oj the source
apfd rescr7,e o/ pressur(~ - Hydraulic system.
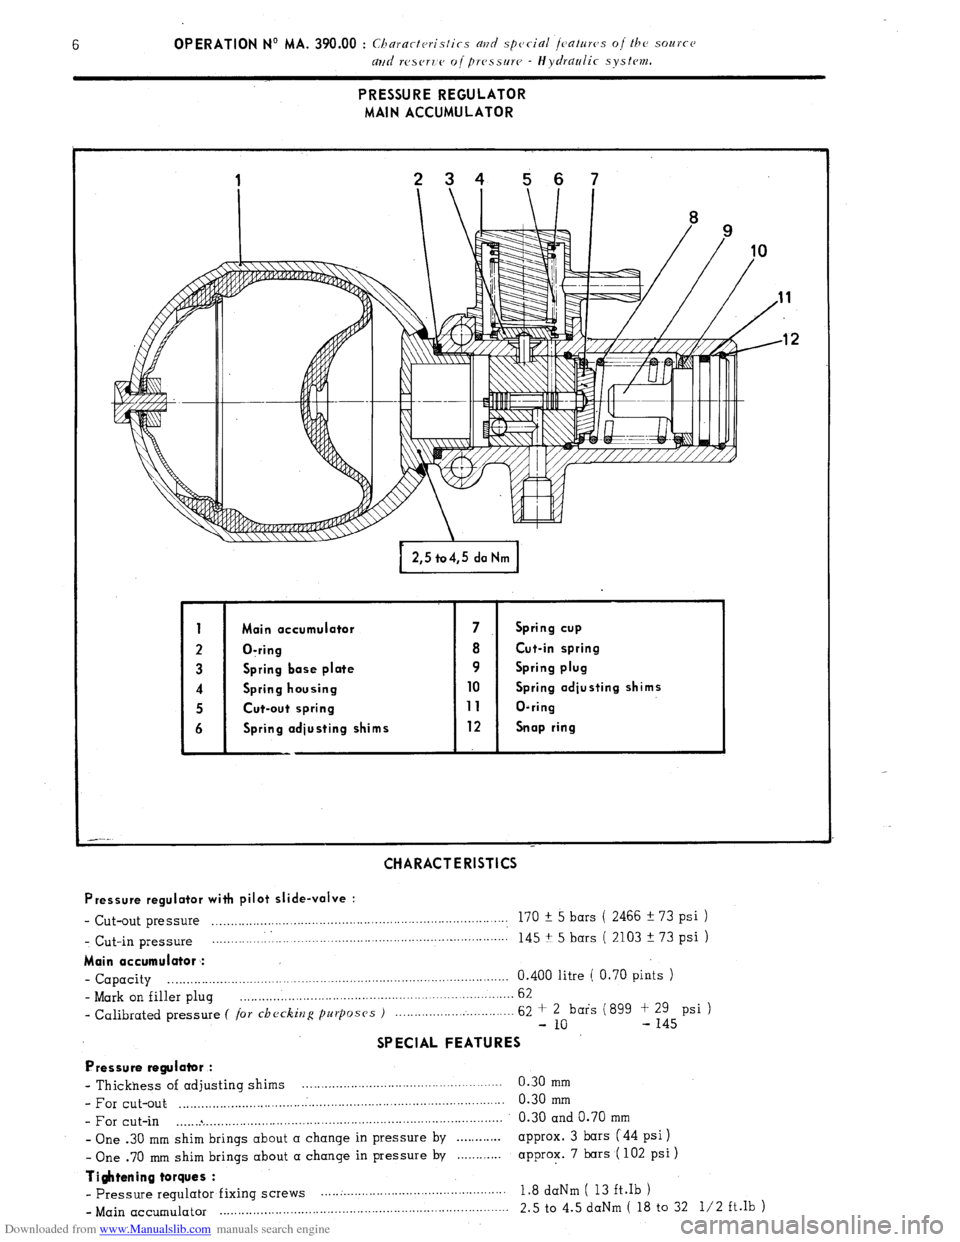
PRESSURE REGULATOR
MAIN ACCUMULATOR
Main occumulotor 7 Spring cup
O-ring 8 Cut-in spring
Spring base plate 9 Spring plug
Spring housing 10 Spring adjusting shims
Cut-out spring 11 O-ring
Spring odjusting shims 12 Snap ring
CHARACTERISTICS
Pressure regulator with pilot slide-valve :
- Cut-out pressure . .._......,_....____.............,.,......................................... 170 f 5 bars ( 2466 !I 73 psi ) _ Cut-in pressure __.....___.__.,..,.....,..,................,,...................................
145 + 5 bars ( 2103 + 73 psi )
Main accumulator :
- Capacity . . . . 0.400 litre ( 0.70 pints )
- Mark on filler plug . . , 62
- Calibrated pressure C /or checking purposes ) 62 + 2 bars (899 f 29 psi )
- 10 - 145
SPECIAL FEATURES
Pressure regulator :
- Thickness of adjusting shims . 0.30 mm
- For cut-out ..I.._......._..... .._. ,. .._. .:.. ,. ,. ..__.. ,. ..__ ,. ,. ._ ._.. .___ 0.30
mm
- For cut-in .._.... * .__....._._.,.,.,._.,....................................... 0.30 and 0.70 mm
- One .30 mm shim brings about a change in pressure by . . . . . . . . . . , approx. 3 bars (44 psi 1
- One .70 mm shim brings about a change in pressure by . . . . . . . . . approx. 7 bars ( 102 psi )
Ti$ttening torques :
- pressure regulator fixing Screws . . . . .._.__.....__._............................... 1.8 daNm ( 13 ft.Ib )
- Main accumulator ..,.. ,. . . ,. __ . . . . .._. ., ,__. ._ __ 2.5 to 4.5 daNm ( 18 to 32 l/2 ft.lb )
Page 218 of 394
Downloaded from www.Manualslib.com manuals search engine 10 OPERATION No MA. 390-00 : Churarteristics and special features oi the source
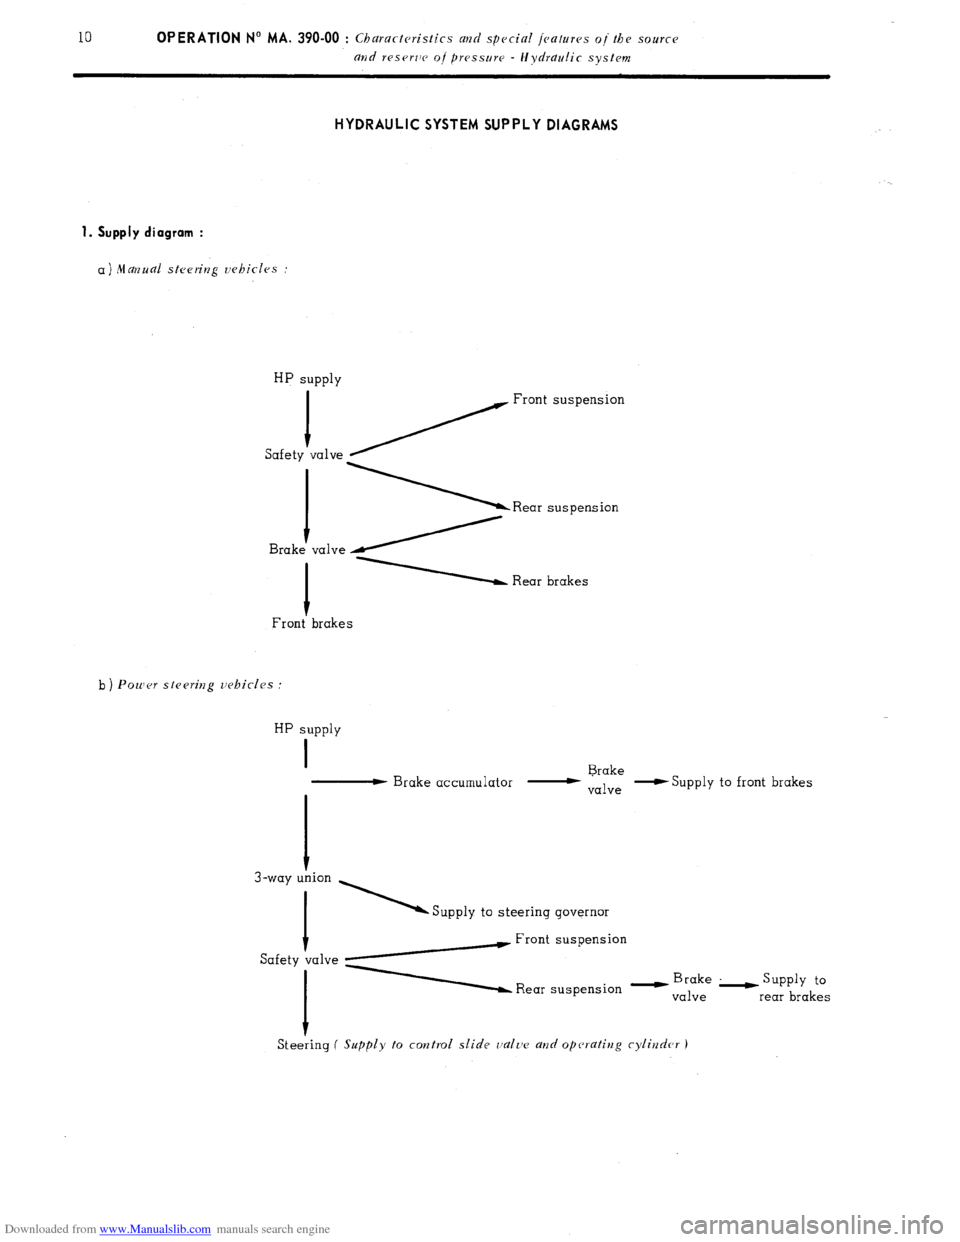
and reserlv oj pressure - Hydraulic system HYDRAULIC SYSTEM SUPPLY DIAGRAMS
1. Supply diagram :
a) Manual steering vehicles :
HP supply
1
Safety ~ Front suspension
va1ve \Rear suspension valve /
1 Rear brakes
Front’ brakes
b ) Power stesritzg vehicles :
HP supply
I
- Brake accumulator - Brake
valve -S
upply to front brakes
I
3-way T ’ Supply to steering governor
Safety talve yw Front suspension
A Rear suspension - y”,;“,“,’ L supp1y to
rear brakes
Steeiing
( Supply to control slide valtv a?zd operating cylirzder J
Page 219 of 394
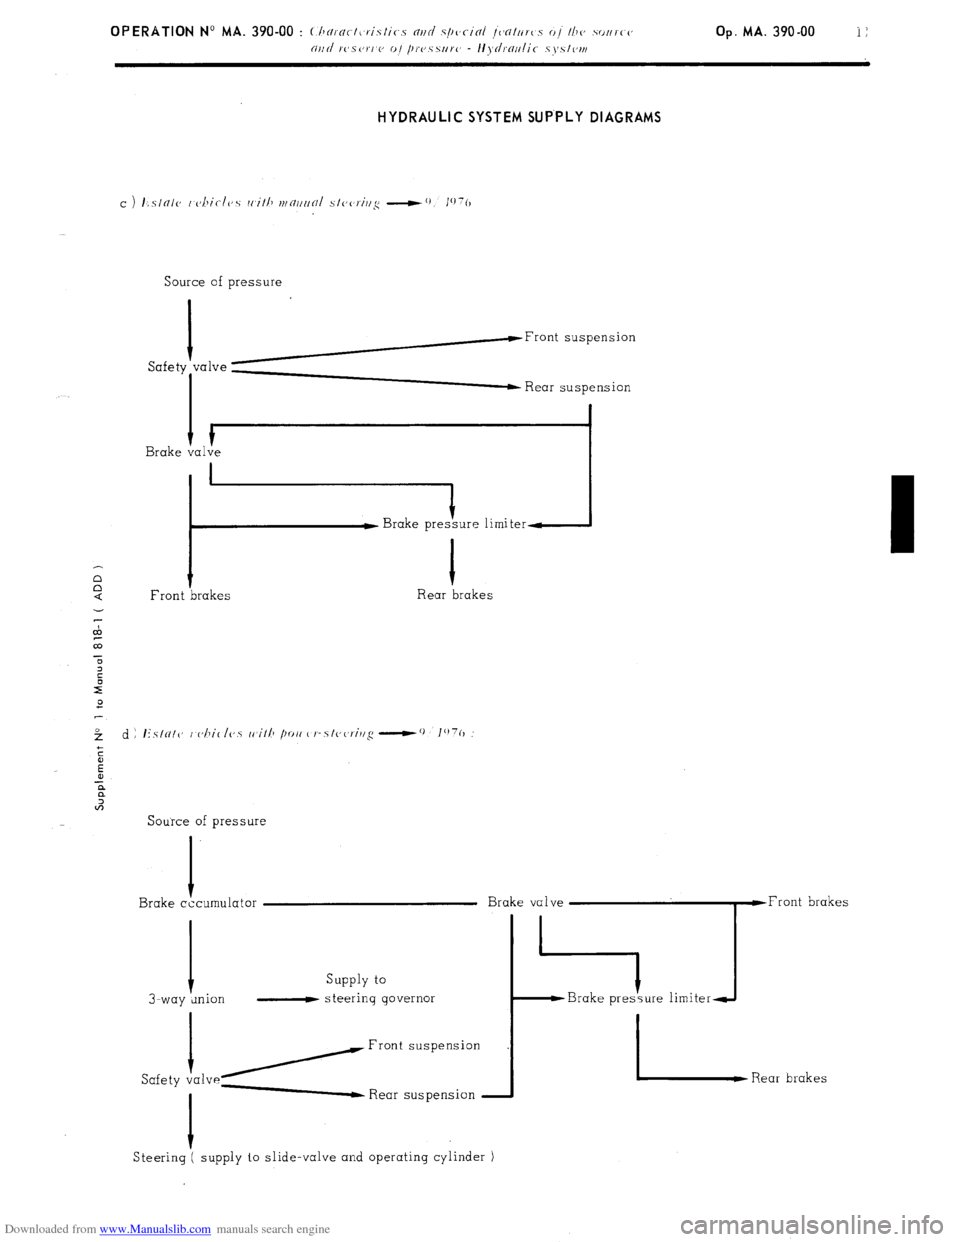
Downloaded from www.Manualslib.com manuals search engine HYDRAULIC SYSTEM SUP.PLY DIAGRAMS
Source of pressure
I
h-Front suspension
Safety “‘lve ; Rear suspension
I
I Brake valve
i :ure limiter-
1
Front brakes Rear brakes
Source of pressure
I
Brake cccumulator
Supply to
I-way wion - steering governor
/Front
Safety va1ve- Rear suspension
I
Steering ( supply to slide-valve and operating cylinder )
Page 243 of 394
Downloaded from www.Manualslib.com manuals search engine a OPERATION N’ MA. 410-O : (./~rrkiq N,,I/
VI. CHECKING AND ADJUSTING THE STEERING GEOMETRY
The crossmember supporting the steering has slots at its fixing point on the front subframe.
Any vertical movement of this crossmember alters the steering geometry.
WARNING
This operation is only to
be carried out in certain ccxses such as
-accidental impact, with repercussions on the steering system.
-work on the vehicle entoiling removal of steering crossmember.
- vehicle with poor
road stability ( p oar stright-line stability) 01 with excessive tyre weor.
CHECKING
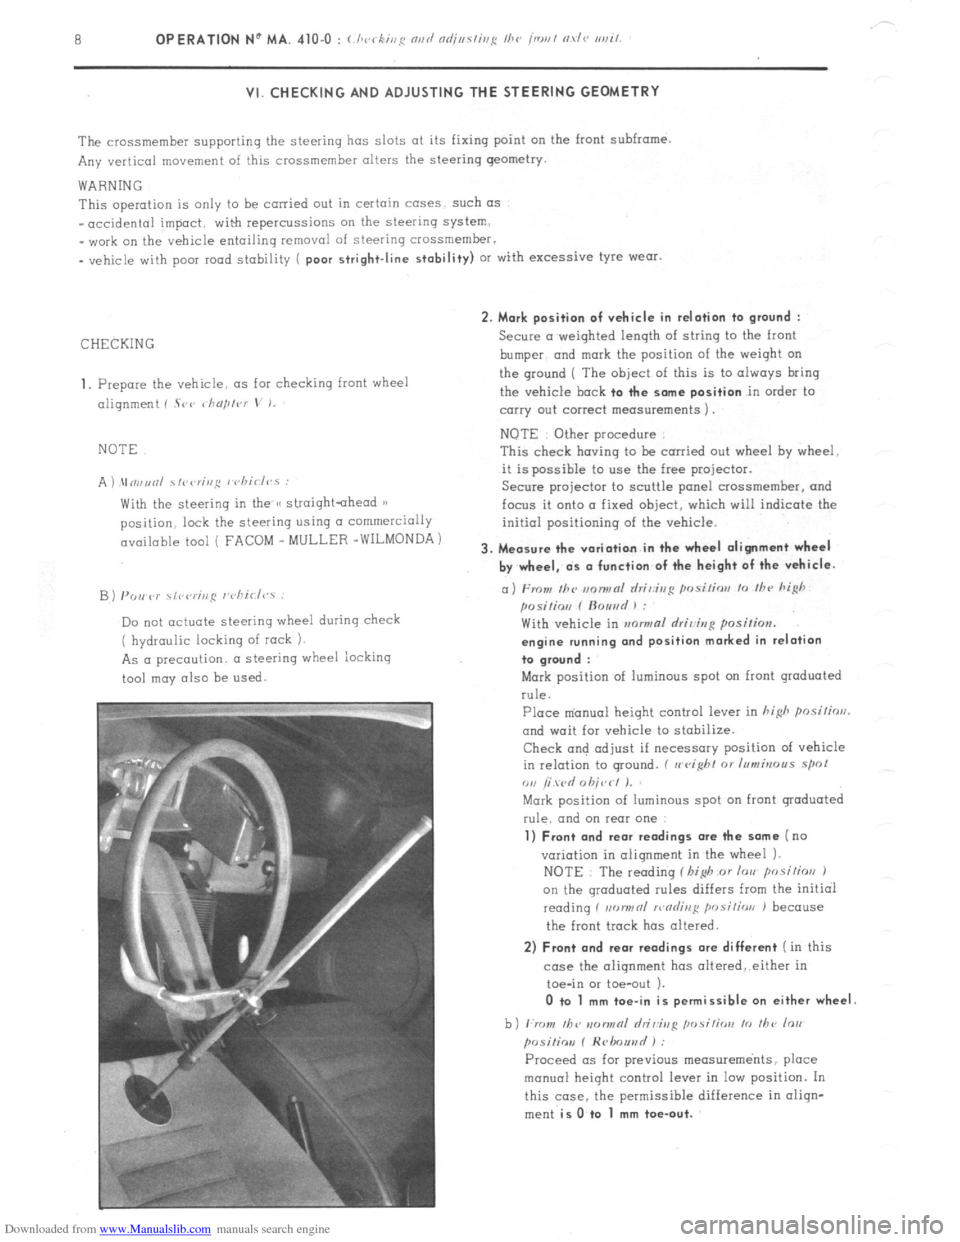
1, Prepare the vehicle. as for checking front wheel
alignment ( Srr ~ho/,lvr
V I.
NOTE
A ) \In,,unl ~fi~<,r;,,~ I chiclvs :
With the steering in the /< straightahead 1)
position. lock the steering using CI commercially
available tool ( FACOM _ MULLER -WILMONDA)
B) PO,, P)’ \,r,rr;ng r’cliirl<,.s :
Do not actuate steering wheel during check
( hydraulic locking of rock 1.
As a precaution. a steering wheel iocking
tool may also be
used. 2. Mark position of vehicle in relation to
ground :
Secure a weighted length of string to the front
bumper. and
mark the position of the weiqht on
the ground ( The
object of this is to always bring
the vehicle
bock to the some position in order to
carry out correct measurements 1.
NOTE Other procedure
This check having to be carried out wheel hy wheel.
it is possible to use the free projector.
Secure projector to scuttle panel crossmemher, and
focus it onto a fixed object, which will indicate the
initial positioning of the vehicle.
3. Measure the variation in the wheel alignment wheel
by wheel, ds o function of the height of the vehicle.
a) From Ihc m~nwnl rlri,:ir,g posi/ior, lo /hc hi@
posilio,, f ftouad 1 :
With vehicle in mwmal rlriving position.
engine running ond position marked in relation
to groond :
Mark position of luminous spot on front graduated
rule.
Place m’anual height control lever in hi&
posilirrrl.
and wait for vehicle to stabilize.
Check and adjust if necessary position of vehicle
in relation to ground. ( II
eight 01 Inmbrous spol
ou /i wd 0 hit,< I J.
Mark position of luminous spot on front graduated
rule. and on rear one
1) Front and rear readings ore the some (no
variation in alignment in the wheel 1.
NOTE : The reading f I,i$ or lorr posilios J
on the qroduated rules differs from the initial
reading f non,,nl >r,nrlinl:
position J because
the front track has altered.
2) Front and rear readings ore different ( in this
case the alignment has oltered,.either in
toe-in or toe-out ).
0 to 1 mm toe-in is permissible on either wheel
b) ,:rr ,,I, /bv IIDIINRI hi&g ,,osi,;orr lo ,I,<, lo,,
posiliov f Hrlmuad ) :
Proceed OS for previous measurements, place
manual height control lever in low position. In
this case. the permissible difference in oliqn-
ment
is O.to 1 mm toe-out.
Page 265 of 394
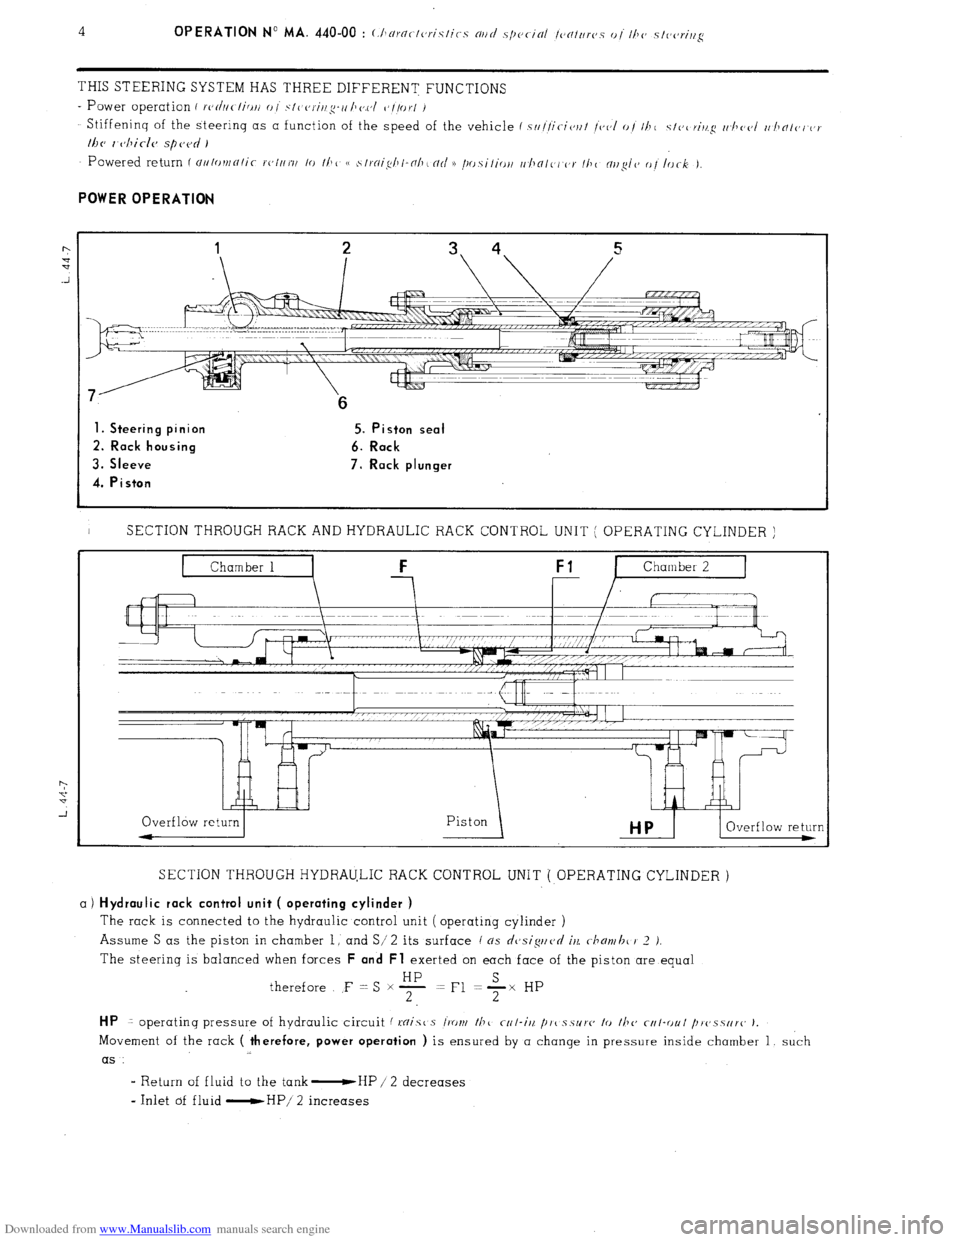
Downloaded from www.Manualslib.com manuals search engine THIS STEERING SYSTEM HAS THREE DIFFERENT FUNCTIONS
- Power operation i rc,d/ic-/ici// 0 I .~/I c,r-i/lg-o /Io.c,/ c’//or/ /
Stiffeninq of the steerinq as a function of the speed of the vehicle f s////it-ic,r/t /<,(,I o/ 11~1 c/c,c~ri/t.cq r/~llc(,I I//JNI(,I or
lhc, 1 cjhicle spc,c~d )
1. Steering pinion 5. Piston seal
2. Rack housing 6. Rack
3. Sleeve 7. Rack plunger
4. Piston
I SECTION THROUGH RACK AND HYDRAULIC RACK CONTROL UNIT ( OPERATING CYLINDER )
SECTION THROUGH HYDRAULIC RACK CONTROL UNIT ( OPERATING CYLINDER )
a) Hydraulic rack control unit ( operating cylinder )
The rack is connected to the hydraulic control unit ( operating cylinder )
Assume S as the piston in chamber 1, and S/ 2
its surface ( ns dcjsiguvd iu c-hmvhc 1’ 2 J.
The steering is balanced when forces F and Fl exerted on each face of the piston are equal
therefore F = S x F =Fl +x HP
HP 1 operatinq pressure of hydraulic circuit f mist s l‘ront /hc r-r/-iit /I,,( s.5~1’~~ lo fhc cf4I-r)ul /~r~~.~.s~ir~~ J.
Movement of the rack ( therefore, power operation ) is ensured by a change in pressure inside chamber 1, such
as
I Return of fluid to the tank -HP / 2 decreases
- Inlet of fluid -HP/ 2 increases
Page 273 of 394
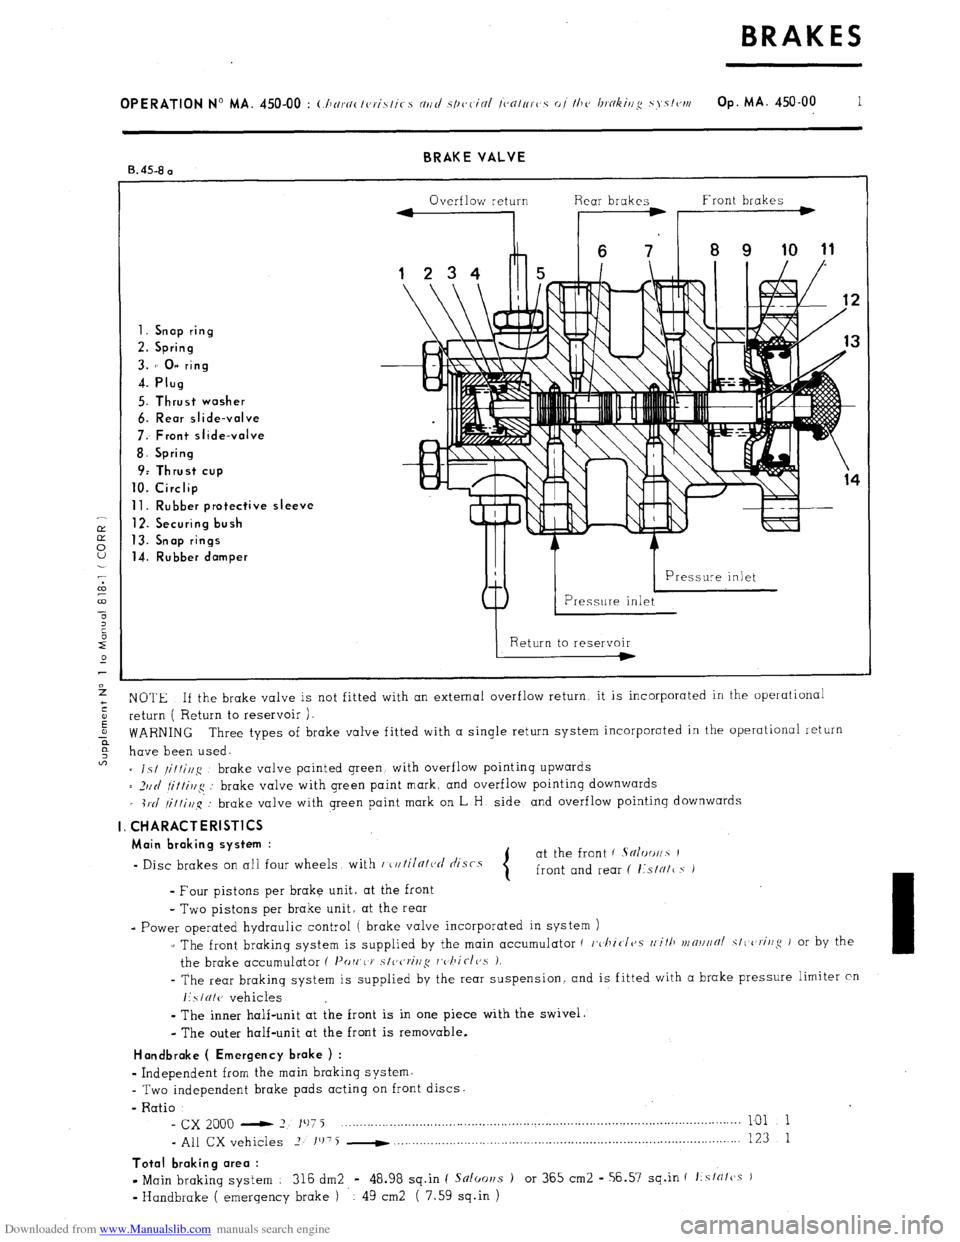
Downloaded from www.Manualslib.com manuals search engine BRAKE VALVE
B. 45-8 a
Overflow return Rear brakes Front brakes
1. Snap ring
2. Spring
3. 1’ 0” ring
4. Plug
5. Thrust washer
6. Rear slide-valve
7: Front slide-valve
8. Spring
9: Thrust cup
10. Circlip
11. Rubber protective sleeve
12. Securing bush
13. Snap rings
14. Rubber damper
NOTE If the brake valve is not fitted with an external overflow return, it is incorporated in the operational
return ( Return to reservoir ).
WARNING Three types of brake valve fitted with a single return system incorporated in the operational return
have been used.
= is/
/it/i//g brake valve painted green with overflow pointing upwards
= _)IIII
fi/tirlg : brake valve with green paint mark, and overflow pointing downwards
_ i1.d
/it/i,l~q’: brake valve with green paint mark on L H side and overflow pointing downwards
I. CHARACTERlSTlCS
Main braking system :
- Disc brakes on all four wheels with r~u/iln/ct/ tlisrs at the front ( Sn/oo//~ I
front and rear ( I:sIN/~ s i
- Four pistons per brake unit. at the front
- Two pistons per brake unit, at the rear
- Power operated hydraulic control ( brake valve incorporated in system )
z The front braking system is supplied by the main accumulator ( c,~l~icI~~.s
rli/ll vrn~l//~/ SIC criug J or by the
the brake accumulator ( I’orr,< J’
s/ccrivg rc,/~iclc,s 1.
- The rear braking system is supplied by the rear suspension. and is fitted with a brake pressure limiter cn
I:SIUI(J vehicles
-
The inner half-unit at the front is in one piece with the swivel.
- The outer half-unit at the front is removable.
Handbroke ( Emergency brake ) :
w
Independent from the main braking system.
- Two independent brake pads acting on front discs.
- Ratio
- cx 2000 - 2 197 j ___._....._..._..._.........,............................................................................... 101 1
- All CX vehicles 2 1’j75 -
. . . . . . 123 1
Total braking area :
- Main braking system : 316 dm2 - 48.98 sq.in ( Snloor~s ) or 365 cm2 - 56.57 sq.in f f:sfrffcss )
v
Handbrake ( emergency brake ) 49 cm2 ( 7.59 sq.in )