height Citroen CX 1974 1.G User Guide
[x] Cancel search | Manufacturer: CITROEN, Model Year: 1974, Model line: CX, Model: Citroen CX 1974 1.GPages: 394
Page 227 of 394
Downloaded from www.Manualslib.com manuals search engine OPERATION No MA. 390-O : ChrckinR thr bydraalir co’mponcnts on the u&i& f Manual stcprine r~ebidos t Op. MA. 390.0 1
CHECKING’THE HYDRAULIC COMPONENTS
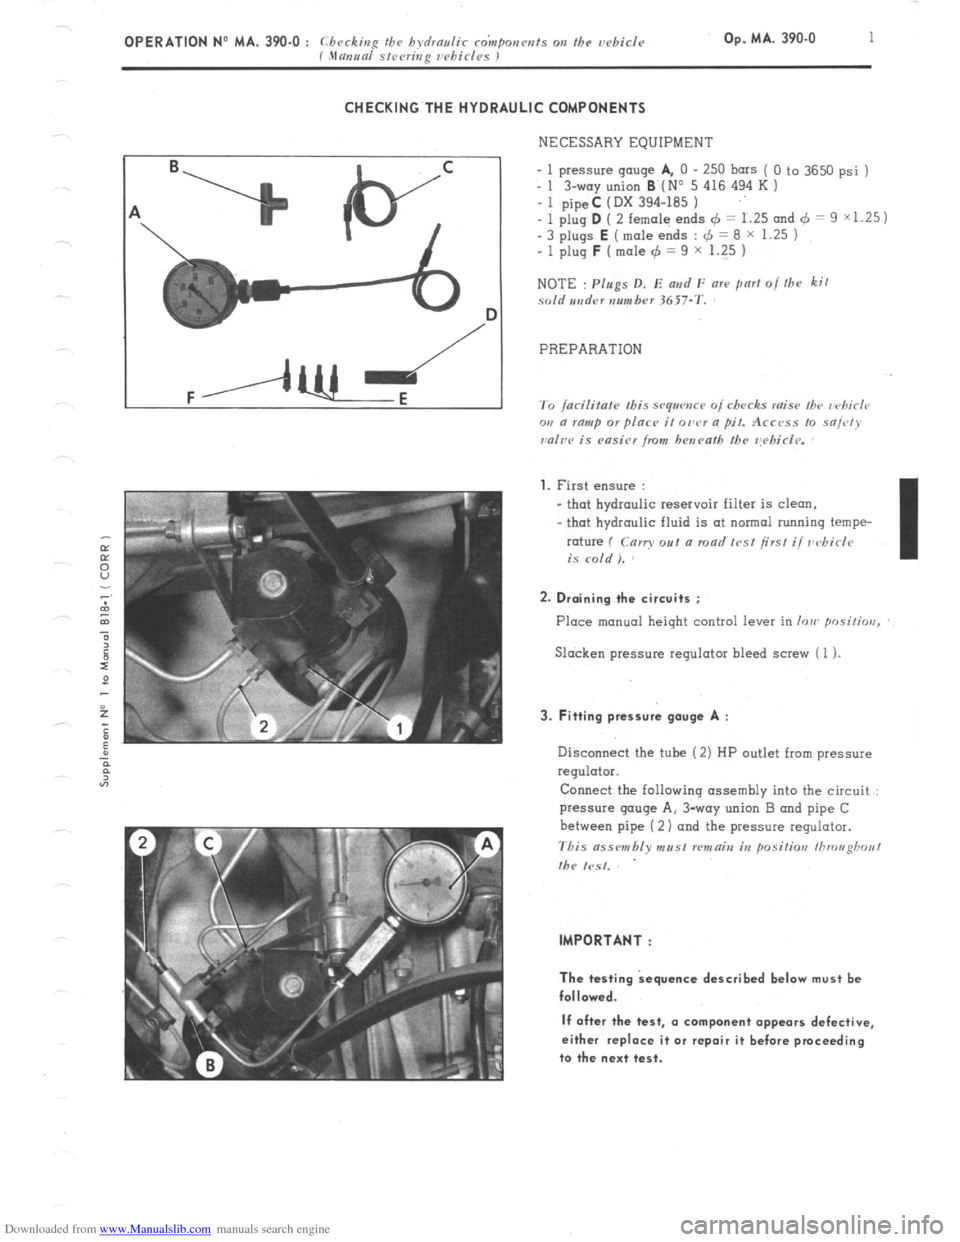
NECESSARY EQUIPMENT
- 1 pressure gauge A,
0 - 250 bars ( 0 to 3650 psi )
_ 1 3-way union B (No 5 416 494 K 1
- 1 pipeC (DX 394-185 ) ..
- 1 plug D ( 2 female ends 4 1.25 and 6 9 X1.25) = =
- 3 plugs E (mole ends : r$ 8 X 1.25 ) =
- 1 plug F (
mole 4 = 9 x 1.25 1
NOTE
: Plugs D, E md F are part 01 fhe kit
sold snder number 3657-T.
PREPARATION 1.
First ensure :
- that hydraulic reservoir filter is clean.
- that hydraulic fluid is ot normal running tempe-
rature ( Carry 0~1 a road lent first i/ vt4icie
is
mid ). 8 2. Draining the circuits :
Place manual height control lever in ion, posirios,
Slacken pressure regulator bleed screw ( 1 ). 3. Fitting pressure gouge A :
Disconnect the tube (2) HP outlet from pressure
regulator.
Connect the following assembly into the circuit :
pressure gaoge A, 3way union B and pipe C
between pipe ( 2) and the pressure regulator.
This ass~nzhly mrtst remain in positioa /brougbo~~l
the test. IMPORTANT :
The testing kquance described below must be
followed.
If after the test, a component appears defective,
either replace it or repair it before proceeding
to the next test.
Page 230 of 394
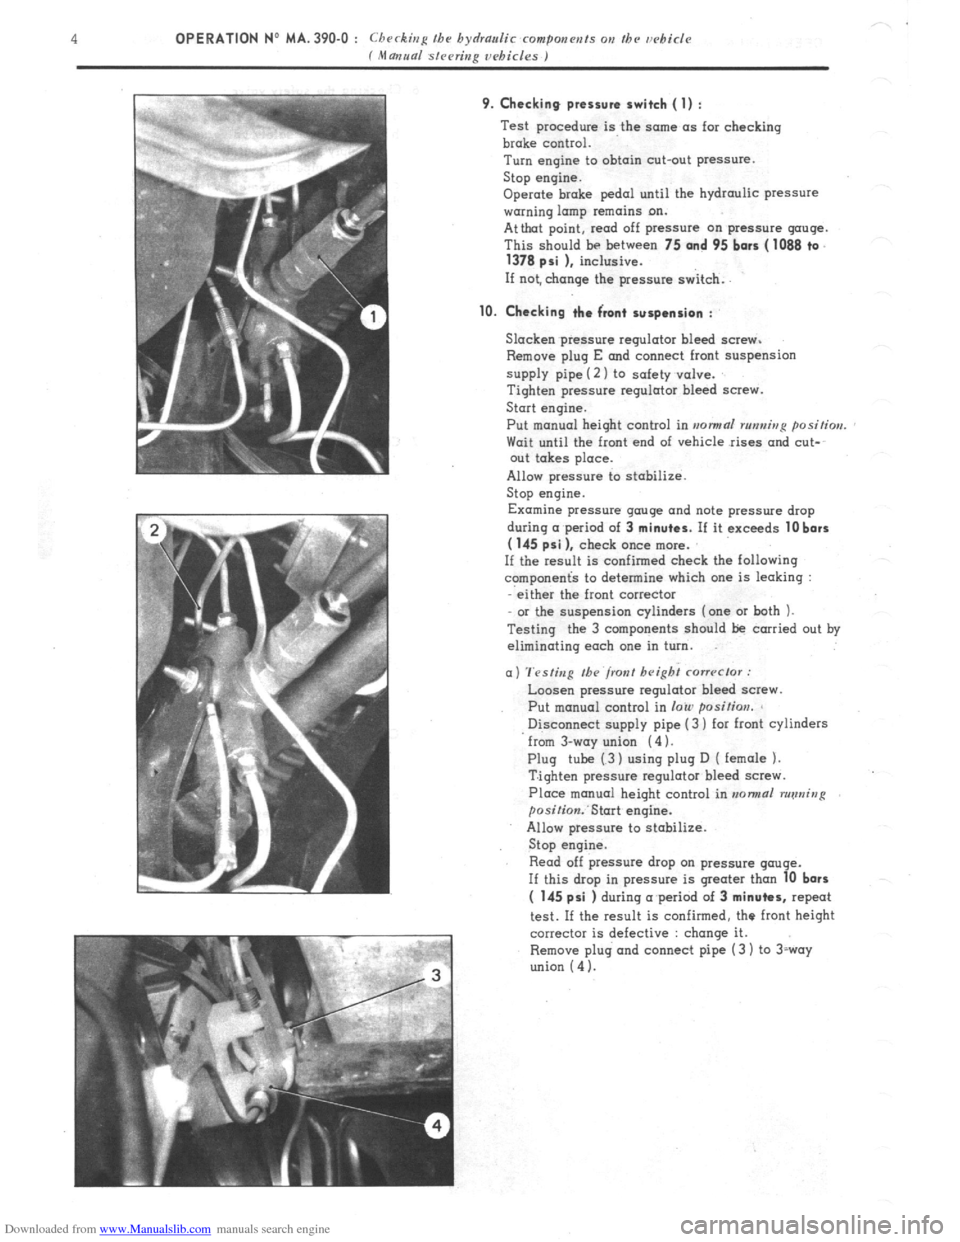
Downloaded from www.Manualslib.com manuals search engine 9. Checking pressure switch (1) : Test procedure is the sctme as for checking
broke control.
Turn engine to obtain cut-out pressure.
Stop engine.
Operate brake pedal until the hydraulic pressure
warning lamp remains on.
Attbat point, read off pressure on pressure gauge.
This should be between 75
and 95 bars ( 1088 ta.
1378 psi 1, inclusive.
If not, change the pressure switch.
10. Checking the Front suspension : Slacken.pressure regulator bleed screw.
Remove plug E and connect front suspension
supply pipe (2 ) to safety valve.
Tighten pressure regulator bleed screw.
Start engine.
Put manual height control in
rronnaf rtmni>rp positim. Wait until the front end of vehicle rises and cut-
out takes place.
Allow pressure to stabilize.
Stop engine.
Examine pressure gauge and note pressure drop
during wperiod of 3
minutes. If it exceeds 10 bars
( 145 psi 1, check once more.
If the result is confirmed check the following
c?mponenG to determine which one is leaking :
either the front corrector
or the suspension cylinders (one or both ).
Testing the 3 components should be carried out by
eliminating each one in turn.
(I) Testing the front height cmwclor : Loosen pressure regulator bleed saew.
Put manual control in
loin position. Disconnect supply pipe (3 ) for front cylinders
from 3-way union (4 ).
Plug tube (3 ) using plug D ( female 1.
Tighten pressure regulator bleed scwe.
Place manual height control in normal running
posiGon:Start engine.
Allow pressure to stabilize.
Stop engine.
Read off pressure drop on pressure qtruqe.
If this drop in pressure is greater than
10 bars (
145 psi ) during a period of 3 minutes, repeat
test. If the result is confirmed, the front height
corrector is defective : change it.
Remove plug and connect pipe (3 ) to 3roy
union
(4 ).
Page 231 of 394
Downloaded from www.Manualslib.com manuals search engine Slacken pressure regulator bleed screw.
Put manual height control in /VII. position
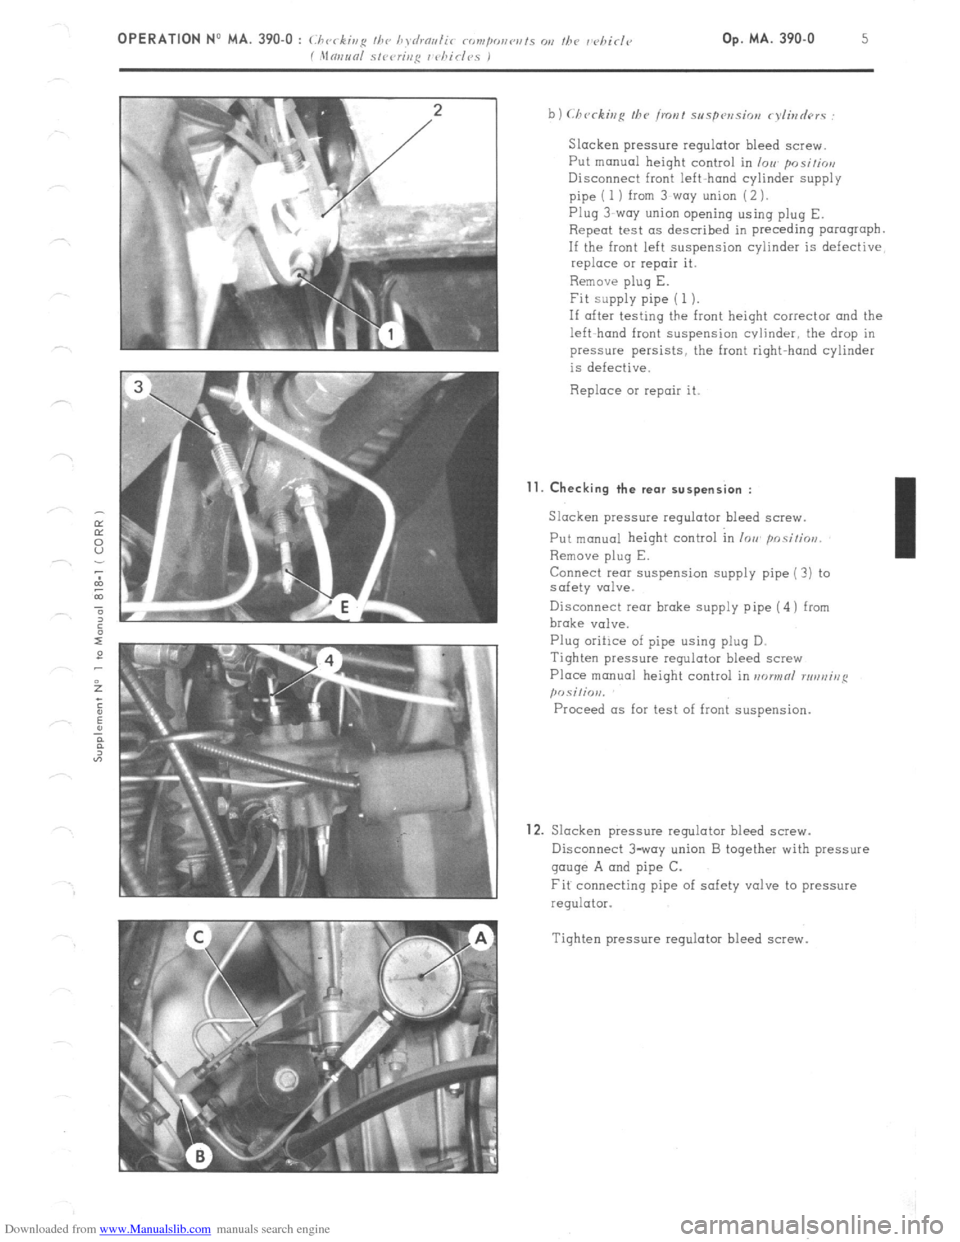
Disconnect front left-hand cylinder supply
pipe ( 1 ) from 3~woy union (2 ).
Plug 3-way union opening using plug E.
Repeat test as described in preceding parograpb.
If the front left suspension cylinder is defective
replace 01 repair it.
Remove plug E.
Fit supply pipe ( 1 ).
If after testing the front height corrector and the
left-hand front suspension cvlinder, the drop in
pressure persists, the front right-hand cylinder
is defective.
Replace or repair it. Il.
Checking the rear suspension :
Slacken pressure regulator bleed screw.
Put manual height control in IOU pnsi!ios,
Remove plug E.
Connect rear suspension supply pipe (?) to
safety valve.
Disconnect rear brake supply pipe (4) from
brake valve.
Plug oriilce of pipe using plug D.
Tighten pressure regulator bleed screw
Place manual height control in aorwnl rrruniug
posilio,,.
Proceed as for test of front suspension.
12. Slacken pressure regulator bleed screw.
Disconnect 3-way union B together with pressure
gauge A and pipe C.
Fit connecting pipe of safety valve to pressure
regulator.
Tighten pressure regulator bleed screw.
Page 232 of 394
Downloaded from www.Manualslib.com manuals search engine FRONT AXLE
OPERATION No MA. 410-00 : Charnctvristics arid S(ICJCI’O~ /‘rattrres o,i the front as/e unit Op. MA. 410-00 1
t
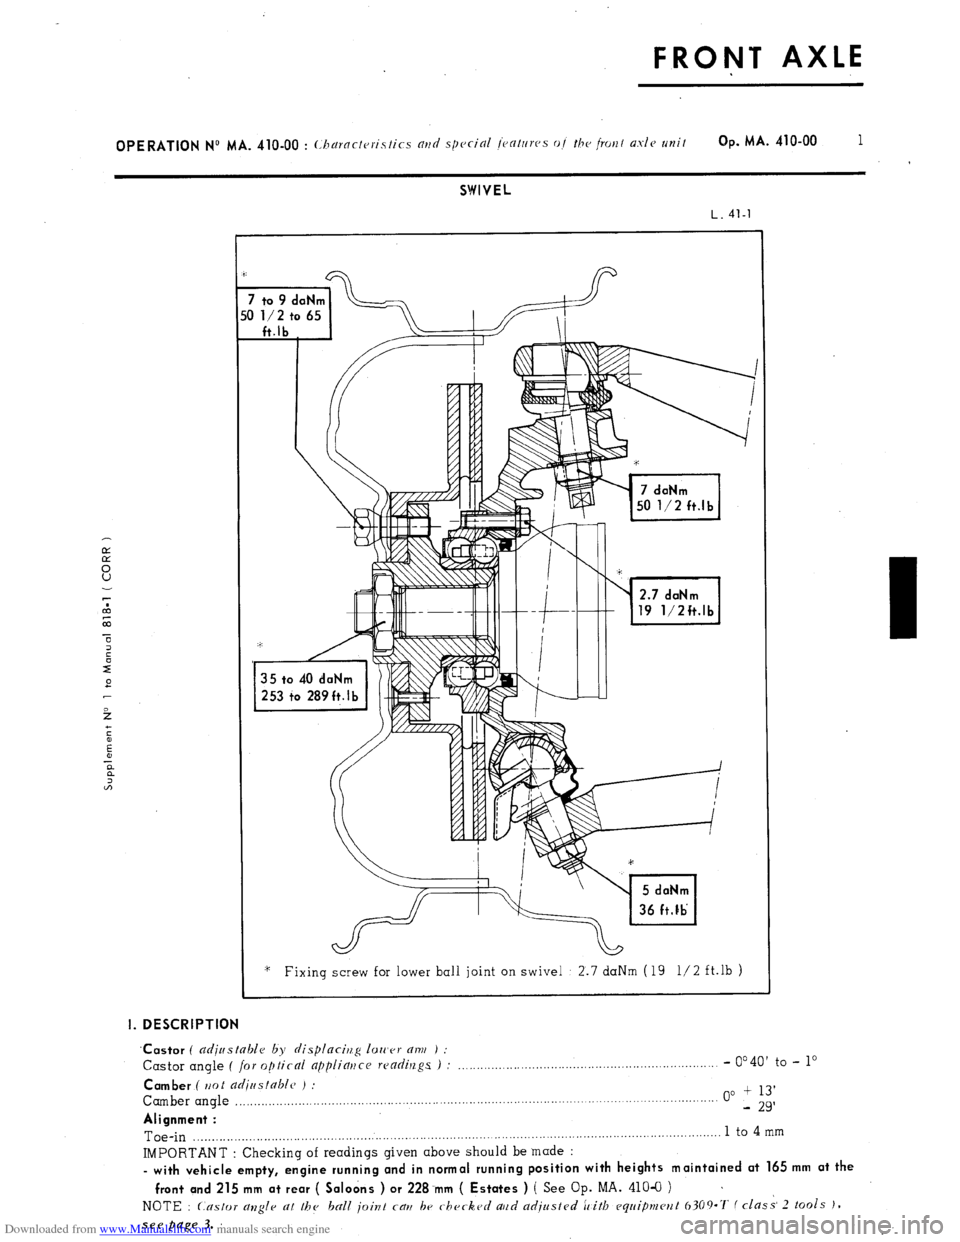
SWIVEL
L. 41-l
2.7 daNm
19 1/2ft.lb
‘* Fixing screw for lower ball joint on swivel 2.7 daNm (19 l/2 ft.lb )
I. DESCRIPTION
‘Castor
( adjustable by displacirlg 1011’er am ) :
Castor angle ( for optical appliatjce readings ) : _.,,....._..._,......,,,,,,.......,.,........,,,.,......,,............ - 0’40’
to - lo
Camber ( ttot adiastable ) :
Camber angle ,,.,,,.,,,..._,,,__.....,...,,.........,,.,.......................................................................... . . . . . 00 + 13’
- 29’
Alignment :
Toe-in ,.........._.__...,.,..,.,,.,,,,,.........,,,,.,......................,....................................................................... 1 to 4
mm
IMPORTANT : Checking of readings given above should be made :
- with vehicle empty, engine running and in normal running position with heights maintained at 165 mm at the
front and 215 mm at rear ( Saloons ) or 228.mm ( Estates ) ( See
Op. MA. 410-O ) ~
NOTE : Castor allgle at the ball joint cau be checked aud adjusted ic’itb equipmcwt 6309.7‘ f class- 2 tools J,
see page 3.
Page 236 of 394
Downloaded from www.Manualslib.com manuals search engine OPERATION No MA. 410-O : ( /,c
1
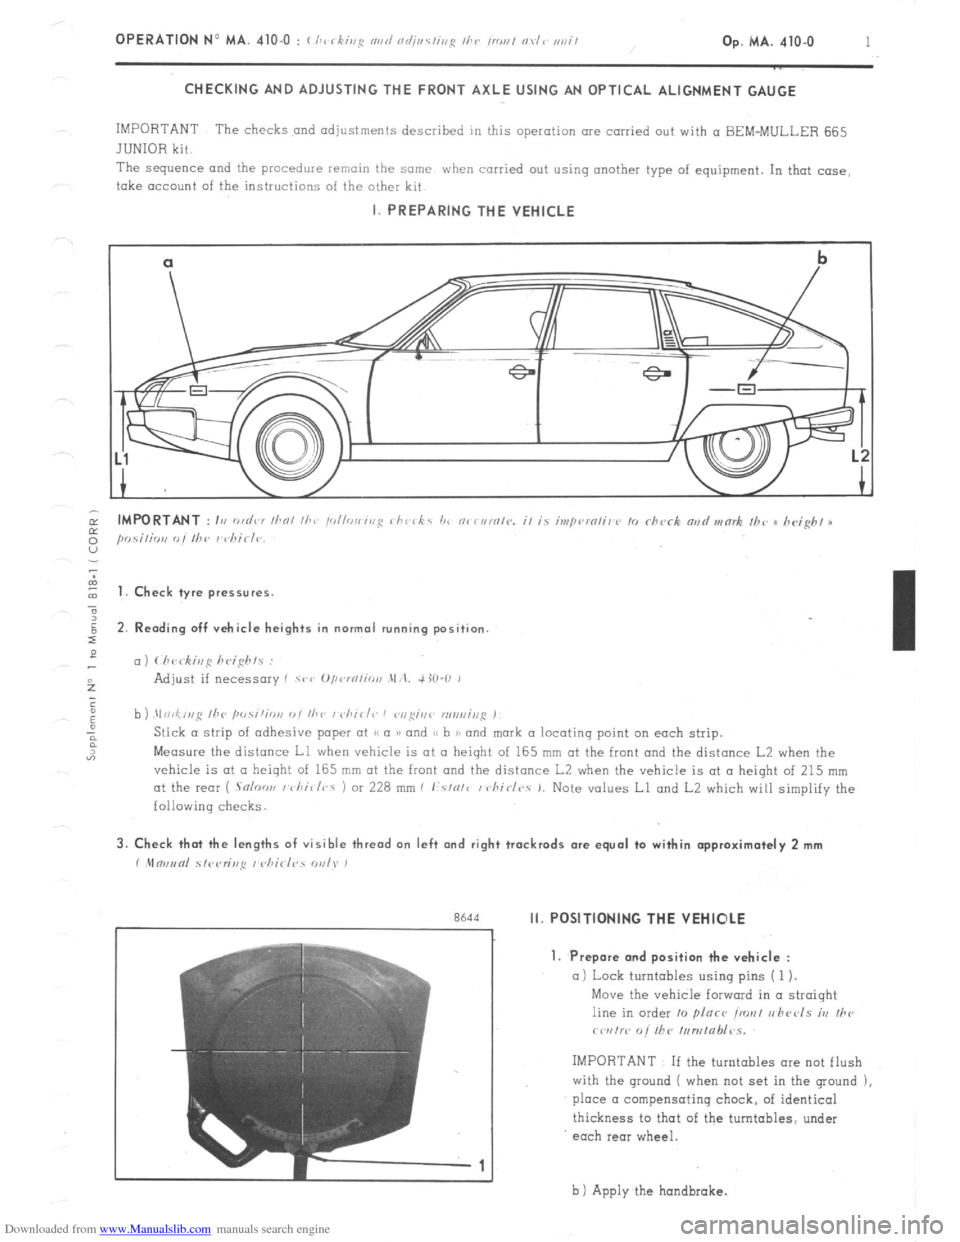
CHECKING AND ADJUSTING THE FRONT AXLE USING AN OPTICAL ALIGNMENT GAUGE
IMPORTANT The checks and adjustments described in this operation are carried out with a BEM-MULLER 665
JUNIOR kit
The sequence and
the procedure remain the same when carried out using another type of equipment. In that case,
take account of the instructions of the other kit I. PREPARING THE VEHICLE
cl
b
-.
I t 1. Check tyre pressures.
2. Rending off vehicle heights in normal running position
c,)
b ) .\I ri,f,,,g /he ,w.s;‘;o,,
Measure the distance Ll when vehicle is at II height of 165 mm at the front and the distance L2 when the
vehicle is at CL height of 165 mm at the front and the distance L2 when the vehicle is at a height of 215 mm
at the rear ( .Snloo,, I vhi~/r,s 1 or 228 mm I I:.s/o/c / chirlr,. 1. Note values Ll and L2 which will simplify the
following checks. 3. Check that the lengths of visible thread on left and right trackrods are equal to within approximately 2 mm
r .Mm,,tnl 51<,<,r;r,,q I <,hirl?s WI). )
r
Rh‘td Ii. POSITIONING THE VEHIOLE
7
-1 1. Prepare and position the vehicle :
a) Lock turntables using pins ( 1 ).
Move the vehicle forward in a straight
line in order 10 plnce ironl r,hccls iv
Ihe
rwrtw o/’ fhC /,,n,tab/~s.
IMPORTANT If the turntables ore not flush
with the ground ( when not set in the ground ),
place a compensating chock, of identical
thickness to that of the turntables, under
each rear wheel.
b 1 Apply the hondbrake.
Page 239 of 394
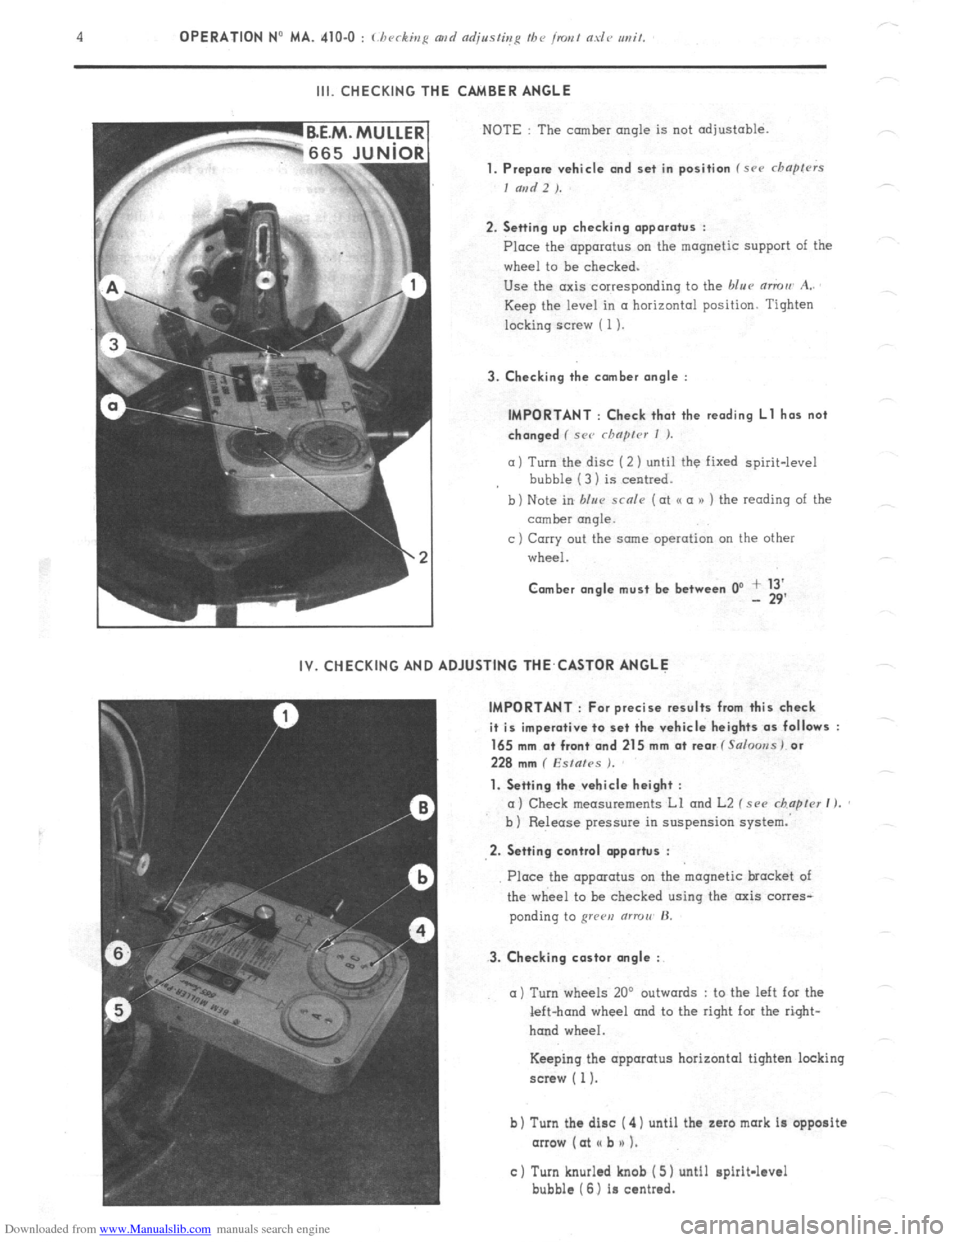
Downloaded from www.Manualslib.com manuals search engine III. CHECKING THE CAMBER ANGLE
NOTE : The camber angle is not adjustable.
1. Prepare vehicle and set in position f src chapfrrs
I and 2 ).
2. Setting up checking apparatus :
Place the apparatus on the magnetic support of the
wheel to be checked.
Use the axis corresponding to the blue mmu A..
Keep the level in a horizontal position. Tighten
locking screw ( 1).
3. Checking the comber angle :
IMPORTANT : Check that the reading Ll has not
changed ( SC<’ rhnprcr I ).
a) Turn the disc (2 ) until the fixed spirit-level
bubble (3 1 is centred.
b) Note in blur scnle (at o a n ) the reading of the
comber rmqle.
c ) Carry out the same operation on the other
wheel.
Comber angle must be between 0’ + 13’ - 29’
IV. CHECKING AND ADJUSTING THE,CASTOR ANGLE
IMPORTANT : For precise results from this check
it is imperative to set the vehicle heights as follows :
165 mm a+ front and 215 mm at rear f Salooss) or
228 mm ( Esfafes ).
1. Setting the vehicle height :
a) Check measurements Ll and L2 f see chapter I ).
b ) Release pressure in suspension system.
2. Setting control opportus :
3. Checking castor angle :
Place the apparatus on the magnetic bracket of
the wheel to be checked using the axis corres-
ponding to grren (ITTOII’ H.
a) Turn wheels 20’ outwards : to the left for the
left-hand wheel and to the right for the right-
hand wheel.
Keeping the apparatus horizontal tighten locking
screw ( 1).
b) Turn the disc ( 4) until the zaro mark is opposite
arrow (at I( b n 1.
c) Turn knurled knob ( 5) until spirit-level
bubble (6) is centred.
Page 243 of 394
Downloaded from www.Manualslib.com manuals search engine a OPERATION N’ MA. 410-O : (./~rrkiq N,,I/
VI. CHECKING AND ADJUSTING THE STEERING GEOMETRY
The crossmember supporting the steering has slots at its fixing point on the front subframe.
Any vertical movement of this crossmember alters the steering geometry.
WARNING
This operation is only to
be carried out in certain ccxses such as
-accidental impact, with repercussions on the steering system.
-work on the vehicle entoiling removal of steering crossmember.
- vehicle with poor
road stability ( p oar stright-line stability) 01 with excessive tyre weor.
CHECKING
1, Prepare the vehicle. as for checking front wheel
alignment ( Srr ~ho/,lvr
V I.
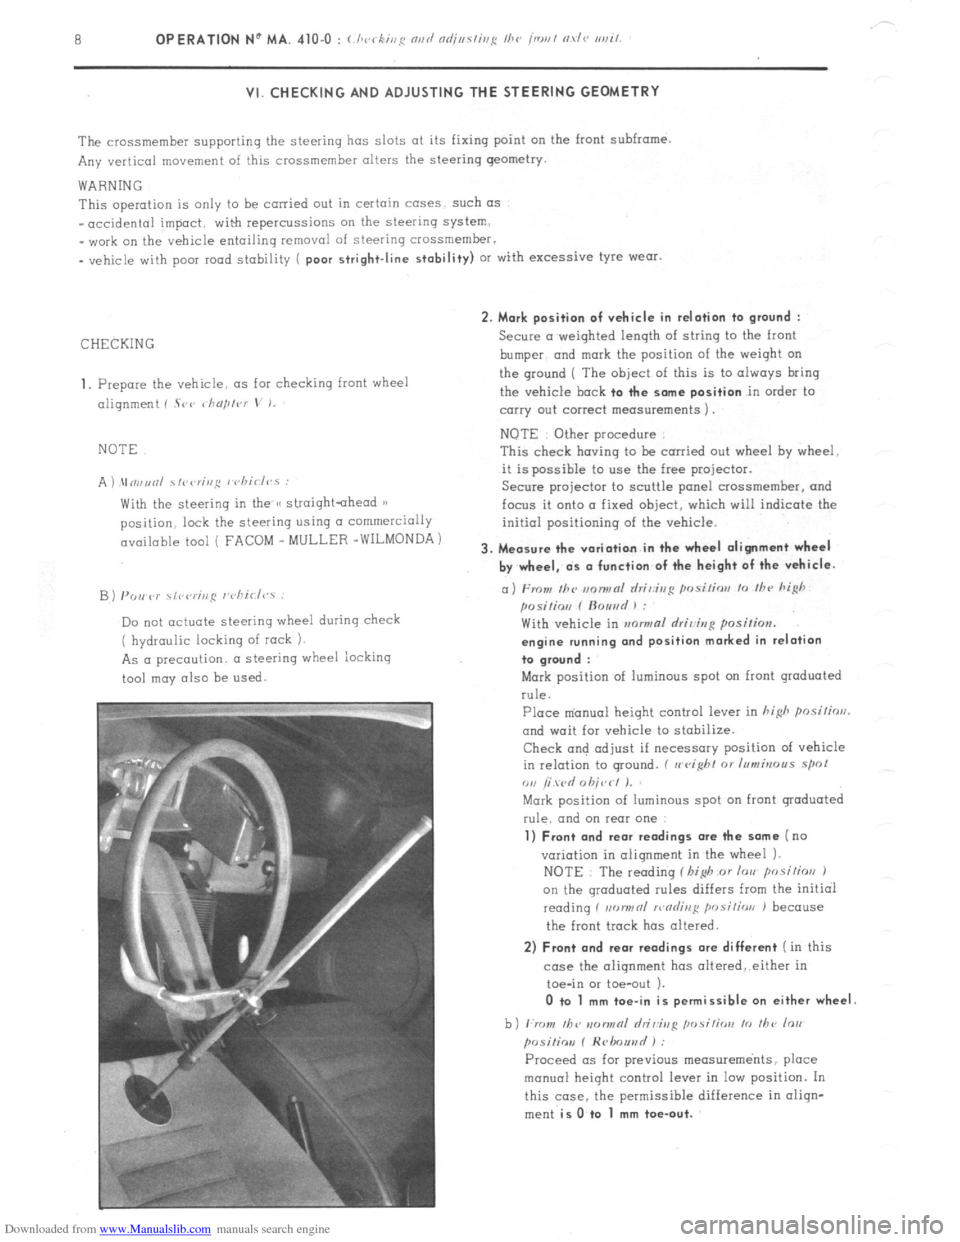
NOTE
A ) \In,,unl ~fi~<,r;,,~ I chiclvs :
With the steering in the /< straightahead 1)
position. lock the steering using CI commercially
available tool ( FACOM _ MULLER -WILMONDA)
B) PO,, P)’ \,r,rr;ng r’cliirl<,.s :
Do not actuate steering wheel during check
( hydraulic locking of rock 1.
As a precaution. a steering wheel iocking
tool may also be
used. 2. Mark position of vehicle in relation to
ground :
Secure a weighted length of string to the front
bumper. and
mark the position of the weiqht on
the ground ( The
object of this is to always bring
the vehicle
bock to the some position in order to
carry out correct measurements 1.
NOTE Other procedure
This check having to be carried out wheel hy wheel.
it is possible to use the free projector.
Secure projector to scuttle panel crossmemher, and
focus it onto a fixed object, which will indicate the
initial positioning of the vehicle.
3. Measure the variation in the wheel alignment wheel
by wheel, ds o function of the height of the vehicle.
a) From Ihc m~nwnl rlri,:ir,g posi/ior, lo /hc hi@
posilio,, f ftouad 1 :
With vehicle in mwmal rlriving position.
engine running ond position marked in relation
to groond :
Mark position of luminous spot on front graduated
rule.
Place m’anual height control lever in hi&
posilirrrl.
and wait for vehicle to stabilize.
Check and adjust if necessary position of vehicle
in relation to ground. ( II
eight 01 Inmbrous spol
ou /i wd 0 hit,< I J.
Mark position of luminous spot on front graduated
rule. and on rear one
1) Front and rear readings ore the some (no
variation in alignment in the wheel 1.
NOTE : The reading f I,i$ or lorr posilios J
on the qroduated rules differs from the initial
reading f non,,nl >r,nrlinl:
position J because
the front track has altered.
2) Front and rear readings ore different ( in this
case the alignment has oltered,.either in
toe-in or toe-out ).
0 to 1 mm toe-in is permissible on either wheel
b) ,:rr ,,I, /bv IIDIINRI hi&g ,,osi,;orr lo ,I,<, lo,,
posiliov f Hrlmuad ) :
Proceed OS for previous measurements, place
manual height control lever in low position. In
this case. the permissible difference in oliqn-
ment
is O.to 1 mm toe-out.
Page 246 of 394
Downloaded from www.Manualslib.com manuals search engine REAR AXLE
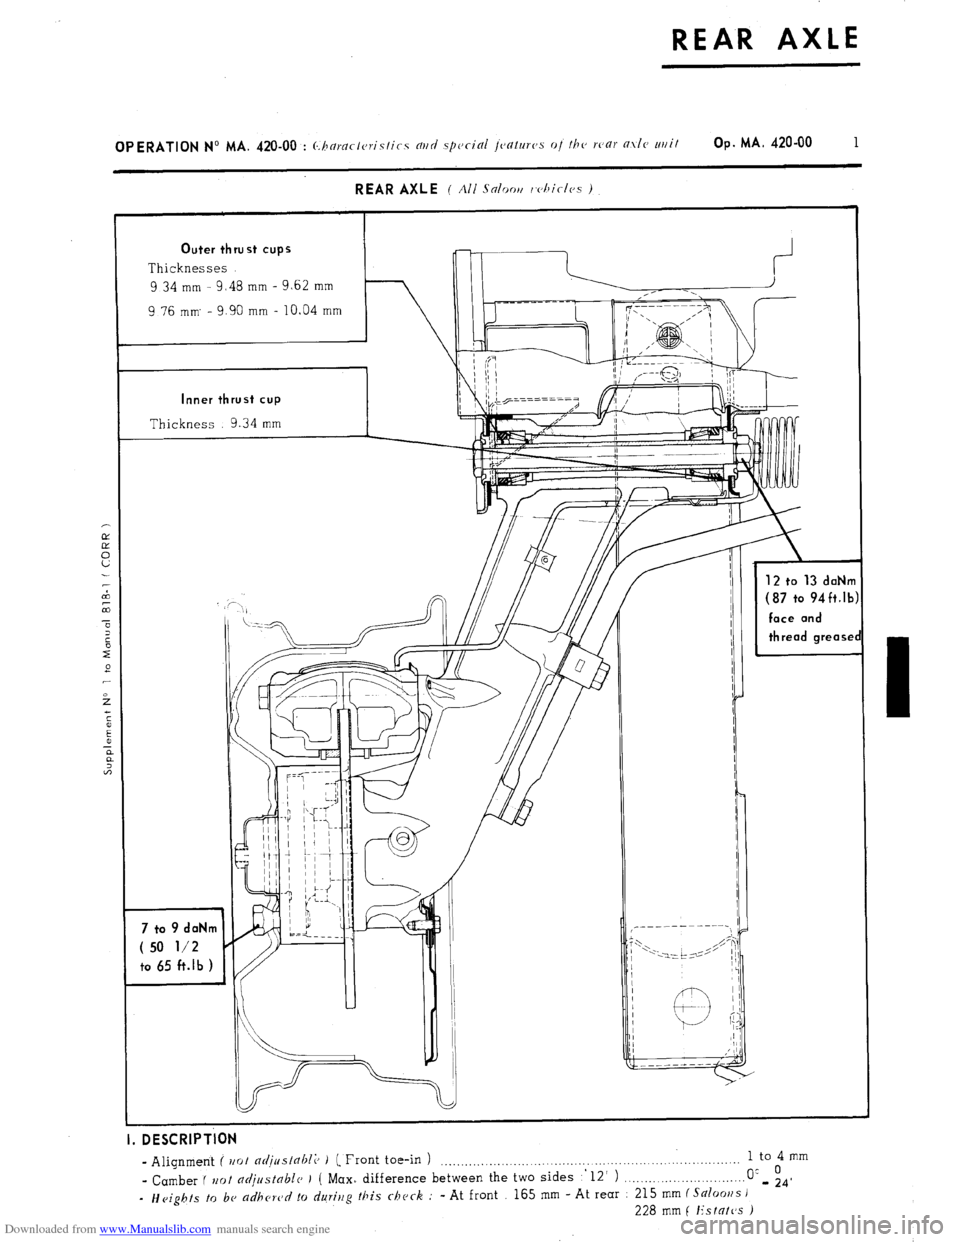
OPERATION No MA. &!O-OO : (.;haracteristics mtd special l~alur~s 01 rho war O.Y/C wit Op. MA. 420-00 1
I Outer thrust cups
Thicknesses 9 34
mm -
9.48 mm - 9.62 mm 9 76
mm’ -
9.90 mm - 10.04 mm 12 to 13 daNn
DESCRIPTION
-
Alignment ( trot nr/juslabl;J ) (. Front toe-in ) ._....,.,.,....,,._........._._._....._..._........ ..,............__._... 1 to 04 mm
- Camber I uot adjustable
J ( Max. difference between the two sides .’ 12’ ) ,,.__._..._...._,......._._... O”- 24,
- Heights to bc a&crc,d to durirrg this chvck : - At front 165 mm - At rear 215 mm I Saloons )
228
mm [ /?stntvs )
Page 250 of 394
Downloaded from www.Manualslib.com manuals search engine Op. MA. 420.0 1
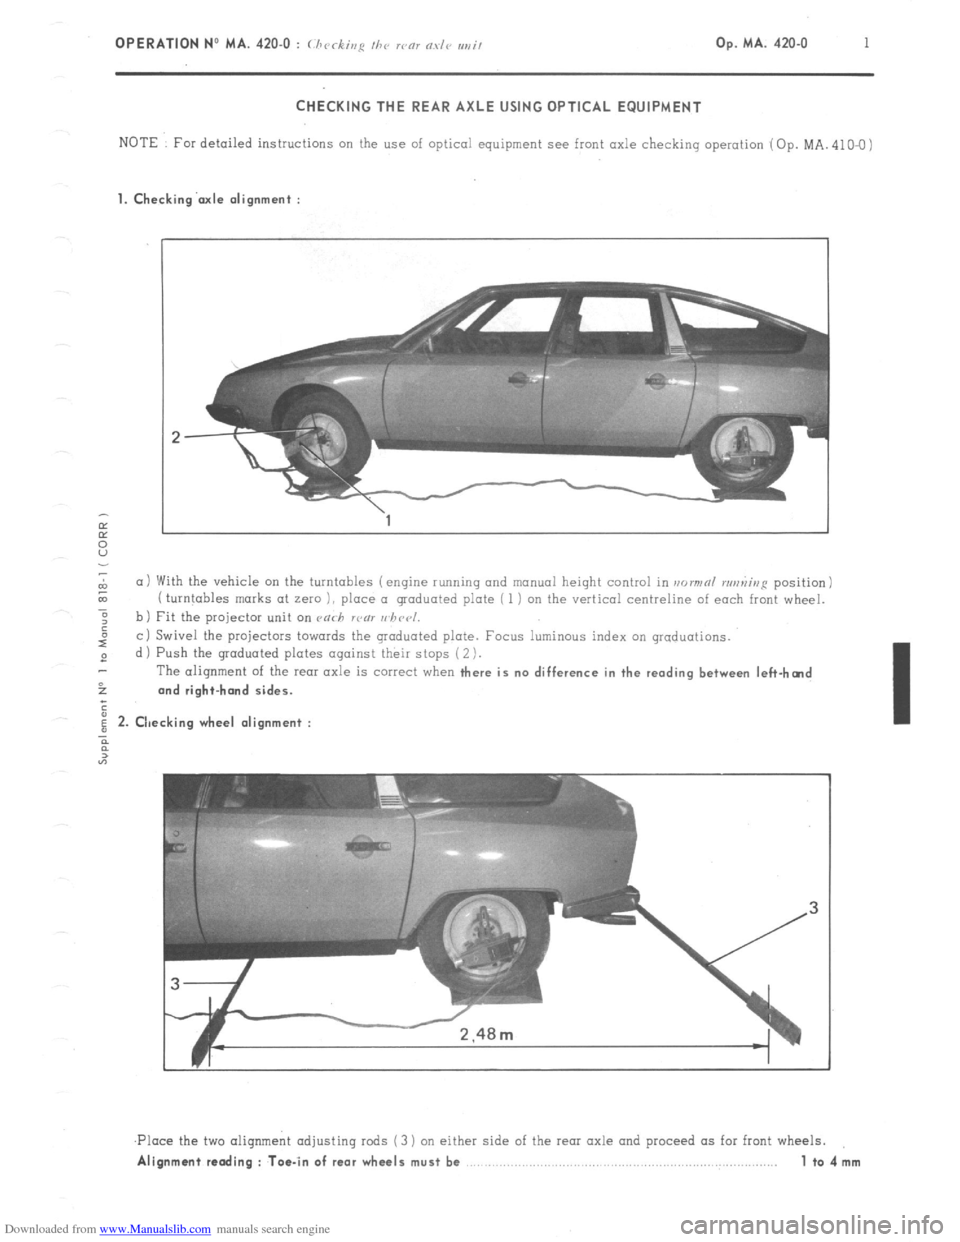
CHECKING THE REAR AXLE USING OPTICAL EQUIPMENT
NOTE For detailed instructions on the use of optical equipment see front axle checking operation (Op. MA. 410-O)
1. Checking’axle alignment :
L
(11 With the vehicle on the turntables (engine running and manual height control in normnl runniup position)
& ( turntables marks at zero 1, place a graduated plate ( 1 i on the vertical centreline of each front wheel.
-6
: b) Fit the projector unit on ca<-h rcnl uhccl.
I”
c i Swivel the projectors towards the graduated plate. Focus luminous index on graduations.
2 d ) Push the graduated plates against their stops ( 2 ).
The alignment of the
rear axle is correct when there is no difference in the reading between left-hcnd
52 and right-hand sides.
;
i 2. Checking wheel alignment :
n
2
“7
,Ploce the two aliqnmeht adjusting rods (3 ) on either side of the rear axle and proceed as for front wheels.
Alignment reading : Toe-in of rear wheels must be 1 to4mm
Page 253 of 394

Downloaded from www.Manualslib.com manuals search engine I. CHARACTERISTICS
..-.-..- --~~~
HEIGHT CORRECTOR
SUSPENSION CYLINDER ( All Saloon vehicles )
L.43-6
SUSPENSION CYLINDER ( Estate vehicles )
-- --.