check engine Citroen CX 1977 1.G Manual Online
[x] Cancel search | Manufacturer: CITROEN, Model Year: 1977, Model line: CX, Model: Citroen CX 1977 1.GPages: 394
Page 357 of 394
Downloaded from www.Manualslib.com manuals search engine OPERATION No MA. 530.0 : Chcrking the vlr,rtricol components Op. MA. 530.0 5
I ALL ENGINES
IV. ADJUSTING THE PINION ON A PARIS-RHONE
D 9 E 16 STARTER MOTOR.
i wirh s,orfw lcmo~ <‘d)
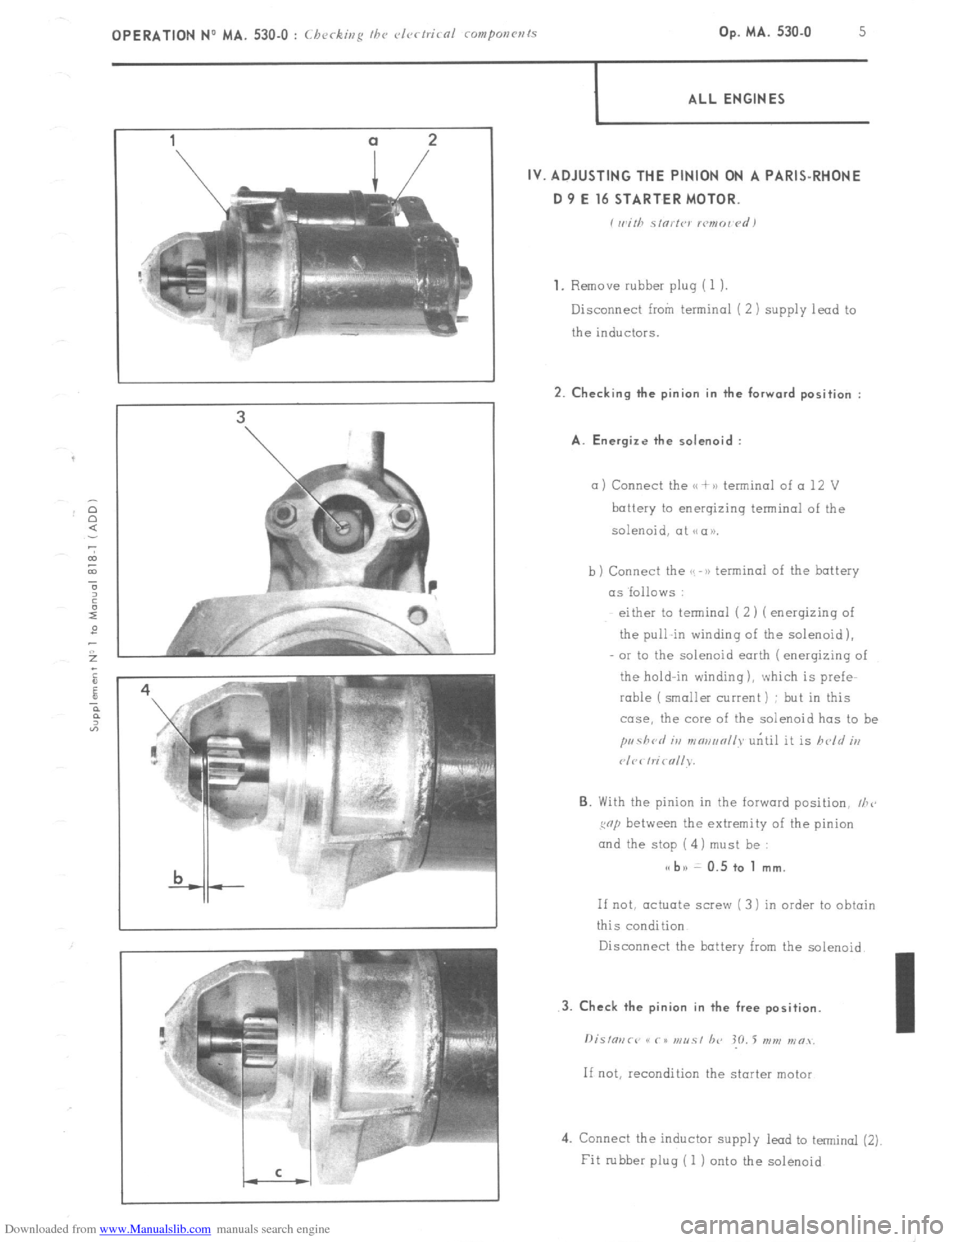
1.
Remove rubber pluq (1 1.
Disconnect from terminal ( 2 ) supply lead to
the inductors. 2. Checking the pinion in the forward position :
A. Energize the solenoid :
a ) Connect the u + >a terminal of a 12 V
battery to energizing terminal of the
solenoid, at NCIU.
b) Connect the GS -B) terminal of the battery
as ‘follows :
either to terminal (2) ( enerqizinq of
the pull-in winding of the solenoid),
OI to the solenoid earth ( enerqizing of
the hold-in winding ), which is prefe-
rable (smaller current) : but in this
case, the core of the solenoid has to be
pr~41crl iu mmanll~ uritil it is held iu
P/C< hi< nllv.
6. With the pinion in the forward position, I/Z<,
cop between the extremity of the pinion
and the stop ( 4) must be : s< bn 0.5 to 1 mm.
If not, actuate screw ( 3 1 in order to obtain
this condition
Disconnect the battery kxn the solenoid.
4. Connect the inductor supply lead to terminal (2)
Fit rubber plug ( 1 j onto the solenoid
Page 358 of 394
Downloaded from www.Manualslib.com manuals search engine OPERATION No MA. 540-O : (hcrking and diusfing the hradlmnps. Op. MA. 540.0 1 ADJUSTING THE HEADLAMPS USING A << REGLOSCOPE >> OR I< REGLOLUX n TYPE APPARATUS
I. CONDITIONS FOR ADJUSTMENT
With the vehicle empty and in running order :
a) Ensure that the tyre ore correctly inflated
and heights correctly adjusted.
Place vehicle on CI flat level surface.
Run the engine at idling speed and set manual.
height control to normal running position.
1 Place the instrument on the same level as that
of the vehicle and opposite the headlamp to be
adjusted. 2. ADJUSTMENT
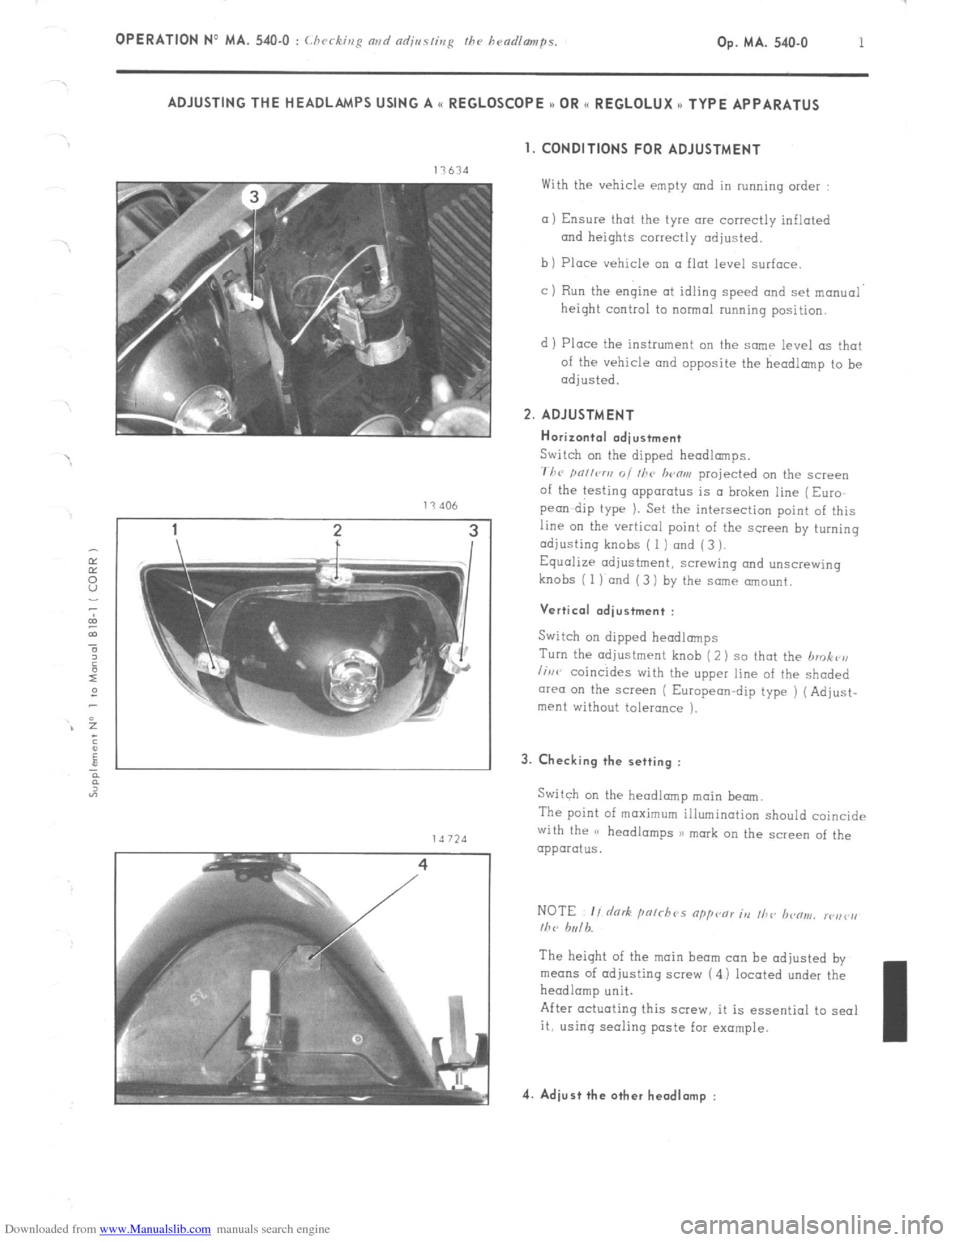
Horizontal adiustment
Switch on the dipped headlamps.
711~ pn,lcrv 01 111~ lwflrn projected on the screen
of the testing apparatus is a broken line (Euro
pea-dip type 1. Set the intersection point of this
line on the vertical point of the screen by turning
adjusting knobs ( 1 ) and (3 ).
Equalize adjustment, screwing and unscrewing
knobs (
1) and (3 1 by the same amount.
Vertical .dius+ment :
Switch on dipped headlamps
Turn the adjustment knob (2) so that the hrokr’n
lirw coincides with the upper line of the shaded
cwea on the screen ( European-dip type ) (Adjust-
ment without tolerance ). 3. Checking the setting :
Switch on the headlamp main beam.
The point of maximum illumination should coincide
with the (’ headlamps 3) mark on the screen of the
apparatus.
The height of the main beam can be adjusted by
means of adjusting screw (4 1 located under the
headlamp unit.
After actuating this screw, it is essential to seal
it, using seoling paste far example. 4. Adiust the other headlamp :
Page 359 of 394
Downloaded from www.Manualslib.com manuals search engine OPERATION No MA. 560.0 : ~hrrkin~ o,,d oc/@s/i,,g I/><, wiurisrrrr,, wip’r. Op. MA. 560.0
1
Fi
m
0 CHECKING AND ADJUSTING THE WINDSCREEN WIPER.
FRONT WINDSCREEN WIPER MOTOR
CHARACTERISTICS.
Manufacturer DUCELLIER
Reference No. 4966 A
Field coils Ferrite
Armature : Endfloot (adjustable by means of stop-screw) : 0.2 mm
Nominal dia. of commutator :
24 mm
Min. dia. after machining : 23 mm
Brushes : Ref. No. :
CL 7239
Minimum length after wear : 5.5 mm
Ratio : .._...................................................................................................
44 1
Connection and circuit diagram as in Op. MA. 510 00.
ELECTRICAL CHECK. BOSCH
0390 346 127
Ferrite
0
23.2 mm
23 mm
1.394.320-058 059, 062
7.5 mm
49 1
1. First speed :
Nominal power : IO watts
Speed, under no load, at 13.5 volts = 50 rpm Corresponding current = I.8 A
Torque, motor locked, at 13.5 volts = 1.9 da Nm 7 13.74 ft.lb min. Corresponding current 18 A max.
Torque at 40 rpm and 13.5 volts = 0.2 do Nm (1.45 ft.lb) Correspondinq current = 5.5 A max.
- Torque ot 20 rpm and 13.5 volts = 1.07 da Nm (7.74 ft.lb) min Corresponding current = 13.2 A max.
2. Second speed :
Nominal power : 15 watts
Speed under no load at 13.5 volts = 70 rpm Corresponding current = 2.3 A
Torque motor locked at 13.5 volts = 1.5 do Nm (IO.85 ft.lb) min Corresponding current = 21 A max
Torque at 60 rpm and 13.5 volts = 0.2 da Nm (1.45 ft.lb) min Corresponding current = 7 A max
Torque ot 30 rpm and 13.5 volts = 0.9 da Nm (6.51 ft.lb) min Corresponding current = 14.7 A mrx.
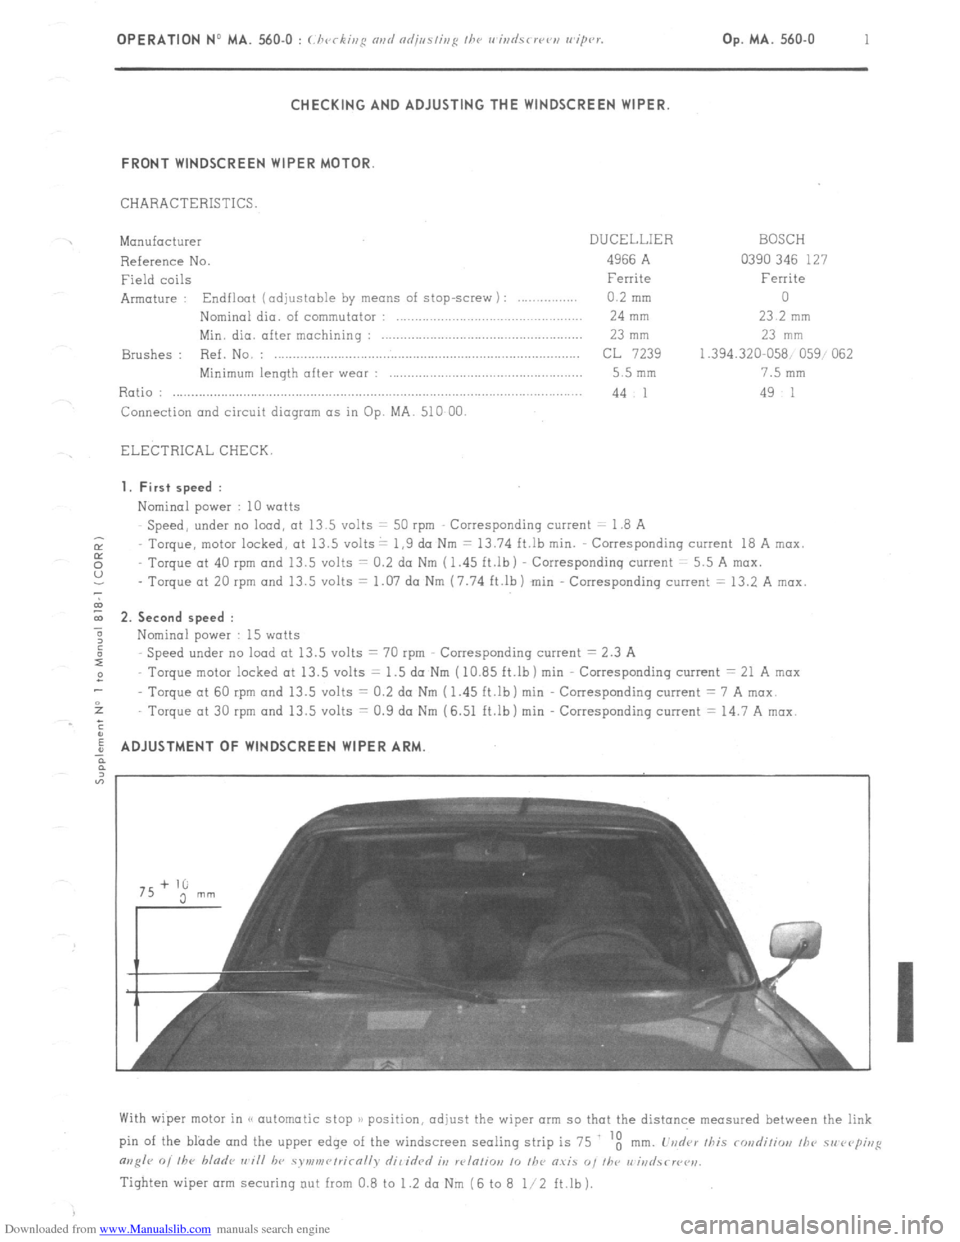
ADJUSTMENT OF WINDSCREEN WIPER ARM
With wiper motor in (< automatic stop )/ position, adjust the wiper arm so that the distance measured between the link
pin of the blade and the upper edge of the windscreen sealing strip is 75 ‘t
mm. L’vd‘ar /his rondiliw, /he 51, rvp;,,g
m,g/r 0, /he bladr ,,~i// hv symv,r~/rirn//v dil idrd it, w/n/io,, 10 /he O.YiS “, I/w r,‘iri
Tighten wiper arm securing out from 0.8 to 1.2 da Nm (6 to 8 l/2 ft.lb).
Page 362 of 394
Downloaded from www.Manualslib.com manuals search engine II. OPERATING PRINCIPLE
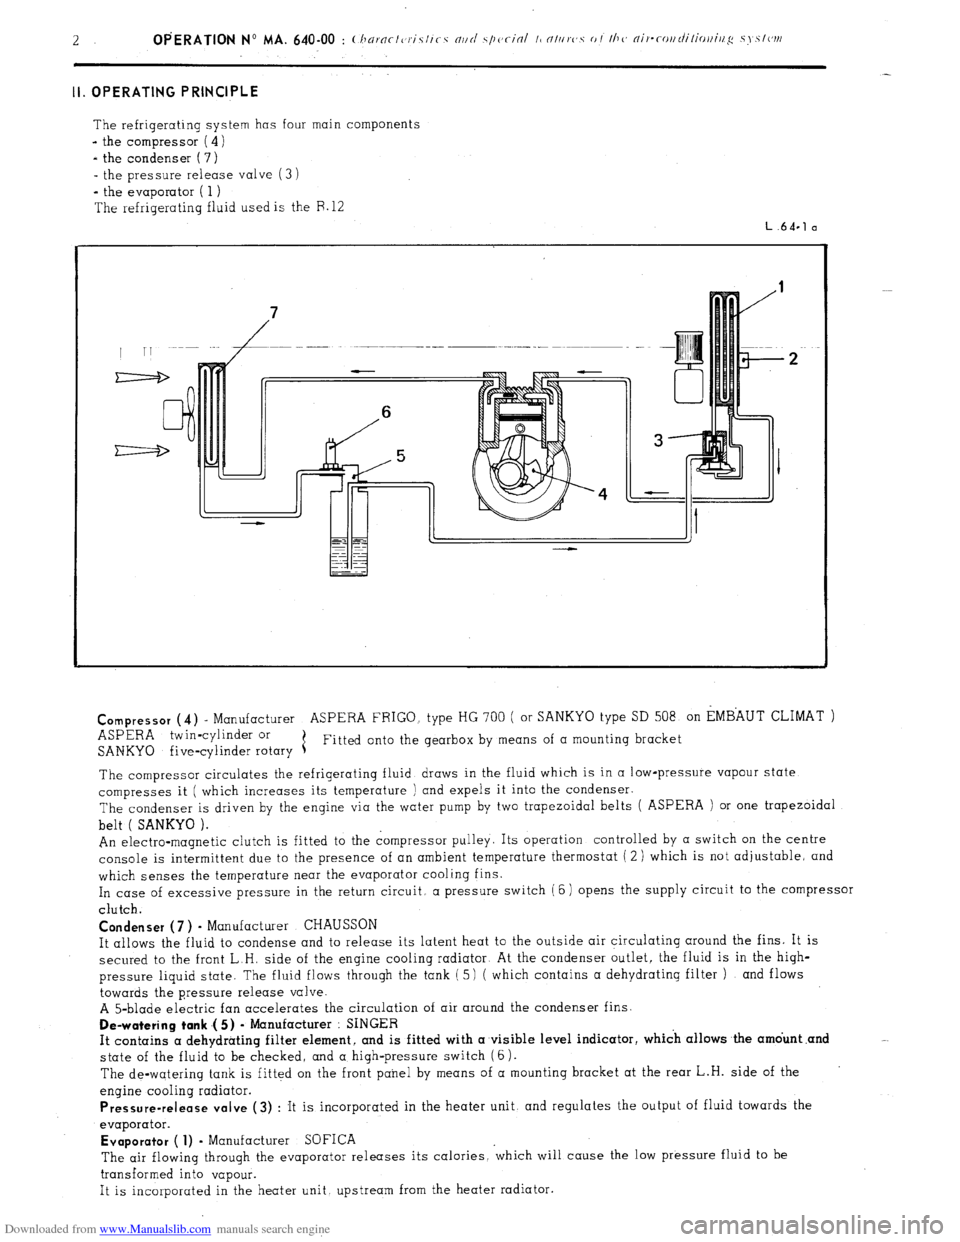
The refrigerating system has four main components
- the compressor ( 4)
- the condenser ( 7)
- the pressure release valve (3 i
*
the evaporator ( 1 )
The refrigerating fluid used is the F. 12
L.64.1 a
Compressor
(4) - Manufacturer ASPERA FRIGO. type HG 700 ( or SANKYO type SD 508 on EMBAUT CLIMAT )
ASPERA twin-cylinder or
SANKYO five-cylinder rotary 1 Fitted onto the gearbox by means of a mounting bracket
The compressor circulates the refrigerating fluid draws in the fluid which is in a low-pressure vapour state
compresses it ( which increases its temperature ) and expels it into the condenser.
The condenser is driven by the engine via the water pump by two trapezoidal belts ( ASPERA ) or one trapezoidal
belt ( SANKYO ).
An electro-magnetic clutch is fitted to the compressor pulley. Its operation controlled by a switch on the centre
console is intermittent due to the presence of an ambient temperature thermostat ( 2 ) which is not adjustable, and
which senses the temperature near the evaporator cooling fins.
In case of excessive pressure in the return circuit, a pressure switch (6) opens the supply circuit to the compressor
clutch.
Condenser (7 ) - Manufacturer CHAUSSON
It allows the fluid to condense and to release its latent heat to the outside air circulating around the fins. It is
secured to the front L.H. side of the engine cooling radiator At the condenser outlet, the fluid is in the high-
pressure liquid state. The fluid flows through the tank ( 5) ( which contains a dehydrating filter ) and flows
towards the pressure release valve.
A 5-blade electric fan accelerates the circulation of air around the condenser fins.
De-watering tank .( 5) - Manufacturer : SINGER
It contains a dehydrating filter element, and is fitted with a visible level indicator, which allows the amdunt .and
state of the fluid to be checked, and a high-pressure switch (6).
The de-watering tank is fitted on the front panel by means of a mounting bracket at the rear L.H. side of the
engine cooling radiator.
Pressure-release valve (3) : It is incorporated in the heater unit, and regulates the output of fluid towards the
evaporator.
Evaporator ( 1) - Manufacturer SOFICA
The air flowing through the evaporator releases its calories, ‘which will cause the low pressure fluid to be
transformed into vapour.
It is incorporated in the heater unit upstream from the heater radiator.
Page 370 of 394
Downloaded from www.Manualslib.com manuals search engine Op. MA. 640-O 1 II CHECKING AND ADJUSTING :
1. Checking the operation of the air-conditioning :
Faulty operation may be due to the following
Insufficient quantity of R.12 fluid, caused by
improper filling 01 a leak.
Water in the system.
Insufficient quantity of fluid may be detected by examining the transparent index mark of the de-watering tank.
This lack of fluid would be shown up by the appearance of air-bubbles during operation.
The presence of water is shown up by the formation of a small quantity of ice near the pressure release valve
which causes irregular functioning of the system.
In both cases. the system must be drained. the circuits niust be put under vwzuum (to eliminate any trace of
water ). and refilled with R.12 fluid. 2. Corburation
: Adjusting the idling speeds (as soon as electric coolinq fans cut out )
a) Vc,hirlcs wi/hou/ loryue con wrtcr :
Engine idling speed 850 to 900 rpm ( compressor switched off )
Fast idling speed 1000 to 1050 rpm ( compressor in operation )
b) Vrhirles with torque co~twrt~~r
Engine idling speed 700 to 750 rpm ( compressor switched off )
Fast idling speed 725 to 775 rpm ( handbrake on, vehicle immobilised. one gear engaged, and compressor
switched off 1
The fast idling speed is adjustable by means of adjusting screw located on top of the vacuum capsule on the
cmburettor. NOTE
: In case the fast idle is impossible to obtain, the vacuum capsule may be moved ( slacken both fixing
screws on carburettor ). in order to reduce the clearance at the fixing point of the rod controlling the first
choke butterfly opening. 3. Adjusting the pulleys :
Camshaft pulley-water pump pulley no aligning to be carried out
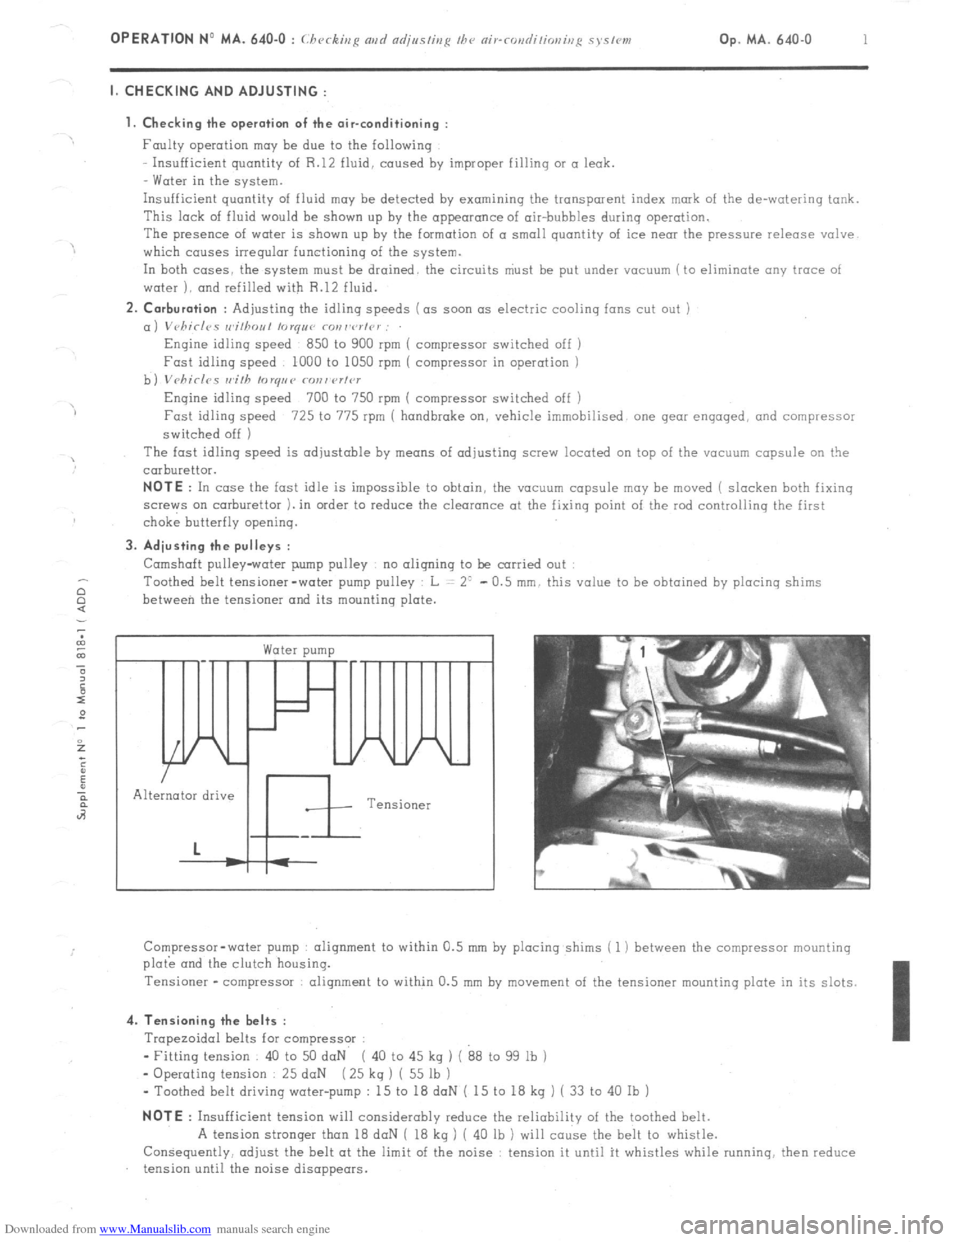
Toothed belt tensioner-water pump pulley L = 2’ - 0.5 mm. this value to be obtained by placing shims
between the tensioner and its mounting plate. c
Water pump /
In
Alternator drive
Tensioner
Compressor-water pump alignment to within 0.5 mm by placing shims ( 1 ) between the compressor mounting
plo& and the clutch housing.
Tensioner -compressor alignment to within 0.5 mm by
movement of the tensioner mounting plate in its slots. 4. Tensioning the belts :
Trapezoidal belts for compressor :
- Fitting tension 40 to 50 daN ( 40 to 45 kg ) ( 88 to 99 lb )
- Operating tension 25 daN ( 25 kq ) ( 55 lb )
- Toothed belt driving water-pump : 15 to 18 doN ( 15 to 18 kg ) ( 33 to 40 Ib ) NOTE
: Insufficient tension will considerably reduce the reliability of the toothed belt.
A tension stronger than 18 daN ( 18 kg ) ( 40 lb ) will cause the belt to whistle.
Consequently, adjust the belt at the limit of the noise : tension it until it whistles while running. then reduce
tension until the noise disappears.
Page 371 of 394
Downloaded from www.Manualslib.com manuals search engine II. PRECAUTIONS TO BE TAKEN WHEN WORKING ON THE AIR-CONDITIONING SYSTEM
a) It is imperative to wear goggles
b ) Do not smoke R 12 fluid,in the presence of a flame turns into a toxic gas.
c) Never heat any section of the refrigerating system.
d) Never switch on the refrigerating system if both electric cooling fans are not connected
e ) Never check the compressor oil level without first having drained the refrigerating circuit.
f ) Never use any oil other than TOTAL (( LUNARIA 25 H, SUNISO No 5 or TEXACO CAPELLA (( E 1) grade 500
g ) Never use refrigerating fluid other than R.12.
NOTE Refrigerating fluid may- be sold under different names : FORANE (( 12 )), FLUGENE (( 12 ))! FREON ((12 ))
( the most important feature is the number (( 12 H which defines the fluid’s properties ).
IMPORTANT NOTES
A. The compressor
MUST NEVER b e switched on when the circuit has been drained of its refrigerating fluid.
during work ‘being carried out in the workshop. for example,. Indeed, in these conditions,
the compressor
would be functioning in air, and would deteriorate rapidly.
‘Consequently, in case of an exchange of compressor necessitating draining the system of its refrigerating
fluid, in a workshop not equipped with the necessary equipment for refilling ( SOGEV equipment )
IT IS
IMPERATIVE,
before driving the vehicle to another workshop equipped with the special equipment. to carry
out the following
- To leave the blanking plugs on the compressor. in order to avoid ingress of air ( the new compressor contains
refrigerating fluid ).
- To blank the intake and outlet hoses and to fix them tempororily.
- Todisconnect the supply lead to the electro-magnetic compressor clutch
( lead with white sleeve ).
NOTE : We remind you that if the circuit has been in contact with the atmosphere, it is necessary to replace
the de-watering tank, and the compressor oil.
B. Slight oil seepage is permissible at the front bearing of the air-conditioning compressor.
Compressors showing such a seepage, and being replaced OS a result, will not be accepted under warranty.
Ill. TIGHTENING TORQUES FOR THE UNIONS IN THE CIRCUIT :
( Oil the union threads with TOTAL LUNARIA 25 before fitting )
On the compressor Intake union : 5/8” 3.45 to 4.3,daNm ( 25 to 31 ft.lb )
Outlet union l/2”’ 2.9 to 3.75 daNm ( 21 to 27 ft.lb )
On the condenser Input union l/2” 4.85 to 5.5 daNm ( 35 to 39 3/4 ft.lb )
Output union : 3/ 8” 2.7 to 3.3 daNm ( 19 l/2 to 23 3/4 ft.lb )
On-de-watering tank : Unions : 3/8” 2.1 to 2.5daNm ( 15 l/4 to 18 ft.lb )
On : Input union evaporator : 3/8” 2.1 to 2.5 daNm ( 15 l/4 to 18 ft.lb )
Output union 5/8” 3.45 to 4.3 daNm ( 25 to 31 ft.lb )
Page 372 of 394
Downloaded from www.Manualslib.com manuals search engine OPERATION No MA. 640.0 : ( h<,ck;ux n,,d od;es/ieg /he nir-~o,,di/io,,iri,~ Z\.SI<:IN Op. MA. 640-O
3
IV. FILLING THE REFRIGERATING CIRCUIT
using SOGEV equipment and a
PRESTOGAZ refill of R. 12
A. VEHICLES FITTED WITH A << ASPERA-FRIGO ,) COMPRESSOR
NOTE Equipment used for this operation :
a) SO(.I.,’ rori/<~iio,l Manufacturer Ets S.0.G.E.V
Avenue de 1 Atlantique Z.I. 91401 ORSAY -Tel. 907-64-00
b) I’Kli$ IoL:\/ ,v/i// o/ I?. II
1 kg refill supplied by the Replacement Parts Department under
ref. No.ZC 9 857 108 U.
IMPORTANT Precautions to be taken during this operation :
a) It is IMPERATIVE to wear goqqles.
b) Never smoke during the operation
R. 12 fluid turns into a toxic gas in the presence of LI flame
c) Never heat any port of the refriqerotinq circuit.
d) Never switch on the air-conditioninq system if either of the cooling fans are disconnected. 1. Drain the circuit :
NOTE
- This operation must be carried out in a well-
ventilated room.
- The refriqerating circcit must be drained before
any work can be carried out on it.
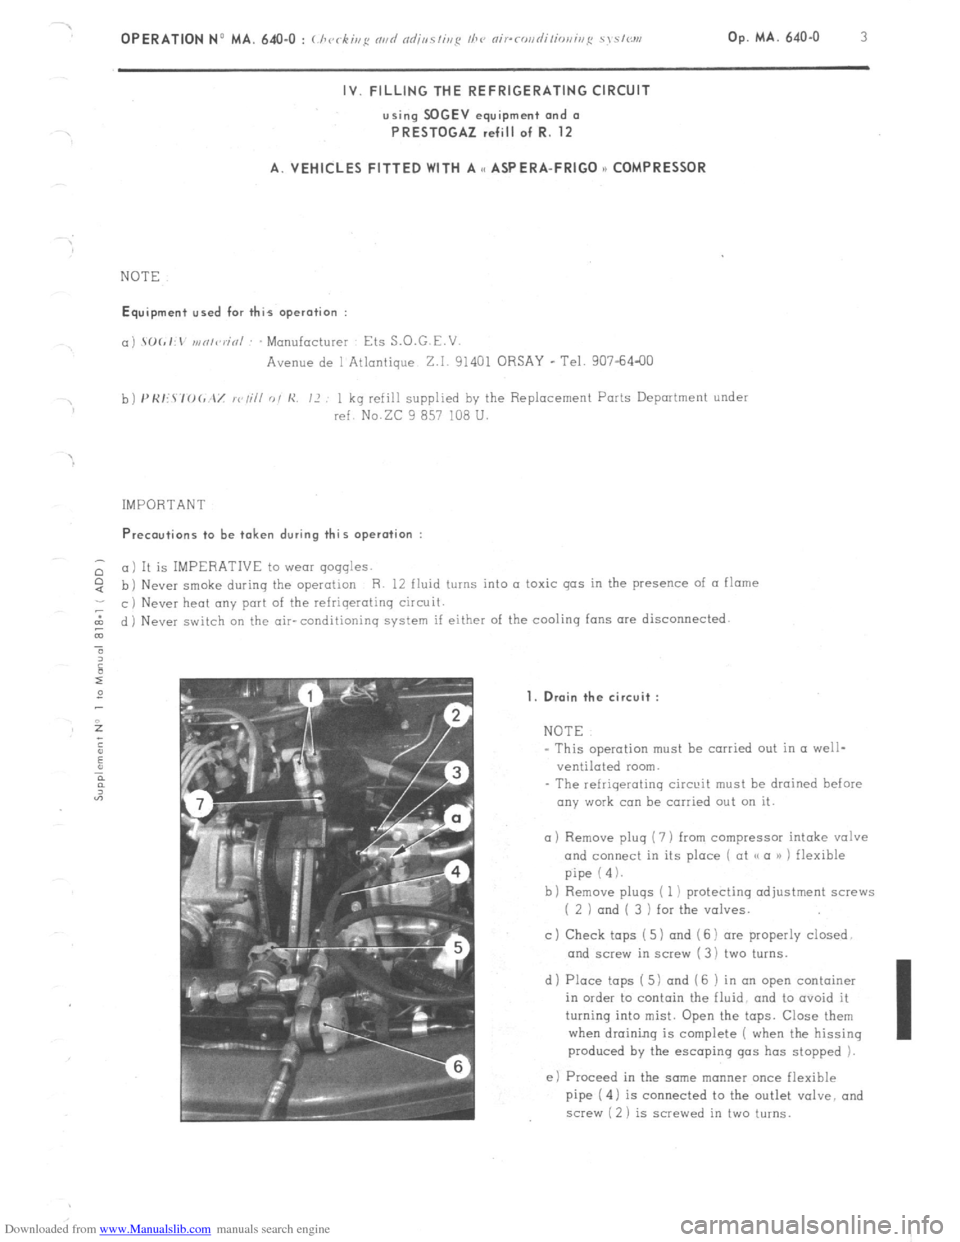
a) Remove pluq (7 ) from compressor intake valve
and connect in its place ( at (/ a /) ) flexible
pipe (4).
b) Remove pluqs ( 1 ) protecting adjustment screws
( 2 ) and ( 3 ) for the valves.
c ) Check tops ( 5) and (6 1 are properly closed
and screw in screw ( 3 1 two turns.
d) Place taps ( 5) and (6 ) in an open container
in order to contain the fluid, and to ovoid it
turning into mist. Open the taps. Close them
when draininq is complete ( when the hissing
produced by the escaping gas has stopped 1.
e) Proceed in the same tn(mner once flexible
pipe ( 4) is connected to the outlet valve, and
screw ( 2 ) is screwed in two turns.
Page 373 of 394
Downloaded from www.Manualslib.com manuals search engine 4 OPERATION No MA. 640.0 : ( ht.< k;nS our/ ndj,,~/ir,~ I/><, ni~.rr,r,r/i/ior,i,,F sm,<,,,,.
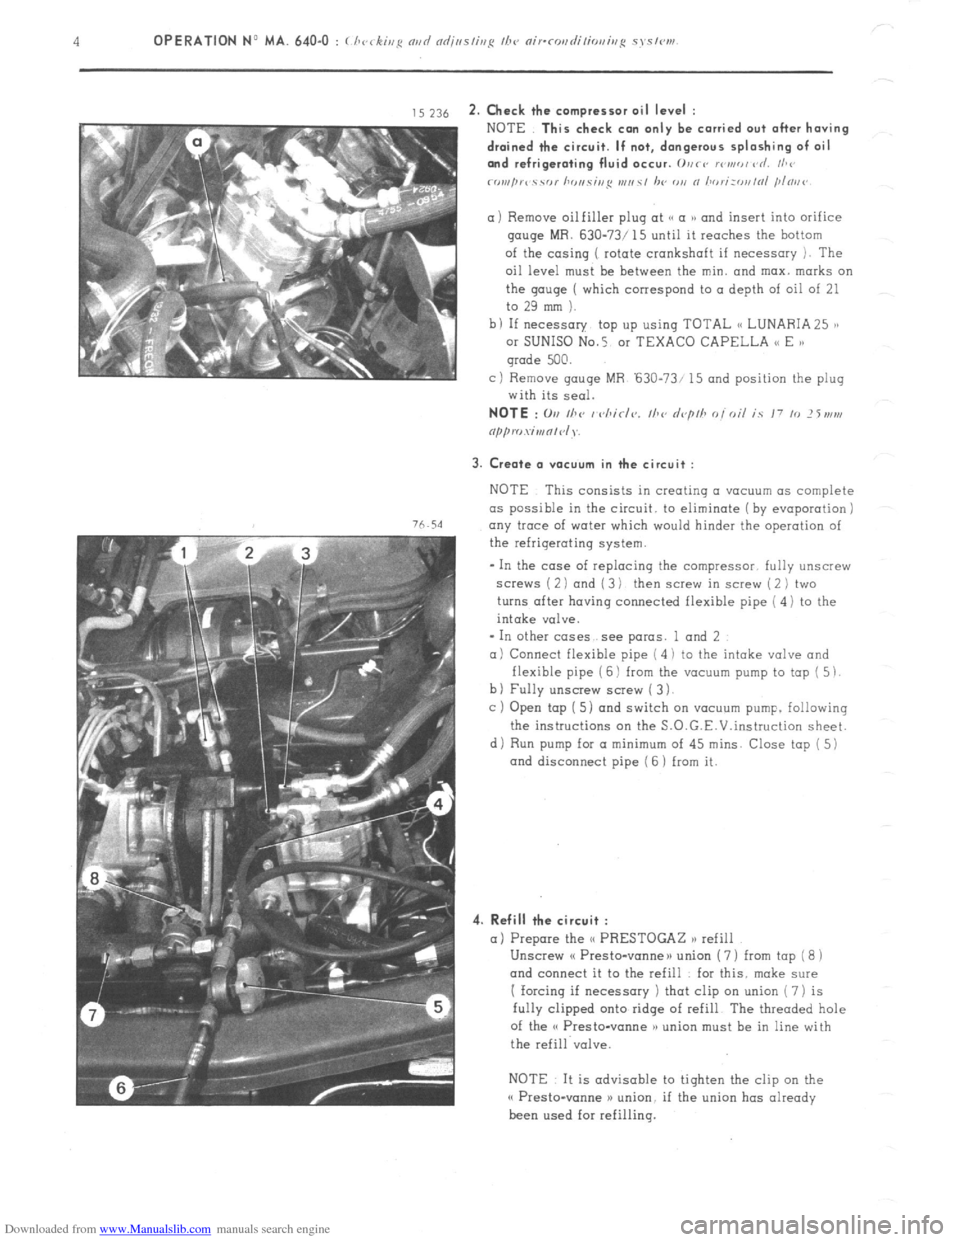
,s ~16 2. Check the ccmpress~r oil level :
76.54
NOTE This check con only be carried out after having
drained the circuit. If not, dangerous splashing of oil
and refrigerating fluid occur. 0vrs rowed vd. I/,<’
rornprc ‘i YC,l hr ,I,. Yi,,S I,,,, s, /w
gauge MR. 630-73/ 15 until it reaches the hottam
of the casing ( rotate crankshaft if necessary 1. The
oil level must be between the min. and max. marks on
the qauqe ( which correspond to a depth of oil of 21
to 29 mm ).
b I If necessary top up using TOTAL (< LUNARIA 25 ),
or SUNISO No.5 01 TEXACO CAPELLA << E )a
grade 500.
c) Remove gouge MR ‘630-73/ 15 and position the plug
with its seal.
3. Create a V(IEYU~ in the circuit :
NOTE This consists in creotinq a vacuum as complete
as possible in the circuit. to eliminate (by evaporation j
any trace of water which
would hinder the operation of
the refrigerating system.
- In the case of replacing the compressor. fully unscrew
screws ( 2 1 and ( 3 1 then screw in screw ( 2 ) two
turns after having connected flexible pipe ( 4) to the
intake valve.
* In other cases see paras. 1 and 2
a) Connect flexible pipe ( 4 i to the intake valve and
flexible pipe ( 6 1 from the vacuum pump to top ( 5 1.
b) Fully unscrew screw ( 3 1.
c ) Open tap [ 5) and switch on vacuum pump. following
the instructions on the S.O.G.E.V.instruction sheet.
di Run pump for a minimum
of 45 mins. Close tap ( 5)
and disconnect pipe ( 6 1 from it.
4. Refill the circuit :
a) Prepare the <( PRESTOGAZ n refill
Unscrew cf Presto-vanneu union ( 7 ) from tap ( 8 1
and connect it to the refill for this. make sure
I forcing if necessary ) that clip on union ( 7) is
fully clipped onto ridge of refill The threaded hole
of the o Presto-vanne )a union must be in line with
the refill valve.
NOTE It is advisable to tighten the clip on the
o Presto-wane >) union. if the union has already
been used for refilling.
Page 375 of 394
Downloaded from www.Manualslib.com manuals search engine 6
OPERATION No MA. 640-O : ( hvrsi~/p nsd ndj/w/isyc /I><, nirr~,s~l;/io,,i,,,~ syc,<,,,,
B. VEHICLES FITTED WITH A SANI(Y0 COMPRESSOR
NOTE Filling operations on CI vehicle fitted with a
and differ from the (< ASPERA-FRIGO 1) compressor only in as much as there are no screws for opening and closing
the valves.
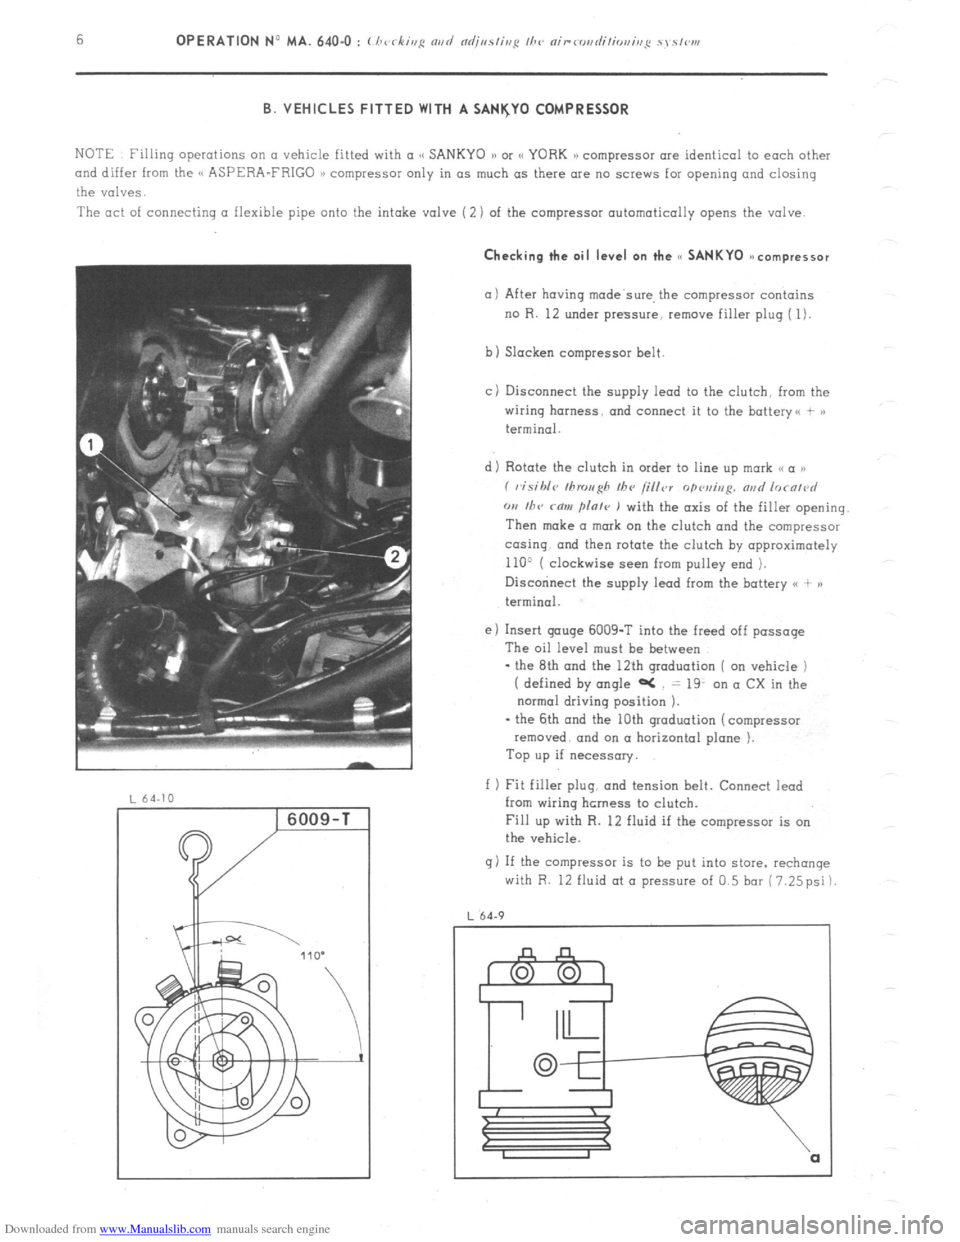
The act of connecting a flexible pipe onto the intake valve (2) of the compressor automatically opens the valve. Checking the oil level on the cc SANKYO ~ncompressor
(11 After having made’swe, the compressor contains
no R. 12 under pressure, remove filler plug ( 1).
b) Slacken compressor belt
cj Disconnect the supply lead to the clutch, from the
wiring harness. and connect it to the battery<, + >)
terminal.
d) Rotate the clutch in order to line up mark ,< a ))
( visihlc~ tllrou~h Ihv /i/ler
opvui,,p. nad lorn/~~d
w I/TV rnw flnle ) with the axis of the filler opening.
Then make a mark on the clutch and the compressor
co-sing. and then rotate the clutch by opproximotely
110’ ( clockwise seen from pulley end ).
Disccninect the supply lead from the battery <( + )a
terminal.
e) Insert gouge 6009-T into the freed off passage
The oil level must be between
- the 8th and the 12th graduation ( on vehicle )
( defined by angle aC = 19. on a CX in the
normal driving position ).
- the 6th and the 10th graduation (compressor
removed. and on a horizontal plane ).
Top up if necessary.
f 1 Fit filler plug, and tension belt. Connect iead
from wiring hcrness to clutch.
Fill up with R. 12 fluid if the compressor is on
the vehicle.
g) If the compressor is to be put into store. rechange
with R. 12 fluid at o pressure of 0.5 bar (7.25psi)
L 64.9
Page 384 of 394
Downloaded from www.Manualslib.com manuals search engine OPERATION No MA. 841-O : Adjusting fh~ doors Op. MA. 841-O 1 I. ADJUSTING A FRONT DOOR
1. Longitudinal adiustment :
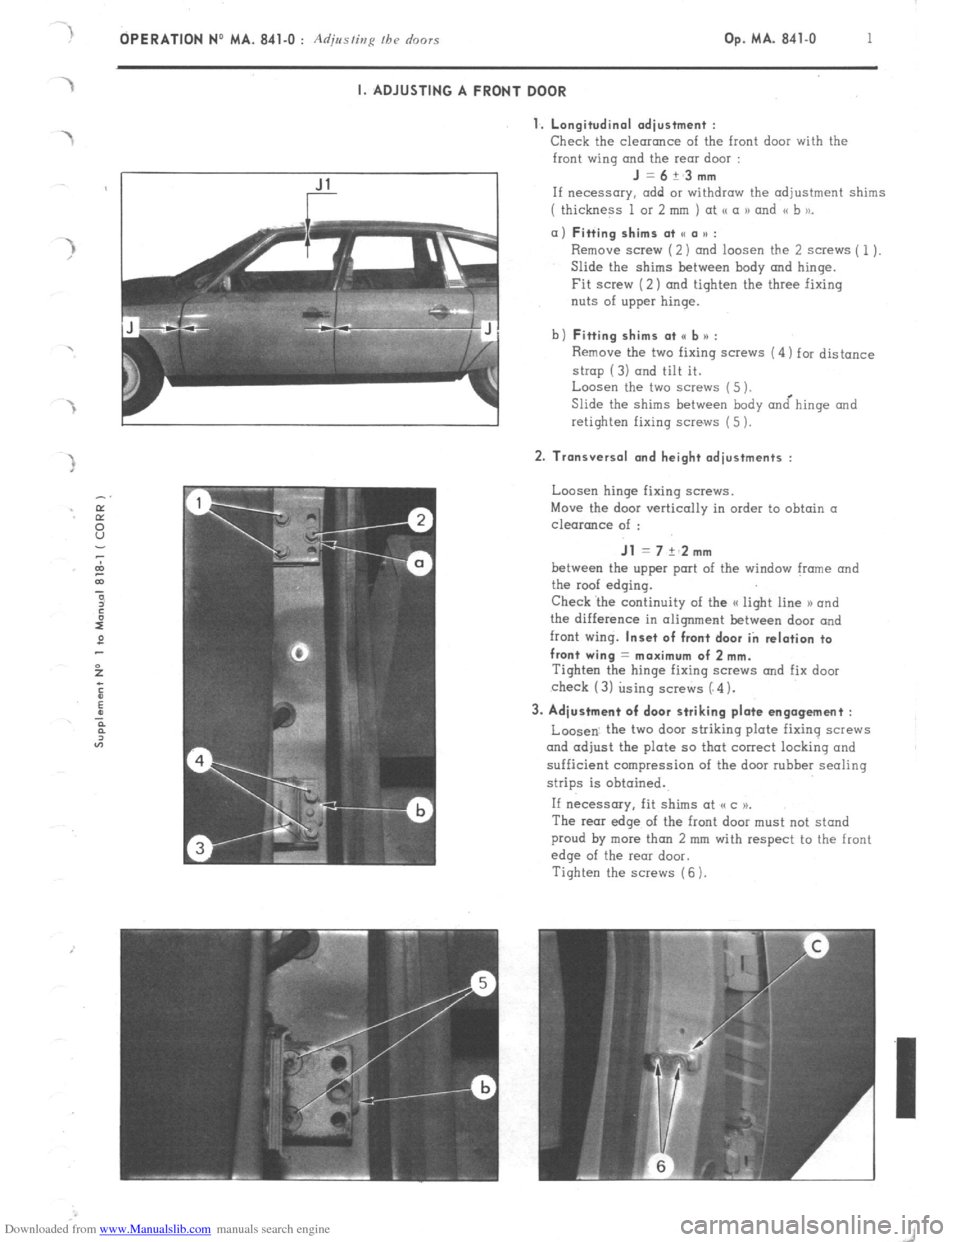
Check
the clearance of the front door with the
front wing and the rear door : J=6+_3mm
If necessary. add or withdraw the adjustment shims
( thickness 1 or 2 mm ) at <( a 1) and << b to_ a) Fitting shims at SC a u :
Remove screw (2) and loosen the 2 screws ( 1).
Slide the shims between hody and hinge.
Fit screw (2) and tighten the three fixing
nuts of upper hinge.
b) Fitting shims at <, b n :
Remove the two fixing screws (4) for distance
strop (3) and tilt it.
Loosen the two screws (5 ).
Slide the shims between body &hinge and
retighten fixing screws (5 ). 2. Transversal and height adjustments :
Loosen hinge fixing screws.
Move the door vertically in order to obtain a
clearance of : Jl = 7 +‘2mm
between the upper port of the window frame and
the roof edging.
Check ‘the continuity of the a light line 1) and
the difference in alignment between door and
front wing. Inset of front door in relation to
front wing = maximum of 2 mm.
Tighten the hinge fixing SCWNS and fix door
check (3) using screws (“4). 3. Adjustment of door striking plate engagement :
Loosen. the two door striking plate fixing screws
and adjust the plate so that correct locking and
sufficient compression of the door rubber sealing
strips is obtained.
If necessary, fit shims at (cc )P.
The rear edge of the front door must not stand
proud by more than 2 mm with respect to the front
edge of the rear door.
Tighten the screws (6 ).