engine Citroen CX 1981 1.G Workshop Manual
[x] Cancel search | Manufacturer: CITROEN, Model Year: 1981, Model line: CX, Model: Citroen CX 1981 1.GPages: 394
Page 371 of 394
Downloaded from www.Manualslib.com manuals search engine II. PRECAUTIONS TO BE TAKEN WHEN WORKING ON THE AIR-CONDITIONING SYSTEM
a) It is imperative to wear goggles
b ) Do not smoke R 12 fluid,in the presence of a flame turns into a toxic gas.
c) Never heat any section of the refrigerating system.
d) Never switch on the refrigerating system if both electric cooling fans are not connected
e ) Never check the compressor oil level without first having drained the refrigerating circuit.
f ) Never use any oil other than TOTAL (( LUNARIA 25 H, SUNISO No 5 or TEXACO CAPELLA (( E 1) grade 500
g ) Never use refrigerating fluid other than R.12.
NOTE Refrigerating fluid may- be sold under different names : FORANE (( 12 )), FLUGENE (( 12 ))! FREON ((12 ))
( the most important feature is the number (( 12 H which defines the fluid’s properties ).
IMPORTANT NOTES
A. The compressor
MUST NEVER b e switched on when the circuit has been drained of its refrigerating fluid.
during work ‘being carried out in the workshop. for example,. Indeed, in these conditions,
the compressor
would be functioning in air, and would deteriorate rapidly.
‘Consequently, in case of an exchange of compressor necessitating draining the system of its refrigerating
fluid, in a workshop not equipped with the necessary equipment for refilling ( SOGEV equipment )
IT IS
IMPERATIVE,
before driving the vehicle to another workshop equipped with the special equipment. to carry
out the following
- To leave the blanking plugs on the compressor. in order to avoid ingress of air ( the new compressor contains
refrigerating fluid ).
- To blank the intake and outlet hoses and to fix them tempororily.
- Todisconnect the supply lead to the electro-magnetic compressor clutch
( lead with white sleeve ).
NOTE : We remind you that if the circuit has been in contact with the atmosphere, it is necessary to replace
the de-watering tank, and the compressor oil.
B. Slight oil seepage is permissible at the front bearing of the air-conditioning compressor.
Compressors showing such a seepage, and being replaced OS a result, will not be accepted under warranty.
Ill. TIGHTENING TORQUES FOR THE UNIONS IN THE CIRCUIT :
( Oil the union threads with TOTAL LUNARIA 25 before fitting )
On the compressor Intake union : 5/8” 3.45 to 4.3,daNm ( 25 to 31 ft.lb )
Outlet union l/2”’ 2.9 to 3.75 daNm ( 21 to 27 ft.lb )
On the condenser Input union l/2” 4.85 to 5.5 daNm ( 35 to 39 3/4 ft.lb )
Output union : 3/ 8” 2.7 to 3.3 daNm ( 19 l/2 to 23 3/4 ft.lb )
On-de-watering tank : Unions : 3/8” 2.1 to 2.5daNm ( 15 l/4 to 18 ft.lb )
On : Input union evaporator : 3/8” 2.1 to 2.5 daNm ( 15 l/4 to 18 ft.lb )
Output union 5/8” 3.45 to 4.3 daNm ( 25 to 31 ft.lb )
Page 372 of 394
Downloaded from www.Manualslib.com manuals search engine OPERATION No MA. 640.0 : ( h<,ck;ux n,,d od;es/ieg /he nir-~o,,di/io,,iri,~ Z\.SI<:IN Op. MA. 640-O
3
IV. FILLING THE REFRIGERATING CIRCUIT
using SOGEV equipment and a
PRESTOGAZ refill of R. 12
A. VEHICLES FITTED WITH A << ASPERA-FRIGO ,) COMPRESSOR
NOTE Equipment used for this operation :
a) SO(.I.,’ rori/<~iio,l Manufacturer Ets S.0.G.E.V
Avenue de 1 Atlantique Z.I. 91401 ORSAY -Tel. 907-64-00
b) I’Kli$ IoL:\/ ,v/i// o/ I?. II
1 kg refill supplied by the Replacement Parts Department under
ref. No.ZC 9 857 108 U.
IMPORTANT Precautions to be taken during this operation :
a) It is IMPERATIVE to wear goqqles.
b) Never smoke during the operation
R. 12 fluid turns into a toxic gas in the presence of LI flame
c) Never heat any port of the refriqerotinq circuit.
d) Never switch on the air-conditioninq system if either of the cooling fans are disconnected. 1. Drain the circuit :
NOTE
- This operation must be carried out in a well-
ventilated room.
- The refriqerating circcit must be drained before
any work can be carried out on it.
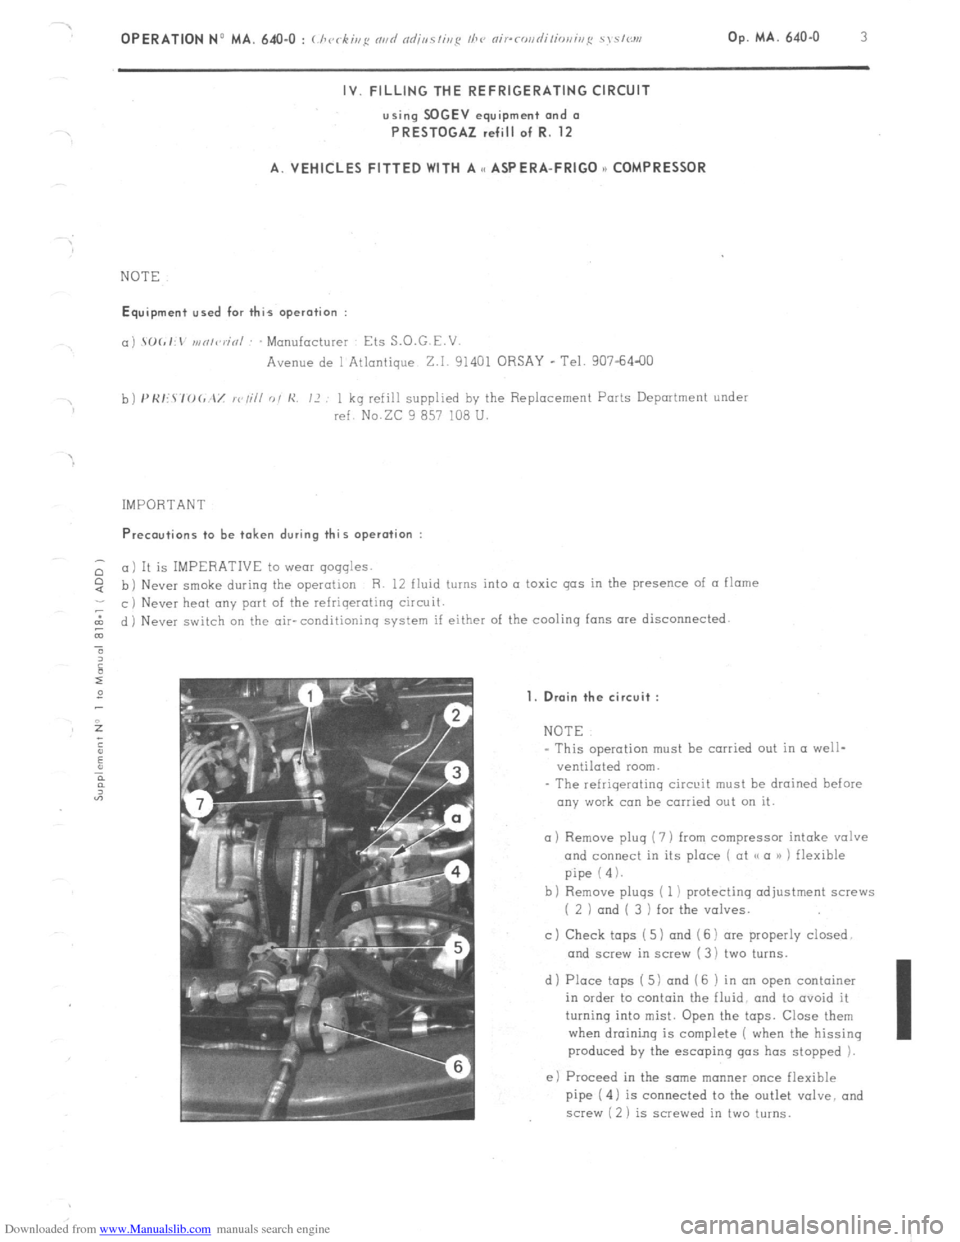
a) Remove pluq (7 ) from compressor intake valve
and connect in its place ( at (/ a /) ) flexible
pipe (4).
b) Remove pluqs ( 1 ) protecting adjustment screws
( 2 ) and ( 3 ) for the valves.
c ) Check tops ( 5) and (6 1 are properly closed
and screw in screw ( 3 1 two turns.
d) Place taps ( 5) and (6 ) in an open container
in order to contain the fluid, and to ovoid it
turning into mist. Open the taps. Close them
when draininq is complete ( when the hissing
produced by the escaping gas has stopped 1.
e) Proceed in the same tn(mner once flexible
pipe ( 4) is connected to the outlet valve, and
screw ( 2 ) is screwed in two turns.
Page 373 of 394
Downloaded from www.Manualslib.com manuals search engine 4 OPERATION No MA. 640.0 : ( ht.< k;nS our/ ndj,,~/ir,~ I/><, ni~.rr,r,r/i/ior,i,,F sm,<,,,,.
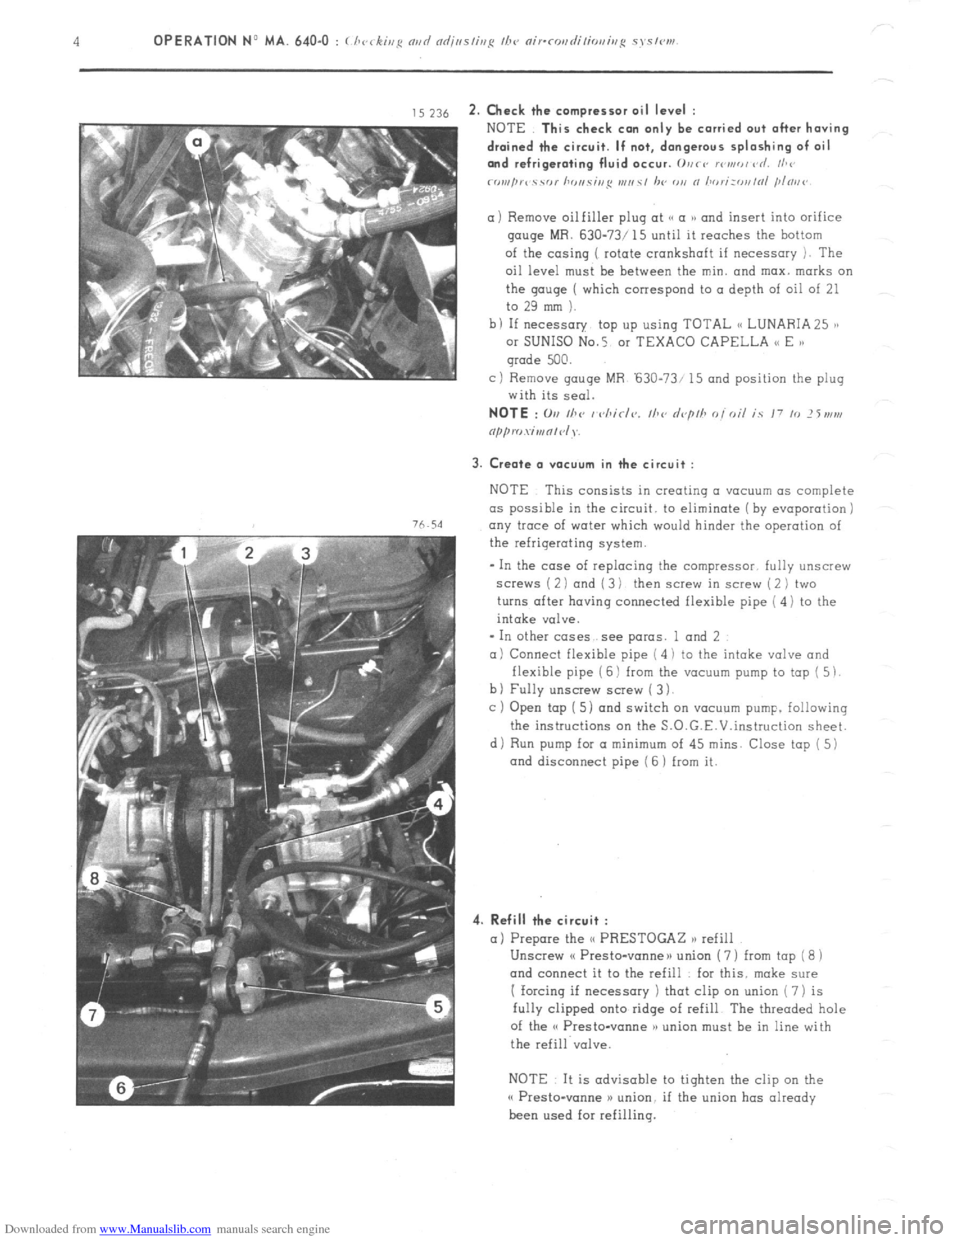
,s ~16 2. Check the ccmpress~r oil level :
76.54
NOTE This check con only be carried out after having
drained the circuit. If not, dangerous splashing of oil
and refrigerating fluid occur. 0vrs rowed vd. I/,<’
rornprc ‘i YC,l hr ,I,. Yi,,S I,,,, s, /w
gauge MR. 630-73/ 15 until it reaches the hottam
of the casing ( rotate crankshaft if necessary 1. The
oil level must be between the min. and max. marks on
the qauqe ( which correspond to a depth of oil of 21
to 29 mm ).
b I If necessary top up using TOTAL (< LUNARIA 25 ),
or SUNISO No.5 01 TEXACO CAPELLA << E )a
grade 500.
c) Remove gouge MR ‘630-73/ 15 and position the plug
with its seal.
3. Create a V(IEYU~ in the circuit :
NOTE This consists in creotinq a vacuum as complete
as possible in the circuit. to eliminate (by evaporation j
any trace of water which
would hinder the operation of
the refrigerating system.
- In the case of replacing the compressor. fully unscrew
screws ( 2 1 and ( 3 1 then screw in screw ( 2 ) two
turns after having connected flexible pipe ( 4) to the
intake valve.
* In other cases see paras. 1 and 2
a) Connect flexible pipe ( 4 i to the intake valve and
flexible pipe ( 6 1 from the vacuum pump to top ( 5 1.
b) Fully unscrew screw ( 3 1.
c ) Open tap [ 5) and switch on vacuum pump. following
the instructions on the S.O.G.E.V.instruction sheet.
di Run pump for a minimum
of 45 mins. Close tap ( 5)
and disconnect pipe ( 6 1 from it.
4. Refill the circuit :
a) Prepare the <( PRESTOGAZ n refill
Unscrew cf Presto-vanneu union ( 7 ) from tap ( 8 1
and connect it to the refill for this. make sure
I forcing if necessary ) that clip on union ( 7) is
fully clipped onto ridge of refill The threaded hole
of the o Presto-vanne )a union must be in line with
the refill valve.
NOTE It is advisable to tighten the clip on the
o Presto-wane >) union. if the union has already
been used for refilling.
Page 374 of 394
Downloaded from www.Manualslib.com manuals search engine OPERATION No MA. 640-O : C h
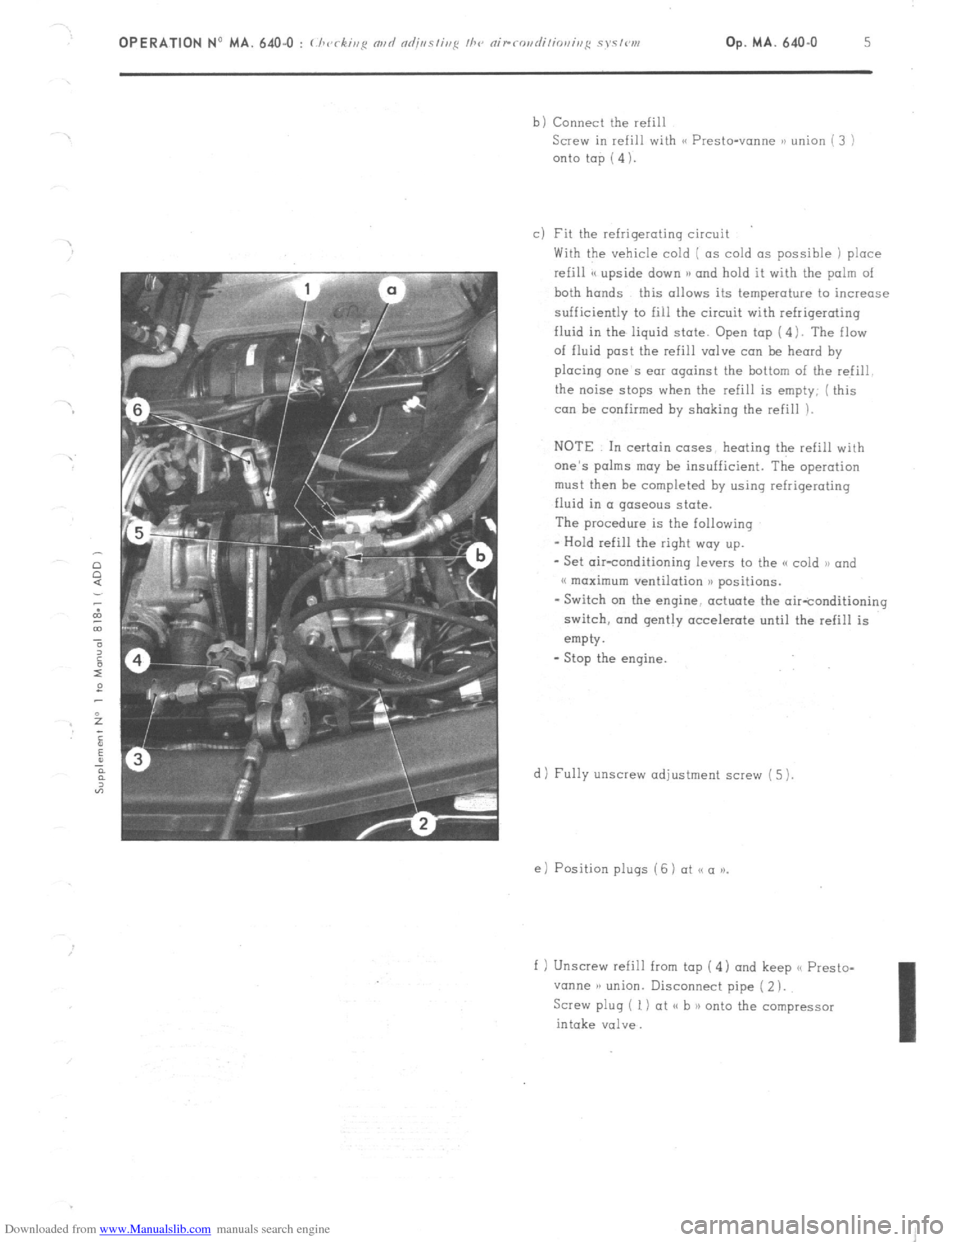
Screw in refill with (< Presto-vonne ~1 union ( 3 )
onto top (4).
c) Fit the refrigerating circuit
With the vehicle cold ( as cold as possible 1 place
refill << upside down >B and hold it with the palm of
both hands this allows its temperature to increase
sufficiently to fill the circuit with refrigerating
fluid in the iiquid state. Open top (4). The flaw
of fluid post the refill valve can be heard by
placing one s ear against the bottom of the refill
the noise stops when the refill is empty; ( this
can be confirmed by shaking the refill ).
NOTE In certain cases heating the refill with
one’s palms may be insufficient. The operation
must then he completed by using refrigerating
fluid in a gaseous state.
The procedure is the following
- Hold refill the right way up.
- Set air-conditioning levers to the SC cold )B and
(( maximum ventilation )) positions.
- Switch on the engine, actuate the air-conditioning
switch, and gently accelerate until the refill is
empty.
- Stop the engine.
d) Fully unscrew adjustment screw (5 ).
e) Position plugs ( 6 ) ot SC a )).
f 1 Unscrew refill from tap (4 1 and keep << Presto-
vanne )a union. Disconnect pipe ( 2 ).
Screw plug ( 1) at ,< h 1) onto the compressor
intake valve.
Page 375 of 394
Downloaded from www.Manualslib.com manuals search engine 6
OPERATION No MA. 640-O : ( hvrsi~/p nsd ndj/w/isyc /I><, nirr~,s~l;/io,,i,,,~ syc,<,,,,
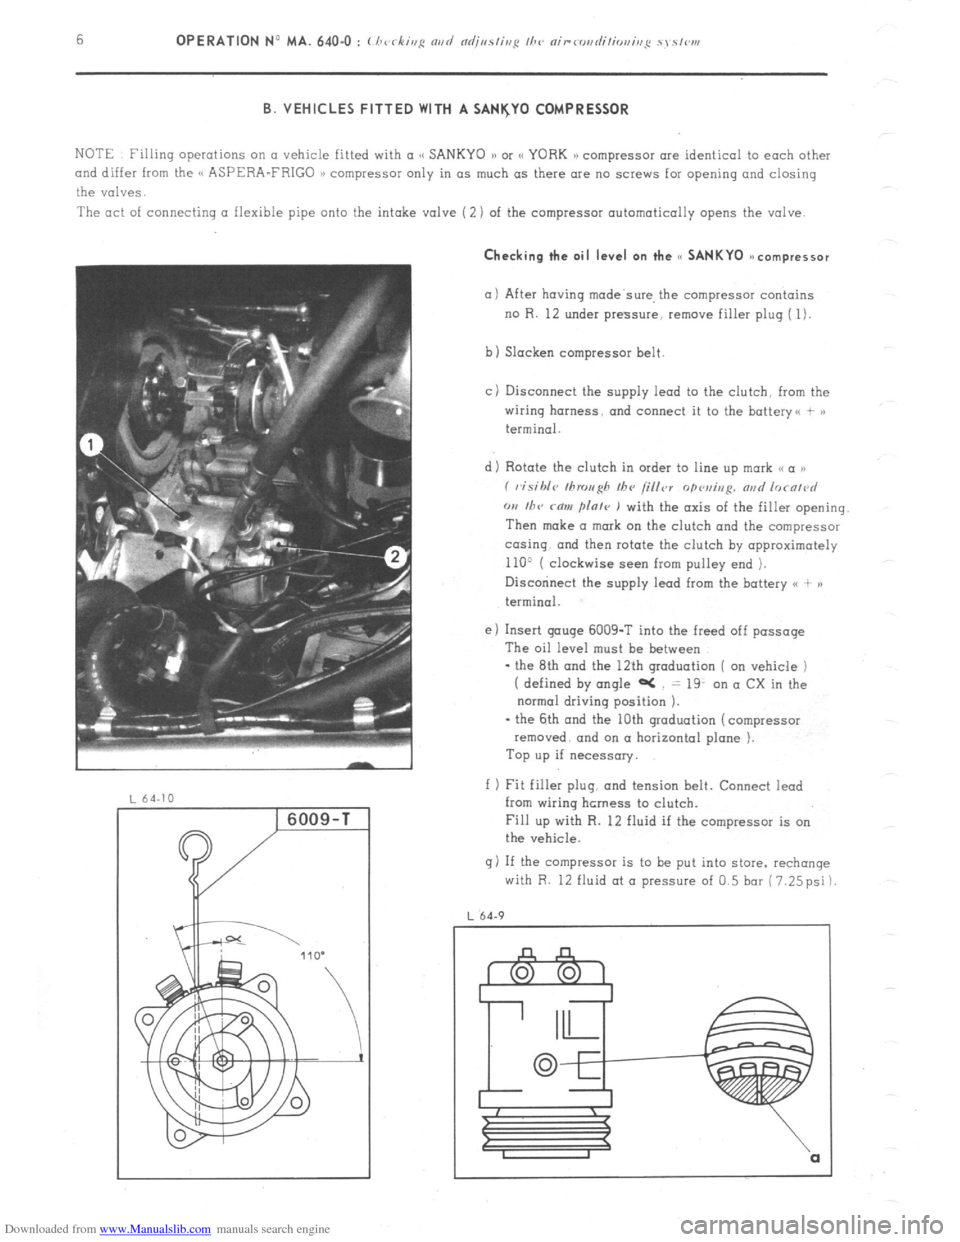
B. VEHICLES FITTED WITH A SANI(Y0 COMPRESSOR
NOTE Filling operations on CI vehicle fitted with a
and differ from the (< ASPERA-FRIGO 1) compressor only in as much as there are no screws for opening and closing
the valves.
The act of connecting a flexible pipe onto the intake valve (2) of the compressor automatically opens the valve. Checking the oil level on the cc SANKYO ~ncompressor
(11 After having made’swe, the compressor contains
no R. 12 under pressure, remove filler plug ( 1).
b) Slacken compressor belt
cj Disconnect the supply lead to the clutch, from the
wiring harness. and connect it to the battery<, + >)
terminal.
d) Rotate the clutch in order to line up mark ,< a ))
( visihlc~ tllrou~h Ihv /i/ler
opvui,,p. nad lorn/~~d
w I/TV rnw flnle ) with the axis of the filler opening.
Then make a mark on the clutch and the compressor
co-sing. and then rotate the clutch by opproximotely
110’ ( clockwise seen from pulley end ).
Disccninect the supply lead from the battery <( + )a
terminal.
e) Insert gouge 6009-T into the freed off passage
The oil level must be between
- the 8th and the 12th graduation ( on vehicle )
( defined by angle aC = 19. on a CX in the
normal driving position ).
- the 6th and the 10th graduation (compressor
removed. and on a horizontal plane ).
Top up if necessary.
f 1 Fit filler plug, and tension belt. Connect iead
from wiring hcrness to clutch.
Fill up with R. 12 fluid if the compressor is on
the vehicle.
g) If the compressor is to be put into store. rechange
with R. 12 fluid at o pressure of 0.5 bar (7.25psi)
L 64.9
Page 376 of 394
Downloaded from www.Manualslib.com manuals search engine Op. MA. 642-00
(< FROID - 20 n HEATING SYSTEM
This heating system consists of the following :
- A device to heat the inlet air
- A’device to increase the heating in the passenger compartment
- A water temperature gauge
- The crankcase has a plug which can be removed to allow a heating element to be inserted in order
to heat the engine coolant
Page 377 of 394
Downloaded from www.Manualslib.com manuals search engine .
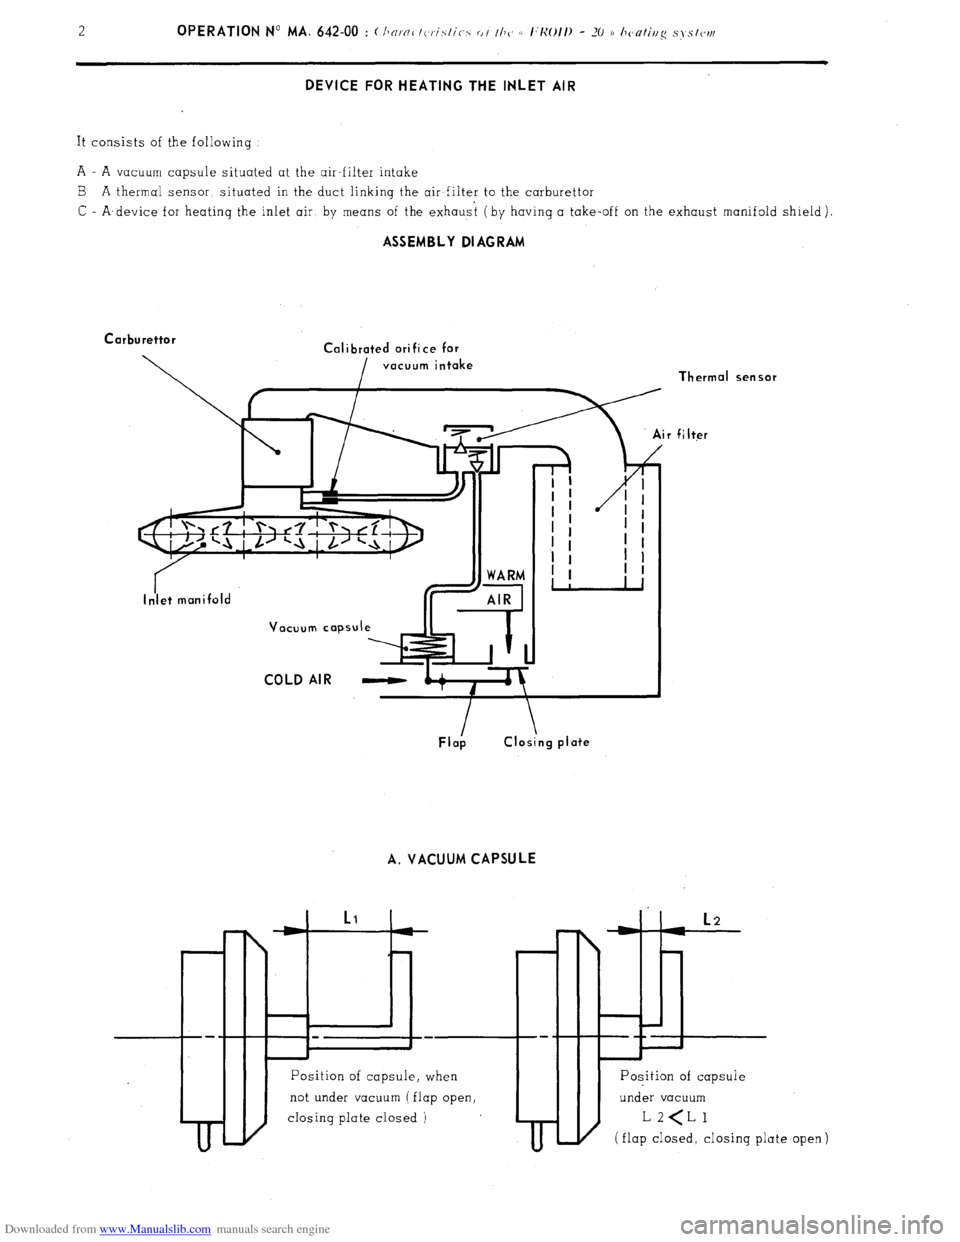
DEVICE FOR HEATING THE INLET AIR
It consists of the following
A - A vacuum capsule situated at the air-filter intake
B A thermal sensor, situated in the duct linking the air-filter to the carburettor
C - A,device for heatinq the inlet air by means of the exhaust (by having a take-off on the exhaust manifold shield). ASSEMBLY DIAGRAM
Carburettor
Calibrated ori fi ce for
vacuum intake
COLD AIR -
A. VACUUM CAPSULE
II I
I
t I
Position of capsule, when
not under vacuum ( flap open,
closing plate closed )
I
m-t L2
L-H ii
---+- Thermal
sensor filter
Position of capsule
under vacuum
(flap closed, closing
plate
open 1
Page 378 of 394
Downloaded from www.Manualslib.com manuals search engine OPERATION No MA. 642-W : ~Thnracteristics o/ thy, e I:Ko/I) - -70 3 hc,nriug s, stew Op. MA. 642-00 3
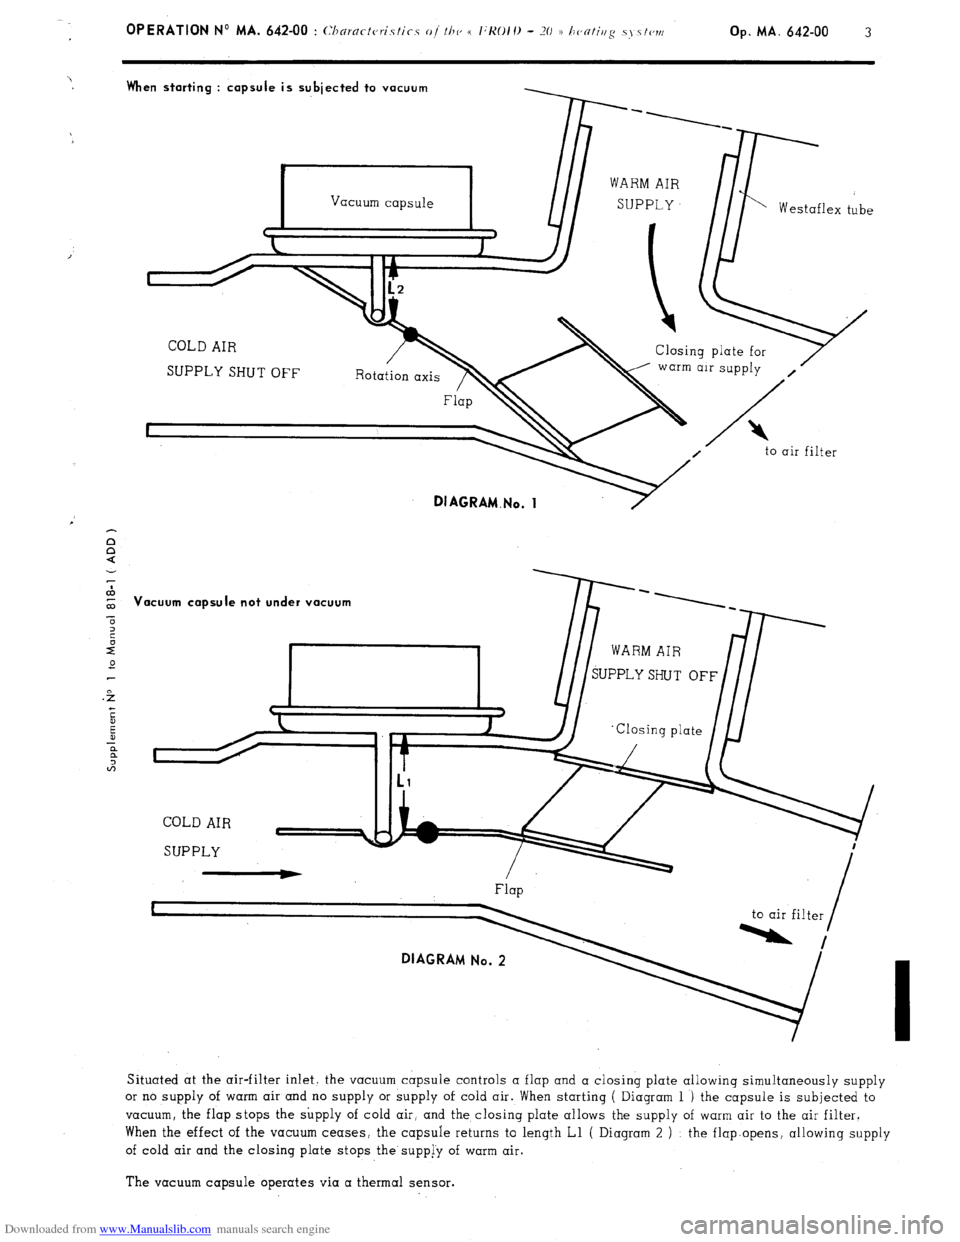
When starting : capsule is subjected to vacuum
Vacuum capsule
Westaflex tube
c J
J
COLD AIR
Closing plate for
SUPPLY SHUT OFF warm air supply
,
Flap B
I
to air filter
DIAGRAM.No. 1
‘acuum capsule not under vacuum
Flap
DIAGRAM No. 2
to air filter
Situated at the air-filter inlet. the vacuum capsule controls a flap and a closing plate allowing simultaneously supply
or no supply of warm air and no supply or supply of cold air. When starting ( Diagram 1 ) the capsule is subjected to
vacuum, the flap stops the supply of cold air, and the closing plate allows the supply of warm air to the air filter.
When the effect of the vacuum ceases, the capsule returns to length Ll ( Diagram 2 ) : the flap.opens, allowing supply
of cold air and the closing plate stops the supp[y of warm air.
The vacuum capsule operates via a thermal sensor.
Page 379 of 394
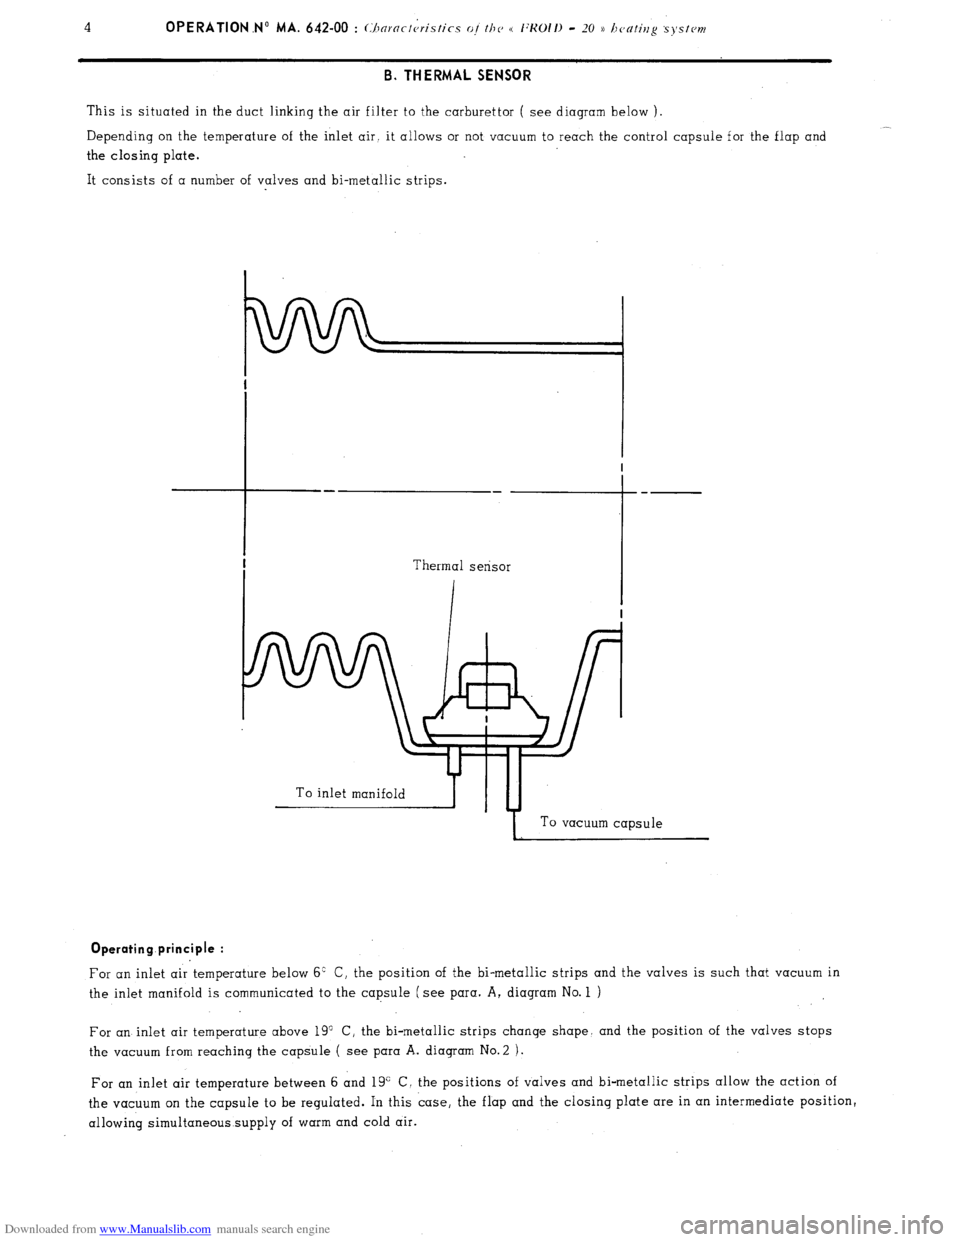
Downloaded from www.Manualslib.com manuals search engine B. THERMAL SENSOR
This is situated in the duct linking the air filter to the carburettor ( see diagram below ).
__
Depending on the temperature of the inlet air. it allows or not vacuum to reach the control capsule for the flap and
the closing plate.
It consists of a number of valves and bi-metallic strips.
To inlet manifoldb-yTu-4
I To vacuum capsule Operating principle :
For an inlet air temperature below 6’ C, the position of the bi-metallic strips and the valves is such that vacuum in
the inlet manifold is communicated to the capsule (see para. A, diagram No. 1 )
For an inlet air temperature above 19” C, the bi-metallic strips change shape. and the position of the valves stops
the vacuum from reaching the capsule ( see para A. diagram No.2 ).
For an inlet air temperature between 6 and 19” C, the positions of valves and bi-metallic strips allow the action of
the vacuum on the capsule to be regulated. In this case, the flap and the closing plate are in an intermediate position,
allowing simultaneous supply of warm and cold air.
Page 380 of 394
Downloaded from www.Manualslib.com manuals search engine Op MA. 642-00 5 II. DEVICE FOR INCREASING THE HEATING OF THE PASSENGER COMPARTMENT
This device entails modifying the following components
- Heater distribution box ( outlets towards side vents unplugged, different radiator )
Side vents with twin outlets ( ambient or heated air )
Addition of Westaflex ducts ( link from heater distribution box to side vents ). III. WATER TEMPERATURE GAUGE
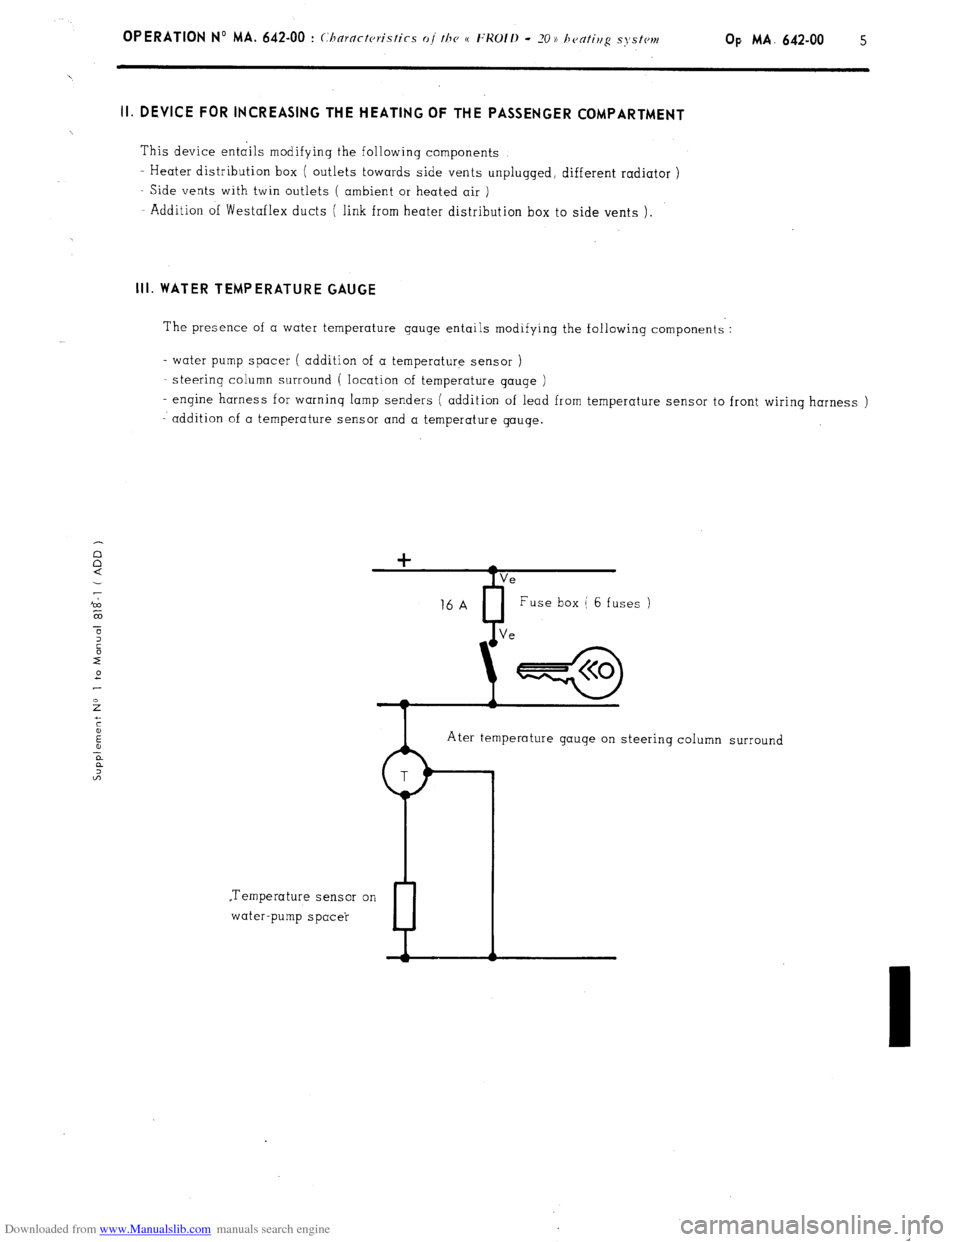
The presence of a water temperature gauge entails modifying the following components :
- water pump spacer ( addition of a temperature sensor )
steerinq column surround ( location of temperature gauqe )
- engine harness for warning lamp senders ( addition of lead from temperature sensor to front wiring harness )
addition of a temperature sensor and a temperature gauge.
Ater temperature gauge on steering column surround
.Temperature sensor on
water-pump spacer
P