engine Citroen CX 1981 1.G Workshop Manual
[x] Cancel search | Manufacturer: CITROEN, Model Year: 1981, Model line: CX, Model: Citroen CX 1981 1.GPages: 394
Page 381 of 394
Downloaded from www.Manualslib.com manuals search engine BODY
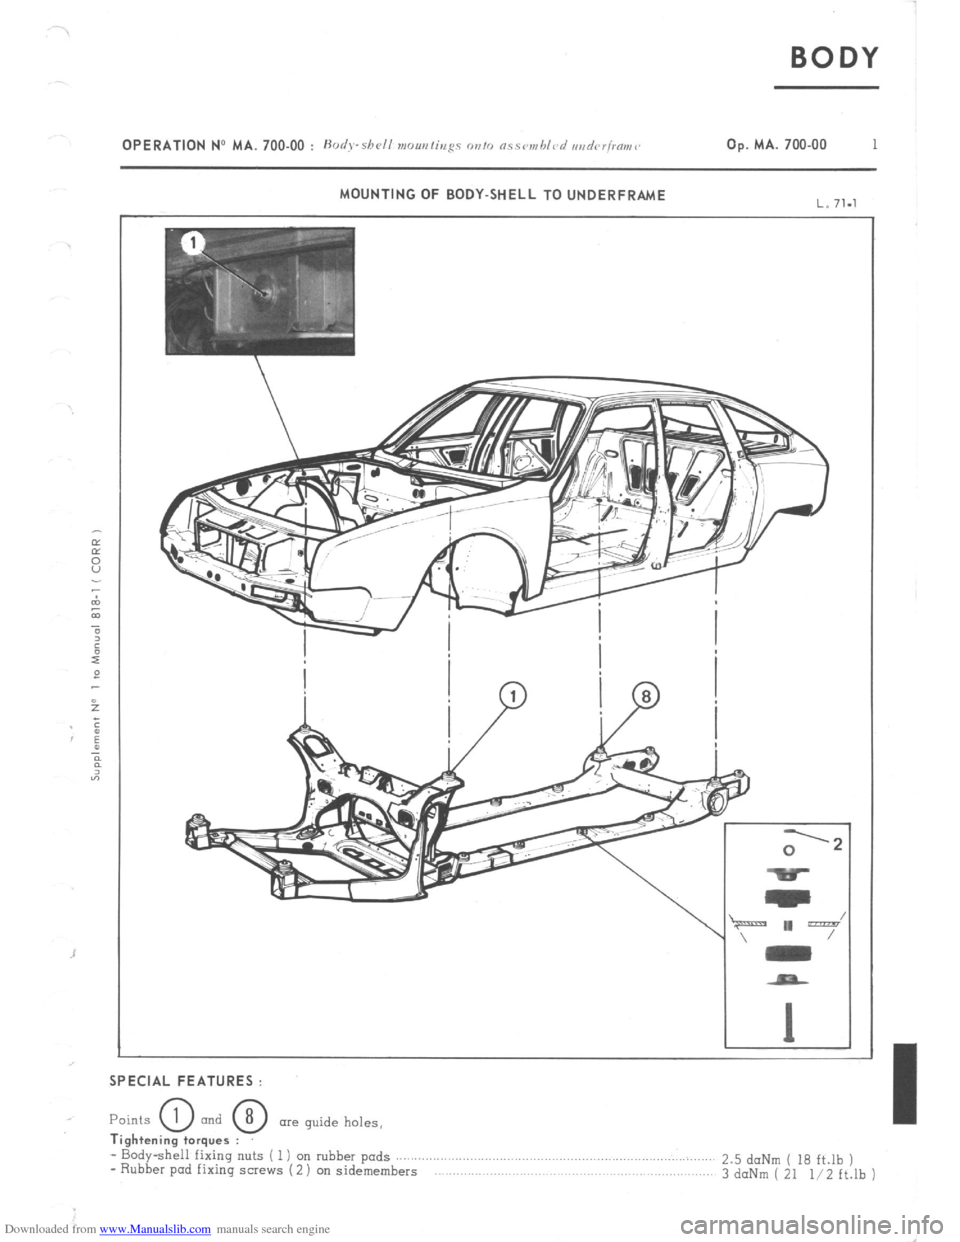
OPERATION No MA. 700.00 : Hods-shell nrountirrgs OVIO n\sov,hlcd uud<~r/m,<. Op. MA. 700.00 1
MOUNTING OF BODY-SHELL TO UNDERFRAME
L. 71.1
SPECIAL FEATURES :
‘,;i;::.gr;;ts@ are guide holes,
- Body-shell fixing nuts ( 1) on rubber pads
- Rubber pod fixing screws (2) on sidemembers 2.5 doNm ( 18 ft,lb )
3 daNm ( 21 l/2 ft.lb )
Page 382 of 394
Downloaded from www.Manualslib.com manuals search engine OPERATION NO MA. 840-O : Adjjrrsting the body-shell rompovcnts Op. MA. 840.0 1
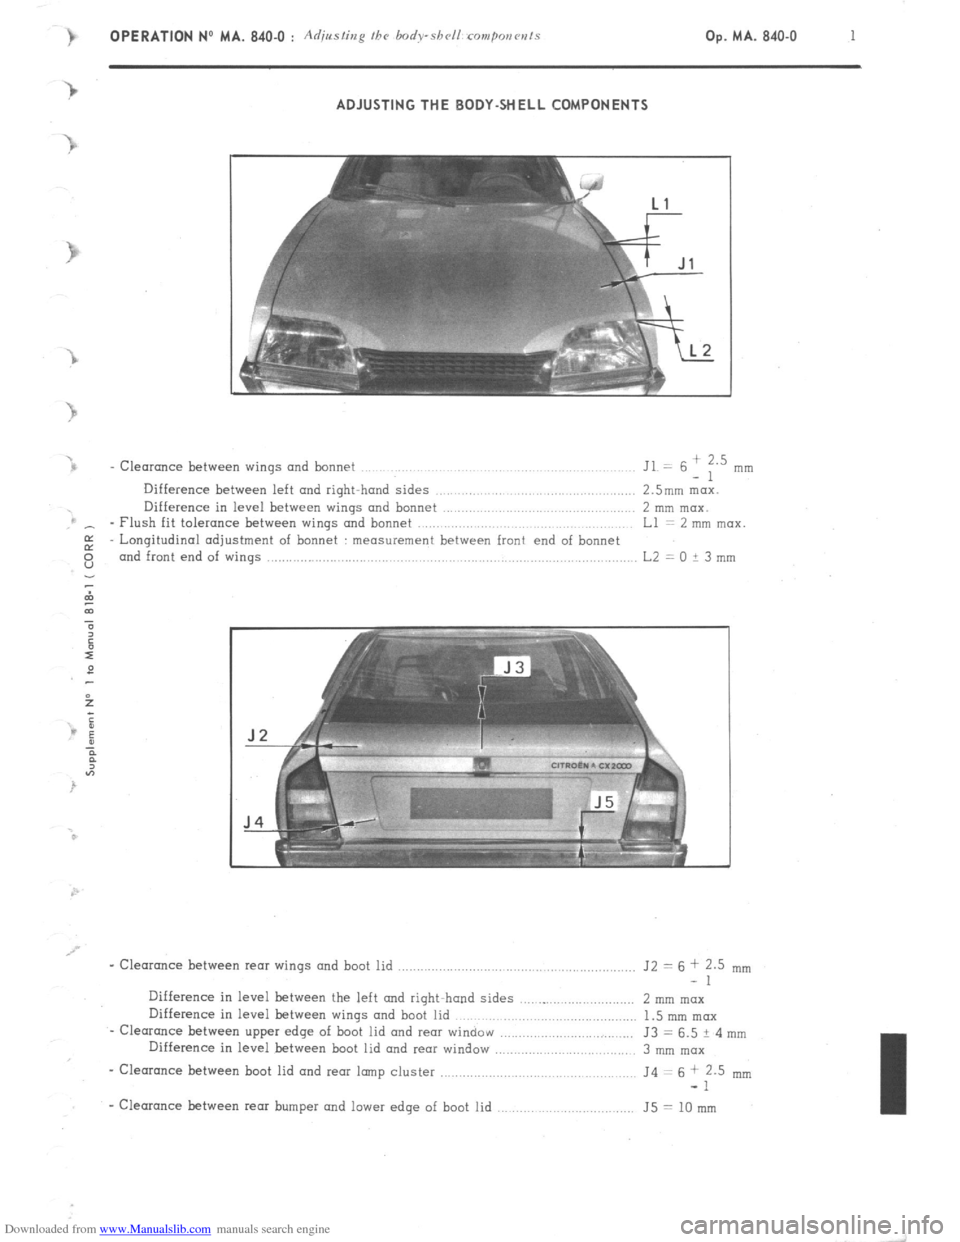
ADJUSTING THE BODY-SHELL COMPONENTS
t
Jl
-
- Clearance between wings and bonnet Jl.- 6; F.5 rnrn
Difference between left and right-hand sides 2.smm “lox.
Difference in level between wings and bonnet 2 mm max.
- - Flush fit tolerance between wings and bonnet ., Ll = 2 mm mox
E - Longitudinal adjustment of bonnet : measurement between front end of bonnet
E and front end of wings .,,,,,, ,., L2 = 0 t 3 mm
- Clearance between rear wings and boot lid ...................................... ....................
J2 = 6 + 2.5 mm
-1
Difference in level between the left and right-hand sides ............................... 2 mm max
Difference in level between wings and boot
lid ............................................. 1.5 mm max
- Clearance between upper edge of boot lid and rear window .............................. J3 = 6.5 ? 4 mm
Difference in level between boot lid and rear window ....................... ......... 3 mm max
- Clearance between boot lid rind rem irXI,p cluster ...................... ,, ., ............ J4 = 6 + 2.5 mm
-1
- Clearance between rem bumper and lower edge of boot lid ....................... ............ 55 = 10 mm
Page 383 of 394
Downloaded from www.Manualslib.com manuals search engine 2 OPERATION No MA. 840-O : A//ii,rs/hq /I><. body-sbcll rom/mncnts
Section A Section C
Section 8
4-k
J4
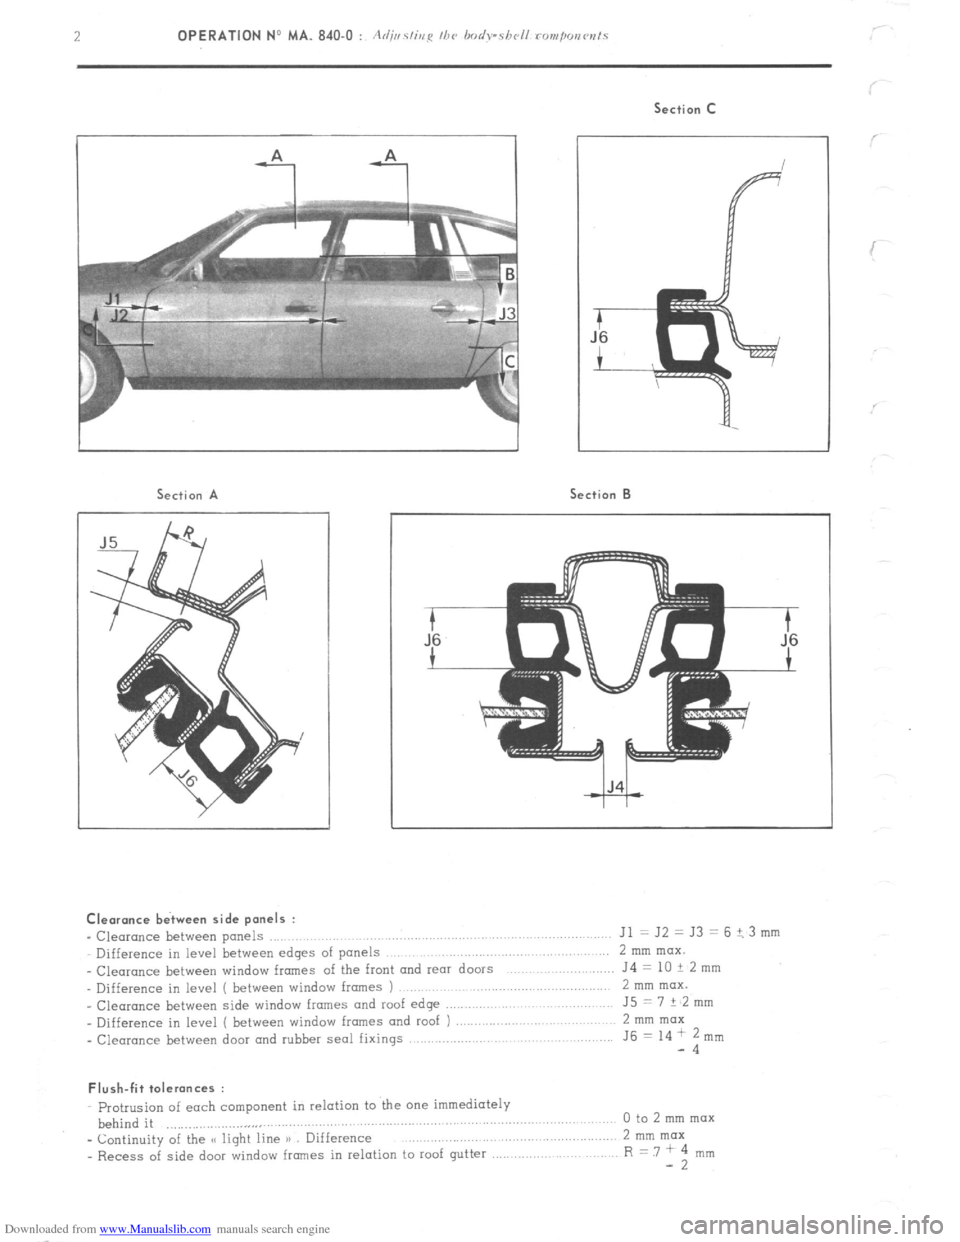
Clearance b&men side panels :
- Clearance between panels
Jl = J2 = J3 = 6 + 3 mm
Difference in level between edges of panels 2 mm max.
- Clearance between window frames of the front and rear doors J4 = 10 + 2 mm
Difference in level ( between window frames ) .,., 2 EN? max.
_ Clearance between side window frames and roof edge
J5 = 7 ? 2 mm
- Difference in level ( between window frames and roof ) 2 mm max
- Clearance between door and rubber seal fixings J6 = 14 + 2 mm -4
Flush-fit tolerances :
Protrusion of each component in relation to the one immediately
behind it 0 to 2 mm max
..,.................,,,II,
- Continuity of the s< light line >a Difference 2 mm max.
- Recess of side door window frames in relation to roof gutter R = .7 ’ 4 mm -2
Page 384 of 394
Downloaded from www.Manualslib.com manuals search engine OPERATION No MA. 841-O : Adjusting fh~ doors Op. MA. 841-O 1 I. ADJUSTING A FRONT DOOR
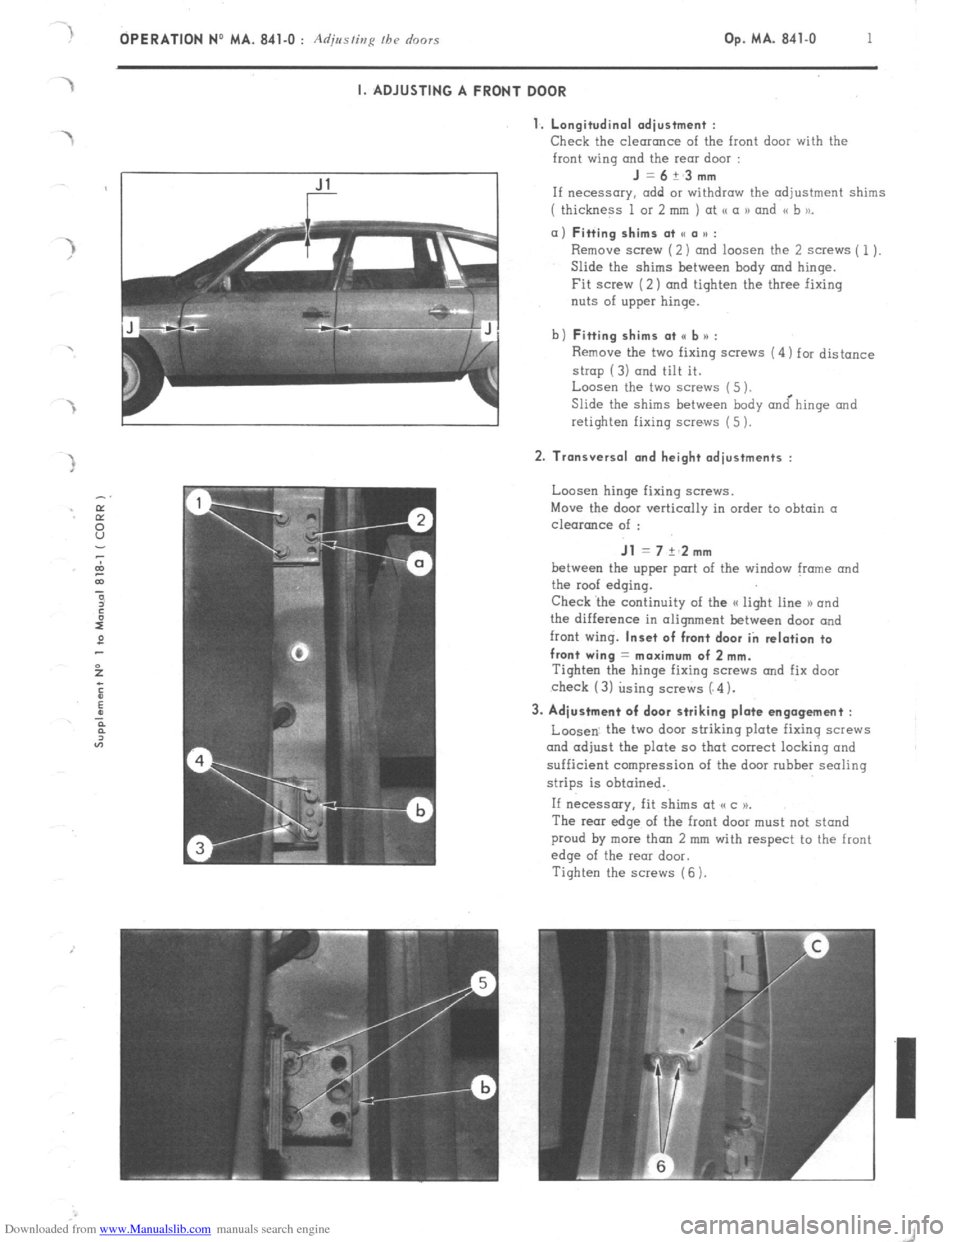
1. Longitudinal adiustment :
Check
the clearance of the front door with the
front wing and the rear door : J=6+_3mm
If necessary. add or withdraw the adjustment shims
( thickness 1 or 2 mm ) at <( a 1) and << b to_ a) Fitting shims at SC a u :
Remove screw (2) and loosen the 2 screws ( 1).
Slide the shims between hody and hinge.
Fit screw (2) and tighten the three fixing
nuts of upper hinge.
b) Fitting shims at <, b n :
Remove the two fixing screws (4) for distance
strop (3) and tilt it.
Loosen the two screws (5 ).
Slide the shims between body &hinge and
retighten fixing screws (5 ). 2. Transversal and height adjustments :
Loosen hinge fixing screws.
Move the door vertically in order to obtain a
clearance of : Jl = 7 +‘2mm
between the upper port of the window frame and
the roof edging.
Check ‘the continuity of the a light line 1) and
the difference in alignment between door and
front wing. Inset of front door in relation to
front wing = maximum of 2 mm.
Tighten the hinge fixing SCWNS and fix door
check (3) using screws (“4). 3. Adjustment of door striking plate engagement :
Loosen. the two door striking plate fixing screws
and adjust the plate so that correct locking and
sufficient compression of the door rubber sealing
strips is obtained.
If necessary, fit shims at (cc )P.
The rear edge of the front door must not stand
proud by more than 2 mm with respect to the front
edge of the rear door.
Tighten the screws (6 ).
Page 385 of 394
Downloaded from www.Manualslib.com manuals search engine 2 OPERATION NO MA. 841-O : Adjmfing /he o’r,ors
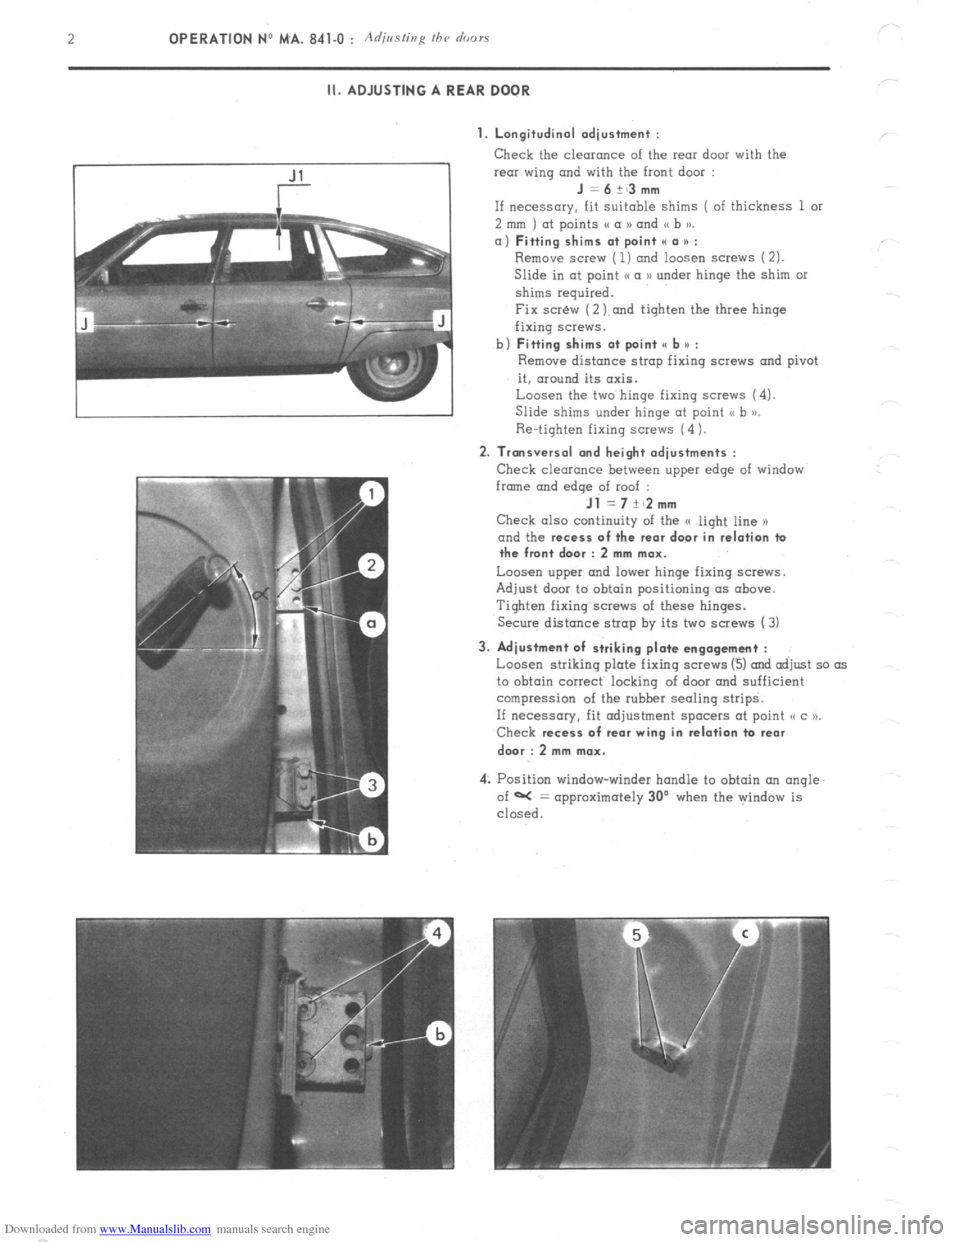
II. ADJUSTING A REAR DOOR
1. Longitudinal adjustment :
Check the clearonce of the rear door with the
rear wing and with the front door :
J =6+~3mm
If necessary, fit Suitable shims ( of thickness 1 or
2 mm ) at points (( a N and (( b )).
a) Fitting shims at point II a * :
Remove screw ( 1) ond loosen screws (2).
Slide in at point I< a D under hinge the shim or
shims required.
Fix scr&v (2 ).and tighten the three hinge
fixing screws.
b)
Fitting shims at point e b u :
Remove distance strop fixing screws and pivot
it, around its axis.
Loosen the two hinge fixing screws (4).
Slide shims under hinge at point <, b >j.
Re-tighten fixing screws (4 1.
2. Transversal and height adjustments :
Check clearance between upper edge of window
frmne and
edqe of roof :
Jl =7+~2mm
Check also continuity of the G light line x
and the recess
of the rear door in relation ta
the front door : 2 mm max.
Loosen upper and lower hinge fixing screws.
Adjust door to obtain positioning (IS above.
Tighten fixing screws of these hinges.
Secure distance strap by its two screws (3)
3. Adjustment of striking plate engagement :
Loosen striking plate fixing screws (3) and adjust so as
to obtain correct locking of door and sufficient
compression of the rubber sealing strips.
If necessary, fit adjustment spacers at point o c u.
Check recess
of rear wing in relation ta rear
dwr : 2 mm max.
4: Position window-winder handle to obtain an angle.
of W = approximately 30’ when the window is
closed.
Page 386 of 394
Downloaded from www.Manualslib.com manuals search engine OPERATION No MA. 844-O : Ad;,/<~lics /be hoot /ic/ Op. MA. 844-O 1
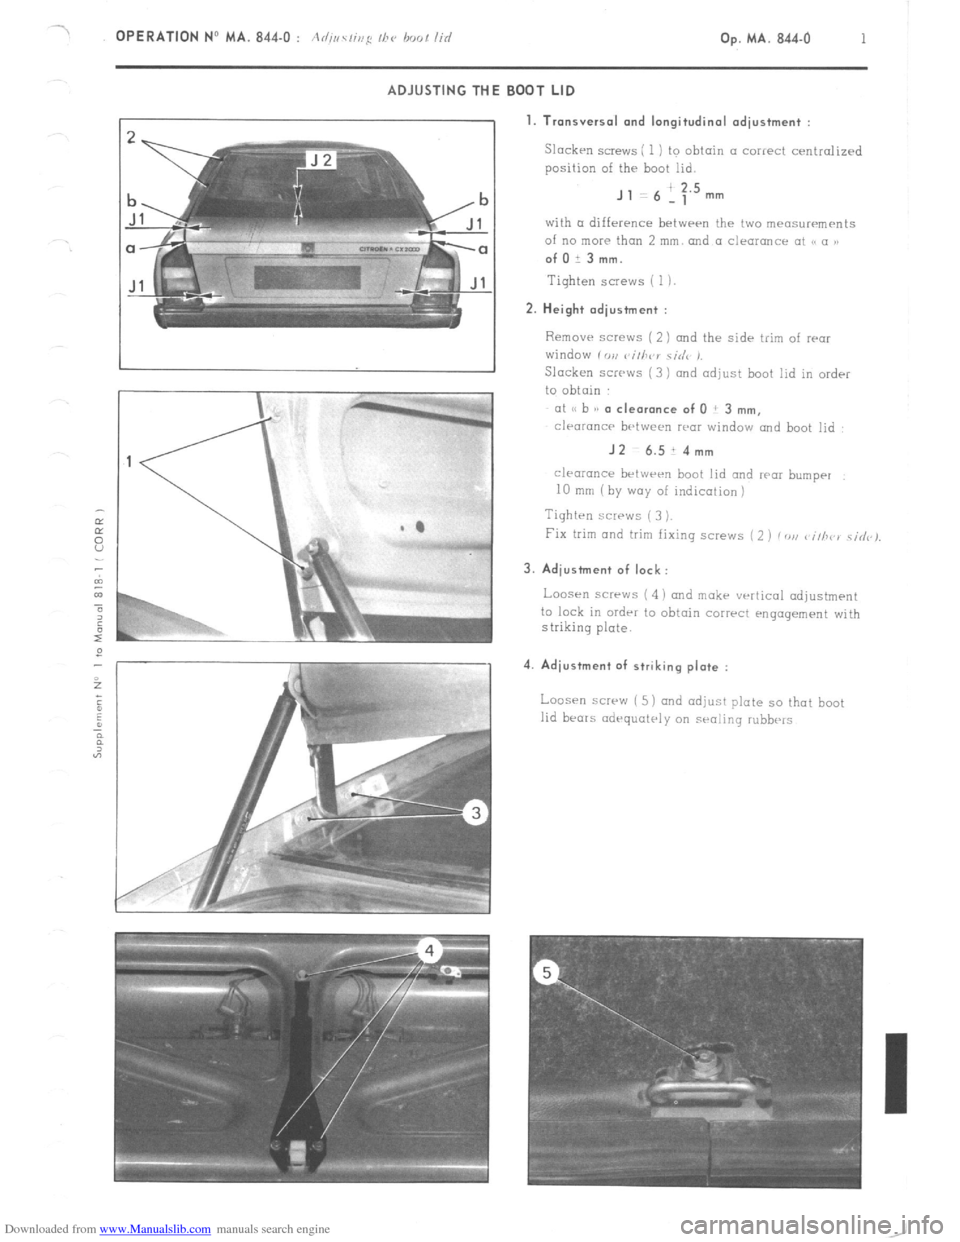
ADJUSTING THE BOOT LID
1. Tronsversol and longitudinal odiustment :
Slacken SCEWS ; 1 ) to obtain (I correct cenirolized
position of the boot lid.
J , 6 ! :‘” mm
with CL difference betwrrn the two meosurrments
of no more than 2 mm. and a clearance ot 18 a 1, ofOi3mm.
Tighten SCIWS ( 1). 2. Height odiustment :
Remove screws ( 2 ) and the sidr trim of rwr
window i vu vi/h~‘r ciriv ,.
Slacken screws ( 3 1 and adjust boot lid in order
to obtain
at I, b a/ a cle.r.nce of 0 ! 3 mm,
clraranc~ brtween war
window rmd boot lid : JZ-6.514mm
clearancr brtwrrn boot lid and rwr bumper
10 rmn (by way of indication)
Tighten screws ( 3 ).
Fix trim and trim fixing screws ( 2 ) /DU c iih~ ) \i&).
3. Adjustment of lock:
Loosen screws ( 4 i and mokr vertical odjustmrnt
to lock in ordrr to obtain correct engagement with
striking plate. 4. Adiustment of striking plate :
Loos-n screw ( 5) and adjust plate so that boot
lid bears odrquatrly on sealing rubbe‘s
Page 387 of 394
Downloaded from www.Manualslib.com manuals search engine OPERATION No MA. 852-O : Adius/ir,y I/><, bo,,r,r/ Op. MA. 852-O 1
~.
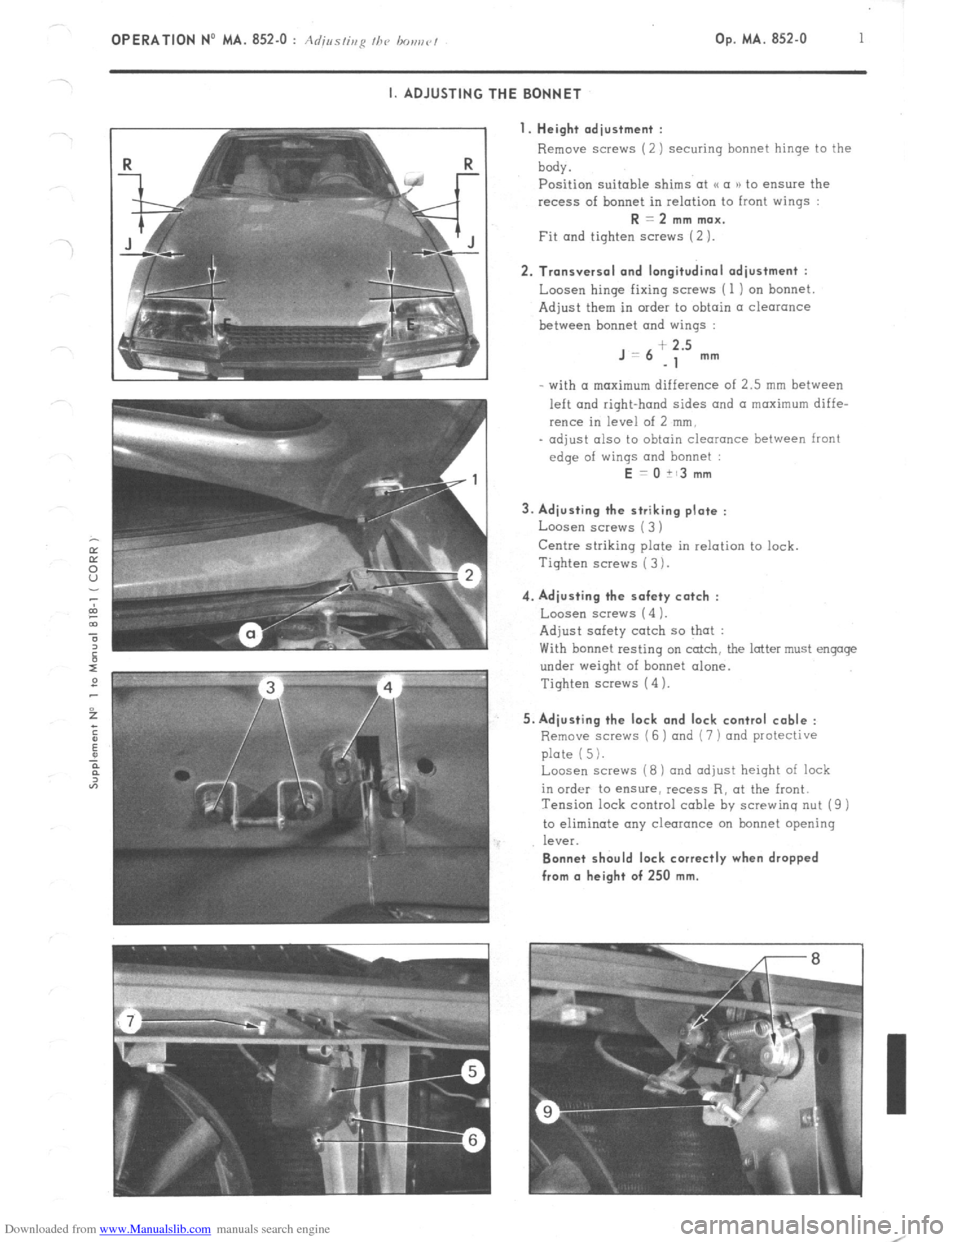
I. ADJUSTING THE BONNET
I. Height adjustment :
Remove screws (2) securing bonnet hinge to the
body.
Position suitable shims at u a )) to ensure the
recess of bonnet in relation to front wings : R = 2 mm max.
Fit and tighten screws (2 ). 2. Transversal and longitudinal adjustment :
Loosen hinge fixing screws ( 1 ) on bonnet
Adjust them in order to obtain a clearance
between bonnet and wings : J=6
+ 2.5
-1 mm
- with (I maximum difference of 2.5 mm between
left and right-hand sides and a maximum diffe-
rence in level of 2 mm,
- adjust also to obtain clearance between front
edge of wings and bonnet : E = 0 it3 mm
3. Adjusting the striking plate :
Loosen screws ( 3 )
Centre striking plate in relation to lock.
Tiqhten screws ( 3 ). 4. Adjusting the safety catch :
Loosen screw5 (4 1.
Adjust safety catch so that :
With bonnet resting on catch, the latter must engage
under weight of bonnet alone.
Tighten screws (4 ). 5. Adjusting the lock and lock control cable :
Remove scravs (6 ) and (7 ) and protective
plate (5).
Loosen screws (8) and adjust height of lock
in order to ensure, recess R, at the front.
Tension lock control cable by screwing nut (9 )
to eliminate any clearance on bonnet opening
leV%. Bonnet should lock correctly when dropped
from (I height of 250 mm.
Page 388 of 394
Downloaded from www.Manualslib.com manuals search engine 2
OPERATION No MA. 852.0 : Acfirrr~isg /hr, bos,rv/ I II. UNLOCKING A BONNET
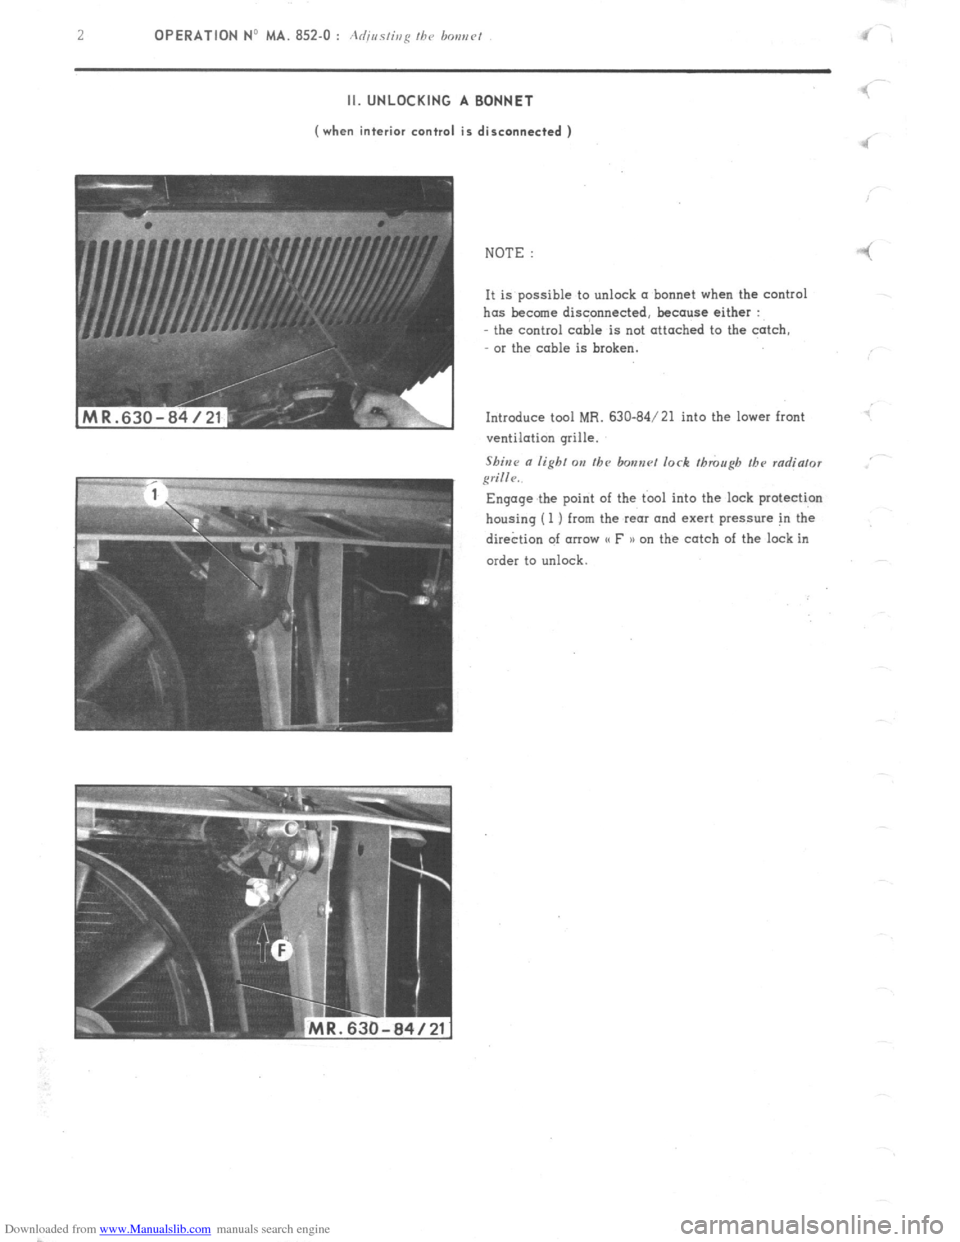
(when interior control is disconnected )
‘I
NOTE :
-! It is possible to unlock (I bonnet when the control
has become discpnnected, because either :
- the control cable is not attached to the catch,
or the cable is broken.
Introduce tool MR. 630-84/21 into the lower front
ventilation grille.
Shine
a lighf on tbc bonnrl lock though the radia/or
grille.. Engage the point of the tbol into the lock protection
housing (1 ) from the rear and exert pressure in the
dire&on of arrow CC F n on the catch of the lock in
order to unlock
Page 389 of 394
Downloaded from www.Manualslib.com manuals search engine OPERATION No MA. 961-O : C/ 3fc ztzg and repairing a war winabzc’ hrating elcmcnt k’ Op. MA. 961-O 1
I. CHECKING
Power of heating resistance :
S&Ions ., 140 to 160 watts at 13.5 1: 0.2 volts
Estates .,.,............: . . . . . . . .._.... . . . . . . . . . . . . . . . . . . . . . . . . . . . . . . . . . . . . . . . . . . . . . . . . . . . . . . . ~.. 130 to 150 watts at 13.5 t 0.2 volts
To check :he heating resistance of a rear window. measure
Either the current flowing in the resistance, using an ammeter connected in series to the supply lead of
the element. The current should be :
Saloons ,..., ., ,. ,. ,..,. ,,., ,,,., _, ,. .,., ..l_. 9.2 to 10.6 amps at 12 volts
Estates . . .., ,,..._.__.. .:_._ ._ . ..8 5 to 9.8 amps at 12 volts
Or the resistance using an ohmmeter. Resistance should be :
Saloons . . . . . . . . . . . . . . . . . . . . . . . . . . . . . . . . . j _..__.._....,. 1.1 to 1.3Q
Estates . .._...........,.,.,...,.....,..,..................................,,..,.,.,.,........,. 1 .2 to 1.4 !J
II. REPAIRING
1. Replacement of terminals : Tin that part of the terminal to be soldered. Solder it in the required location ( soldering iron ).
2. Repairing a section of the heating element : a) Obtain from the Replacement Parts Department :
- 1 Repair kit .,,..,,..,,.,.,.,.,,,.,.,,....,................,,,,,...,., ZC. 9 855 128 U
This M SECURIGLACE ))‘outfit includes :
- 1 Bottle of abrasive cleaning powder
- 1 Small bottle of conductive enamel
- 1 Tube of adhesive
- 1 Tube of hardener for adhesive
- 1 Small bottle of metallic powder
- 1 Roll of thick self-adhesive tape
- 1 Warning lamp for detecting cuts
- 1 Roll of self-adhesive tape for detecting cuts ( thermopaper )
- 1 Plastic spatula
- 1 Small glass plate ( for preparation of mixtures )
b)
Locating the cut : With the resistance fed as normal :
- Locate the defective resistance wire by sticking the adhesive detection tape at the centre of the rear
window ( interior side ) and on all resistance wires so that the tape is perpendicular to the latter.
The unbroken wires will turn the thermo-paper blue when they increase in temperature.
- Slide the two pointed probes of the warning lamp support on the cut wire. When the lamp lights up,
the pointed probes are on both sides of the break in the wire.
By slightly moving the probes along the length of the wire, the exact extent of the cut can be determined.
Page 390 of 394
Downloaded from www.Manualslib.com manuals search engine C) Preparing the rear window :
With the resistance switched off, clean the area to be treated with the powder contained in the bottle marked
(( Bimspulver )L
Spread this product on a small piece of cloth and rub.
Wipe off with a second clean cloth.
Place a strip, 25 mm long, of thick adhesive tape on each side of the resistance to mark out the width of the
resistance. The edges of the strip must be perfectly straight and clean so
as to avoid the possibility of a
cut during repair.
d
) Rep’ai r operation :
Zst part.
Empty the complete contents of the bottle of conductor enamel onto the glass plate. Mix thoroughly with the
spatula.
Apply the paste thus obtained on the area required,,filling the space between the two adhesive tapes.
Restrict the application of paste to the cut area.
Allow to dry at ambient temperature for approximately 15 minutes.
2nd Part
On the glass plate, prepare a small quantity of mixture composed of equal parts of UHV hardener and binding
agent.
Add to this paste an equal quantity of the metallic powder contained in the bottle marked (( Metallpulver )).
Mix well, using the spatula.
Apply the resulting paste on the conductor enamel deposit, overlapping on both sides by 10 mm, but with the
width still restricted by the strips of adhesive tape.
Thickness of the mixture should be equalized with the spatula, using the tape as a support.
Allow to dry for 1 l/2 hours at ambient temperature before removing the strips of adhesive tape.Move them aside
in a parallel direction to the surface of the rear window to avoid removing the applied film. Drying time can be
reduced by passing electric current through the resistance for half an hour.
NOTE : Wait for 24 to 48 hours before cleaning the inside of the rear window.
e) Checking :
The check can be carried out using the self-adhesive detecting tape.
Proceed as when locating the cut.