ignition CITROEN DISPATCH SPACETOURER 2017 Handbook (in English)
[x] Cancel search | Manufacturer: CITROEN, Model Year: 2017, Model line: DISPATCH SPACETOURER, Model: CITROEN DISPATCH SPACETOURER 2017Pages: 774, PDF Size: 48.25 MB
Page 203 of 774

201
Parking brake
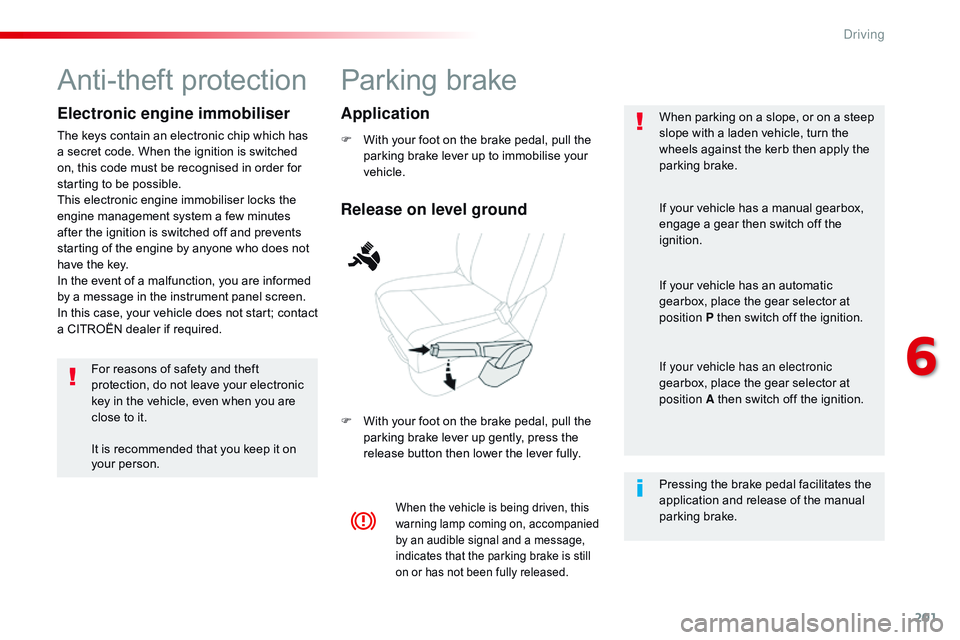
F With your foot on the brake pedal, pull the parking brake lever up to immobilise your
vehicle.
F
W
ith your foot on the brake pedal, pull the
parking brake lever up gently, press the
release button then lower the lever fully. When parking on a slope, or on a steep
slope with a laden vehicle, turn the
wheels against the kerb then apply the
parking brake.
When the vehicle is being driven, this
warning lamp coming on, accompanied
by an audible signal and a message,
indicates that the parking brake is still
on or has not been fully released.
Pressing the brake pedal facilitates the
application and release of the manual
parking brake. If your vehicle has a manual gearbox,
engage a gear then switch off the
ignition.
If your vehicle has an automatic
gearbox, place the gear selector at
position P then switch off the ignition.
If your vehicle has an electronic
gearbox, place the gear selector at
position A then switch off the ignition.
Release on level ground Application
Anti-theft protection
Electronic engine immobiliser
The keys contain an electronic chip which has
a secret code. When the ignition is switched
on, this code must be recognised in order for
starting to be possible.
This electronic engine immobiliser locks the
engine management system a few minutes
after the ignition is switched off and prevents
starting of the engine by anyone who does not
have the key.
In the event of a malfunction, you are informed
by a message in the instrument panel screen.
In this case, your vehicle does not start; contact
a CITROËN dealer if required.
For reasons of safety and theft
protection, do not leave your electronic
key in the vehicle, even when you are
close to it.
It is recommended that you keep it on
your person.
6
Driving
Page 211 of 774

209
When the ignition is on, a message
appears in the instrument panel
screen to indicate a gearbox fault.
Operating fault
In this case, the gearbox switches to back-up
mode and is locked in 3rd gear. You may feel
a substantial knock when changing from P
to R and from N to R. This will not cause any
damage to the gearbox.
Do not exceed 60 mph (100 km/h), local speed
restrictions permitting.
Have it checked by a CITROËN dealer or a
qualified workshop. You risk damaging the gearbox:
-
i
f you press the accelerator and
brake pedals at the same time
(braking or acceleration must be
done only with the right foot),
-
i
f you force the selector from
position P to another position when
the battery is flat.
To reduce fuel consumption when
stationary for long periods with the
engine running (traffic jam...), position
the selector at N and apply the parking
brake.
Stopping the vehicle
A stiff point may be noticed when
moving to position P .
If the selector is not in position P ,
when the driver's door is opened or
approximately 45 seconds after the
ignition is switched off, there is an
audible signal and a message appears.
F
R
eturn the selector to position P ;
the audible signal stops and the
message disappears.
Before switching off the engine, select
position
P then apply the parking brake to
immobilise the vehicle. In all circumstances, ensure that the
selector is in position P before leaving
your vehicle. On a steep slope with a loaded
vehicle, press the brake pedal
, select
position
P
, apply the parking brake then
release the brake pedal.
6
Driving
Page 215 of 774

213
With the ignition on, the flashing of A or AUTO,
a ccompanied by an audible signal and a
message, indicates a malfunction of the
gearbox.
Operating fault
Have it checked by a CITROËN dealer or a
qualified workshop.
Stopping the vehicle
Before switching off the engine, you can:
- m ove to position N to engage neutral,
or
-
l
eave the gear engaged; in this case, it will
not be possible to move the vehicle.
In both cases, you must apply the parking
brake to immobilise the vehicle.
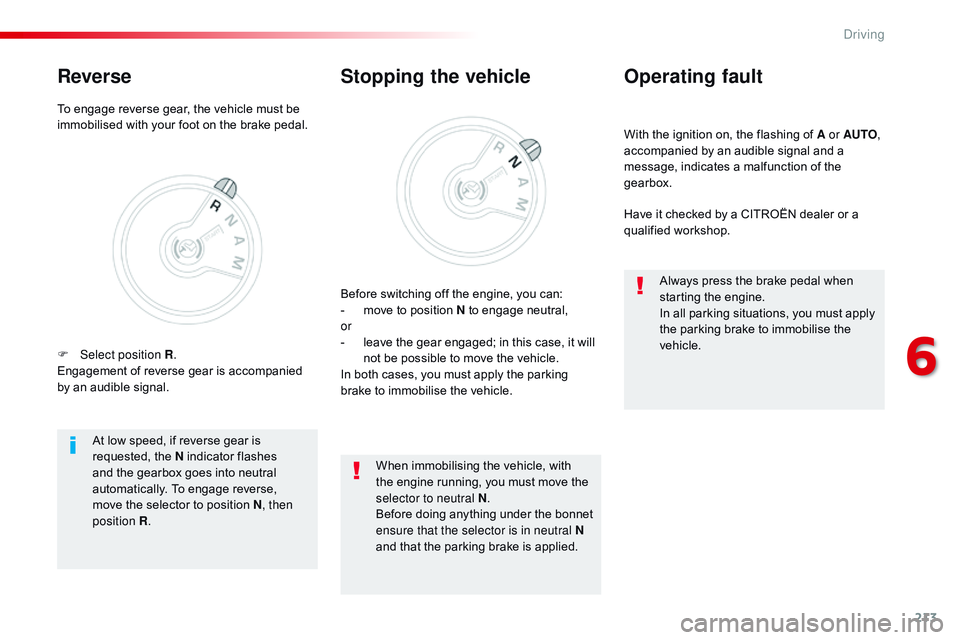
At low speed, if reverse gear is
requested, the N
indicator flashes
and the gearbox goes into neutral
automatically. To engage reverse,
move the selector to position N , then
position
R . When immobilising the vehicle, with
the engine running, you must move the
selector to neutral N
.
Before doing anything under the bonnet
ensure that the selector is in neutral N
and that the parking brake is applied. Always press the brake pedal when
starting the engine.
In all parking situations, you must apply
the parking brake to immobilise the
vehicle.
To engage reverse gear, the vehicle must be
immobilised with your foot on the brake pedal.
Reverse
F Select position R
.
Engagement of reverse gear is accompanied
by an audible signal.
6
Driving
Page 216 of 774

214
Stop & StartGoing into engine
STOP mode
If your vehicle has a manual gearbox, its
speed must be below 12 mph (20 km/h) or
stationary (depending on engine); the "ECO"
indicator lamp comes on in the instrument
panel and the engine goes into standby
automatically when you place the gear lever in
neutral and you release the clutch pedal.
For your comfort, during parking
manoeuvres, STOP mode is not
available for a few seconds after
coming out of reverse gear.
Stop & Start does not affect the
functionality of the vehicle, such as for
example, braking, power steering...
A slight delay between the vehicle
stopping and the engine cutting out may
be noticed.If your vehicle is fitted with
Stop & Start, a time counter
calculates the time spent in
STOP mode during a journey.
It resets to zero every time the ignition is
switched on.
Stop & Start time counter
The Stop & Start system puts the engine
t emporarily into standby - STOP mode - during
stops in the traffic (red lights, traffic jams, or
other...). The engine restarts automatically -
START mode - as soon as you want to move
off. The restart takes place instantly, quickly
and silently.
Per fect for urban use, the Stop & Start system
reduces fuel consumption and exhaust
emissions as well as the noise level when
stationary.
If your vehicle has an automatic gearbox
and the vehicle is stationary, the "ECO"
indicator lamp comes on and the engine goes
into standby automatically when you press
the brake pedal or place the gear selector in
position N .
If your vehicle has an electronic gearbox and
the vehicle's speed is below 5 mph (8
km/h),
the "ECO" indicator lamp comes on and the
engine goes into standby automatically when
you press the brake pedal or place the gear
selector in position N . (minutes / seconds or hours / minutes)
Never refuel with the engine in
STOP
mode; you must switch off the
ignition with the button.
Driving
Page 219 of 774

217
Operating fault
Depending on your vehicle's equipment:
Have it checked by a CITROËN dealer or a
qualified workshop.
In the event of a fault in STOP mode, the
vehicle may stall.
All of the instrument panel warning lamps
come on.
Depending on version, an alert message may
also be displayed, asking you to place the gear
lever in position N and put your foot on the
brake pedal.
With the vehicle stationary, you must switch off
the ignition and then start the engine again. The Stop & Start system requires a
12
V battery with a special specification
and technology.
The warning lamp in this button
flashes and a message appears,
accompanied by an audible signal. In the event of a fault with the
system, this warning lamp flashes in
the instrument panel. All work on this type of battery must
be done by a CITROËN or a qualified
workshop.
For more information on the 12 V batter y,
refer to the corresponding section.
6
Driving
Page 221 of 774

219
F With the engine running, adjust the brightness of the information displayed
using buttons 3 :
-
t
he "sun" to increase the brightness,
-
t
he "moon" to decrease the brightness.
Brightness adjustment
Height adjustment
In certain extreme weather conditions
(rain and/or snow, bright sunshine,
...)
the head-up display may not be legible
or may suffer temporary inter ference.
Some sunglasses may hamper reading
of the information.
To clean the blade, use a clean, soft
cloth (such as a spectacles cloth or
microfibre cloth). Do not use a dry or
abrasive cloth or detergent or solvent
products as these could scratch the
blade or damage the non-reflective
coating. We recommend that adjustments are
made using these buttons only when
the vehicle is stationary.
When stationary or while driving, no
objects should be placed around the
blade (or in its recess) so as to not
impede deployment of the blade and its
correct operation.
This system operates when the engine
is running and the settings are stored
when the ignition is switched off.
F
W
ith the engine running, adjust the display
to the desired height using buttons 4 :
-
u
p to move the display up,
-
d
own to move the display down.
6
Driving
Page 227 of 774

225
GAP
MEM
Steering mounted controls
6. Speed limiter on/pause indication.
7. S peed limiter mode selection indication.
8.
S
peed value setting.
Speed limiter ("LIMIT")
System which prevents the vehicle from exceeding the speed programmed by the driver.
The speed limiter cannot, in any circumstances,
replace the need to observe speed limits, nor can it
replace the need for vigilance on the part of the driver.
Once the programmed speed limit is reached,
additional pressure on the accelerator pedal
has no effect.
1.
S
elect speed limiter mode.
2.
L
ower the programmed speed.
3.
R
aise the programmed speed.
4.
S
peed limiter on / pause.
5.
I
f fitted to your vehicle, display the list of
memorised speeds or memorise the speed
suggested by the speed limit recognition
system.
Display in the instrument panel
The programmed speed remains in the
memory when the ignition is switched off.
For more information on this button
and the Dynamic cruise control ,
refer to the corresponding section.
For more information on
Memorising speeds , refer to the
corresponding section.
Head-up display
For more information on Speed limit
recognition and memorising them in
particular, refer to the corresponding
section.
6
Driving
Page 230 of 774

228
MEM
MEM
Cruise control ("CRUISE")
System which automatically maintains
the speed of the vehicle at the value
programmed by the driver, without any
action on the accelerator pedal.
Steering mounted controls
1. Select cruise control mode.
2. Programme a speed setting/Lower the
speed setting.
3.
P
rogramme a speed setting/Raise the
speed setting.
4.
P
ause-resume cruise control.
5.
I
f fitted to your vehicle, display the list of
memorised speeds or memorise the speed
offered by the speed limit recognition
system.
The cruise control system cannot, in
any circumstances, replace the need to
observe speed limits, nor can it replace the
need for vigilance on the part of the driver.
You are advised to keep your feet near the
pedals at all times.
For more information on Speed
limit recognition , refer to the
corresponding section.
Switching off the ignition cancels any
programmed speed value.
For more information on
Memorising speeds , refer to the
corresponding section.
Driving
Page 234 of 774

232
Dynamic cruise control ("CRUISE")
This systems allows the vehicle's speed to
be maintained at a value set by the driver.
In addition it allows (when circumstances
permit) an inter-vehicle distance that you
have selected to be maintained between
your vehicle and the vehicle in front.
In the Driving menu, activate/deactivate
" Dynamic cruise control".
The state of the system is memorised on
switching off the ignition.
Activation / Deactivation
The cruise control selection
thumbwheel must be at the
"CRUISE" position, otherwise the
selection is not taken into account.
Activation or deactivation of
the system is via the vehicle
configuration menu.
With the touch screen
1. Select cruise control mode.
2. P rogramme a speed setting/Reduce the
speed setting.
3.
P
rogramme a speed setting/Increase the
speed setting.
4.
P
ause / Resume cruise control.
5.
I
f fitted to your vehicle, display the list of
memorised speeds or memorise the speed
suggested by the speed limit recognition
system.
6.
S
elect the inter-vehicle distance (" Close",
" Normal ", "Distant ").
Steering mounted controls
By default, the inter-vehicle distance is
set at "Normal ".
Other wise, the last setting made will be
used when switching on the system.
Driving
Page 237 of 774

235
This value remains in memory, regardless of
the state of the system. F
P
ress button 6 to select a new inter-vehicle
distance setting from the three levels
("Close ", "Normal ", "Distant ").
Modification of the inter-
vehicle distanceIn the event of the presence of a vehicle
detected by the inter-vehicle distance
radar, if the speed selected is too far
above the speed of that vehicle, the
system is not activated and the alert
message "Activation not possible,
conditions unsuitable" is displayed until
driving conditions are safe to allow
activation of the system.
The inter-vehicle distance setting
is memorised when the ignition is
switched off.
Exceeding the programmed
speed
Simply release the accelerator pedal
to return to the programmed speed. It is possible to exceed the
programmed speed temporarily by
depressing the accelerator pedal. The dynamic cruise control can be paused
manually with the control, or automatically:
-
b
y pressing the brake or clutch pedal,
-
i
n the event of operation of the ESC, for
safety reasons,
-
w
hen an inter-vehicle distance threshold
is reached (calculated according to the
relative speeds of your vehicle and the
vehicle in front and the inter-vehicle
distance setting selected),
-
w
hen the distance between your vehicle
and the one in front becomes too small,
-
w
hen the speed of the vehicle in front is
too
low,
- w hen the speed of your vehicle becomes
too low.
Pause
If the programmed setting is unintentionally
exceeded, descending a steep hill for example,
the speed setting in the instrument panel
flashes as a warning.
6
Driving