seat CITROEN DISPATCH SPACETOURER 2018 Handbook (in English)
[x] Cancel search | Manufacturer: CITROEN, Model Year: 2018, Model line: DISPATCH SPACETOURER, Model: CITROEN DISPATCH SPACETOURER 2018Pages: 400, PDF Size: 16.99 MB
Page 93 of 400

91
F Lock the front feet using the handles.
F T ilt the seat backwards until the rear feet
lock into place.
Be aware of the feet of passengers when
tipping a seat.
Check that the seat has correctly engaged in its
anchorages on the floor when returned to the
seating position. F
I
f fitted to your vehicle, pull the control
to raise the backrest (from the rear,
lower the handle).
Ensure that no object, or the feet of a
passenger seated at the rear, could
obstruct the anchorage points or prevent
the correct latching of the assembly.
Rear seat and bench seat
on rails
The different levels of equipment and settings
described hereafter vary according to the
version and the configuration of your vehicle.
The individual seat is always on the right and
the bench seat on the left (facing for ward).
The bench seat has two independent
backrests.
3
Ease of use and comfort
Page 94 of 400

92
Head restraints
F To raise a head restraint, pull it up until it engages in its notches.
F
T
o remove the head restraint, press lug A
and pull the head restraint upward.
Reclining the backrest
The reclining backrest can be adjusted to
several positions.
F
T
o recline the backrest, raise the control
(from the rear, lower the handle).
F
R
elease the control when the desired
position is obtained.
Moving forward or backward
(example of an individual seat)
Two controls are provided for moving the seat
forwards and backwards:
F
F
rom the rear, pull the strap without going
beyond the point of resistance and push the
seat for ward or pull it back.
F
F
rom the front, raise the control and slide
the seat for ward or back.
F
T
o put it back in place, engage the head
restraint rods in the apertures keeping them
in line with the seat backrest.
F
T
o lower it, press on lug A and on the head
restraint at the same time.
For more information on the Seat belts
,
refer to the corresponding section.
Ease of use and comfort
Page 95 of 400

93
Moving the seat along the
full length of the rail
F Place the seat backrest in the table position.
F S lide the seat by pulling on the rear strap.
Folding the backrest to the
table position
(example of an individual seat)
F
P
ut the head restraints into the low position.
F
F
rom the rear, lower the handle to release
the backrest.
F
F
rom the front, raise the handle to release
the backrest.
F
F
old the backrest onto the cushion.
Do not leave objects (such as a bag or toys)
on the cushion when folding the backrest.
Return the backrest to the
normal position (between
the markings)
To return the backrest to the normal position,
the seat must be positioned between the
markings.
The arrow must not be outside the markings.
3
Ease of use and comfort
Page 96 of 400

94
F Use the front control to move the seat so that it is between the markings. Do not use the strap to lift the seat or
bench seat.
If removing and storing a seat (or bench
seat) out of the vehicle, ensure that it is
placed in a clean area, so as to avoid
introducing any foreign bodies into the
mechanisms.
The seat (or bench seat) is not designed
for any other purposes than on-board the
vehicle. It has mechanisms and may be
damaged if used improperly or if dropped.
Refitting a seat
Removing a seat
(example of an individual seat)
F
M ove the seat for ward for access to the
strap.
F
F
old the backrest to the table position.
F
F
rom the rear, pull the strap fully, to release
the anchorages and tip the seat for ward to
the vertical position.
F
R
emove the seat by the sliding door in
row 2
or from the rear in row 3.
Ease of use and comfort
Page 97 of 400

95
Before refitting a seat or bench seat to the
vehicle, pull the strap fully to ensure that
the latching mechanism has engaged.
Do not use the strap to lift the seat or
bench seat.(example of an individual seat)
F
C heck that nothing is obstructing the rails.
F
P
lace the front of the guides on the rails.
F
T
ip the seat back to align the rear of the
guides with the rails. F
S
lide the seat for ward or back until it
engages in the notches.
F
S
traighten the backrest.
Check that the seat has correctly engaged
in its anchorages on the floor when
returned to the seating position.
Ensure that no object, or the feet of a
passenger seated at the rear, could
obstruct the anchorage points or prevent
the correct latching of the assembly.
3
Ease of use and comfort
Page 98 of 400
96
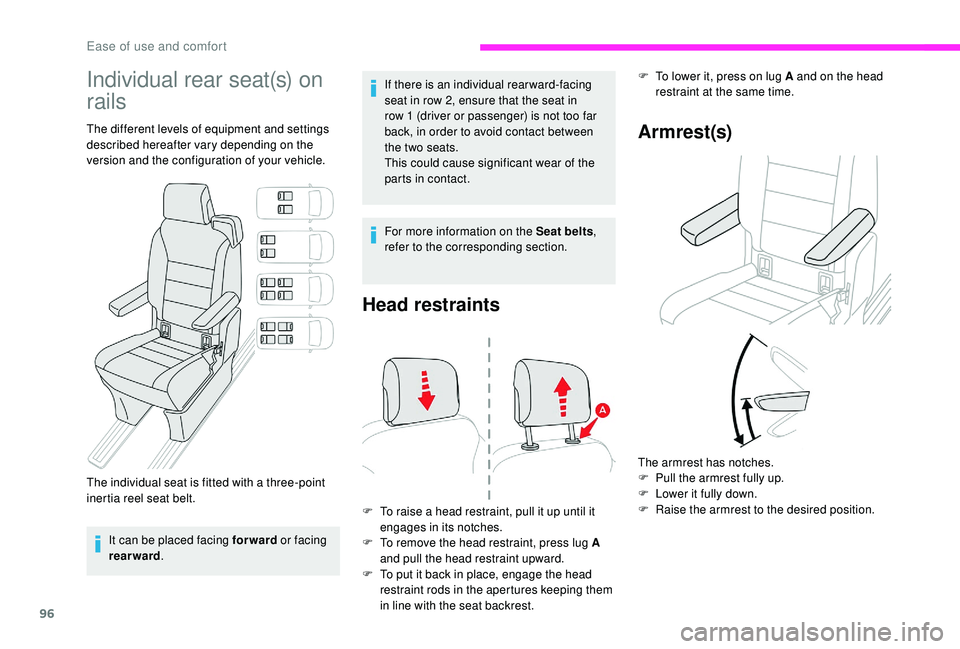
Individual rear seat(s) on
rails
The different levels of equipment and settings
described hereafter vary depending on the
version and the configuration of your vehicle.
The individual seat is fitted with a three-point
inertia reel seat belt.It can be placed facing forward or facing
rearward . If there is an individual rearward-facing
seat in row 2, ensure that the seat in
row 1
(driver or passenger) is not too far
back, in order to avoid contact between
the two seats.
This could cause significant wear of the
parts in contact.
For more information on the Seat belts ,
refer to the corresponding section.
Head restraints
F To raise a head restraint, pull it up until it engages in its notches.
F
T
o remove the head restraint, press lug A
and pull the head restraint upward.
F
T
o put it back in place, engage the head
restraint rods in the apertures keeping them
in line with the seat backrest.
Ar mrest(s)
F To lower it, press on lug A and on the head restraint at the same time.
The armrest has notches.
F
P
ull the armrest fully up.
F
L
ower it fully down.
F
R
aise the armrest to the desired position.
Ease of use and comfort
Page 99 of 400

97
Reclining the backrest
The reclining backrest can be adjusted to
several positions.
Moving forward or backward
Two controls are provided for moving the seat
forwards and backwards:
F
F
rom the rear, pull the strap without going
beyond the point of resistance and push the
seat for ward or pull it back.
F
F
rom the front, raise the control and slide
the seat for ward or back.
F
T
o recline the backrest, raise the control
(from the rear, lower the lever).
F
R
elease the control when the desired
position is obtained.
Folding the backrest to the
table position
Ensure that nothing (examples: bag,
suitcase, toy, folding and sliding table) is
inter fering with the mechanism to fold the
backrest.
3
Ease of use and comfort
Page 100 of 400
98
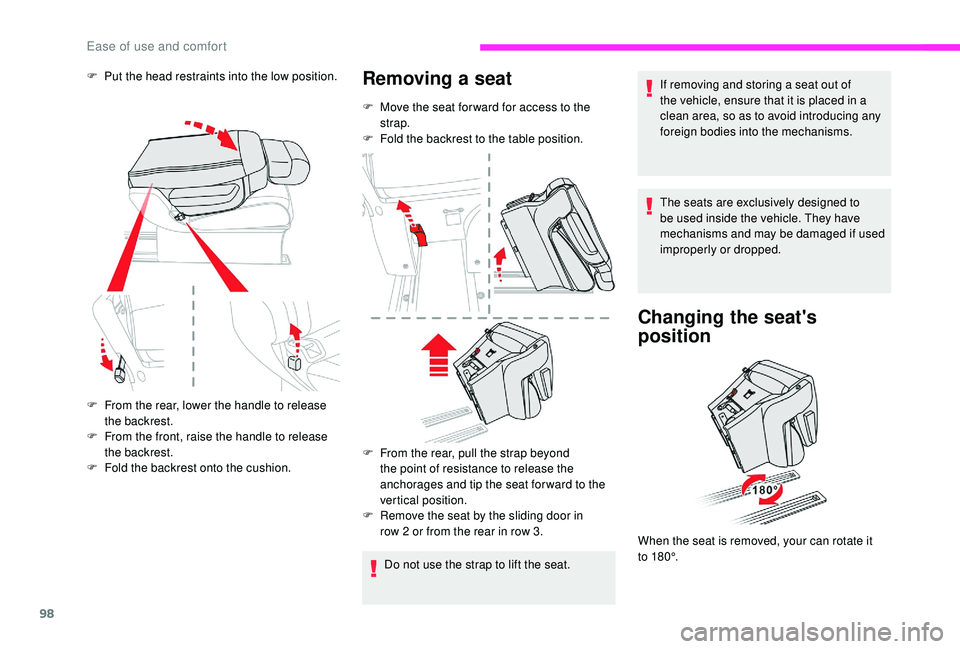
F From the rear, lower the handle to release the backrest.
F
F
rom the front, raise the handle to release
the backrest.
F
F
old the backrest onto the cushion.
Do not use the strap to lift the seat. If removing and storing a seat out of
the vehicle, ensure that it is placed in a
clean area, so as to avoid introducing any
foreign bodies into the mechanisms.
The seats are exclusively designed to
be used inside the vehicle. They have
mechanisms and may be damaged if used
improperly or dropped.
Changing the seat's
position
Removing a seat
F Move the seat for ward for access to the
strap.
F
F
old the backrest to the table position.
F
F
rom the rear, pull the strap beyond
the point of resistance to release the
anchorages and tip the seat for ward to the
vertical position.
F
R
emove the seat by the sliding door in
row 2
or from the rear in row 3. When the seat is removed, your can rotate it
t o 18 0 °.
F
P
ut the head restraints into the low position.
Ease of use and comfort
Page 101 of 400

99
Refitting a seat
Before refitting a seat to the vehicle, pull
the strap fully to ensure that the latching
mechanism has engaged.
Do not use the strap to lift the seat.F
P
lace the front of the guides on the rails.
F
T
ip the seat back to align the rear of the
guides with the rails. F
S
lide the seat for ward or back until it
engages in the notches.
F S traighten the backrest.
Check that the seat has correctly engaged
in its anchorages on the floor when
returned to the seating position.
Ensure that no object, or the feet of a
passenger seated at the rear, could
obstruct the anchorage points or prevent
the correct latching of the assembly.
F
C
heck that nothing is obstructing the rails.
3
Ease of use and comfort
Page 102 of 400
100
Precautions for the seats
and bench seats
Following the various handling operations:
- d o not remove a head restraint without
storing it and fixing it to a support,
-
c
heck that the seat belts are always
accessible to the passenger and easy to
fasten,
-
a p
assenger must not take their seat without
adjusting the seat's head restraint correctly
and adjusting and fastening the seat belt.
Loading luggage or objects
behind the row 3 seats and
bench seat
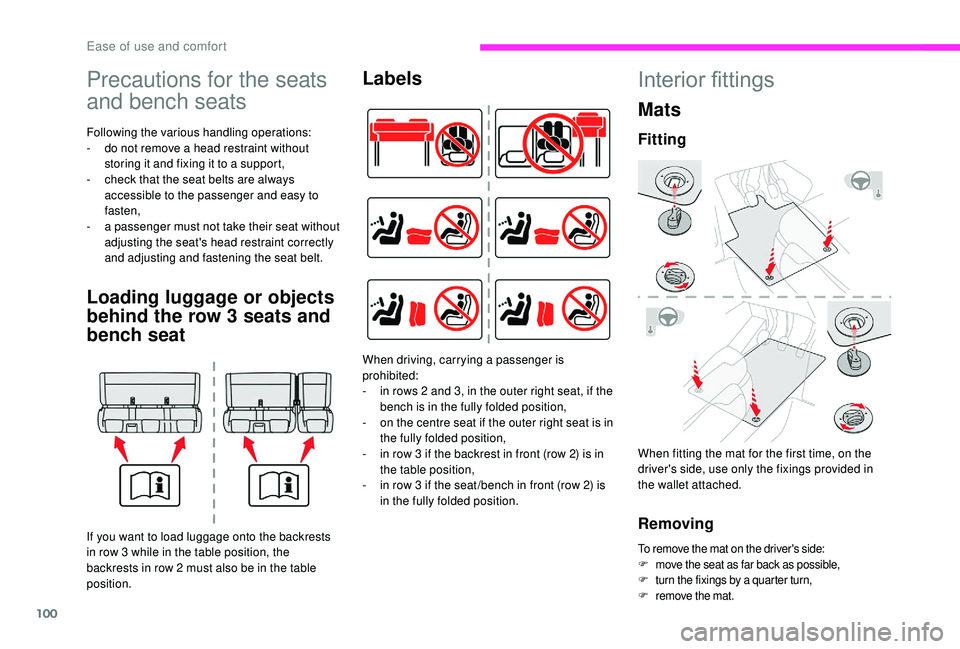
If you want to load luggage onto the backrests
in row 3
while in the table position, the
backrests in row 2
must also be in the table
position.
LabelsInterior fittings
Mats
Fitting
When fitting the mat for the first time, on the
driver's side, use only the fixings provided in
the wallet attached.
Removing
To remove the mat on the driver's side:
F m ove the seat as far back as possible,
F
t
urn the fixings by a quarter turn,
F
r
emove the mat.
When driving, carrying a passenger is
prohibited:
-
i
n rows 2 and 3, in the outer right seat, if the
bench is in the fully folded position,
-
o
n the centre seat if the outer right seat is in
the fully folded position,
-
i
n row 3 if the backrest in front (row 2) is in
the table position,
-
i
n row 3 if the seat /bench in front (row 2) is
in the fully folded position.
Ease of use and comfort