seat CITROEN DISPATCH SPACETOURER 2018 Handbook (in English)
[x] Cancel search | Manufacturer: CITROEN, Model Year: 2018, Model line: DISPATCH SPACETOURER, Model: CITROEN DISPATCH SPACETOURER 2018Pages: 400, PDF Size: 16.99 MB
Page 103 of 400

101
Refitting
To refit the mat on the driver's side:
F p osition the mat correctly,
F
r
efit the fixings by turning them by a quarter
turn,
F
c
heck that the mat is secured correctly.
To avoid any risk of jamming the pedals:
-
o
nly use mats which are suited to the
fixings already present in the vehicle;
these fixings must be used,
-
n
ever place one mat on top of another.
The use of mats not approved by
CITROËN may inter fere with access to
the pedals and hinder the operation of the
cruise control/speed limiter.
The mats approved by CITROËN have two
fixings located below the seat. Use the Velcro to connect the transverse mats
in row 2
with the longitudinal mats in rows 2
and 3.
Sun visor
The sun visors provide protection from the
sun from the front or the side and have an
illuminated vanity mirror (depending on
ve r s i o n).
A pocket is provided on the driver's sun visor to
hold toll tickets, receipts, etc.
Glove box
It houses the passenger's front airbag
deactivation switch and can hold a water bottle,
the vehicle's documentation, etc.
F
T
o open the glove box, pull the handle
towards you.
Never drive with the glove box open when
a passenger is at the front. It may cause
injury during sharp deceleration.
In rows 2 and 3
F With the ignition on, raise the concealing flap; the mirror is illuminated automatically.
3
Ease of use and comfort
Page 104 of 400

102
Storage compartment
It can hold a water bottle, the vehicle's
documentation, etc.
F
T
o open the storage compartment, press
the left-hand end of the control and guide
the lid to its open position notch.
If so equipped, it is lit when the lid is opened.
When driving , keep the storage
compartment closed. Otherwise there is a
risk of injury in the event of an accident or
sudden braking. Depending on the country of
sale, with air conditioning, it
gives access to the ventilation
nozzle, delivering the same air-
conditioned air as the vents in
the passenger compartment.
Front door pockets
Liquids carried in an open vessel (a cup
or mug) could be spilt, presenting a risk of
damage on contact with the controls in the
dashboard and centre console. Be careful.
Glove box, upper
This is located on the dashboard, behind the
steering wheel.
Press the control to open the lid (depending on
version) then guide it to its fully open position.
To close it, guide the cover then press the
centre gently.
Any liquid which could spill risks causing an
electrical short circuit and therefore a potential
fire.
"Aircraft" type tables
Fitted to the back of each front seat, these
allow you to place objects.
Ease of use and comfort
Page 105 of 400
103
On the passenger side, do not forget to
fold the "aircraft" type table before placing
the seat in the table position.
Do not place hard or heavy objects on
the table. They could become dangerous
projectiles in the event of emergency
braking or impact.
For more information on the Front seats
and, in particular, the "table" position for
the backrest, refer to the corresponding
section.
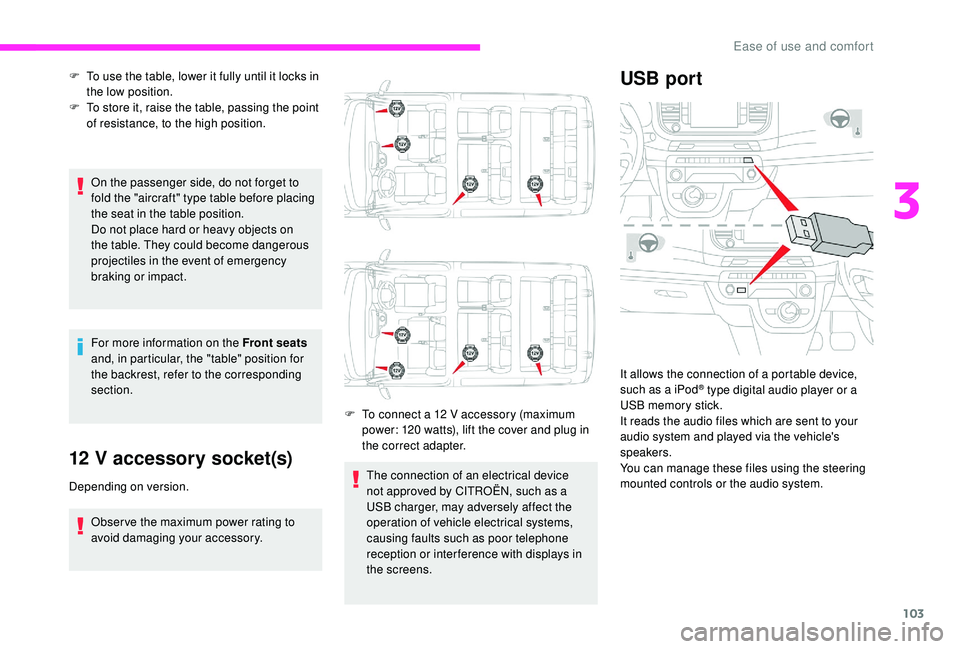
12 V accessory socket(s)
Depending on version.
Obser ve the maximum power rating to
avoid damaging your accessory. F
T
o connect a 12 V accessory (maximum
power: 120 watts), lift the cover and plug in
the correct adapter.
F
T
o use the table, lower it fully until it locks in
the low position.
F
T
o store it, raise the table, passing the point
of resistance, to the high position.
The connection of an electrical device
not approved by CITROËN, such as a
USB charger, may adversely affect the
operation of vehicle electrical systems,
causing faults such as poor telephone
reception or inter ference with displays in
the screens.
USB port
It allows the connection of a portable device,
such as a iPod® type digital audio player or a
USB memory stick.
It reads the audio files which are sent to your
audio system and played via the vehicle's
speakers.
You can manage these files using the steering
mounted controls or the audio system.
3
Ease of use and comfort
Page 106 of 400
104
When the USB port is used, the portable
device charges automatically.
While charging, a message is displayed if
the current drawn by the portable device
exceeds the power rating of the vehicle's
port.
For more information on using this
equipment, refer to the Audio equipment
and telematics section. For more information on the use of this
equipment, refer to the Audio equipment
and telematics
section.
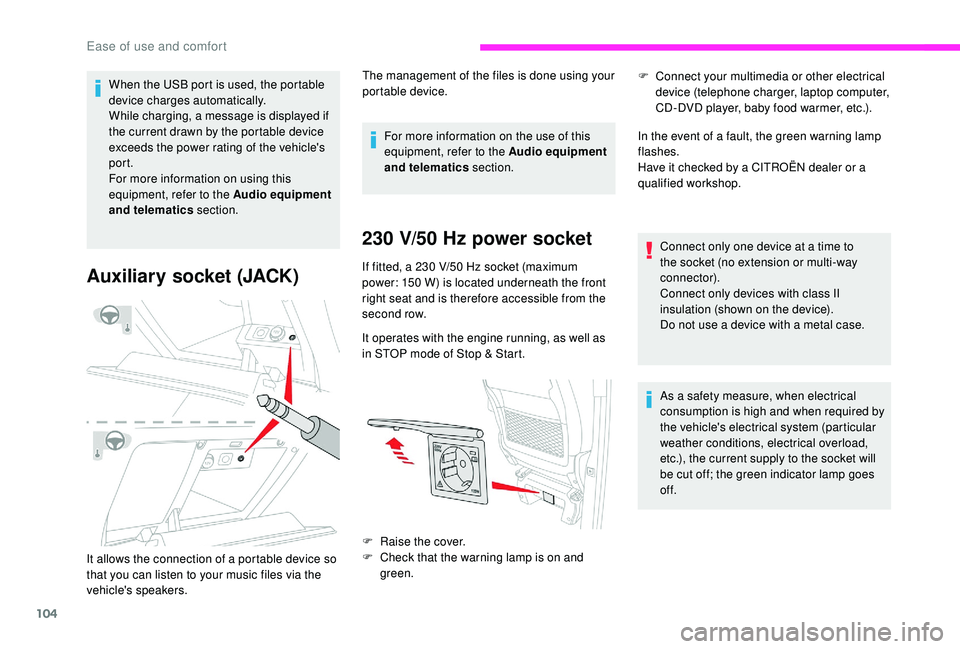
230 V/50 Hz power socket
If fitted, a 230 V/50 Hz socket (maximum
p ower: 150 W) is located underneath the front
right seat and is therefore accessible from the
second row.
It operates with the engine running, as well as
in STOP mode of Stop & Start.
F
Ra
ise the cover.
F
C
heck that the warning lamp is on and
green. In the event of a fault, the green warning lamp
flashes.
Have it checked by a CITROËN dealer or a
qualified workshop.Auxiliary socket (JACK)
It allows the connection of a portable device so
that you can listen to your music files via the
vehicle's speakers.
As a safety measure, when electrical
consumption is high and when required by
the vehicle's electrical system (particular
weather conditions, electrical overload,
etc.), the current supply to the socket will
be cut off; the green indicator lamp goes
of f. Connect only one device at a time to
the socket (no extension or multi-way
connector).
Connect only devices with class II
insulation (shown on the device).
Do not use a device with a metal case.
The management of the files is done using your
portable device.
F
C
onnect your multimedia or other electrical
device (telephone charger, laptop computer,
CD-DVD player, baby food warmer, etc.).
Ease of use and comfort
Page 107 of 400

105
Seating area fittings
Strap type grab handleCup holder (depending on
version)
Liquids carried in an open vessel (a cup or
mug) could be spilt, presenting a risk. Be
careful.
Front seat backrest nets
Hanger rail hooks
3
Ease of use and comfort
Page 108 of 400
106
High load retaining net
This allows the use of the entire loading
capacity, up to the roof:
-
b
ehind the front seats in row 1, when the
rear seats (and bench seats) in rows 2
and
3
are folded or removed.
-
b
ehind the rear seats (and bench seats)
in row 2, when the rear seats (and bench
seats) in row 3
are folded or removed.
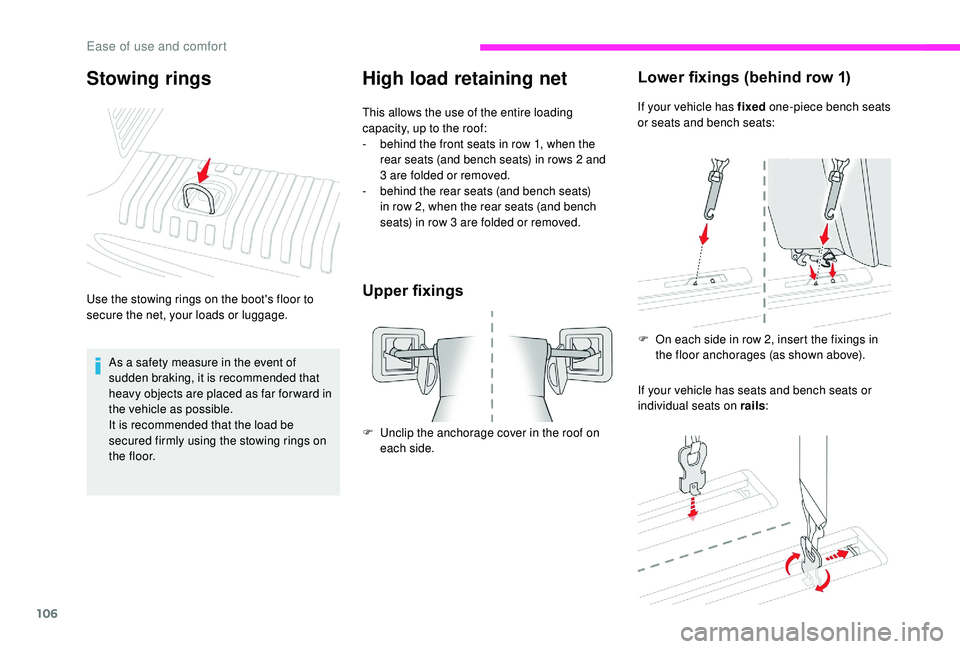
Upper fixings
F Unclip the anchorage cover in the roof on each side.
Lower fixings (behind row 1)
If your vehicle has fixed one-piece bench seats
or seats and bench seats:
If your vehicle has seats and bench seats or
individual seats on rails :
F
O
n each side in row 2, insert the fixings in
the floor anchorages (as shown above).
Stowing rings
Use the stowing rings on the boot's floor to
secure the net, your loads or luggage.
As a safety measure in the event of
sudden braking, it is recommended that
heavy objects are placed as far for ward in
the vehicle as possible.
It is recommended that the load be
secured firmly using the stowing rings on
t h e f l o o r.
Ease of use and comfort
Page 109 of 400
107
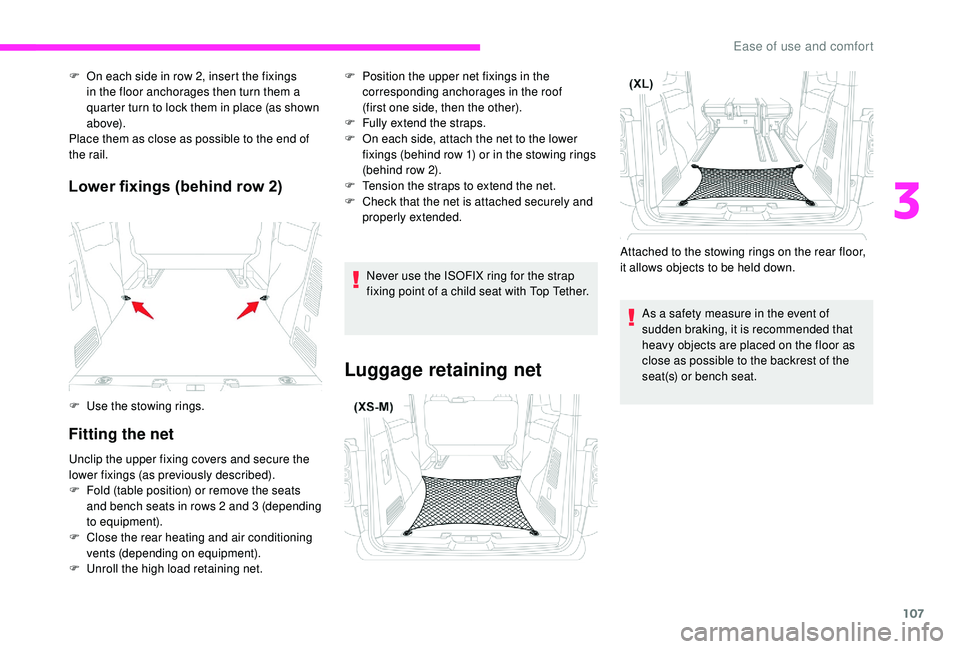
Lower fixings (behind row 2)
Fitting the net
F On each side in row 2, insert the fixings in the floor anchorages then turn them a
quarter turn to lock them in place (as shown
a b ove).
Place them as close as possible to the end of
the rail.
F
U
se the stowing rings.
Unclip the upper fixing covers and secure the
lower fixings (as previously described).
F
F
old (table position) or remove the seats
and bench seats in rows 2
and 3 (depending
to equipment).
F
C
lose the rear heating and air conditioning
vents (depending on equipment).
F
U
nroll the high load retaining net. F
P osition the upper net fixings in the
corresponding anchorages in the roof
(first one side, then the other).
F
F
ully extend the straps.
F
O
n each side, attach the net to the lower
fixings (behind row 1) or in the stowing rings
(behind row 2).
F
T
ension the straps to extend the net.
F
C
heck that the net is attached securely and
properly extended.
Never use the ISOFIX ring for the strap
fixing point of a child seat with Top Tether.
Luggage retaining net
Attached to the stowing rings on the rear floor,
it allows objects to be held down. As a safety measure in the event of
sudden braking, it is recommended that
heavy objects are placed on the floor as
close as possible to the backrest of the
seat(s) or bench seat.
3
Ease of use and comfort
Page 114 of 400

112
Removal
F Raise the control fully to release the anchorages and tip the table assembly
forward.
F
R
emove the table assembly through the
sliding door in row 2.
Check that there is nothing in the space
around the runner on the floor, so that the
table disengages cleanly.
Changing the direction
Remove a seat to make this easier.
With the table removed, you can turn it 180°.
Cup holders
Liquids carried in an open vessel (a cup
or mug) could be spilt, presenting a risk.
Be careful.
Never use the table in this position while
the vehicle is being driven.
Two cups or cans and small objects (such as
a credit card, portable ashtray or pen) can be
carried in the middle of the unfolded table.
Ease of use and comfort
Page 116 of 400

114
To move the table or an individual seat
for wards or backwards, make sure that
the seat's backrest is upright and the table
is stowed.When stowing the table trays, never put
your hand in the sliding area, you may get
your fingers trapped. Use the dedicated
handle.
Never place hot objects such as
saucepans or cooking pans on the table,
as you risk damaging its sur face (risk of
f i r e). With the table open, each tray can bear
a maximum load of 10
kg. If you do not
adhere to the maximum load, the table
may be partially or completely damaged.
Never raise the table when it is between
individual seats; this risks damaging the
table tops.
Incorrect use of the table could cause
serious injury.
Never use the table in the open or
unfolded position while the vehicle is
moving. Any objects on the table will turn
into projectiles if the vehicle has to brake
suddenly.
Ensure that the table is correctly stowed in
the low position before moving off.
Never use the table tops as seats or lean
on them.
A label on the table reminds you of of this.
Ease of use and comfort
Page 135 of 400
133
Pause
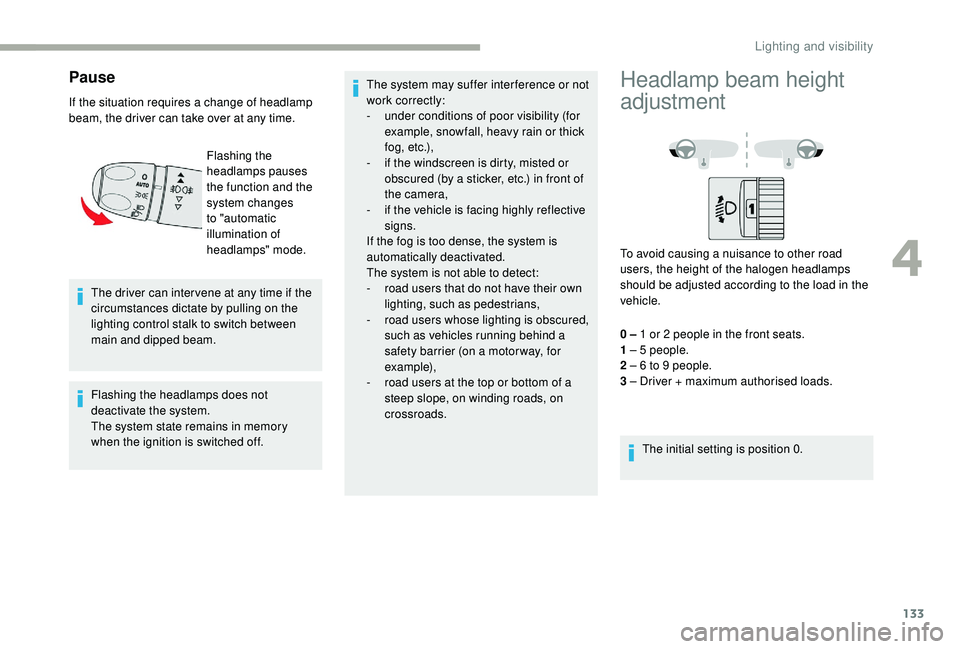
If the situation requires a change of headlamp
beam, the driver can take over at any time.The driver can inter vene at any time if the
circumstances dictate by pulling on the
lighting control stalk to switch between
main and dipped beam.
Flashing the headlamps does not
deactivate the system.
The system state remains in memory
when the ignition is switched off. The system may suffer inter ference or not
work correctly:
-
u nder conditions of poor visibility (for
example, snowfall, heavy rain or thick
f o g , e t c .),
-
i
f the windscreen is dirty, misted or
obscured (by a sticker, etc.) in front of
the camera,
-
i
f the vehicle is facing highly reflective
signs.
If the fog is too dense, the system is
automatically deactivated.
The system is not able to detect:
-
r
oad users that do not have their own
lighting, such as pedestrians,
-
r
oad users whose lighting is obscured,
such as vehicles running behind a
safety barrier (on a motor way, for
example),
-
r
oad users at the top or bottom of a
steep slope, on winding roads, on
crossroads.
Flashing the
headlamps pauses
the function and the
system changes
to "automatic
illumination of
headlamps" mode.
Headlamp beam height
adjustment
To avoid causing a nuisance to other road
users, the height of the halogen headlamps
should be adjusted according to the load in the
vehicle.
0
– 1 or 2 people in the front seats.
1
– 5 people.
2
– 6 to 9 people.
3
– Driver + maximum authorised loads. The initial setting is position 0.
4
Lighting and visibility