towing CITROEN DISPATCH SPACETOURER 2018 Handbook (in English)
[x] Cancel search | Manufacturer: CITROEN, Model Year: 2018, Model line: DISPATCH SPACETOURER, Model: CITROEN DISPATCH SPACETOURER 2018Pages: 400, PDF Size: 16.99 MB
Page 5 of 400

3
.
.
Driving recommendations 177
Starting/switching off the engine,
manual key, remote control
1
79
Starting/switching off the engine,
"
K
eyless Entry and Starting"
1
82
Anti-theft protection
1
86
Parking brake
1
86
Hill start assist
1
87
5-speed manual gearbox
1
88
6-speed manual gearbox
1
88
Gear ef ficiency indicator
1
89
Automatic gearbox
1
90
Electronic gearbox
1
95
Stop & Start
1
98
Head-up display
2
01
Memorising speeds
20
3
Recognition of speed limit signs and
recommendation
204
Speed limiter
20
7
Cruise control
2
10
Adaptive cruise control
2
13
Collision Risk Alert and
Active Safety Brake
2
19
Lane departure warning system
2
23
Fatigue detection system
2
24
Blind spot monitoring system
2
25
Parking sensors
2
28
Reversing camera, interior mirror
2
30
Visiopark 1
2
31
Under-inflation detection
23
4Fuel
237
Diesel misfuel prevention 23 8
Compatibility of fuels
2
39
Snow chains
2
40
Towing a trailer
2
41
Energy economy mode
2
41
Load reduction mode
2
42
Roof bars
2
42
Changing a wiper blade
2
43
Bonnet
2
44
Engine
245
Checking levels
2
46
Checks
248
AdBlue
® (BlueHDi engines) 2 50
Advice on care 2 54
Warning triangle
2
55
Running out of fuel (Diesel)
2
55
Tool box
2
56
Temporary puncture repair kit
2
58
Spare wheel
26
3
Changing a bulb
2
69
Changing a fuse
2
79
12
V battery
2
84
Towing
287Characteristics of the engines
and towed loads
2
89
Dimensions
292
Identification markings
2
93
CITROËN Connect Nav
CITROËN Connect Radio
Bluetooth audio system
Driving Practical information
In the event of a breakdown Technical data
Alphabetical index
Audio equipment and telematics
.
Contents
Page 108 of 400

106
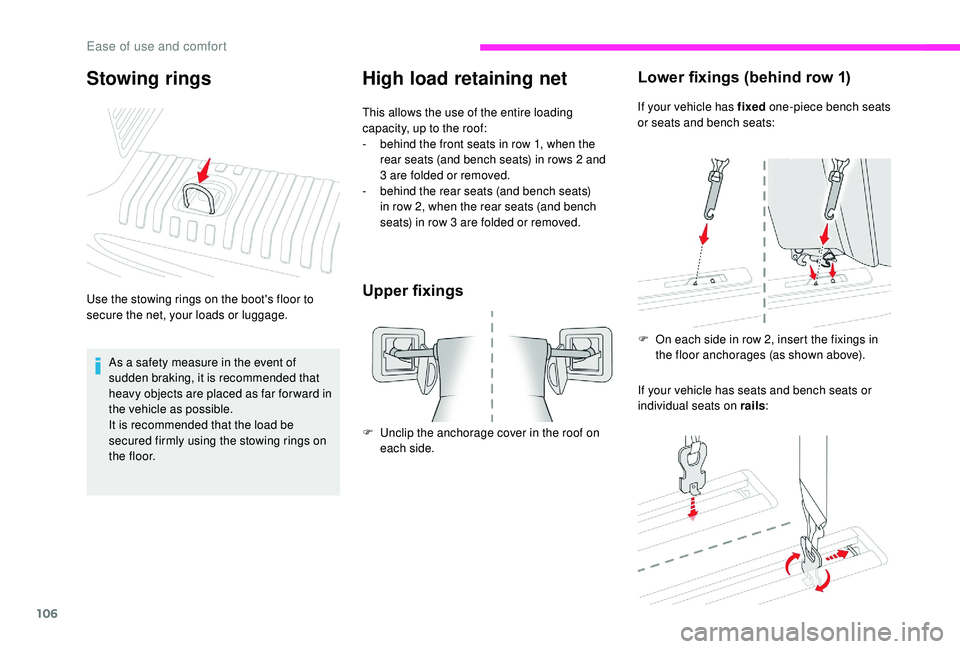
High load retaining net
This allows the use of the entire loading
capacity, up to the roof:
-
b
ehind the front seats in row 1, when the
rear seats (and bench seats) in rows 2
and
3
are folded or removed.
-
b
ehind the rear seats (and bench seats)
in row 2, when the rear seats (and bench
seats) in row 3
are folded or removed.
Upper fixings
F Unclip the anchorage cover in the roof on each side.
Lower fixings (behind row 1)
If your vehicle has fixed one-piece bench seats
or seats and bench seats:
If your vehicle has seats and bench seats or
individual seats on rails :
F
O
n each side in row 2, insert the fixings in
the floor anchorages (as shown above).
Stowing rings
Use the stowing rings on the boot's floor to
secure the net, your loads or luggage.
As a safety measure in the event of
sudden braking, it is recommended that
heavy objects are placed as far for ward in
the vehicle as possible.
It is recommended that the load be
secured firmly using the stowing rings on
t h e f l o o r.
Ease of use and comfort
Page 109 of 400

107
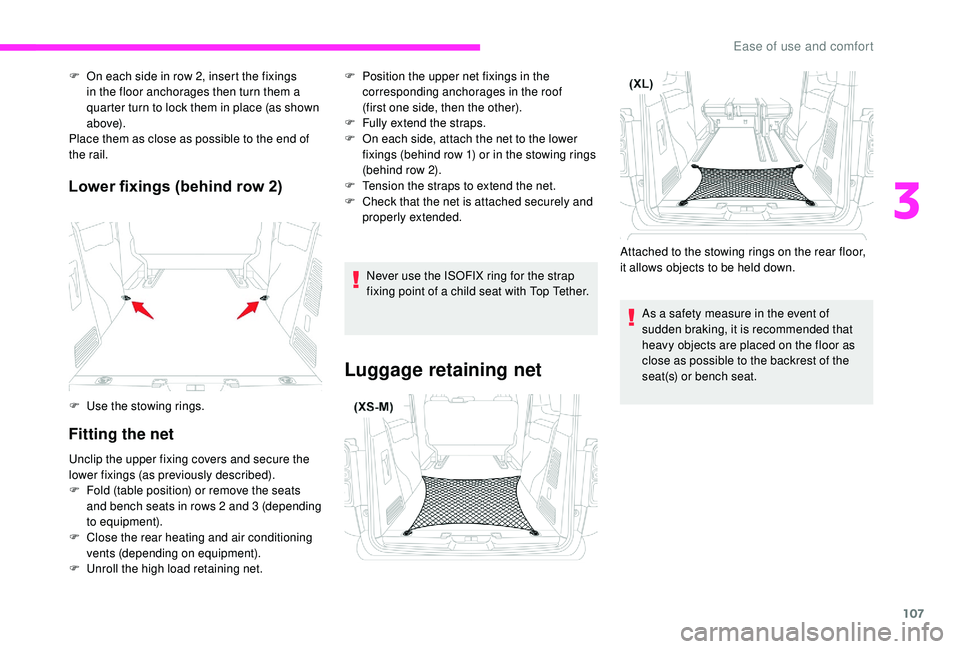
Lower fixings (behind row 2)
Fitting the net
F On each side in row 2, insert the fixings in the floor anchorages then turn them a
quarter turn to lock them in place (as shown
a b ove).
Place them as close as possible to the end of
the rail.
F
U
se the stowing rings.
Unclip the upper fixing covers and secure the
lower fixings (as previously described).
F
F
old (table position) or remove the seats
and bench seats in rows 2
and 3 (depending
to equipment).
F
C
lose the rear heating and air conditioning
vents (depending on equipment).
F
U
nroll the high load retaining net. F
P osition the upper net fixings in the
corresponding anchorages in the roof
(first one side, then the other).
F
F
ully extend the straps.
F
O
n each side, attach the net to the lower
fixings (behind row 1) or in the stowing rings
(behind row 2).
F
T
ension the straps to extend the net.
F
C
heck that the net is attached securely and
properly extended.
Never use the ISOFIX ring for the strap
fixing point of a child seat with Top Tether.
Luggage retaining net
Attached to the stowing rings on the rear floor,
it allows objects to be held down. As a safety measure in the event of
sudden braking, it is recommended that
heavy objects are placed on the floor as
close as possible to the backrest of the
seat(s) or bench seat.
3
Ease of use and comfort
Page 113 of 400

111
F Lift the control (without going beyond the point of resistance) and slide the assembly
forwards or backwards.
F
R
elease the control when it is in the desired
position.
F
C
heck that the table is secured on the
runner. If this is not the case, move the
assembly slightly to the next notch on the
r u n n e r.
You can move the table in both the open
and stowed position. However, to ensure
safety, it is advised that you handle the
assembly in the stowed position.
To ensure that the table runs smoothly,
ensure that no objects are blocking the
space used by the runner on the floor.
Before manoeuvring the table, check that
there is nothing on the table.Unfolding
F Operate the control on the top and pull the table assembly up until it clicks into place.
F
P
ull each table top fully up then pivot them
on each side into the horizontal position.
Folding
F Raise each table top, going beyond the point of resistance, to the vertical position.
F
P
ush each table top down into its housing
until it clicks into place.
F
P
ush the control then tip the table assembly
downward until it clicks into place.
Before stowing the table tops, check that
they are clear. Before tipping the assembly
down, check that the two table tops have
clicked home in the low position and that
there is nothing in the cup holder area
(such as a can or pen).
3
Ease of use and comfort
Page 116 of 400

114
To move the table or an individual seat
for wards or backwards, make sure that
the seat's backrest is upright and the table
is stowed.When stowing the table trays, never put
your hand in the sliding area, you may get
your fingers trapped. Use the dedicated
handle.
Never place hot objects such as
saucepans or cooking pans on the table,
as you risk damaging its sur face (risk of
f i r e). With the table open, each tray can bear
a maximum load of 10
kg. If you do not
adhere to the maximum load, the table
may be partially or completely damaged.
Never raise the table when it is between
individual seats; this risks damaging the
table tops.
Incorrect use of the table could cause
serious injury.
Never use the table in the open or
unfolded position while the vehicle is
moving. Any objects on the table will turn
into projectiles if the vehicle has to brake
suddenly.
Ensure that the table is correctly stowed in
the low position before moving off.
Never use the table tops as seats or lean
on them.
A label on the table reminds you of of this.
Ease of use and comfort
Page 124 of 400

122
Advice
In order for these systems to be fully effective,
follow the operation and maintenance
guidelines below:
F
T
o ensure that the air is distributed evenly,
keep the external air intake grilles at the
base of the windscreen, the nozzles, the
vents, the air outlets and the air extractor
located in the rear free from obstructions.
F
D
o not cover the sunshine sensor, located
at the top of the windscreen; this is used
for regulation of the air conditioning
system.
F
O
perate the air conditioning system for
at least 5
to 10 minutes, once or twice a
month to keep it in per fect working order.
F
T
o prevent misting or deteriorating air
quality inside the passenger compartment,
you should not deactivate the system for
too long and avoid extended operation of
the air recycling system when driving.
F
E
nsure that the passenger compartment
filter is in good condition and have the
filter elements replaced regularly.
We recommend the use of a combined
passenger compartment filter. Thanks to
its special active additive, it contributes
to the purification of the air breathed by
the occupants and the cleanliness of the
passenger compartment (reduction of allergic
symptoms, bad odours and greasy deposits). If after an extended stop in sunshine,
the interior temperature is very
high, first ventilate the passenger
compartment for a few moments.
Put the air flow control at a setting high
enough to quickly change the air in the
passenger compartment.
The air conditioning system does not
contain chlorine and does not present
any danger to the ozone layer.
The condensation created by the air
conditioning results in a discharge of
water under the vehicle which is per fectly
normal.
Stop & Star t
The heating and air conditioning systems
only work when the engine is running.
To maintain a comfortable temperature
in the passenger compartment, you can
temporarily deactivate the Stop & Start
system.
For more information on Stop & Star t ,
refer to the corresponding section.
F T
o ensure correct operation of the air
conditioning system, you are also advised
to have it checked regularly according
to the Maintenance and Warranty Guide
recommendations.
F
I
f the system does not produce cold air,
switch it off and contact a CITROËN dealer
or a qualified workshop.
When towing the maximum load on a steep
gradient in high temperatures, switching off the
air conditioning increases the available engine
power and so improves the towing ability.
Vents
To close the vent, move the control outwards.
You may feel slight resistance.
Ease of use and comfort
Page 180 of 400

178
Manoeuvre cautiously, at low
speed
The dimensions of your vehicle differ from
those of a light vehicle, in width, in height, as
well as in length, and some obstacles will be
more difficult to notice.
Manoeuvre slowly.
Before turning, check that there are no
obstacles at mid-height along the sides.
Before reversing, check that there are no
obstacles, particularly at high level behind the
vehicle.
Be aware of the external dimensions, if ladders
are fitted.
Load the vehicle correctly
If your vehicle is fitted with a drop-side back,
the height and width of the load must remain
within the overall dimensions of the vehicle.
Drive the vehicle in a prudent
and efficient way
Take corners gently.
Anticipate the need to brake as the stopping
distance is increased, particularly on wet or icy
roads.
Be aware of the effect of side winds on the
vehicle.
Effective eco-driving saves fuel; accelerate
progressively, anticipate the need to slow down
and adapt your speed to suit the situation.
Indicate changes of direction well in advance
so that you are seen by other road users.
Take care
The tyres must be inflated to at least the
pressures indicated on the label, even over-
inflated by 0.2 to 0.3 bar for long journeys.
With a load carried, the vehicle must remain
within the maximum authorised weight, the
Gross Vehicle Weight.
To avoid upsetting the balance of the vehicle,
the load should be centred and the heaviest
part placed on the floor in front of the rear
wheels.
It is inadvisable to place heavy loads on a roof
rack.
Loading also implies adherence to the
maximum load of the roof bar anchor points.
Adhere to the maximum permissible weight,
according to CITROËN dealer specifications.
Loads must be securely lashed down.
A load that is not properly secured inside the
vehicle may affect vehicle handling and create
a risk of accident.
In case of towing
Driving with a trailer places greater
demands on the towing vehicle and
requires extra care from the driver.
Distribution of loads
F Distribute the load in the trailer so that the
heaviest items are as close as possible to
the axle and the nose weight approaches
the maximum permitted without exceeding
it.
Air density decreases with altitude, thus
reducing engine performance. The maximum
towed load must be reduced by 10% for every
1,000
metres of altitude.
Please respect the maximum towable
weights.
F
T
ake into account the increased sensitivity
to wind.
Side wind
Driving
Page 181 of 400

179
Cooling
Towing a trailer on a slope increases the
temperature of the coolant.
As the fan is electrically controlled, its cooling
capacity is not dependent on the engine speed.
F
T
o lower the engine speed, reduce your
speed.
The maximum towable load on an incline
depends on the gradient and the exterior
temperature.
In all cases, keep a check on the coolant
temperature.
F
I
f this warning lamp and the
STOP warning lamp come on,
stop the vehicle and switch off
the engine as soon as possible.
New vehicle
Do not pull a trailer before having driven at
least around 600
miles (1,000 kilometres).
When the exterior temperature is high,
leaving the engine running for 1
to
2
minutes after stopping the vehicle to
allow it to cool is recommended.
Braking
Towing a trailer increases the braking distance.
To avoid overheating of the brakes, the use of
engine braking is recommended.
Ty r e s
F Check the tyre pressures of the towing vehicle and of the trailer, observing the
recommended pressures.
Lighting
F Check the electrical lighting and signalling on the trailer and the headlamp beam height
of your vehicle.
For more information on Headlamp
beam height adjustment , refer to the
corresponding section.
The rear parking sensors will be
deactivated automatically to avoid the
audible signal if a genuine CITROËN
towbar is used.
Starting/switching off
the engine, manual key,
remote control
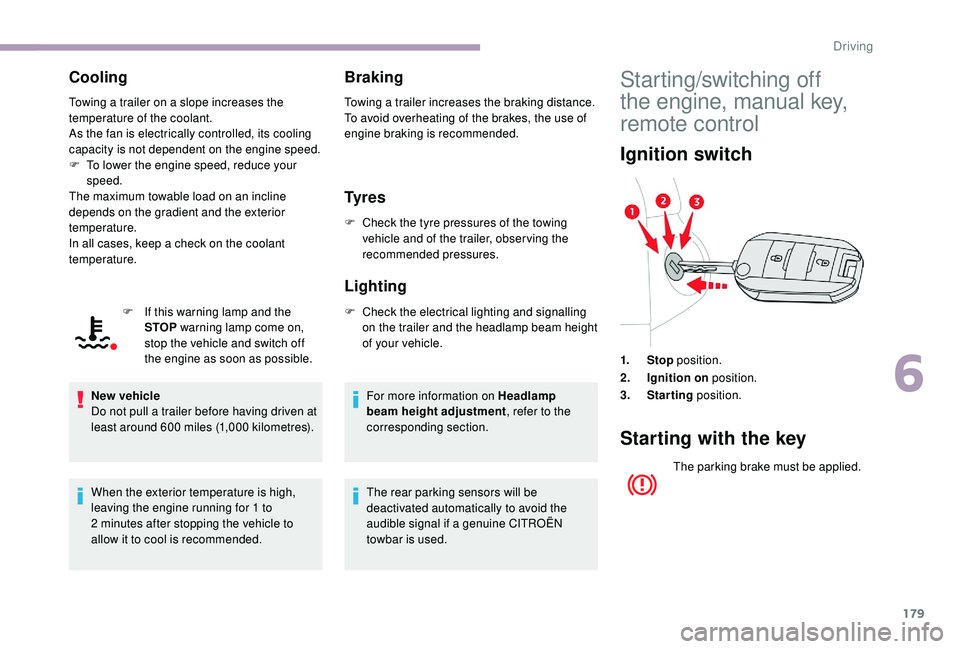
Ignition switch
1. Stop position.
2. Ignition on position.
3. Starting position.
Starting with the key
The parking brake must be applied.
6
Driving
Page 222 of 400

220
Operating limits
In the following cases, deactivating the
system via the vehicle's configuration menu is
recommended:
-
w
hen towing a trailer or caravan,
-
w
hen a load on the roof rack extends
beyond the windscreen (for example: long
objects),
-
w
hen the vehicle is being towed, with the
engine running,
-
w
hen a "space-saver" type spare wheel is
fitted (if your vehicle has one),
-
w
hen on a rolling road for a ser vice in a
workshop,
-
w
hen in an automatic car wash,
-
i
f the brake lamps are not working. Because of limits in the operation of the
system, it is possible that warnings are
not given, are given too late or seem
unjustified. Consequently, always stay
alert and be prepared to react at any time
to avoid an accident.Collision Risk Alert
Depending on the degree of risk of collision
detected by the system and the alert threshold
chosen, different levels of alert can be
triggered and displayed in the instrument panel
or the head-up display.
This information also appears in the
head-up display. For more information
on the Head-up display, refer to the
corresponding section.
Level 1 : visual alert only, warning
you that the vehicle ahead is very
close.
A message is displayed warning you
to be vigilant when approaching the
target vehicle. This level of alert is based on the inter-vehicle
time between your vehicle and the vehicle in
front.
Level 2: visual and audible alert,
warning you that a collision is
imminent.
A message indicating that you
should brake is displayed.
This level of alert is based on the time before
collision. It takes account of the vehicle
dynamics, the speed of your vehicle and the
one in front, the environmental conditions, the
operation of the vehicle (cornering, pedals
pressed, etc.) to trigger the alert at the best
moment.
After an impact, the function automatically
stops operating. Consult a CITROËN
dealer or a qualified workshop to have the
system checked.
Where the speed of your vehicle is too
high approaching another vehicle, the first
level of alert may not be displayed: the
level 2 alert may be displayed directly.
Furthermore, the level 1
alert is never
displayed with the " Close" threshold.
Driving
Page 229 of 400

227
With audio system
To deactivate the system:
With the touch screen
In the "Driving/Vehicle " menu,
activate/deactivate " Blind spot
monitoring ".
The system state remains in memory
when the ignition is switched off. The system is automatically deactivated
when towing with a towbar approved by
CITROËN.
Operating fault
To activate the system:
F
P
ress this button, its indicator
lamp comes on, the system is
activated.
F
P
ress this button, its indicator
lamp goes off, the system is
deactivated. Depending on your vehicle's equipment:
or
The warning lamp in this button
flashes and a message appears,
accompanied by an audible signal.
Contact a CITROËN dealer or a qualified
workshop. The system may suffer temporary
interference in certain weather conditions
(rain, hail, etc.).
In particular, driving on a wet sur face
or moving from a dry area to a wet area
can cause false alerts (for example, the
presence of a fog of water droplets in
the blind spot angle is interpreted as a
vehicle).
In bad or wintry weather, ensure that the
sensors are not covered with mud, ice or
snow.
Take care not to cover the warning zone in
the door mirrors or the detection zones on
the front and rear bumpers with adhesive
labels or other objects; they may hamper
the correct operation of the system.
High pressure jet wash
When washing your vehicle, do not place
the tip of the lance within 30
cm of the
sensors as other wise there is a risk of
damaging them.
In the event of a fault, these warning lamps
flash.
Activation/Deactivation
6
Driving