steering CITROEN DISPATCH SPACETOURER 2020 Handbook (in English)
[x] Cancel search | Manufacturer: CITROEN, Model Year: 2020, Model line: DISPATCH SPACETOURER, Model: CITROEN DISPATCH SPACETOURER 2020Pages: 324, PDF Size: 10.89 MB
Page 157 of 324

155
The inflation pressures specified for the
vehicle can be found on the tyre pressure
label.
For more information on the
Identification markings, refer to the
corresponding section.
Checking tyre pressures
This check should be done when the tyres
are "cold" (vehicle stopped for 1 hour or
after a journey of less than 6
miles (10 km)
at moderate speeds).
Other wise, add 0.3
bar to the pressures
shown on the label. Snow chains
The system does not have to be
reinitialised after fitting or removing snow
chains.
Spare wheel
The steel spare wheel does not have an
under-inflation detection sensor.
Under-inflation alert
Under-inflation detection does not replace
the need for vigilance on the part of the
driver.
This system does not avoid the need
to regularly check the tyre pressures
(including the spare wheel) as well as
before a long journey.
Driving with under-inflated tyres,
particularly in adverse conditions (heavy
load, high speed, long journey):
-
w
orsens road-holding,
-
l
engthens braking distances,
-
c
auses premature wear of the tyres,
-
i
ncreases fuel consumption. This is signalled by the fixed
illumination of this warning lamp,
accompanied by an audible signal
and, depending on equipment, the
display of a message.
F
R
educe speed immediately, avoid excessive
steering movements and avoid sudden
braking.
F
S
top the vehicle as soon as it is safe to do
so.
The loss of pressure detected does not
always cause visible bulging of the tyre.
Do not rely on just a visual check. F
I f it is not possible to make this check
immediately, drive carefully at reduced
speed.
F
I
n the event of a puncture, use the
temporary puncture repair kit or the spare
wheel (depending on equipment).
The alert is kept active until the system is
reinitialised.
Reinitialisation
Reinitialise the system after adjusting one or
more tyre pressures and after changing one or
more wheels.
Before reinitialising the system, make
sure that the pressures of the four tyres
are correct for the conditions of use of the
vehicle and conform to the values written
on the tyre pressure label.
Check the pressures of the four tyres
before performing the reinitialisation.
The system does not advise if a pressure
is incorrect at the time of reinitialisation.
F
U
sing a compressor, such as the one in the
temporary puncture repair kit, check the
pressures of the four tyres when cold.
6
Driving
Page 158 of 324

156
Without audio system
F Press this button for about 3 seconds then release it, an audible signal confirms the
reinitialisation.
With audio system or touch
screen
The reinitialisation is carried out via
the vehicle configuration menu.
Malfunction
In this case, under-inflation monitoring of the
tyres is no longer assured.
Have the system checked by a CITROËN
dealer or a qualified workshop. The illumination of these warning lamps
indicates a fault with the system.
Driving and manoeuvring
aids - General
recommendations
Driving and manoeuvring aids cannot, in
any circumstances, replace the need for
vigilance on the part of the driver.
The driver must comply with the Highway
Code, must remain in control of the
vehicle in all circumstances and must be
able to retake control of it at all times. The
driver must adapt the speed to climactic
conditions, traffic and the state of the
road.
It is the driver's responsibility to constantly
check the traffic, to assess the relative
distances and speeds of other vehicles
and to anticipate their movements before
indicating and changing lane.
The systems cannot exceed the limits of
the laws of physics.
Driving aids
You should hold the steering wheel with
both hands, always use the interior and
exterior rear view mirrors, always keep the
feet close to the pedals and take a break
every two hours. Manoeuvring aids
The driver must always check the
surroundings of the vehicle before and
during the whole manoeuvre, in particular
using the mirrors.
Radar
The operation of the radar as well as the
associated functions may be impaired
through the accumulation of dirt (mud,
frost, etc.), in certain difficult weather
conditions (very heavy rain, snow) or if the
bumper is damaged.
If the front bumper is to be repainted,
contact a CITROËN dealer or a qualified
workshop
; certain types of paint could
inter fere with the operation of the radar.
Driving
Page 163 of 324
161
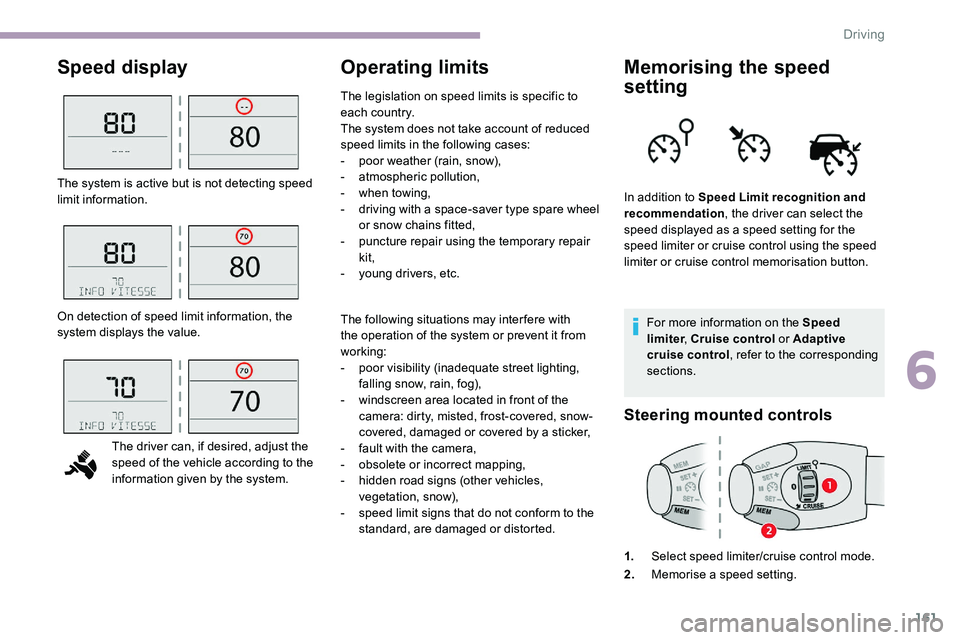
Speed displayOperating limitsMemorising the speed
setting
For more information on the Speed
limiter, Cruise control or Adaptive
cruise control , refer to the corresponding
sections.
Steering mounted controls
1. Select speed limiter/cruise control mode.
2. Memorise a speed setting.
The system is active but is not detecting speed
limit information.
On detection of speed limit information, the
system displays the value.
The driver can, if desired, adjust the
speed of the vehicle according to the
information given by the system. The following situations may interfere with
the operation of the system or prevent it from
working:
-
p
oor visibility (inadequate street lighting,
falling snow, rain, fog),
-
w
indscreen area located in front of the
camera: dirty, misted, frost-covered, snow-
covered, damaged or covered by a sticker,
-
f
ault with the camera,
-
o
bsolete or incorrect mapping,
-
h
idden road signs (other vehicles,
vegetation, snow),
-
s
peed limit signs that do not conform to the
standard, are damaged or distorted. In addition to Speed Limit recognition and
recommendation
, the driver can select the
speed displayed as a speed setting for the
speed limiter or cruise control using the speed
limiter or cruise control memorisation button.
The legislation on speed limits is specific to
each country.
The system does not take account of reduced
speed limits in the following cases:
-
p
oor weather (rain, snow),
-
a
tmospheric pollution,
-
w
hen towing,
-
d
riving with a space-saver type spare wheel
or snow chains fitted,
-
p
uncture repair using the temporary repair
kit,
-
y
oung drivers, etc.
6
Driving
Page 165 of 324
163
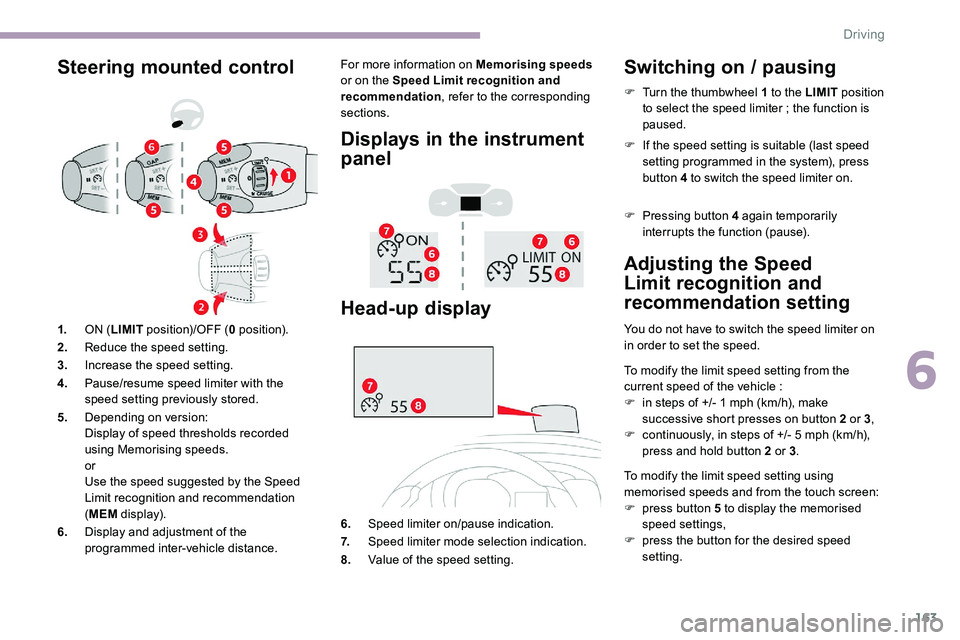
Steering mounted controlFor more information on Memorising speeds
or on the Speed Limit recognition and
recommendation , refer to the corresponding
sections.
Displays in the instrument
panel
Head-up display
6. Speed limiter on/pause indication.
7. Speed limiter mode selection indication.
8. Value of the speed setting.
Switching on / pausing
Adjusting the Speed
Limit recognition and
recommendation setting
You do not have to switch the speed limiter on
in order to set the speed.
To modify the limit speed setting from the
current speed of the vehicle :
F
i
n steps of +/- 1 mph (km/h), make
successive short presses on button 2 or 3 ,
F
c
ontinuously, in steps of +/- 5 mph (km/h),
press and hold button 2 or 3 .
To modify the limit speed setting using
memorised speeds and from the touch screen:
F
p
ress button 5 to display the memorised
speed settings,
F
p
ress the button for the desired speed
setting.
1.
ON (LIMIT position)/OFF ( 0 position).
2. Reduce the speed setting.
3. Increase the speed setting.
4. Pause/resume speed limiter with the
speed setting previously stored.
5. Depending on version:
Display of speed thresholds recorded
using Memorising speeds.
or
Use the speed suggested by the Speed
Limit recognition and recommendation
(MEM display).
6. Display and adjustment of the
programmed inter-vehicle distance. F
T
urn the thumbwheel 1 to the LIMIT
position
to select the speed limiter ; the function is
paused.
F
I
f the speed setting is suitable (last speed
setting programmed in the system), press
button 4 to switch the speed limiter on.
F
P
ressing button 4 again temporarily
interrupts the function (pause).
6
Driving
Page 167 of 324

165
Exceeding the programmed speed
setting
The speed setting can be exceeded
temporarily by pressing the accelerator
pedal (the programmed speed flashes).
To return to the speed setting, release
the accelerator pedal (when this speed is
reached again, the display of the speed
stops flashing).
Operating limits
Never use the system in the following
situations:
-
i
n an urban area with the risk of
pedestrians crossing the road,
-
i
n heavy traffic,
-
o
n winding or steep roads,
-
o
n slippery or flooded roads,
-
i
n unfavourable climatic conditions,
-
d
riving on a speed circuit,
-
d
riving on a rolling road,
-
u
se of snow chains, non-slip covers or
studded tyres.Cruise control
Refer to the General recommendations
on the use of driving and manoeuvring
aids and to Cruise control - par ticular
recommendations .
This system automatically keeps the
vehicle’s speed at the cruise value
programmed by the driver (speed
setting), without using the accelerator
pedal.
The cruise control is switched on manually.
It requires a minimum vehicle speed of 25 mph
(40
km/h).
With a manual gearbox, it requires the
engagement of third gear or higher.
With an automatic gearbox, it requires the
engagement of mode D or of second gear or
higher in mode M .
With an automatic or electronic gearbox,
second gear or higher must be engaged.
The cruise control remains active after
changing gear regardless of the gearbox
type on engines fitted with Stop & Start. Switching off the ignition cancels any
speed setting.
Steering mounted control
1.
ON (CRUISE position)/OFF ( 0 position).
2. Activation of cruise control at the current
speed/decrease speed setting.
3. Activation of cruise control at the current
speed/increase speed setting.
4. Pausing/resumption of cruise control with
the speed setting previously stored.
5. Depending on version:
Display of speed thresholds recorded
using Memorising speeds.
or
Use the speed suggested by the Speed
Limit recognition and recommendation
(MEM display).
6
Driving
Page 170 of 324
168
Primarily designed for driving on main
roads and motor ways, this system only
works with moving vehicles driving in the
same direction as your vehicle.
If the driver operates a direction indicator
to overtake a slower vehicle, the cruise
control allows your vehicle to temporarily
approach the vehicle in front to assist
the overtaking manoeuvre, without ever
exceeding the speed setting.
Some vehicles present on the road
may not be properly seen or may be
poorly interpreted by radar (e.g. a lorry),
which may lead to a poor assessment
of the distances and lead to the vehicle
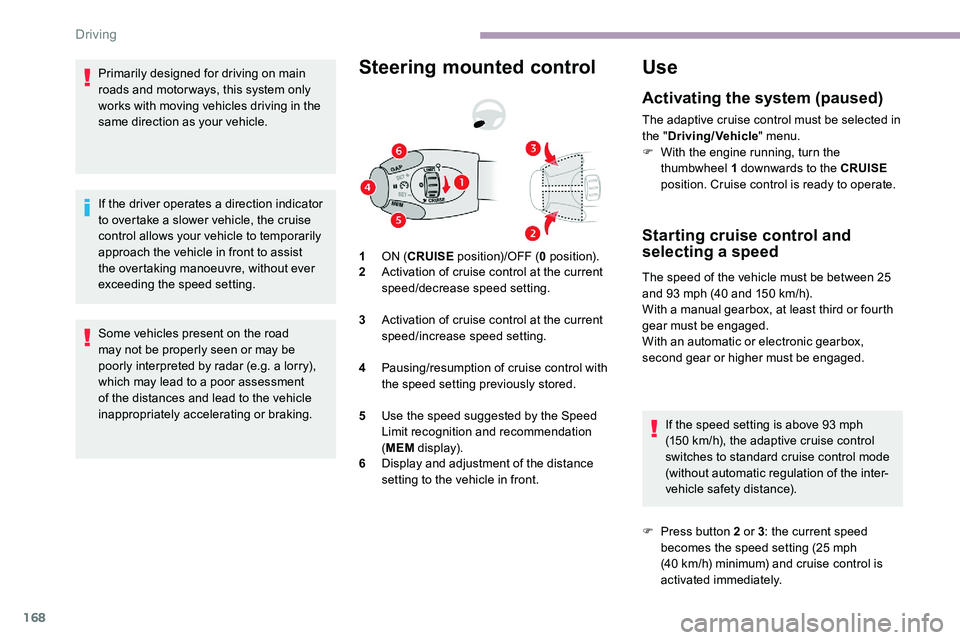
inappropriately accelerating or braking.Steering mounted control
1ON ( CRUISE position)/OFF ( 0 position).
2 Activation of cruise control at the current
speed/decrease speed setting.
3 Activation of cruise control at the current
speed/increase speed setting.
4 Pausing/resumption of cruise control with
the speed setting previously stored.
5 Use the speed suggested by the Speed
Limit recognition and recommendation
(MEM display).
6 Display and adjustment of the distance
setting to the vehicle in front.
Use
Activating the system (paused)
The adaptive cruise control must be selected in
the " Driving/Vehicle " menu.
F
W
ith the engine running, turn the
thumbwheel 1 downwards to the CRUISE
position. Cruise control is ready to operate.
Starting cruise control and
selecting a speed
The speed of the vehicle must be between 25
and 93 mph (40 and 150 km/h).
With a manual gearbox, at least third or fourth
gear must be engaged.
With an automatic or electronic gearbox,
second gear or higher must be engaged.
If the speed setting is above 93
mph
(150
km/h), the adaptive cruise control
switches to standard cruise control mode
(without automatic regulation of the inter-
vehicle safety distance).
F
P
ress button 2 or 3 : the current speed
becomes the speed setting (25
mph
(40
km/h) minimum) and cruise control is
activated immediately.
Driving
Page 176 of 324
174
The driver can maintain control of the
vehicle at any time by sharply turning
the steering wheel and/or pressing the
accelerator pedal.
Operation of the function may be felt by
slight vibration in the brake pedal.
If the vehicle comes to a complete stop,
the automatic braking is maintained for 1
to 2 seconds.
Deactivation/Activation
By default, the system is automatically
activated at every engine start.This system can be deactivated
or activated via the vehicle
configuration menu.
Deactivation of the system is
signalled by the illumination of this
indicator lamp, accompanied by the
display of a message.
Malfunction
In the event of a fault with the system,
you are alerted by the continuous
illumination of this warning lamp,
accompanied by the display of a
message and an audible signal.
If these warning lamps come
on after the engine has been
switched off and restarted, contact
a CITROËN dealer or a qualified
workshop to have the system
checked.
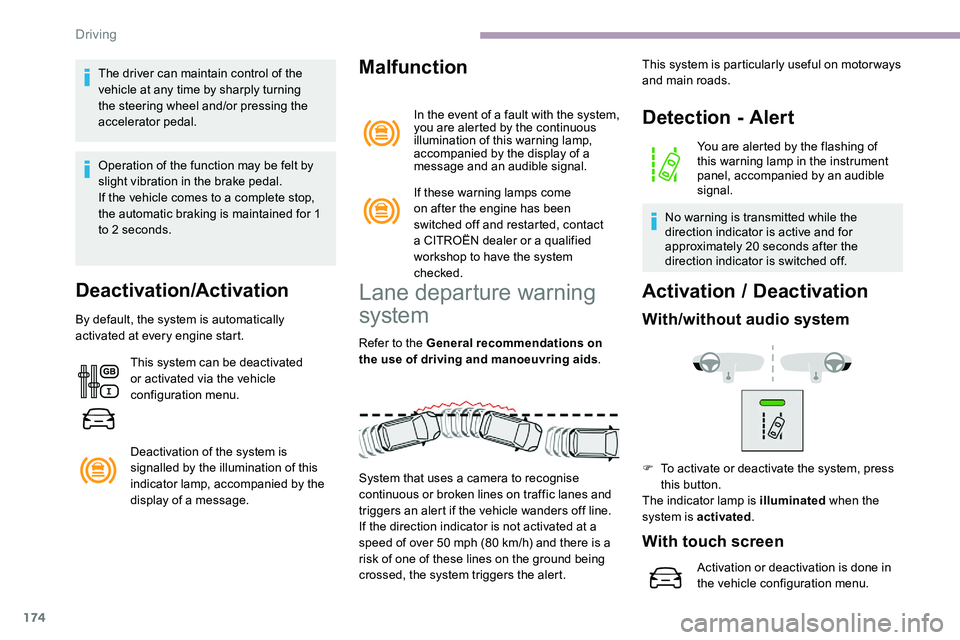
Lane departure warning
system
Refer to the General recommendations on
the use of driving and manoeuvring aids .
System that uses a camera to recognise
continuous or broken lines on traffic lanes and
triggers an alert if the vehicle wanders off line.
If the direction indicator is not activated at a
speed of over 50 mph (80
km/h) and there is a
risk of one of these lines on the ground being
crossed, the system triggers the alert.
Detection - Alert
You are alerted by the flashing of
this warning lamp in the instrument
panel, accompanied by an audible
signal.
No warning is transmitted while the
direction indicator is active and for
approximately 20 seconds after the
direction indicator is switched off.
Activation / D eactivation
With/without audio system
This system is particularly useful on motor ways
and main roads.
F
T
o activate or deactivate the system, press
this button.
The indicator lamp is illuminated when the
system is activated .
With touch screen
Activation or deactivation is done in
the vehicle configuration menu.
Driving
Page 184 of 324
182
When the sub-menu is displayed, select one of
the four views: You can choose the display mode at any time
by pressing on this area."Standard view".
"180° view".
"Zoom view".
"AUTO m o de".
The function will be deactivated:
-
I
f a trailer is attached or a bicycle
carrier is fitted on a towing device
(vehicle fitted with a towing device
installed in line with the manufacturer's
recommendations).
-
A
bove about 6 mph (10 km/h).
-
O
n opening the tailgate.
-
W
hen shifting out of reverse (the image
remains displayed for 7 seconds).
-
B
y pressing the red cross or the white
arrow in the top left-hand corner of the
touch screen.
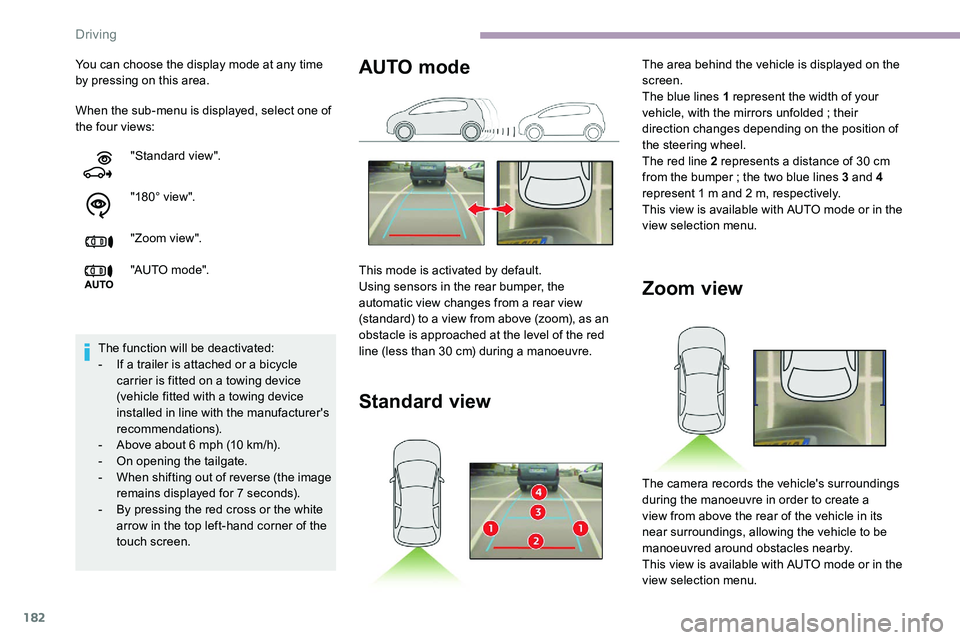
Zoom view
The camera records the vehicle's surroundings
during the manoeuvre in order to create a
view from above the rear of the vehicle in its
near surroundings, allowing the vehicle to be
manoeuvred around obstacles nearby.
This view is available with AUTO mode or in the
view selection menu.
AUTO mode
This mode is activated by default.
Using sensors in the rear bumper, the
automatic view changes from a rear view
(standard) to a view from above (zoom), as an
obstacle is approached at the level of the red
line (less than 30
cm) during a manoeuvre.
Standard view
The area behind the vehicle is displayed on the
screen.
The blue lines 1 represent the width of your
vehicle, with the mirrors unfolded ; their
direction changes depending on the position of
the steering wheel.
The red line 2 represents a distance of 30
cm
from the bumper
; the two blue lines 3 and 4
represent 1
m and 2 m, respectively.
This view is available with AUTO mode or in the
view selection menu.
Driving
Page 193 of 324
191
When the engine is hot, handle the
exterior safety catch and the bonnet
stay with care (risk of burns), using the
protected area.
When the bonnet is open, take care not to
damage the safety catch.
Do not open the bonnet under very windy
conditions.
The cooling fan may star t after
switching off the engine: take care
with articles and clothing that might be
caught by the fan blades.
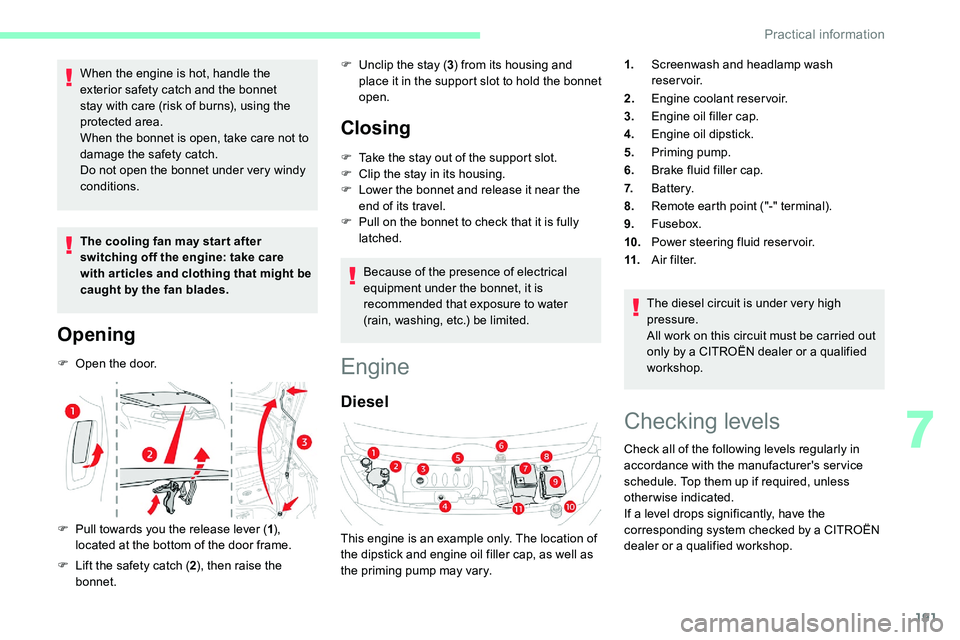
Opening
F Open the door.
F
P
ull towards you the release lever ( 1),
located at the bottom of the door frame.
F
L
ift the safety catch ( 2), then raise the
bonnet. F
U
nclip the stay (
3) from its housing and
place it in the support slot to hold the bonnet
open.
Closing
F Take the stay out of the support slot.
F C lip the stay in its housing.
F
L
ower the bonnet and release it near the
end of its travel.
F
P
ull on the bonnet to check that it is fully
latched.
Because of the presence of electrical
equipment under the bonnet, it is
recommended that exposure to water
(rain, washing, etc.) be limited.
Engine
Diesel
The diesel circuit is under very high
pressure.
All work on this circuit must be carried out
only by a CITROËN dealer or a qualified
workshop.
This engine is an example only. The location of
the dipstick and engine oil filler cap, as well as
the priming pump may vary. 1.
Screenwash and headlamp wash
reservoir.
2. Engine coolant reservoir.
3. Engine oil filler cap.
4. Engine oil dipstick.
5. Priming pump.
6. Brake fluid filler cap.
7. Battery.
8. Remote earth point ("-" terminal).
9. Fusebox.
10. Power steering fluid reservoir.
11. A i r f i l t e r.
Checking levels
Check all of the following levels regularly in
accordance with the manufacturer's service
schedule. Top them up if required, unless
otherwise indicated.
If a level drops significantly, have the
corresponding system checked by a CITROËN
dealer or a qualified workshop.
7
Practical information
Page 195 of 324
193
During the 30 minutes after topping up the
o il, the check per formed with the oil level
indicator in the instrument panel when the
ignition is switched on is not valid.
Brake fluid
The level of this fluid should be
close to the " MAX" mark. If not,
check the brake pad wear.
To know how often the brake fluid should be
replaced, refer to the manufacturer's servicing
schedule. If topping up, clean the cap before
replacing it. Use only DOT4 brake fluid
from a sealed canister.
F
A
dd more oil if necessary.
F
A
fter checking the level, carefully refit the oil
filler cap and the dipstick in its tube.
Power steering fluid
The level of this fluid should be
close to the " MAX" mark. With the
engine cold and the vehicle standing
on level ground, check this by
reading the level on the filler neck.
Engine coolant
Check the engine coolant level
regularly.
It is normal to top up this fluid
between two services.
The check and top-up must only be done with
the engine cold.
A low level presents a risk of serious damage
to the engine.
The level of this fluid should be close to the
" MAX " mark but should never exceed it.
If the level is close to or below the " MIN” mark,
it is essential to top up. the pressure to drop.
Once the pressure has dropped, remove the
cap and top up to the required level.
Screen and headlamp
washer fluid
Top up the reser voir when you next
stop the vehicle.
Fluid specification
The fluid must be topped up with a ready-to-
use mixture.
In winter (temperatures below zero), a liquid
containing an agent to prevent freezing must
be used which is appropriate for the prevailing
conditions, in order to protect the elements of
the system (pump, tank, ducts, jets, etc.).
When the engine is hot, the temperature of this
fluid is regulated by the fan.
In addition, as the cooling system is
pressurised, wait at least one hour after
switching off the engine before carrying out any
work.
To avoid the risk of scalding if you need to top
up in an emergency, wrap a cloth around the
cap and unscrew the cap by two turns to allow Filling with pure water is prohibited
under all circumstances (risk of freezing,
limestone deposits, etc.).
Diesel fuel additive (Diesel
with particle filter)
or
The minimum level in the particle
filter additive tank is indicated by
fixed illumination of this warning
lamp, accompanied by an audible
warning and a message warning that
the level of additive is too low.
7
Practical information