ESP CITROEN DISPATCH SPACETOURER 2020 Handbook (in English)
[x] Cancel search | Manufacturer: CITROEN, Model Year: 2020, Model line: DISPATCH SPACETOURER, Model: CITROEN DISPATCH SPACETOURER 2020Pages: 324, PDF Size: 10.89 MB
Page 163 of 324
161
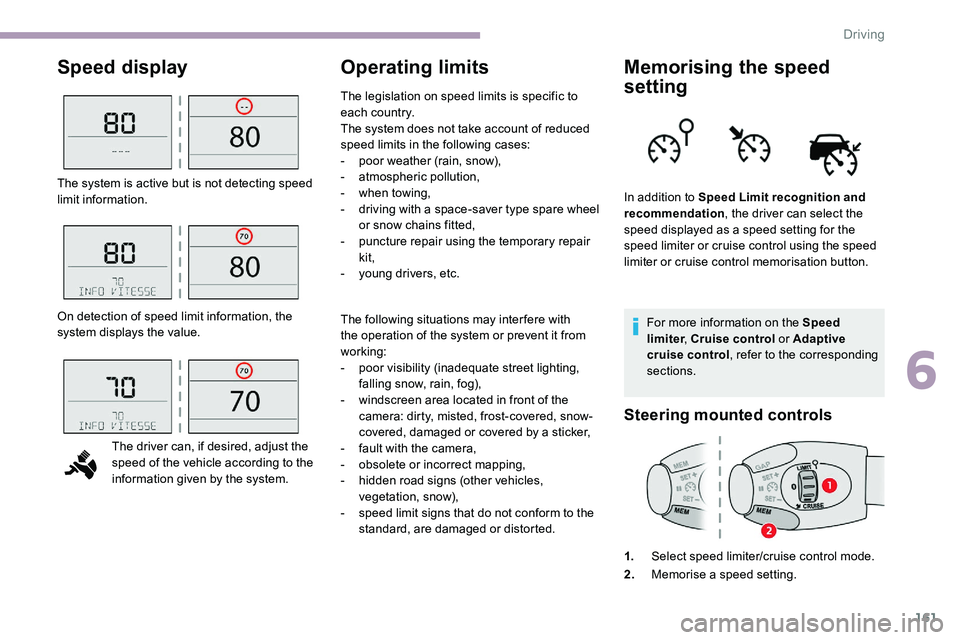
Speed displayOperating limitsMemorising the speed
setting
For more information on the Speed
limiter, Cruise control or Adaptive
cruise control , refer to the corresponding
sections.
Steering mounted controls
1. Select speed limiter/cruise control mode.
2. Memorise a speed setting.
The system is active but is not detecting speed
limit information.
On detection of speed limit information, the
system displays the value.
The driver can, if desired, adjust the
speed of the vehicle according to the
information given by the system. The following situations may interfere with
the operation of the system or prevent it from
working:
-
p
oor visibility (inadequate street lighting,
falling snow, rain, fog),
-
w
indscreen area located in front of the
camera: dirty, misted, frost-covered, snow-
covered, damaged or covered by a sticker,
-
f
ault with the camera,
-
o
bsolete or incorrect mapping,
-
h
idden road signs (other vehicles,
vegetation, snow),
-
s
peed limit signs that do not conform to the
standard, are damaged or distorted. In addition to Speed Limit recognition and
recommendation
, the driver can select the
speed displayed as a speed setting for the
speed limiter or cruise control using the speed
limiter or cruise control memorisation button.
The legislation on speed limits is specific to
each country.
The system does not take account of reduced
speed limits in the following cases:
-
p
oor weather (rain, snow),
-
a
tmospheric pollution,
-
w
hen towing,
-
d
riving with a space-saver type spare wheel
or snow chains fitted,
-
p
uncture repair using the temporary repair
kit,
-
y
oung drivers, etc.
6
Driving
Page 164 of 324

162
Displays in the instrument panel
Head-up display
3.Speed limit indication.
4. Speed memorisation request.
5. Current speed setting.
Memorising the speed
On detection of a sign offering a new speed
limit, the system displays the value and " MEM"
flashes for a few seconds to offer to make it a
new speed setting.
If there is a difference of less than 6 mph
(9
km/h) between the speed setting and
the speed displayed by the Speed Limit
recognition and recommendation, the
" MEM " symbol is not displayed.
Depending on the road conditions, several
speeds may be displayed.
F
P
ress button 2 once to save the suggested
speed value.
A message is displayed to confirm the request.
F
P
ress button 2 again to confirm and save
the new speed setting.
After a predetermined period, the screen
returns to the current display. F
S
witch on the speed limiter/cruise control.
The speed limiter/cruise control information is
displayed.
Speed limiter
Refer to the General recommendations on
the use of driving and manoeuvring aids .
This system prevents the vehicle
from exceeding the speed
programmed by the driver (speed
setting).
The speed limiter is switched on manually.
The minimum speed setting is 19 mph
(30
km/h).
The speed setting remains in the system
memory when the ignition is switched off.
For more information on this
button and the Adaptive
cruise control , refer to the
corresponding section.
For more information on
Memorising speeds , refer to the
corresponding section.
For more information on Speed limit
recognition and memorising the
speed limit in particular, refer to the
corresponding section.
Driving
Page 165 of 324
163
Steering mounted controlFor more information on Memorising speeds
or on the Speed Limit recognition and
recommendation , refer to the corresponding
sections.
Displays in the instrument
panel
Head-up display
6. Speed limiter on/pause indication.
7. Speed limiter mode selection indication.
8. Value of the speed setting.
Switching on / pausing
Adjusting the Speed
Limit recognition and
recommendation setting
You do not have to switch the speed limiter on
in order to set the speed.
To modify the limit speed setting from the
current speed of the vehicle :
F
i
n steps of +/- 1 mph (km/h), make
successive short presses on button 2 or 3 ,
F
c
ontinuously, in steps of +/- 5 mph (km/h),
press and hold button 2 or 3 .
To modify the limit speed setting using
memorised speeds and from the touch screen:
F
p
ress button 5 to display the memorised
speed settings,
F
p
ress the button for the desired speed
setting.
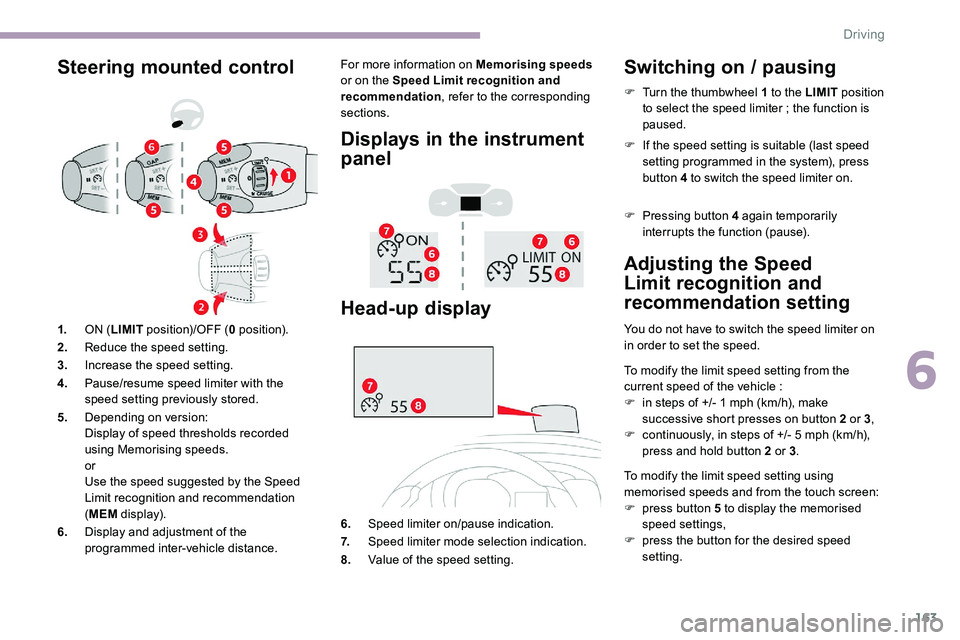
1.
ON (LIMIT position)/OFF ( 0 position).
2. Reduce the speed setting.
3. Increase the speed setting.
4. Pause/resume speed limiter with the
speed setting previously stored.
5. Depending on version:
Display of speed thresholds recorded
using Memorising speeds.
or
Use the speed suggested by the Speed
Limit recognition and recommendation
(MEM display).
6. Display and adjustment of the
programmed inter-vehicle distance. F
T
urn the thumbwheel 1 to the LIMIT
position
to select the speed limiter ; the function is
paused.
F
I
f the speed setting is suitable (last speed
setting programmed in the system), press
button 4 to switch the speed limiter on.
F
P
ressing button 4 again temporarily
interrupts the function (pause).
6
Driving
Page 168 of 324

166
For more information on Memorising speeds
or on the Speed Limit recognition and
recommendation , refer to the corresponding
sections.
Displays in the instrument
panel
Head-up display
6. Cruise control pause/resume indication.
7. Cruise control mode selection indication.
8. Value of the speed setting.
Switching on/pausing
F Turn thumbwheel 1 to the " CRUISE"
position to select cruise control mode ; the
function is paused.
F
T
o activate the cruise control and save a
speed setting, once the vehicle has reached
the desired speed, press button 2 or 3
; the
current speed of your vehicle becomes the
speed setting.
You can release the accelerator pedal.
F
P
ressing button 4 temporarily interrupts the
function (pause).
F
P
ressing button 4 again restores operation
of the cruise control (ON).
The operation of the cruise control can
also be temporarily interrupted (pause):
-
b
y pressing the brake pedal,
-
a
utomatically, if the electronic stability
control (ESC) system is triggered.
Modifying the cruise speed
setting
The cruise control must be active. To modify the cruise speed setting from the
current speed of the vehicle:
F
i
n steps of +/- 1 mph (km/h), make
successive short presses on button 2 or 3 ,
F
c
ontinuously, in steps of +/- 5 mph (km/h),
press and hold button 2 or 3 .
Take care: pressing and holding button 2
or 3 results in a rapid change in the speed
of your vehicle.
As a precaution, it is recommended
that the cruise speed chosen be close
to the current speed of your vehicle, so
as to avoid any sudden acceleration or
deceleration of the vehicle.
To modify the cruise speed setting using
memorised speed settings and from the touch
screen:
F
p
ress button 5 to display the memorised
speed settings,
F
p
ress the button for the desired speed
setting.
The selection screen closes after a few
moments.
This setting becomes the new cruise speed.
Driving
Page 172 of 324

170
For more information on the Head-up
display, refer to the corresponding
section.
Messages and alerts
The display of these messages or alerts is
not sequential.
Operating limits
“Cruise control paused” or “Cruise
control suspended” following a brief
acceleration by the driver.
“Cruise control active”, no vehicle
detected.
“Cruise control active”, vehicle
detected.
“Cruise control active and speed
adjusted”, vehicle detected too close
or at a slower speed.
“Cruise control active and speed
adjusted”, automatic deactivation
imminent following a cruise control
limit being reached.
“Cruise control paused”, automatic
deactivation following speed limit
adjustment being exceeded and no
reaction from the driver. The regulation range is limited to a
maximum difference of 19 mph (30
km/h)
between the cruise speed setting and the
speed of the vehicle in front.
Above this, the system pauses itself if the
safety distance becomes too short.
The adaptive cruise control uses only engine
braking to slow the vehicle. Consequently the
vehicle loses speed slowly, as when releasing
the accelerator pedal.
The system is paused automatically:
-
i
f the vehicle in front slows down too much
or too suddenly, and the driver does not
brake,
-
i
f a vehicle comes between your vehicle and
the vehicle in front,
-
i
f the system does not slow the vehicle
enough to continue to maintain a safe
distance, for example when descending a
steep hill.
Cases of non- detection by the radar:
-
S
tationary vehicles (traffic jam, breakdown,
e t c .) .
-
V
ehicles driving in the opposite direction.
Head-up display
7.Cruise control pause/resume indication.
8. Indication of selection of cruise control
mode, or vehicle speed adjustment phase.
9. Value of the speed setting.
Displays in the instrument
panel
Driving
Page 174 of 324
172
- Active Safety Brake (automatic emergency b r ak ing).
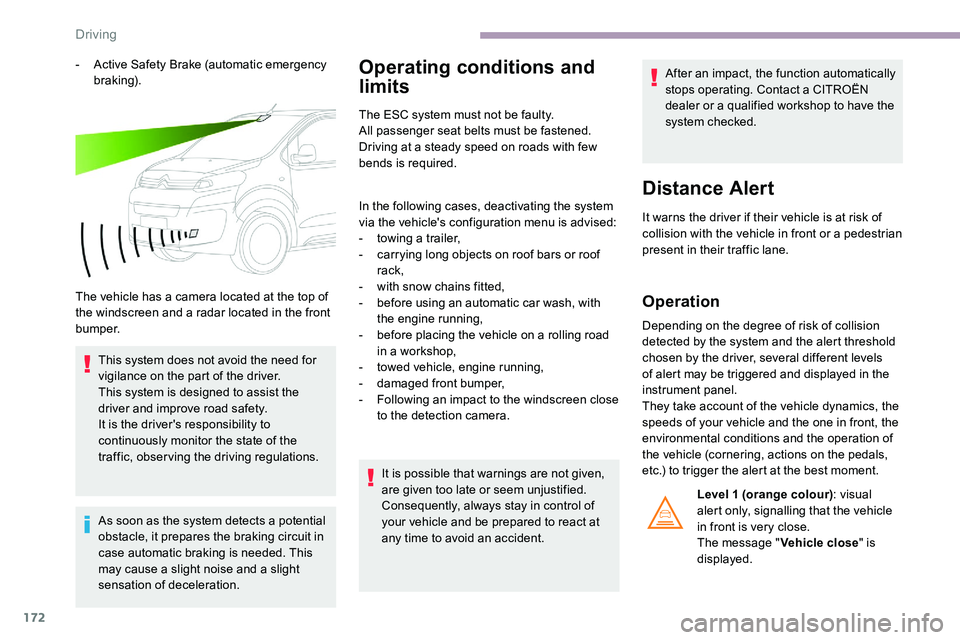
The vehicle has a camera located at the top of
the windscreen and a radar located in the front
b u m p e r. This system does not avoid the need for
vigilance on the part of the driver.
This system is designed to assist the
driver and improve road safety.
It is the driver's responsibility to
continuously monitor the state of the
traffic, observing the driving regulations.
As soon as the system detects a potential
obstacle, it prepares the braking circuit in
case automatic braking is needed. This
may cause a slight noise and a slight
sensation of deceleration.Operating conditions and
limits
The ESC system must not be faulty.
All passenger seat belts must be fastened.
Driving at a steady speed on roads with few
bends is required.
In the following cases, deactivating the system
via the vehicle's configuration menu is advised:
-
t
owing a trailer,
-
c
arrying long objects on roof bars or roof
rack,
-
w
ith snow chains fitted,
-
b
efore using an automatic car wash, with
the engine running,
-
b
efore placing the vehicle on a rolling road
in a workshop,
-
t
owed vehicle, engine running,
-
d
amaged front bumper,
-
F
ollowing an impact to the windscreen close
to the detection camera.
It is possible that warnings are not given,
are given too late or seem unjustified.
Consequently, always stay in control of
your vehicle and be prepared to react at
any time to avoid an accident. After an impact, the function automatically
stops operating. Contact a CITROËN
dealer or a qualified workshop to have the
system checked.
Distance Alert
It warns the driver if their vehicle is at risk of
collision with the vehicle in front or a pedestrian
present in their traffic lane.
Operation
Depending on the degree of risk of collision
detected by the system and the alert threshold
chosen by the driver, several different levels
of alert may be triggered and displayed in the
instrument panel.
They take account of the vehicle dynamics, the
speeds of your vehicle and the one in front, the
environmental conditions and the operation of
the vehicle (cornering, actions on the pedals,
etc.) to trigger the alert at the best moment.
Level
1 (orange colour) : visual
alert only, signalling that the vehicle
in front is very close.
The message " Vehicle close" is
displayed.
Driving
Page 182 of 324

180
Malfunction
Reversing camera with
display in the interior
mirror
Refer to the General recommendations on
the use of driving and manoeuvring aids.
The visual reversing assistance camera is
activated automatically when reverse gear is
engaged. If a malfunction occurs, when
shifting to reverse, this warning lamp
comes on in the instrument panel,
accompanied by the display of a
message and an audible signal (short
b e e p).
Contact a CITROËN dealer or a qualified
workshop to have the system checked. The function may be supplemented by parking
sensors.
The image is displayed in the interior mirror. They are represented as lines marked
"on the ground" and do not indicate the
position of the vehicle in relation to tall
obstacles (e.g. other vehicles).
Some distortion of the image is normal.
It is normal to have a part of the number
plate showing at the bottom of the screen.
Opening the tailgate or rear door
(depending on equipment) can interfere
with the display.
If a side-hinged door is open, allow for the
space it occupies.
The blue lines ( 1) represent the width of the
vehicle including the mirrors.
The red line ( 2) represents a distance of 30
cm
from the rear bumper and the thin blue lines
1
m (A) and 2
m (B) respectively. Check the cleanliness of the camera lens
regularly.
Clean the reversing camera regularly
using a soft, dry cloth.
Top Rear Vision
Refer to the General recommendations on
the use of driving and manoeuvring aids
.
Driving
Page 184 of 324
182
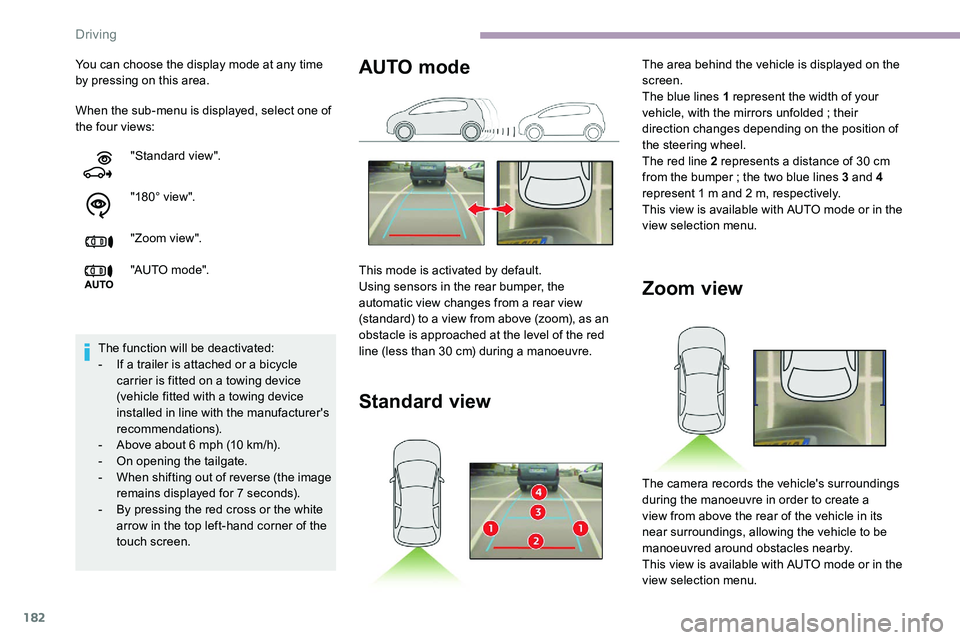
When the sub-menu is displayed, select one of
the four views: You can choose the display mode at any time
by pressing on this area."Standard view".
"180° view".
"Zoom view".
"AUTO m o de".
The function will be deactivated:
-
I
f a trailer is attached or a bicycle
carrier is fitted on a towing device
(vehicle fitted with a towing device
installed in line with the manufacturer's
recommendations).
-
A
bove about 6 mph (10 km/h).
-
O
n opening the tailgate.
-
W
hen shifting out of reverse (the image
remains displayed for 7 seconds).
-
B
y pressing the red cross or the white
arrow in the top left-hand corner of the
touch screen.
Zoom view
The camera records the vehicle's surroundings
during the manoeuvre in order to create a
view from above the rear of the vehicle in its
near surroundings, allowing the vehicle to be
manoeuvred around obstacles nearby.
This view is available with AUTO mode or in the
view selection menu.
AUTO mode
This mode is activated by default.
Using sensors in the rear bumper, the
automatic view changes from a rear view
(standard) to a view from above (zoom), as an
obstacle is approached at the level of the red
line (less than 30
cm) during a manoeuvre.
Standard view
The area behind the vehicle is displayed on the
screen.
The blue lines 1 represent the width of your
vehicle, with the mirrors unfolded ; their
direction changes depending on the position of
the steering wheel.
The red line 2 represents a distance of 30
cm
from the bumper
; the two blue lines 3 and 4
represent 1
m and 2 m, respectively.
This view is available with AUTO mode or in the
view selection menu.
Driving
Page 187 of 324
185
Compatibility of fuels
The use of any other type of (bio) fuel
(vegetable or animal oils, pure or diluted,
domestic fuel, etc.) is strictly prohibited
(risk of damage to the engine and fuel
syste m).
The only Diesel fuel additives authorised
for use are those that meet the B715000
standard.
Diesel at low temperature
At temperatures below 0 °C (+32 °F), the
f ormation of paraffins in summer-type Diesel
fuels could prevent the engine from operating
correctly. In these temperature conditions, use
winter-type Diesel fuel and keep the fuel tank
more than 50
% full.
At temperatures below -15
°C (+5 °F) to avoid
problems starting, it is best to park the vehicle
under shelter (heated garage).
Travelling abroad
Cer tain fuels could damage your vehicle’s
engine.
In cer tain countries, the use of a par ticular
fuel may be required (specific octane
rating, specific trade name, etc.) to ensure
correct operation of the engine.
For all additional information, consult a dealer.
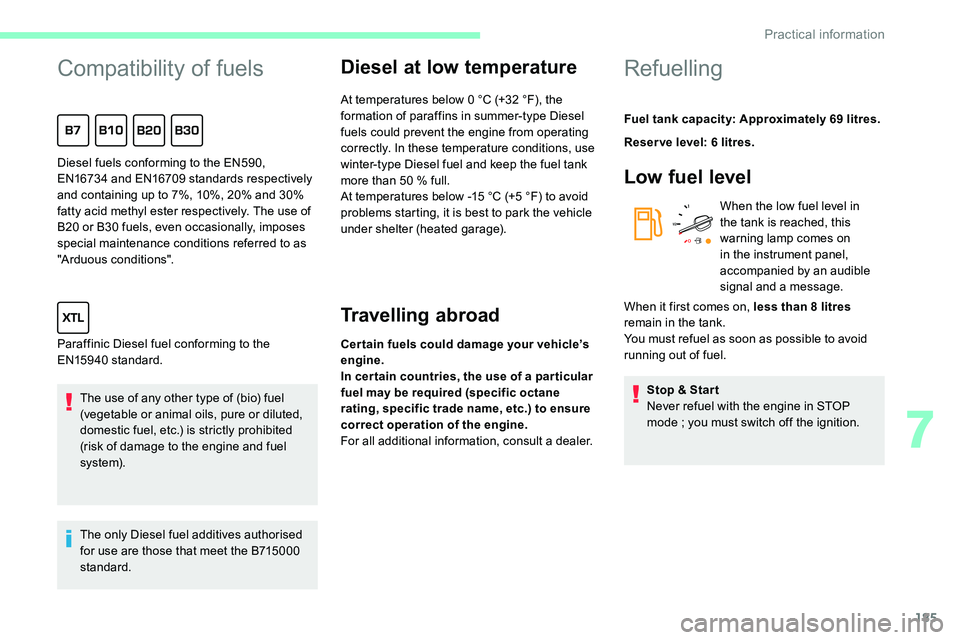
Diesel fuels conforming to the EN590,
EN16734 and EN16709 standards respectively
and containing up to 7%, 10%, 20% and 30%
fatty acid methyl ester respectively. The use of
B20 or B30 fuels, even occasionally, imposes
special maintenance conditions referred to as
"Arduous conditions".
Paraffinic Diesel fuel conforming to the
EN15940 standard.
Refuelling
Fuel tank capacity: Approximately 69 litres.
R eser ve level: 6 litres.
Low fuel level
When the low fuel level in
the tank is reached, this
warning lamp comes on
in the instrument panel,
accompanied by an audible
signal and a message.
Stop & Star t
Never refuel with the engine in STOP
mode
; you must switch off the ignition.
When it first comes on, less than 8
litres
remain in the tank.
You must refuel as soon as possible to avoid
running out of fuel.
7
Practical information
Page 191 of 324
189
Energy economy mode
System which manages the duration of use of
certain functions to conser ve a sufficient level
of charge in the battery.
After switching off the engine and for a
maximum cumulative period of around
40 minutes, you can continue to use functions
such as the audio and telematics system,
the wipers, the dipped beam headlamps, the
courtesy lamps, etc.
Switching to this mode
A message appears in the instrument panel
screen indicating that the vehicle has switched
to economy mode and the active functions are
put on standby.
If a telephone call is being made at this
time, it will be maintained for around
10
minutes with the Bluetooth hands-free
system of your audio system.
Exiting the mode
These functions will be automatically
reactivated the next time the vehicle is used.
In order to restore the use of these functions
immediately, start the engine and let it run:
-
f
or less than 10 minutes, to use the
equipment for approximately 5
minutes,
-
f
or more than 10 minutes, to use the
equipment for approximately 30
minutes.A flat battery prevents the engine from
starting.
For more information on the 12
V batter y
,
refer to the corresponding section.
Load reduction mode
System which manages the use of certain
functions according to the level of charge
remaining in the battery.
When the vehicle is being driven, the load
reduction function temporarily deactivates
certain functions, such as the air conditioning
and the heated rear screen.
The deactivated functions are reactivated
automatically as soon as conditions permit. Let the engine run for the duration specified to
ensure that the battery charge is sufficient.
Do not repeatedly and continuously restart the
engine in order to charge the battery.
Roof bars/Roof rack
As a safety measure and to avoid
damaging the roof, it is essential to use
the roof bars and racks approved for the
vehicle.
Obser ve the instructions on fitting and use
contained in the guide supplied with the
roof bars and racks.
Recommendations
Distribute the load uniformly, taking care
to avoid overloading one of the sides.
Arrange the heaviest part of the load as
close as possible to the roof.
Secure the load securely.
Drive gently: the vehicle will be more
susceptible to the effects of side winds
and its stability may be affected.
Regularly check the security and tight
fastening of the roof bars, at least before
each trip.
Remove the roof bars once they are no
longer needed.
7
Practical information