isofix CITROEN DISPATCH SPACETOURER 2020 Handbook (in English)
[x] Cancel search | Manufacturer: CITROEN, Model Year: 2020, Model line: DISPATCH SPACETOURER, Model: CITROEN DISPATCH SPACETOURER 2020Pages: 324, PDF Size: 10.89 MB
Page 4 of 324
2
.
.
Instrument Panel 9
I ndicators 23
Distance recorders
2
7
Lighting dimmer
2
7
Trip computer
2
8
Setting the time and date
2
9
Electronic key with remote control
function and built-in key,
3
1
Unlocking/Complete or selective unlocking
3
3
Back-up procedures
3
8
Central locking
/ unlocking
4
1
Electric sliding side door(s)
4
3
General recommendations
for the sliding side doors
4
5
Hands-free sliding side door(s)
4
7
Side-hinged rear doors
4
9
Tailgate
5
0
Tailgate rear screen
5
0
Alarm
51
Electric windows
5
3Correct driving position
5
4
Front seats
5
4
2-seat front bench seat
5
6
Steering wheel adjustment
5
8
Mirrors 59
Moduwork
6
0
Precautions for the seats and bench seats
6
3
Fixed one-piece bench seat 6 4
Fixed rear seat and bench seat 6 6
Rear seat and bench seat on rails 6 8
Individual rear seat(s) on rails
7
1
Crew cab, fixed
7
3
Crew cab, folding
7
4
Interior fittings
7
5
Loading area fittings
7
9
Seating area fittings
8
1
Panoramic sunroof
8
2
Retractable sliding table
8
3
Heating and Ventilation
8
6
Heating
87
Manual air conditioning
8
7
Dual-zone automatic air conditioning
8
8
Recirculation of interior air
9
0
Front demisting - defrosting
9
0
Rear screen and/or door mirrors demisting -
defrosting
91
Rear heating - air conditioning
9
2
Additional Heating
/ Ventilation
9
2
Courtesy lamp(s)
9
5Lighting control stalk
9
7
Direction indicators
9
8
Daytime running lamps/Sidelamps
9
9
Automatic illumination of headlamps
9
9
Guide-me-home and welcome lighting
9
9
Cornering lighting
1
00
Automatic headlamp dipping
1
01
Manual headlamp beam
height adjustment 1 02
Interior ambient lighting 1 02
Wiper control stalk
1
03
Automatic wiping
1
04
Changing a wiper blade
1
06
General safety recommendations
1
07
Hazard warning lamps
1
08
Emergency or assistance call
1
08
Audible warning
1
09
Electronic stability control (ESC)
1
09
Advanced Grip Control
1
12
Seat belts
1
13
Airbags
117
Child seats
1
20
Deactivating the front passenger airbag
1
22
ISOFIX child seats
1
29
Manual child lock
1
36
Electric child lock
1
36
Child lock on rear windows
1
37
Over view
Instruments
Access Ease of use and comfort
Safety
Lighting and visibility
Instruments and controls 4
L abels 5
Eco-driving
Contents
Page 8 of 324
6
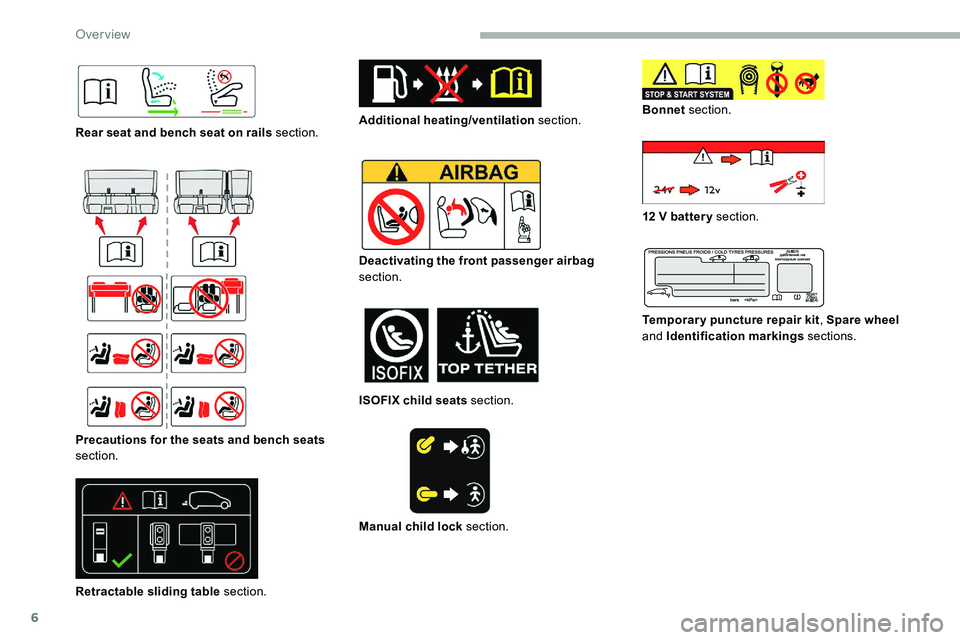
Rear seat and bench seat on rails section.
Precautions for the seats and bench seats
section.
Retractable sliding table section.Additional heating/ventilation
section.
Deactivating the front passenger airbag
section.
ISOFIX child seats section.
Manual child lock section. Bonnet
section.
12 V batter y section.
Temporary puncture repair kit , Spare wheel
and Identification markings sections.
Over view
Page 75 of 324

73
F Check that nothing is obstructing the rails.
F
F
it the front part on the rails.
F
T
ip the seat to align the rear of the guides in
the rails.
F
S
lide the seat for wards or backwards until it
engages in the notches.
F
Ra
ise the backrest.
Check that the seat has correctly locked
on the floor when returned to the seating
position.
Crew cab, fixed
It comprises a fixed bench seat, seat belts,
storage compartments (depending on
equipment) and side windows.
It is separated from the loading area by a high-
strength partition offering comfort and safety.
Rear bench seat
This ergonomic bench seat has three seats.
The two outer seats are fitted with ISOFIX
mountings.
For more information on the ISOFIX
mountings , refer to the corresponding
section.
Storage compartment Under seat cushion storage
wells
If the vehicle is so equipped, they are located
underneath the centre and outer left-hand
seats.
To gain access to it from the cab, tip the
required seat forwards.
If applicable, a storage compartment is
available at the front, underneath the bench
seat.
3
Ease of use and comfort
Page 84 of 324

82
F Position the net upper fixings in the corresponding anchorages in the roof (first
one side, then the other).
F
F
ully extend the straps.
F
O
n each side, attach the bottom fixings of
the net to the lower anchorages (behind row
1) or in the stowing rings (behind row 2).
F
T
ension the straps to extend the net.
F
C
heck that the net is attached securely and
properly extended.
Never use the ISOFIX ring provided for
fixing the strap of a child seat with Top
Tether.
Rear windows in row 2
If the vehicle is so equipped, the side windows
of row 2 can be opened. For more information on the Child
lock for rear windows
, refer to the
corresponding section.
Side blinds
Fitted to the windows in row 2, they protect the
passenger compartment from the sun's rays.
While driving, the windows must be closed or
secured at one of the notches. Always guide the blind slowly using the
tab, both up and down.
F
P
ull the tab A and anchor the blind on the
hook B .
Panoramic sunroof
This is equipped with two manual and
independent blinds, which improve thermal and
acoustic comfort.
Blinds
Opening/Closing
F Take one of the blinds by its grip and push
it back or pull it for wards to the desired
position.
F
S
queeze the two controls then move the
window sideways.
Ease of use and comfort
Page 122 of 324

120
Curtain airbags
Lateral airbags
Use only approved covers on the seats,
compatible with the deployment of the
lateral airbags. For information on the
range of seat covers suitable for your
vehicle, contact a CITROËN dealer.
Do not fix or attach anything to the seat
backrests (clothes, etc.), as this could
cause injuries to the thorax or arm when
the lateral airbag is deployed.
Do not sit with the upper part of the body
any nearer to the door than necessary.
The vehicle's front door panels include
side impact sensors.
A damaged door or any unauthorised or
incorrectly executed work (modification or
repair) on the front doors or their interior
trim could compromise the operation of
these sensors - risk of malfunction of the
lateral airbags!
Such work must only be done by a
CITROËN dealer or a qualified workshop.
General points relating to
child seats
The legislation on carrying children is
specific to each country. Refer to the
legislation in force in your country. -
S
tatistically, the safest seats in your
vehicle for carr ying children are the rear
seats.
-
A c
hild weighing less than 9 kg must
travel in the "rear ward facing" position
both in the front and in the rear.
It is recommended that children travel on
the rear seats of your vehicle:
- "
rearward facing " up to the age of 3,
- "
forward facing " over the age of 3.
Ensure that the seat belt is positioned and
tightened correctly.
For child seats with a support leg, ensure
that the support leg is in firm and steady
contact with the floor.
At the front: if necessary, adjust the
passenger seat.
At the rear: if necessary, adjust the
relevant front seat.
Remove and stow the head restraint
before installing a child seat with backrest
on a passenger seat. Refit the head
restraint once the child seat has been
removed.
Feel
, Shine , Business
Lounge
Do not fix or attach anything to the roof,
as this could cause head injuries when the
curtain airbag is deployed.
Do not remove the grab handles installed
on the roof, as they play a part in securing
the curtain airbags.
For maximum safety, please obser ve the
following recommendations:
-
I
n accordance with European regulations,
all children under the age of 12 or less
than one and a half metres tall must
travel in approved child seats suited to
their weight , on seats fitted with a seat belt
or ISOFIX mountings.
Safety
Page 125 of 324

123
F Move the vehicle's front seat for ward and straighten the backrest so that the legs of
the child in the "for ward facing" child seat or
the "rear ward facing" child seat itself do not
touch the vehicle's front seat.
F
V
erify that the backrest of the "for ward
facing" child seat is as close as possible to
the backrest of the vehicle's rear seat, and
is ideally in contact with it.
F
A
djust the rear seat to the fully back
longitudinal position, with the backrest
straightened.
Make sure that the seat belt is correctly
tightened.
For child seats with a support leg, make
sure that the support leg is in firm and
steady contact with the floor. If necessary,
adjust the front seat of the vehicle.
Row 3
If the vehicle is so equipped, when a child seat
is installed on a passenger seat in the 3rd row,
m
ove the seats in the 2nd row for ward and
straighten the backrests so that the child seat
or the legs of the child do not touch the seats in
the 2
nd row.
Recommended child seats
Range of recommended child seats which are secured using a three-point seat belt .
Group 0+: from bir th to 13 kg
L1
"RÖMER Baby-Safe Plus"
Installed in the rearward facing position.
Groups 2 and 3: from 15 to 36
kg
L5
"RÖMER KIDFIX XP"
Can be fitted to the vehicle's ISOFIX mountings.
The child is restrained by the seat belt.
Is only installed on the outer rear seats.
The head restraint on the vehicle seat must be removed. Groups 2 and 3: from 15 to 36
kg
L6
"GRACO Booster"
The child is restrained by the seat belt.
Is only installed on the front passenger seat or on the outer rear seats.
5
Safety
Page 131 of 324

129
UFSeat position suitable for the installation
of a child seat secured using the seat belt
and universally approved "forward facing".
X Seat position not suitable for the
installation of a child seat of the weight
class indicated.
"ISOFIX" mountingsThe vehicle has been approved in accordance
with the latest ISOFIX regulation.
If fitted to the vehicle, the ISOFIX regulation
mountings are identified by labels.
The mountings comprise three rings for each
seat:
-
T
wo front rings A , located between the
vehicle seat backrest and cushion, indicated
by an "ISOFIX" marking,
-
I
f fitted to your vehicle, a rear ring B called
the Top Tether and located behind the
vehicle's seat, for securing the upper strap,
as indicated by a "Top Tether" marking.
The Top Tether is used to secure the upper
strap of child seats that have one. This system
prevents the child seat from tipping for ward in
the event of a front impact.
This ISOFIX mounting system provides fast,
reliable and safe fitting of the child seat in your
vehicle. For information on the possibilities for
installing ISOFIX child seats in your
vehicle, refer to the summary table.
The ISOFIX child seats are fitted with two
latches which are secured on the two front
rings A
.
Some child seats also have an upper strap
which is attached to rear ring B .
To secure the child seat to the Top Tether:
-
r
emove and stow the head restraint before
installing a child seat on this seat (refit it
once the child seat has been removed),
-
r
un the strap of the child seat behind the top
of the seat backrest, centring it between the
holes for the head restraint rods,
-
a
ttach the hook of the upper strap to rear
ring B ,
-
t
ighten the upper strap.
The incorrect installation of a child seat in
a vehicle compromises the protection of
the child in the event of an accident.
Strictly follow the fitting instructions
provided in the installation guide supplied
with the child seat.
5
Safety
Page 132 of 324
130
Recommended ISOFIX
child seats
Also consult the user guides from the child
seat’s manufacturer to find out how to
install and remove the seat.
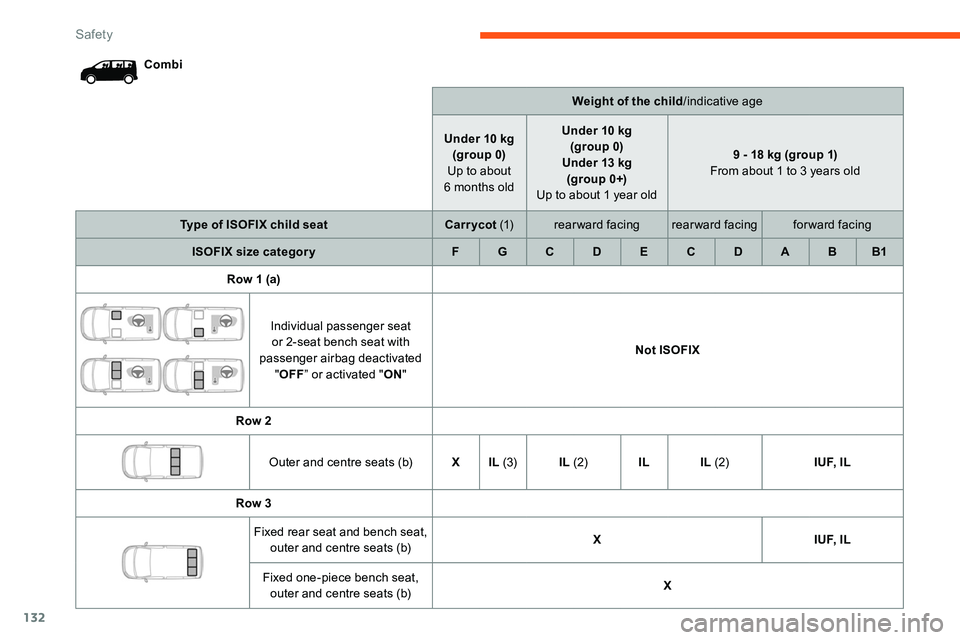
Locations for ISOFIX child
seats
In accordance with European regulations, the
table indicates the options for installing ISOFIX
child seats on the vehicle seats fitted with
ISOFIX mountings.
In the case of universal and semi-universal
ISOFIX child seats, the ISOFIX size category,
determined by a letter from A to G, is indicated
on the child seat next to the ISOFIX logo.
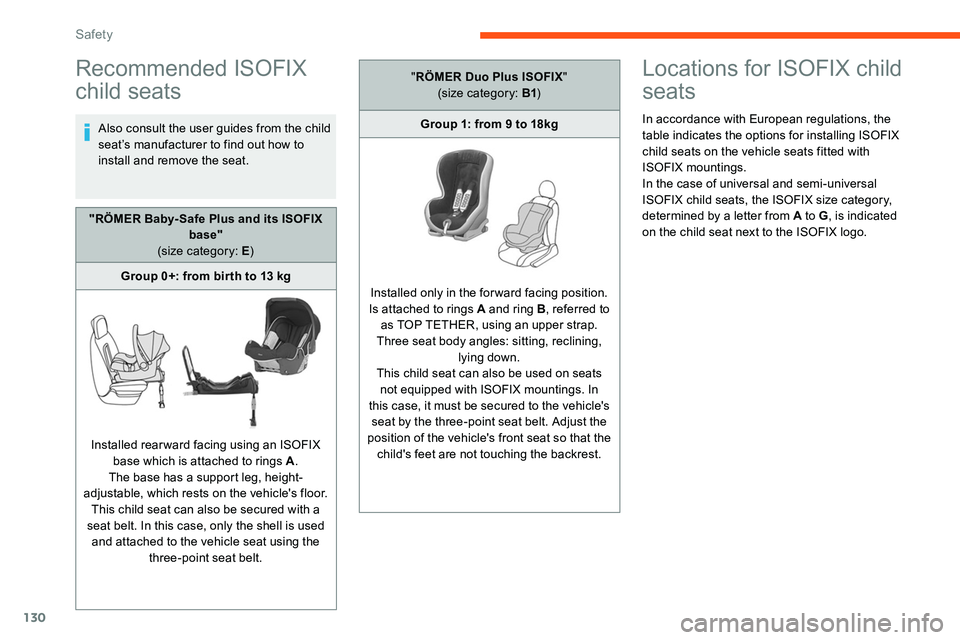
"RÖMER Baby- Safe Plus and its ISOFIX
base"
(size category: E )
Group 0+: from bir th to 13
kg
Installed rearward facing using an ISOFIX base which is attached to rings A .
The base has a support leg, height-
adjustable, which rests on the vehicle's floor. This child seat can also be secured with a
seat belt. In this case, only the shell is used and attached to the vehicle seat using the three-point seat belt. "
RÖMER Duo Plus ISOFIX "
(size category: B1 )
Group 1: from 9 to 18kg
Installed only in the forward facing position.
Is attached to rings A and ring B , referred to
as TOP TETHER, using an upper strap.
Three seat body angles: sitting, reclining, lying down.
This child seat can also be used on seats not equipped with ISOFIX mountings. In
this case, it must be secured to the vehicle's seat by the three-point seat belt. Adjust the
position of the vehicle's front seat so that the child's feet are not touching the backrest.
Safety
Page 133 of 324
131
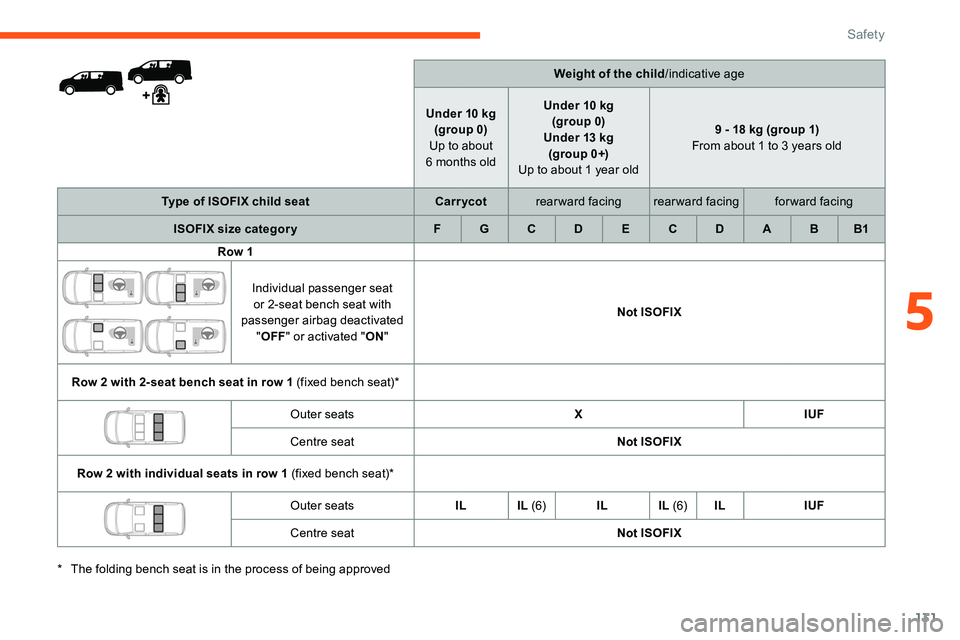
Weight of the child/indicative age
Under 10
kg
(group 0)
Up to about
6
months old Under 10
kg
(group 0)
Under 13
kg
(group 0+)
Up to about 1 year old 9 - 18
kg (group 1)
From about 1 to 3 years old
Type of ISOFIX child seat Carr ycotrearward facing rearward facing forward facing
ISOFIX size categor y F G C D E C D A B B1
Row 1
Individual passenger seat or 2-seat bench seat with
passenger airbag deactivated "OFF " or activated " ON" Not ISOFIX
Row 2 with 2-seat bench seat in row 1 (fixed bench seat)* Outer seats XIUF
Centre seat Not ISOFIX
Row 2 with individual seats in row 1 (fixed bench seat)* Outer seatsIL IL (6)IL IL (6)IL IUF
Centre seat Not ISOFIX
*
T
he folding bench seat is in the process of being approved
5
Safety
Page 134 of 324
132
CombiWeight of the child/indicative age
Under 10
kg
(group 0)
Up to about
6
months oldUnder 10
kg
(group 0)
Under 13
kg
(group 0+)
Up to about 1 year old 9 - 18
kg (group 1)
From about 1 to 3 years old
Type of ISOFIX child seat Carr ycot (1) rearward facing rearward facing forward facing
ISOFIX size categor y F G C D E C D A B B1
Row 1 (a)
Individual passenger seat or 2-seat bench seat with
passenger airbag deactivated "OFF ” or activated " ON" Not ISOFIX
Row 2 Outer and centre seats (b) XIL (3) IL (2) IL IL (2) I U F, I L
Row 3 Fixed rear seat and bench seat, outer and centre seats (b) X
I U F, I L
Fixed one-piece bench seat, outer and centre seats (b) X
Safety