wipers CITROEN DISPATCH SPACETOURER 2020 Handbook (in English)
[x] Cancel search | Manufacturer: CITROEN, Model Year: 2020, Model line: DISPATCH SPACETOURER, Model: CITROEN DISPATCH SPACETOURER 2020Pages: 324, PDF Size: 10.89 MB
Page 93 of 324

91
Dual-zone automatic air
conditioning
F Press this button to demist or defrost the windscreen and side
windows as quickly as possible.
The system automatically manages the air
conditioning, air flow and air intake, and
provides optimum distribution towards the
windscreen and side windows. F
T
o turn it off, press this button
again or press “ AUTO”.
The system is reactivated with the values prior
to the deactivation.
Heated windscreen and
washer jets
Depending on country of sale.
This function heats the windscreen and washer
jets under cold conditions.
In area 1 , the heating frees the wiper blades
from the windscreen when they are stuck by
snow or ice.
In area 2 , the heating improves visibility by
avoiding the accumulation of snow when the
wipers are operating.
Switching on
The period of operation depends on the
exterior temperature.
Pressing this button again switches the function
off
; its indicator lamp goes off.
F
W
ith the engine running, press this button ;
its indicator lamp comes on.
Rear screen and/or
door mirrors demisting -
defrosting
On/Off
F Press this button to switch on/off the defrosting of the rear screen and door
mirrors (if the vehicle is so equipped).
The indicator lamp in the button is on when the
function is activated .
Demisting/defrosting switches off automatically
to prevent an excessive consumption of
current.
3
Ease of use and comfort
Page 101 of 324

99
Daytime running lamps/
Sidelamps
If the vehicle is so equipped, they come on
automatically when the engine is started, when
the lighting control stalk is in position "0" or
" AUTO ".
Automatic headlamp
illumination
When a low level of ambient light is detected
by a sunshine sensor, the number plate
lamps,
sidelamps and dipped beam headlamps
are switched on automatically, without any F
T
urn the ring to the "AUTO"
position. When
the function is activated, a message is
displayed.
F
T
urn the ring to another position
.
Deactivation of the function is accompanied
by the display of a message.
Malfunction
In the event of a malfunction of
the sunshine sensor, the lighting
comes on and this warning lamp is
displayed in the instrument panel,
accompanied by an audible signal
and/or a message.
Contact a CITROËN dealer or a qualified
workshop.
In fog or snow, the sunshine sensor may
detect sufficient light. In this case, the
lighting will not come on automatically.
Do not cover the sunshine sensor,
integrated with the rain sensor and located
at the top of the windscreen behind the
rear view mirror
; the associated functions
would no longer be controlled.
Guide-me-home and
welcome lightingaction on the part of the driver. They can also
come on if rain is detected, at the same time as
the automatic rain sensitive wipers.
As soon as the brightness returns to a
sufficient level or after the windscreen wipers
are switched off, the lamps are switched off
automatically.
Guide-me-home lighting
Manual
Switching on/off
F W ith the ignition off, "flash" the headlamps
using the lighting control stalk to switch the
function on/off.
Manual guide-me-home lighting goes off
automatically at the end of a given period of
time.
Automatic
With the "Automatic headlamp illumination"
function activated (lighting control stalk
in the " AUTO" position), when the light is
poor, the dipped beam headlamps come on
automatically when the ignition is switched off.
With the ring in the " AUTO" position, when the
light is poor, the dipped beam headlamps come
on automatically when the ignition is switched
of f.
4
Lighting and visibility
Page 105 of 324

103
Wiper control stalk
Programming
Your vehicle may also include some functions
that can be activated/deactivated:In wintry conditions, remove snow, ice or
frost present on the windscreen, around
the wiper arms and blades and the
windscreen seal, before operating the
wipers.
Do not operate the wipers on a dry
windscreen. Under extremely hot or cold
conditions, ensure that the wiper blades
are not stuck to the windscreen before
operating the wipers.
Manual controls
The wipers are controlled directly by the driver.
With manual wiping (intermittent)
With AUTO wiping
- automatic windscreen wipers,
- rear wiping on engaging reverse gear.
Front wipers
Raise or lower the control to the desired
position to change the wiping speed.
Fast wiping (heavy rain).
Normal wiping (moderate rain).
Intermittent wiping (proportional to
the speed of the vehicle).
Of f. Single wipe (press down or pull
the stalk briefly towards you, then
release).
or Automatic wiping (press down,
then release).
Single wipe (pull the stalk briefly
towards you).
Automatic windscreen
wiping
The windscreen wipers operate automatically
once rain is detected (sensor behind the
rear view mirror), adapting their speed to the
intensity of the rain, without any action on the
part of the driver.
4
Lighting and visibility
Page 106 of 324

104
Windscreen and headlamp
wash
Switching on
Give a short downwards push to the
control stalk.
A wiping cycle confirms that the
instruction has been accepted.
This indicator lamp comes on in the
instrument panel and a message is
displayed.
Switching off
Give the control stalk a brief push
downwards or shift the control stalk
to a different position (Int, 1 or 2).
This indicator lamp goes off in the
instrument panel and a message is
displayed.
The automatic rain sensitive windscreen
wipers must be reactivated by pushing the
control stalk downwards, if the ignition has
been off for more than one
minute.
Operating fault
If a fault occurs with the automatic windscreen
wipers, the wipers will operate in intermittent
mode.
Have it checked by a CITROËN dealer or a
qualified workshop. Do not cover the rain sensor, linked with
the sunshine sensor and located in the
top of the windscreen behind the rear view
m i r r o r.
Switch off the automatic windscreen
wipers when using an automatic car wash.
In winter, it is advisable to wait until
the windscreen is completely clear of
ice before activating the automatic rain
sensitive wipers.
Rear wiper
Of f.
Intermittent wipe.
Wash-wipe (set duration).
Reverse gear
When reverse gear is engaged, the rear wiper
will come into operation automatically if the
windscreen wipers are operating.
Activation/Deactivation
With audio system or touch screen
The system is activated or
deactivated via the vehicle
configuration menu.
This system is activated by default.
If a significant accumulation of snow or ice
is present, or when using a bicycle carrier
on the tailgate, deactivate the automatic
rear wiper.
F
P
ull the wiper control stalk towards you.
Lighting and visibility
Page 107 of 324

105
The screenwash then the windscreen wipers
operate for a pre-determined time.
The headlamp washers only operate when
the dipped beam headlamps are on and the
vehicle is moving.
With daytime running lamps on, to activate the
headlamp wash, position the lighting control
stalk in the dipped beam headlamps position.
On vehicles fitted with automatic air
conditioning, any action on the windscreen
wash control results in temporary closing
of the air intake to avoid odours inside the
passenger compartment.
Screenwash/headlamp wash
level low
For vehicles fitted with headlamp
washers, when the fluid reservoir
low level is reached, this warning
lamp comes on in the instrument
panel, accompanied by an audible
signal and a message.
It comes on when the ignition is switched on,
or every time the stalk is operated, until the
reservoir is refilled.
Next time you stop, refill the screenwash/
headlamp wash reservoir.
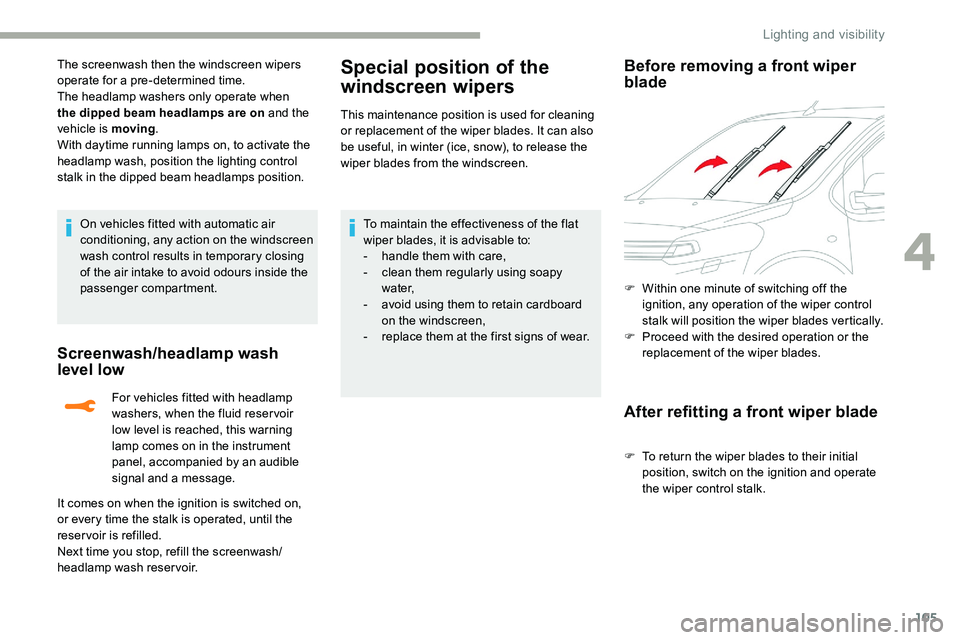
Special position of the
windscreen wipers
This maintenance position is used for cleaning
or replacement of the wiper blades. It can also
be useful, in winter (ice, snow), to release the
wiper blades from the windscreen.
To maintain the effectiveness of the flat
wiper blades, it is advisable to:
-
h
andle them with care,
-
c
lean them regularly using soapy
water,
-
a
void using them to retain cardboard
on the windscreen,
-
r
eplace them at the first signs of wear.
Before removing a front wiper
blade
F Within one minute of switching off the
ignition, any operation of the wiper control
stalk will position the wiper blades vertically.
F
P
roceed with the desired operation or the
replacement of the wiper blades.
After refitting a front wiper blade
F To return the wiper blades to their initial position, switch on the ignition and operate
the wiper control stalk.
4
Lighting and visibility
Page 191 of 324

189
Energy economy mode
System which manages the duration of use of
certain functions to conser ve a sufficient level
of charge in the battery.
After switching off the engine and for a
maximum cumulative period of around
40 minutes, you can continue to use functions
such as the audio and telematics system,
the wipers, the dipped beam headlamps, the
courtesy lamps, etc.
Switching to this mode
A message appears in the instrument panel
screen indicating that the vehicle has switched
to economy mode and the active functions are
put on standby.
If a telephone call is being made at this
time, it will be maintained for around
10
minutes with the Bluetooth hands-free
system of your audio system.
Exiting the mode
These functions will be automatically
reactivated the next time the vehicle is used.
In order to restore the use of these functions
immediately, start the engine and let it run:
-
f
or less than 10 minutes, to use the
equipment for approximately 5
minutes,
-
f
or more than 10 minutes, to use the
equipment for approximately 30
minutes.A flat battery prevents the engine from
starting.
For more information on the 12
V batter y
,
refer to the corresponding section.
Load reduction mode
System which manages the use of certain
functions according to the level of charge
remaining in the battery.
When the vehicle is being driven, the load
reduction function temporarily deactivates
certain functions, such as the air conditioning
and the heated rear screen.
The deactivated functions are reactivated
automatically as soon as conditions permit. Let the engine run for the duration specified to
ensure that the battery charge is sufficient.
Do not repeatedly and continuously restart the
engine in order to charge the battery.
Roof bars/Roof rack
As a safety measure and to avoid
damaging the roof, it is essential to use
the roof bars and racks approved for the
vehicle.
Obser ve the instructions on fitting and use
contained in the guide supplied with the
roof bars and racks.
Recommendations
Distribute the load uniformly, taking care
to avoid overloading one of the sides.
Arrange the heaviest part of the load as
close as possible to the roof.
Secure the load securely.
Drive gently: the vehicle will be more
susceptible to the effects of side winds
and its stability may be affected.
Regularly check the security and tight
fastening of the roof bars, at least before
each trip.
Remove the roof bars once they are no
longer needed.
7
Practical information
Page 220 of 324

218
CITROËN accepts no responsibility for
the cost incurred in repairing your vehicle
or for rectifying malfunctions resulting
from the installation of accessories
not supplied and not recommended by
CITROËN and not installed in accordance
with specifications, in particular when the
combined power consumption of all of the
additional equipment connected exceeds
10 milliamperes.
For more information on installing a
towbar or equipment of the TA XI type,
contact a CITROËN dealer.
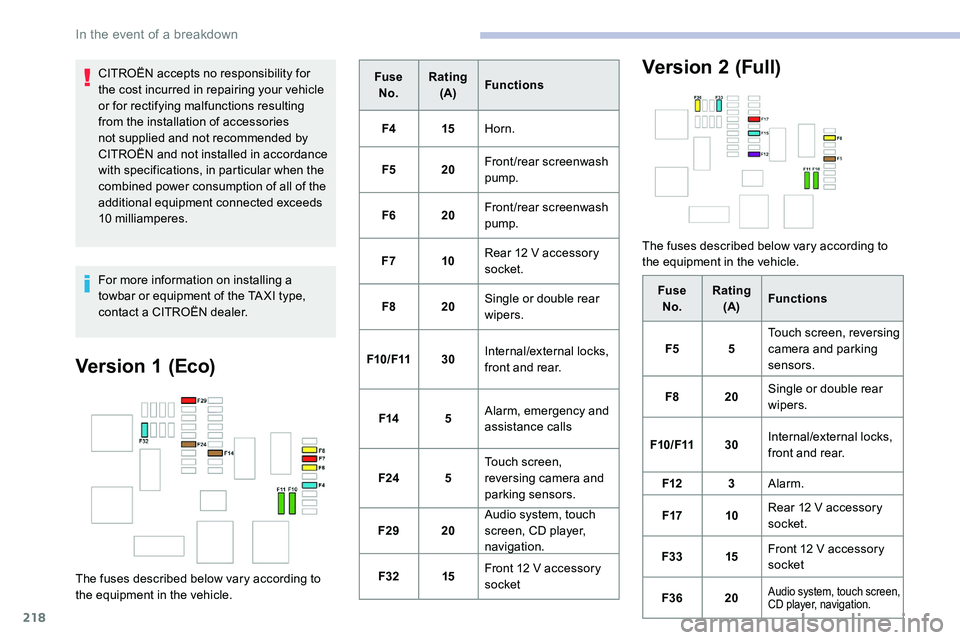
Version 1 (Eco)
The fuses described below vary according to
the equipment in the vehicle.Fuse
No. Rating
(A) Functions
F4 15Horn.
F5 20Front/rear screenwash
pump.
F6 20Front/rear screenwash
pump.
F7 10Rear 12 V accessory
socket.
F8 20Single or double rear
wipers.
F10/F11 30Internal/external locks,
front and rear.
F14 5Alarm, emergency and
assistance calls
F24 5Touch screen,
reversing camera and
parking sensors.
F29 20Audio system, touch
screen, CD player,
navigation.
F32 15Front 12 V accessory
socket
Version 2 (Full)
The fuses described below vary according to
the equipment in the vehicle.
FuseNo. Rating
(A) Functions
F5 5Touch screen, reversing
camera and parking
sensors.
F8 20Single or double rear
wipers.
F10/F11 30Internal/external locks,
front and rear.
F12 3Alarm.
F17 10Rear 12
V accessory
socket.
F33 15Front 12
V accessory
socket
F36 20
Audio system, touch screen,
CD player, navigation.
In the event of a breakdown
Page 222 of 324

220
The battery is located under the bonnet.
F O pen the bonnet using the interior release
lever, then the exterior safety catch.
F
S
ecure the bonnet stay.
For more information on the Bonnet and
the Engine , refer to the corresponding
sections.
Starting using another
battery
When your vehicle's battery is discharged, the
engine can be started using a backup battery
(external or from another vehicle) and jump
leads or using a battery booster.
Never start the engine by connecting a
battery charger.
Never use a 24
V or higher battery
b o o s t e r.
Check beforehand that the backup
battery has a nominal voltage of 12
V and
a capacity at least equal to that of the
discharged battery.
The two vehicles must not be in contact
with each other.
Switch off all the electrical consumers
on both vehicles (audio system, wipers,
lighting, etc.).
Make sure that the jump leads are not
close to the moving parts of the engine
(fan, belt, etc.).
Do not disconnect the (+) terminal while
the engine is running.
Always replace the battery with one of
equivalent specification.
Access to the battery
F Remove the plastic cover to access the (+)
terminal, if your vehicle has one.
The battery (-) terminal is not accessible.
A remote earth point is provided at the front of
the vehicle. F
L
ift the plastic cover on the (+) terminal, if
your vehicle has one.
F
C
onnect the red cable to the (+) terminal of
flat battery A (at the metal elbow), then to
the (+) terminal of backup battery B or the
b o o s t e r.
F
C
onnect one end of the green or black
cable to the (-) terminal of backup battery B
or the booster (or to an earth point on the
assisting vehicle).
F
C
onnect the other end of the green or black
cable to earth point C on the broken down
vehicle.
F
S
tart the engine of the assisting vehicle and
leave it running for a few
minutes.
F
O
perate the starter on the broken down
vehicle and let the engine run.
If the engine does not start straight away,
switch off the ignition and wait a few moments
before trying again.
In the event of a breakdown
Page 223 of 324

221
24v 12v
F Wait for it to return to idle.
F D isconnect the jump leads in reverse
order .
F
R
efit the plastic cover to the (+) terminal, if
your vehicle has one.
F
A
llow the engine to run for at least
30
minutes, by driving or with the vehicle
stationary, so that the battery reaches an
adequate state of charge.
To disconnect, proceed in reverse order.
Some functions, including Stop & Start,
are not available if the battery is not
sufficiently charged.
Charging the battery using
a battery charger
For optimum ser vice life of the battery, it is
essential to maintain an adequate state of
charge.
In some circumstances, it may be necessary to
charge the battery:
-
i
f you only use your vehicle for short
journeys,
-
i
f the vehicle is to be taken off the road for
several weeks.
Contact a CITROËN dealer or a qualified
workshop. If you wish to charge your vehicle's battery
yourself, use only a charger compatible
with lead-acid batteries with a nominal
voltage of 12
V.
Follow the instructions provided by the
manufacturer of the charger.
Never reverse polarities.
It is not necessary to disconnect the
battery.
F
S
witch off the ignition.
F
S
witch off all electrical consumers (audio
system, lighting, wipers, etc.). F
E
nsure that the charger cables are in good
condition.
F
I
f your vehicle has one, lift the plastic cover
on the (+) terminal.
F
C
onnect the cables of charger B as follows:
-
t
he positive (+) red cable to the (+)
terminal of battery A ,
-
t
he negative (-) black cable to earth
point C on the vehicle.
F
A
t the end of the charging operation, switch
off charger B before disconnecting the
cables from battery A .
F
S
witch off charger B before connecting the
cables to the battery, so as to avoid any
dangerous sparks. If this label is present, it is essential to
use only a 12
V charger to avoid causing
irreversible damage to the electrical
components related to the Stop & Start
system.
Never try to charge a frozen battery - risk
of explosion!
If the battery has frozen, have it checked
by a CITROËN dealer or by a qualified
workshop who will check that the internal
components have not been damaged and
that the container has not cracked, which
would mean a risk of toxic and corrosive
acid leaking.
8
In the event of a breakdown
Page 224 of 324

222
Disconnecting the battery
In order to maintain an adequate state
of charge for starting the engine, it is
recommended that the battery be disconnected
if the vehicle is taken out of ser vice for a long
period.
Before disconnecting the battery:
F
c
lose the windows and the doors before
disconnecting the battery,
F
s
witch off all electrical consumers (audio
system, wipers, lighting, etc.).
F
s
witch off the ignition and wait for
four
minutes.
At the battery, detach the (+) terminal only.
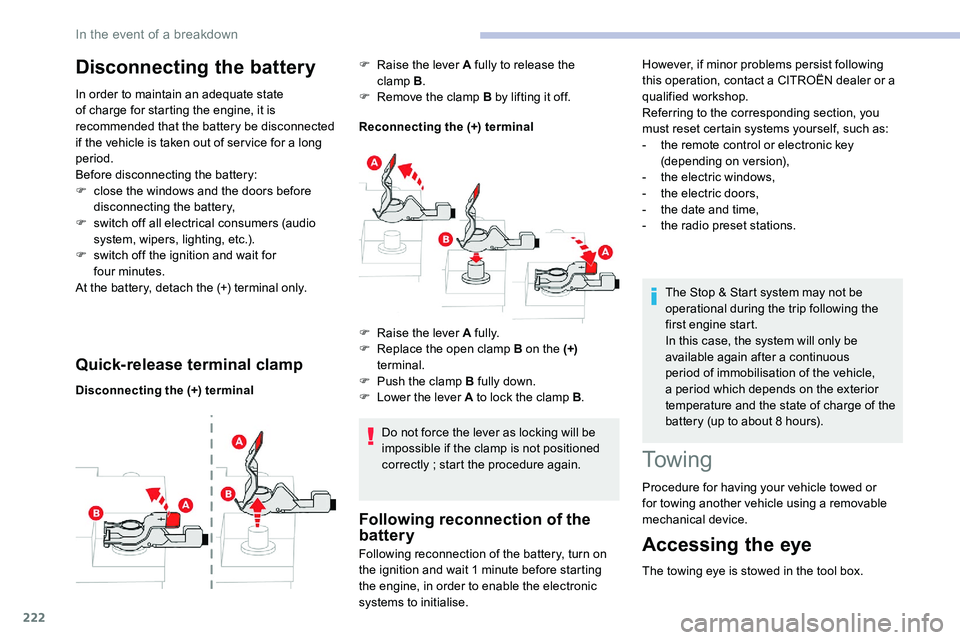
Quick-release terminal clamp
Disconnecting the (+) terminal Reconnecting the (+) terminal
Do not force the lever as locking will be
impossible if the clamp is not positioned
correctly ; start the procedure again.
Following reconnection of the
battery
F Raise the lever A fully to release the clamp B.
F
R
emove the clamp B by lifting it off.
Following reconnection of the battery, turn on
the ignition and wait 1
minute before starting
the engine, in order to enable the electronic
systems to initialise. The Stop & Start system may not be
operational during the trip following the
first engine start.
In this case, the system will only be
available again after a continuous
period of immobilisation of the vehicle,
a period which depends on the exterior
temperature and the state of charge of the
battery (up to about 8 hours).
To w i n g
Procedure for having your vehicle towed or
for towing another vehicle using a removable
mechanical device.
Accessing the eye
The towing eye is stowed in the tool box.
F
Ra
ise the lever A fully.
F
R
eplace the open clamp B on the (+)
terminal.
F
P
ush the clamp B fully down.
F
L
ower the lever A to lock the clamp B
.However, if minor problems persist following
this operation, contact a CITROËN dealer or a
qualified workshop.
Referring to the corresponding section, you
must reset certain systems yourself, such as:
-
t
he remote control or electronic key
(depending on version),
-
t
he electric windows,
-
t
he electric doors,
-
t
he date and time,
-
t
he radio preset stations.
In the event of a breakdown