open bonnet CITROEN DISPATCH SPACETOURER 2020 Handbook (in English)
[x] Cancel search | Manufacturer: CITROEN, Model Year: 2020, Model line: DISPATCH SPACETOURER, Model: CITROEN DISPATCH SPACETOURER 2020Pages: 324, PDF Size: 10.89 MB
Page 6 of 324
4
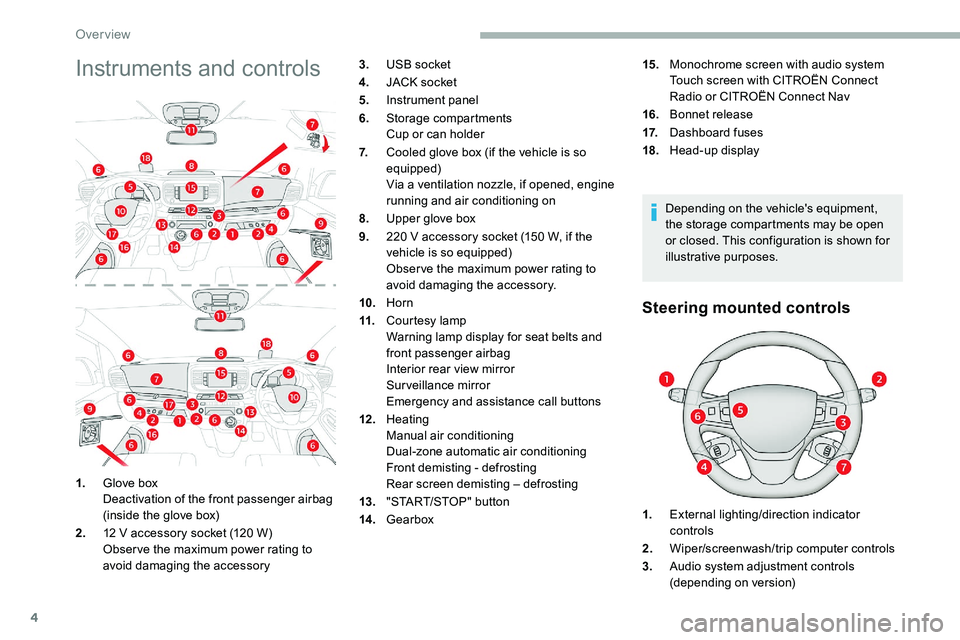
Instruments and controls
Depending on the vehicle's equipment,
the storage compartments may be open
or closed. This configuration is shown for
illustrative purposes.
Steering mounted controls
1.Glove box
Deactivation of the front passenger airbag
(inside the glove box)
2. 12
V accessory socket (120 W)
Obser ve the maximum power rating to
avoid damaging the accessory 3.
USB socket
4. JACK socket
5. Instrument panel
6. Storage compartments
Cup or can holder
7. Cooled glove box (if the vehicle is so
equipped)
Via a ventilation nozzle, if opened, engine
running and air conditioning on
8. Upper glove box
9. 220 V accessory socket (150 W, if the
vehicle is so equipped)
Obser ve the maximum power rating to
avoid damaging the accessory.
10. Horn
11. Courtesy lamp
Warning lamp display for seat belts and
front passenger airbag
Interior rear view mirror
Surveillance mirror
Emergency and assistance call buttons
12 . Heating
Manual air conditioning
Dual-zone automatic air conditioning
Front demisting - defrosting
Rear screen demisting – defrosting
13. "START/STOP" button
14 . Gearbox 15.
Monochrome screen with audio system
Touch screen with CITROËN Connect
Radio or CITROËN Connect Nav
16. Bonnet release
17. Dashboard fuses
18. Head-up display
1. External lighting/direction indicator
controls
2. Wiper/screenwash/trip computer controls
3. Audio system adjustment controls
(depending on version)
Over view
Page 53 of 324
51
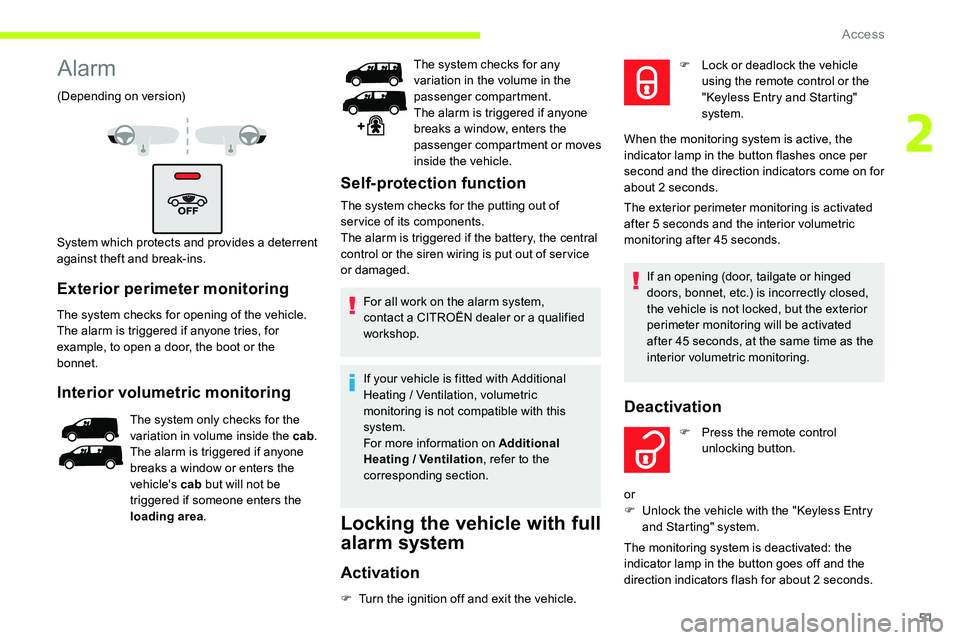
Alarm
(Depending on version)
System which protects and provides a deterrent
against theft and break-ins.
Exterior perimeter monitoring
The system checks for opening of the vehicle.
The alarm is triggered if anyone tries, for
example, to open a door, the boot or the
bonnet.
Interior volumetric monitoring
The system only checks for the
variation in volume inside the cab .
The alarm is triggered if anyone
breaks a window or enters the
vehicle's cab but will not be
triggered if someone enters the
loading area . The system checks for any
variation in the volume in the
passenger compartment.
The alarm is triggered if anyone
breaks a window, enters the
passenger compartment or moves
inside the vehicle.
Self-protection function
The system checks for the putting out of
ser vice of its components.
The alarm is triggered if the battery, the central
control or the siren wiring is put out of ser vice
or damaged.
For all work on the alarm system,
contact a CITROËN dealer or a qualified
workshop.
If your vehicle is fitted with Additional
Heating
/ Ventilation, volumetric
monitoring is not compatible with this
system.
For more information on Additional
Heating
/ Ventilation, refer to the
corresponding section.
Locking the vehicle with full
alarm system
Activation
F Turn the ignition off and exit the vehicle. The exterior perimeter monitoring is activated
after 5 seconds and the interior volumetric
monitoring after 45 seconds.
If an opening (door, tailgate or hinged
doors, bonnet, etc.) is incorrectly closed,
the vehicle is not locked, but the exterior
perimeter monitoring will be activated
after 45 seconds, at the same time as the
interior volumetric monitoring.
Deactivation
F Lock or deadlock the vehicle using the remote control or the
"Keyless Entry and Starting"
system.
When the monitoring system is active, the
indicator lamp in the button flashes once per
second and the direction indicators come on for
about 2 seconds.
F
P
ress the remote control
unlocking button.
or
F
U
nlock the vehicle with the "Keyless Entry
and Starting" system.
The monitoring system is deactivated: the
indicator lamp in the button goes off and the
direction indicators flash for about 2 seconds.
2
Access
Page 192 of 324
190
As this value may change, please verify
the maximum load set out in the manual
supplied with the roof bars.
If the height exceeds 40 cm, adapt the
speed of the vehicle to the profile of the
road to avoid damaging the roof bars and
the fixings on the vehicle.
Be sure to refer to national legislation in
order to comply with the regulations for
transporting objects which are longer than
the vehicle.
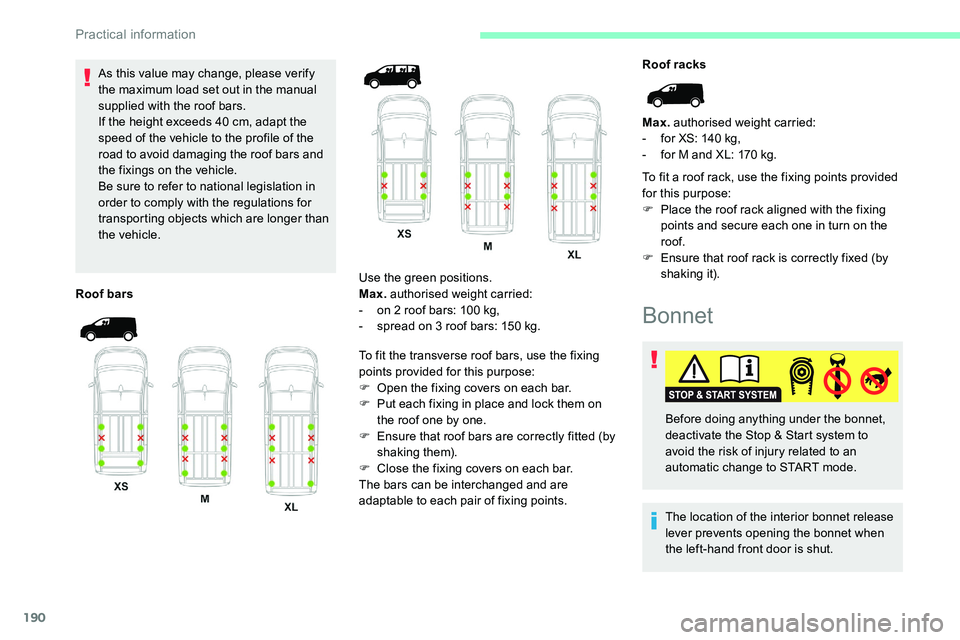
Roof bars Use the green positions.
Max.
authorised weight carried:
-
o
n 2 roof bars: 100 kg,
-
s
pread on 3 roof bars: 150 kg.
To fit the transverse roof bars, use the fixing
points provided for this purpose:
F
O
pen the fixing covers on each bar.
F
P
ut each fixing in place and lock them on
the roof one by one.
F
E
nsure that roof bars are correctly fitted (by
shaking them).
F
C
lose the fixing covers on each bar.
The bars can be interchanged and are
adaptable to each pair of fixing points. Roof racks
Max.
authorised weight carried:
-
f
or XS: 140 kg,
-
f
or M and XL: 170 kg.
To fit a roof rack, use the fixing points provided
for this purpose:
F
P
lace the roof rack aligned with the fixing
points and secure each one in turn on the
roof.
F
E
nsure that roof rack is correctly fixed (by
shaking it).
Bonnet
The location of the interior bonnet release
lever prevents opening the bonnet when
the left-hand front door is shut. Before doing anything under the bonnet,
deactivate the Stop & Start system to
avoid the risk of injury related to an
automatic change to START mode.
Practical information
Page 193 of 324
191
When the engine is hot, handle the
exterior safety catch and the bonnet
stay with care (risk of burns), using the
protected area.
When the bonnet is open, take care not to
damage the safety catch.
Do not open the bonnet under very windy
conditions.
The cooling fan may star t after
switching off the engine: take care
with articles and clothing that might be
caught by the fan blades.
Opening
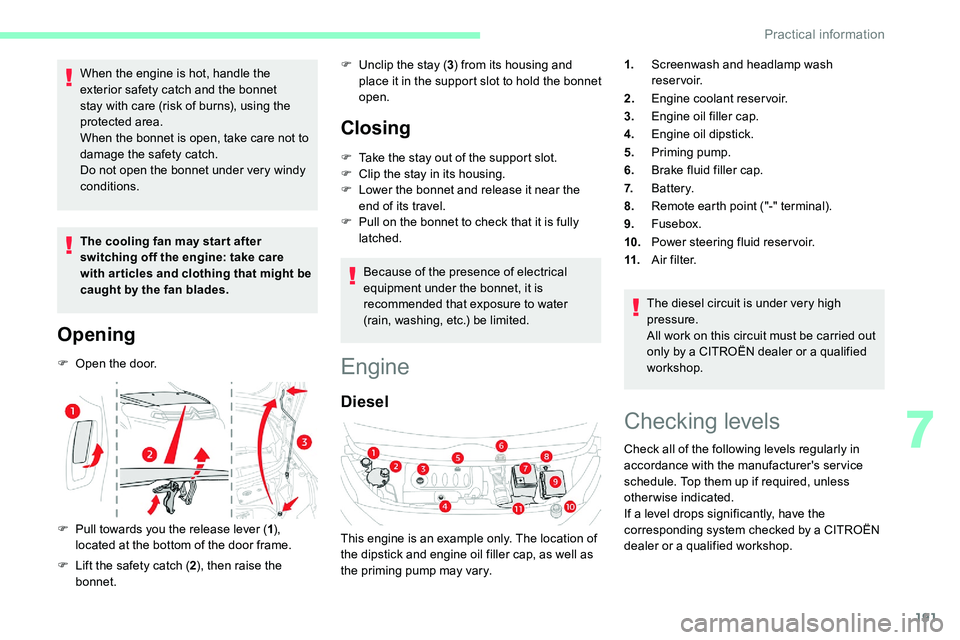
F Open the door.
F
P
ull towards you the release lever ( 1),
located at the bottom of the door frame.
F
L
ift the safety catch ( 2), then raise the
bonnet. F
U
nclip the stay (
3) from its housing and
place it in the support slot to hold the bonnet
open.
Closing
F Take the stay out of the support slot.
F C lip the stay in its housing.
F
L
ower the bonnet and release it near the
end of its travel.
F
P
ull on the bonnet to check that it is fully
latched.
Because of the presence of electrical
equipment under the bonnet, it is
recommended that exposure to water
(rain, washing, etc.) be limited.
Engine
Diesel
The diesel circuit is under very high
pressure.
All work on this circuit must be carried out
only by a CITROËN dealer or a qualified
workshop.
This engine is an example only. The location of
the dipstick and engine oil filler cap, as well as
the priming pump may vary. 1.
Screenwash and headlamp wash
reservoir.
2. Engine coolant reservoir.
3. Engine oil filler cap.
4. Engine oil dipstick.
5. Priming pump.
6. Brake fluid filler cap.
7. Battery.
8. Remote earth point ("-" terminal).
9. Fusebox.
10. Power steering fluid reservoir.
11. A i r f i l t e r.
Checking levels
Check all of the following levels regularly in
accordance with the manufacturer's service
schedule. Top them up if required, unless
otherwise indicated.
If a level drops significantly, have the
corresponding system checked by a CITROËN
dealer or a qualified workshop.
7
Practical information
Page 202 of 324
200
Warning triangle
This safety equipment should be used in
addition to the hazard warning lamps.
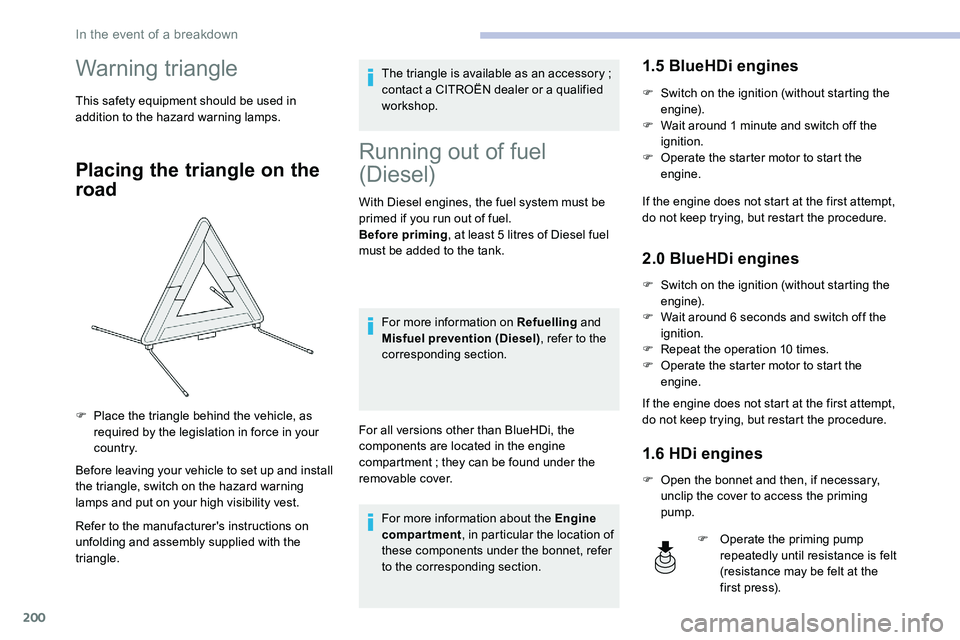
Placing the triangle on the
road
Before leaving your vehicle to set up and install
the triangle, switch on the hazard warning
lamps and put on your high visibility vest.
Refer to the manufacturer's instructions on
unfolding and assembly supplied with the
triangle.The triangle is available as an accessory
;
contact a CITROËN dealer or a qualified
workshop.
Running out of fuel
(Diesel)
With Diesel engines, the fuel system must be
primed if you run out of fuel.
Before priming , at least 5
litres of Diesel fuel
must be added to the tank.
For more information on Refuelling and
Misfuel prevention (Diesel) , refer to the
corresponding section.
For all versions other than BlueHDi, the
components are located in the engine
compartment
; they can be found under the
removable cover.
For more information about the Engine
compartment , in particular the location of
these components under the bonnet, refer
to the corresponding section.
1.5 BlueHDi engines
F Switch on the ignition (without starting the engine).
F
W
ait around 1 minute and switch off the
ignition.
F
O
perate the starter motor to start the
engine.
If the engine does not start at the first attempt,
do not keep trying, but restart the procedure.
2.0 BlueHDi engines
F Switch on the ignition (without starting the engine).
F
W
ait around 6 seconds and switch off the
ignition.
F
R
epeat the operation 10
times.
F
O
perate the starter motor to start the
engine.
If the engine does not start at the first attempt,
do not keep trying, but restart the procedure.
1.6 HDi engines
F Open the bonnet and then, if necessary, unclip the cover to access the priming
pump.
F
P
lace the triangle behind the vehicle, as
required by the legislation in force in your
c o u nt r y.
F
O
perate the priming pump
repeatedly until resistance is felt
(resistance may be felt at the
f i r st p r e s s).
In the event of a breakdown
Page 203 of 324
201
F Operate the starter motor to start the engine (if the engine does not start at the first
attempt, wait around 15 seconds before
trying again).
F
I
f the engine does not start after a few
attempts, operate the priming pump again,
then the starter motor.
F
P
ut the cover back in place and clip it in,
then close the bonnet.
2.0 HDi engines
F Open the bonnet and then, if necessary, unclip the cover to access the priming
pump.
F
L
oosen the degassing bolt. F
O
perate the priming pump until
fuel appears in the transparent
tube.
F
R
etighten the degassing bolt.
F
O
perate the starter motor until the engine
starts (if the engine does not start at the
first attempt, wait around 15
seconds before
trying again).
F
I
f the engine does not start after a few
attempts, operate the priming pump again,
then the starter motor.
F
P
ut the cover back in place and clip it in,
then close the bonnet.
Tool box
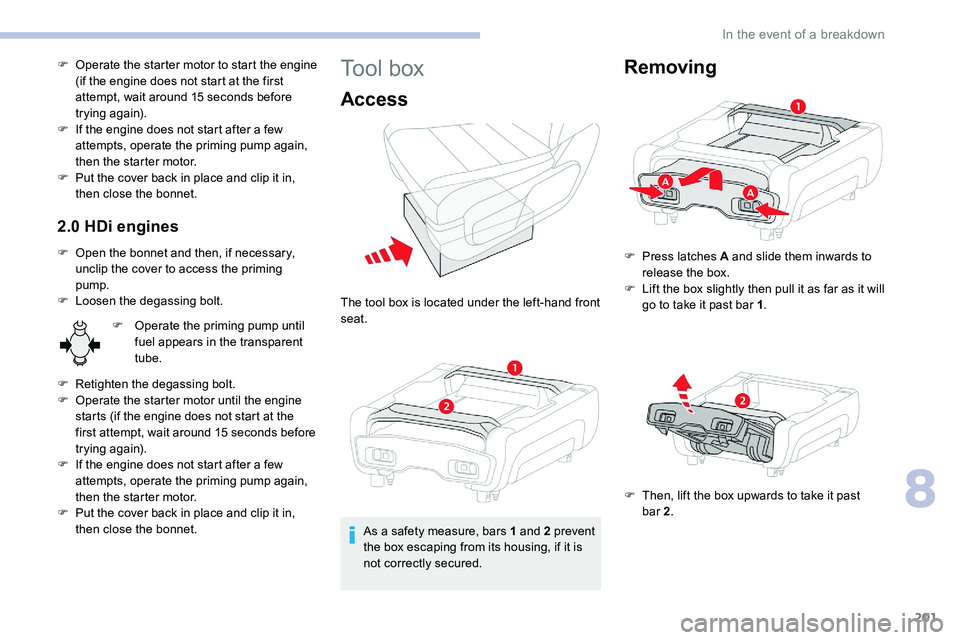
Access
The tool box is located under the left-hand front
seat.
As a safety measure, bars 1 and 2 prevent
the box escaping from its housing, if it is
not correctly secured.
Removing
F Press latches A and slide them inwards to release the box.
F
L
ift the box slightly then pull it as far as it will
go to take it past bar 1 .
F
T
hen, lift the box upwards to take it past
bar
2.
8
In the event of a breakdown
Page 213 of 324
211
Changing a bulb
The headlamps have polycarbonate
lenses with a protective coating:
F
d
o not clean them using a dr y or
abrasive cloth, nor with a detergent
or solvent product,
F
u
se a sponge and soapy water or a pH
neutral product,
F
w
hen using a high pressure washer
on persistent marks, do not keep the
lance directed towards the lamps or
their edges for too long, so as not to
damage their protective coating and
seals.
Changing a bulb must only be done with
the ignition off and after the lamp has
been switched off for several
minutes -
Risk of serious burns!
F
D
o not touch the bulb directly with your
fingers, use a lint-free cloth.
It is essential only to use anti-ultraviolet
(UV) type bulbs, so as not to damage the
headlamp.
Always replace a failed bulb with a new
bulb with the same type and specification. Halogen bulbs
To ensure good quality lighting, check
that the bulb is correctly positioned in its
housing.
After changing a bulb
To refit, carry out the operations in reverse
order to removal.
Close the protective cover very carefully to
guarantee the sealing of the lamps. Opening the bonnet /Access to bulbs
With the engine warm, proceed with
caution - risk of burns!
Take care with objects or clothing that
could be caught in the blades of the
engine cooling fan - risk of strangulation!
In some weather conditions (e.g. low
temperature or humidity), the presence
of misting on the internal sur face of the
glass of the headlamps and rear lamps is
normal
; it disappears after the lamps have
been on for a few
minutes.
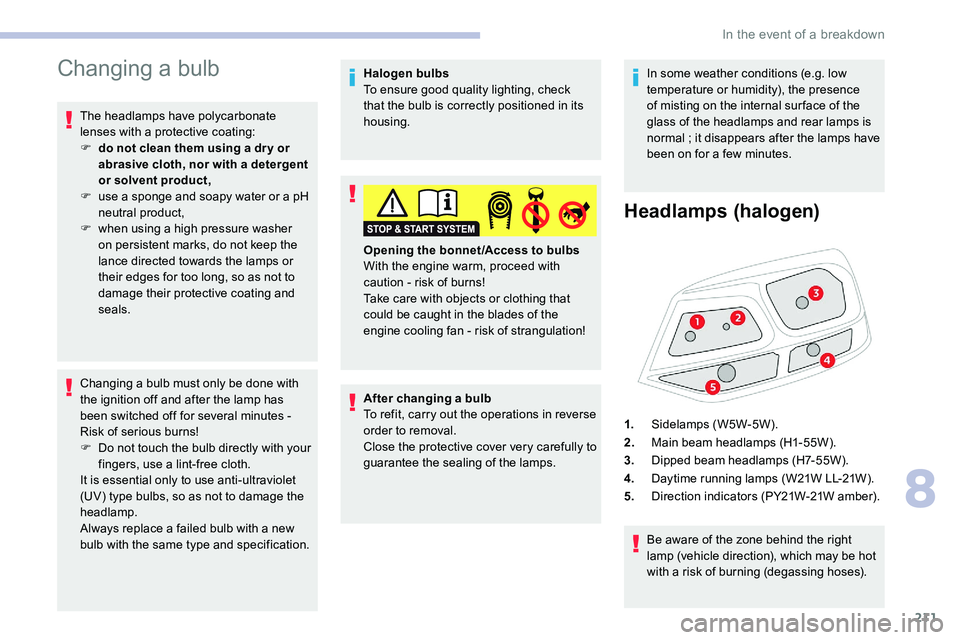
Headlamps (halogen)
Be aware of the zone behind the right
lamp (vehicle direction), which may be hot
with a risk of burning (degassing hoses).
1.
Sidelamps (W5W-5W).
2. Main beam headlamps (H1-55W).
3. Dipped beam headlamps (H7-55W).
4. Daytime running lamps (W21W LL-21W).
5. Direction indicators (PY21W-21W amber).
8
In the event of a breakdown
Page 312 of 324
236
O
Obstacle detection ........................................ 178
Oil change ..................................................... 19
2
Oil consumption
............................................ 192
OIl, engine
...............................
......................192
On-board tools
...................................... 201-202
Opening the bonnet
...............................19 0 -191
Opening the boot
................................ 31- 32, 50
Opening the doors
.........................31- 32, 43 - 4 4
Opening to 180°
........................................ 49
-50
Pads, brake
................................................... 195
Paint
.............................................................. 231
Paint colour code
.......................................... 231
Panoramic glass sunroof
................................82
Parcel shelf, rear
............................................. 76
Parking brake
........................................ 14 4, 19 5
Parking sensors, audible and visual
.............178
Parking sensors, front
...................................179
Parking sensors, rear .................................... 178
Plates, identification ...................................... 231
Port, USB
........................................................ 77
Power steering
...............................
.................19
Pre-heater, Diesel
........................................... 18
Pressures, tyres
........................... 196, 203, 205
Pre-tensioning seat belts
.......................11 6 -117
Priming pump
........................................ 20
0-201
Priming the fuel system
................................200
Protecting children
..........118 , 12 0 -124, 13 0 -13 6
Puncture
................................. 202-203, 205-206
P
RRadar (warnings) ........................................... 15 6
Range .............................................................. 29
Range, AdBlue
.................................. 15, 25, 194
Rear screen, demisting
...................................91
Recharging the battery
.................................221
Recirculation, air
....................................... 88-90
Reduction of electrical load
..........................189
Regeneration of the particle filter
.................195
Reinitialisation of the under- inflation detection system
...........................15 5
Reinitialising the remote control
..................... 40
R
eminder, key in ignition
...............................14
2
Reminder, lighting on
...................................... 98
R
emote control
............................ 31-36, 38, 140
Removing a wheel
................................ 208 -210
Removing the mat
........................................... 75
Replacing bulbs
............................. 21
1, 213 -216
Replacing fuses
..................................... 217-218
Replacing the air filter
................................... 19
4
Replacing the oil filter
................................... 19
4
Replacing the passenger compartment filter
...................................... 19 4
Reservoir, headlamp wash
........................... 19
3
Reservoir, screenwash
.................................193
Resetting the service indicator
.......................23
Resetting the trip recorder
..............................27
Reversing camera
......................... 1
57, 18 0, 183
Reversing camera (on interior mirror)
..........18 0
Reversing lamp
..................................... 214, 216
Roof bars
....................................................... 189
Running out of fuel (Diesel)
..........................200SSafety, children ...............118 , 12 0 -124, 13 0 -13 6
Saturation of the particle filter (Diesel) .........195
Screen, instrument panel
................................28
Screenwash
.................................................. 104
Screenwash, rear
.......................................... 104
SCR (Selective Catalytic Reduction)
......26, 19 6
Seat and bench seat, rear, fixed
...63-64, 66-67
Seat and bench seat, rear, on rails
......................................... 63-64, 68-70
Seat angle
....................................................... 54
Seat belts
.................................. 12 , 113 -117, 12 3
Seat belts, rear
.............................................. 115
Seat, bench front, 2-seat
........................ 5
6 , 114
Seat, rear bench
....................................... 63-64
Seats, electric
........................................... 55-56
Seats, front
...............................
.................54-56
Seats, heated
.................................................. 57
Seat(s), individual, rear, on rails
........71 - 7 2 , 115
Seats, rear
......................................... 6 4 -70, 12 2
Selector, gear
.................................146, 15 0 -152
Sensors (warnings)
....................................... 157
Serial number, vehicle
..................................231
Service indicator
....................................... 23 -24
Servicing
............................... 1
3, 23, 23 -24, 194
Sidelamps
................................ 9
7, 211-214, 216
Side repeater
................................................ 214
Sliding side door, electric
...............37- 3 8 , 4 3 - 47
Sliding side door, hands-free
.....................47- 4 9
Sliding side window
........................................ 8
2
Snow chains
........................... 155, 187-188, 208
Snow chains, link
.................................. 188, 208
Socket, 12 V accessory
..................................77
Socket, 220 V
.................................................. 78
Socket, Jack
.................................................... 78
Sockets, audio
........................................... 7
7-78
Sockets, auxiliary
...............................
.............78
Speed limiter
.................................. 1
59, 161-16 4
Speed limit recognition
............ 16
0 -161, 163, 166, 170 -171
Speedometer
................................................ 15 8
Index alphab