headlamp CITROEN DISPATCH SPACETOURER DAG 2018 Handbook (in English)
[x] Cancel search | Manufacturer: CITROEN, Model Year: 2018, Model line: DISPATCH SPACETOURER DAG, Model: CITROEN DISPATCH SPACETOURER DAG 2018Pages: 400, PDF Size: 16.99 MB
Page 256 of 400

254
Advice on care
General recommendations on the care and
maintenance of your vehicle are given in the
Maintenance and Warranty GuideObserve the following recommendations to
avoid damaging your vehicle:
-
D
o not clean your lamps with a dry or
abrasive cloth, nor with detergent or
solvent products. Use a sponge and
soapy water or a pH neutral product.
-
W
hen using a high pressure washer on
stubborn dirt, avoid prolonged use on the
headlamps, the lamps and their edges to
avoid damaging their lacquer finish and
seals.
-
N
ever use an abrasive sponge to clean
persistent dirt, as this may scratch the
paint sur face. Use a soft cloth with soapy
water instead.
-
W
hen washing your vehicle, never clean
the interior with a water jet.
-
W
hen washing your vehicle in an
automatic roller-brush car wash, be sure
to lock your doors and, depending on the
version you have, remove the key and
deactivate the " Hands-Free Tailgate
Access " system. It is always preferable to have paint
repairs carried out by a CITROËN dealer
or a qualified workshop.
-
N
ever use high pressure washing to
clean the engine compartment, in order
to avoid damaging the electrical units.
-
L
iquids carried in an open vessel (a cup
or mug) could be spilt, presenting a risk
of damage on contact with the controls
in the dashboard and centre console. Be
careful.
Depending on the version you have, in order
to avoid damaging or unpeeling the stickers
on the bodywork, you are strongly advised
against using high-pressure cleaners to
wash your vehicle. It is recommended that
you wash it using a high-flow water jet and
rinse the vehicle down using demineralised
water.
Only a microfibre cloth is recommended for
wiping your vehicle, it must be clean and
used gently.
Practical information
Page 271 of 400

269
Changing a bulb
The headlamps have polycarbonate
lenses with a protective coating:
F
d
o not clean them using a dr y or
abrasive cloth, nor with a detergent
or solvent product,
F
u
se a sponge and soapy water or a pH
neutral product,
F
w
hen using a high pressure washer
on persistent marks, do not keep the
lance directed towards the lamps or
their edges for too long, so as not to
damage their protective coating and
seals.
Changing a bulb should only be done after
the headlamp has been switched off for
several minutes (risk of serious burns).
F
D
o not touch the bulb directly with your
fingers, use a lint-free cloth.
It is essential only to use anti-ultraviolet
(UV) type bulbs, so as not to damage the
headlamp.
Always replace a failed bulb with a new
bulb with the same type and specification. In some weather conditions (e.g. low
temperature or humidity), the presence
of misting on the internal sur face of the
glass of the headlamps and rear lamps is
normal; it disappears after the lamps have
been on for a few minutes.
Types of bulb
Various types of bulb are fitted to your vehicle.
To remove them:
Ty p e A
Ty p e B
Ty p e C
Ty p e D
Halogen bulbs must be replaced with the
lamps having been off for a few minutes
(risk of severe burns). Do not touch the
bulb directly, use a lint-free cloth.
All glass bulb: pull gently as it is fitted by
pressure.
Bayonet bulb: press on the bulb then turn it
anti-clockwise. Halogen bulb: release the retaining spring from
its housing.
Halogen bulb: turn the bulb anti-clockwise.
8
In the event of a breakdown
Page 272 of 400

270
Ty p e E
When each operation has been completed,
check the operation of the lighting.
Front lamps
Halogen headlamps
Xenon bulb: xenon bulbs must be changed by
a CITROËN dealer or a qualified workshop as
there is a risk of electrocution.For more information on Changing a bulb
and in particular the types of bulb, refer to the
corresponding section.
For H7 type bulbs with lugs, take care to
obser ve their correct installation so as to
ensure the best lighting performance.
1.
Sidelamps.
Ty p e A , W5W-5W
2. Main beam headlamps.
Ty p e C , H1- 55W
3. Dipped beam headlamps.
Ty p e C , H7- 5 5 W
4. Daytime running lamps.
Ty p e A , W21W LL-21W
5. Direction indicators.
Ty p e B , PY21W-21W (amber)
Xenon headlamps
For more information on Changing a bulb
and in particular the types of bulb, refer to the
corresponding section.
1. Main beam headlamps.
Ty p e C , H1- 55W
2. Dipped beam headlamps.
Ty p e E , D8S 25W
3. Direction indicators.
Ty p e B , PY21W-21W (amber)
In the event of a breakdown
Page 273 of 400

271
Foglamps
Ty p e D, H11 - 5 5 W
Daytime running lamps/sidelamps
If fitted to your vehicle, contact a CITROËN
dealer or a qualified workshop for the
replacement of this type of LED lamp and light
guide.
A replacement kit for the LEDs is available from
CITROËN dealers.
Direction indicator side repeater
Ty p e A , W Y5W-5W (amber)
-
P
ush the repeater towards the rear and
disengage it.
-
W
hen refitting, engage the repeater towards
the front and then bring it towards the rear.
Amber coloured bulbs (direction indicators and
side repeaters) must be replaced with bulbs of
identical specification and colour.
Dipped beam headlamps
(halogen headlamps)
Ty p e C , H7- 5 5 W
When refitting the connector and bulb
in the lamp, push the assembly into its
housing until it clicks into place.
F
P
ress the upper clip on the cover then tip it
rear wards to remove it.
F
P
ress the lower clip on the electrical
connector and remove the assembly of
connector and bulb.
F
P
ull the bulb out and change it.
To refit, proceed in reverse order.
8
In the event of a breakdown
Page 274 of 400

272
Daytime running lamps (halogen headlamps)
Ty p e A, W21W LL-21W
Sidelamps (halogen headlamps)
Ty p e A, W5W
Main beam headlamps (halogen headlamps)
Ty p e C, H1- 55W
F
P
ress the upper clip on the cover then tip it
rear wards to remove it.
F
P
ress the two side clips on the electrical
connector and remove the assembly of
connector and bulb.
F
P
ull the bulb out and change it.
To refit, proceed in reverse order. F
P
ress the upper clip on the cover then tip it
rear wards to remove it.
F
P
ress the two side clips on the electrical
connector and remove the assembly of
connector and bulb.
F
P
ull the bulb out and change it.
To refit, proceed in reverse order. F
P
ress the upper clip on the cover then tip it
rear wards to remove it.
F
P
ress the lower clip on the electrical
connector and remove the assembly of
connector and bulb.
F
P
ull the bulb out and change it.
To refit, proceed in reverse order.
Be aware that the area behind the right-
hand headlamp (facing forwards) may
be hot, with the risk of burns (degassing
p i p e s).
In the event of a breakdown
Page 275 of 400

273
Direction indicators (halogen
headlamps)
Ty p e B, PY21W-21W (amber)
Faster flashing of the direction indicator
lamp (left or right) indicates a failed bulb
on that side.
Dipped beam headlamps (xenon
headlamps)
Ty p e E , D8S 25W
Replacement of D8S xenon bulbs must
be done by a CITROËN dealer or a
qualified workshop as there is a risk of
electrocution.
It is recommended that both D8S bulbs be
replaced at the same time, in the event of
the failure of one of them.
Main beam headlamps (xenon headlamps)
Ty p e C , H1- 55W
When refitting the connector and bulb
in the lamp, push the assembly into its
housing until it clicks into place.
F
P
ress the upper clip on the cover then tip it
rear wards to remove it.
F
T
urn the bulb holder a quarter turn anti-
clockwise.
F
R
emove the bulb holder.
F
C
hange the faulty bulb.
To refit, proceed in reverse order. F
P
ress the upper clip on the cover then tip it
rear wards to remove it.
F
P
ress the lower clip on the electrical
connector and remove the assembly of
connector and bulb.
F
P
ull the bulb out and change it.
To refit, proceed in reverse order.
8
In the event of a breakdown
Page 276 of 400

274
Direction indicators (xenon
headlamps)
Ty p e B, PY21W-21W (amber)
Faster flashing of the direction indicator
lamp (left or right) indicates a failed bulb
on that side.
Foglamps
Ty p e D , H11 - 5 5 W
F
B
elow the front bumper, unscrew the fixing
screws for the deflector A .
F
R
emove the deflector A . F
P
ress the locking clip and disconnect the
connector.
F T urn the bulb holder a quarter turn anti-
clockwise.
F
R
emove the bulb holder.
F
C
hange the faulty bulb.
To refit, proceed in reverse order.
You can also contact a CITROËN
dealer or a qualified workshop for the
replacement of these bulbs.
F
P
ress the upper clip on the cover then tip it
rear wards to remove it.
F
T
urn the bulb holder a quarter turn anti-
clockwise.
F
C
hange the faulty bulb.
To refit, proceed in reverse order.
In the event of a breakdown
Page 283 of 400

281
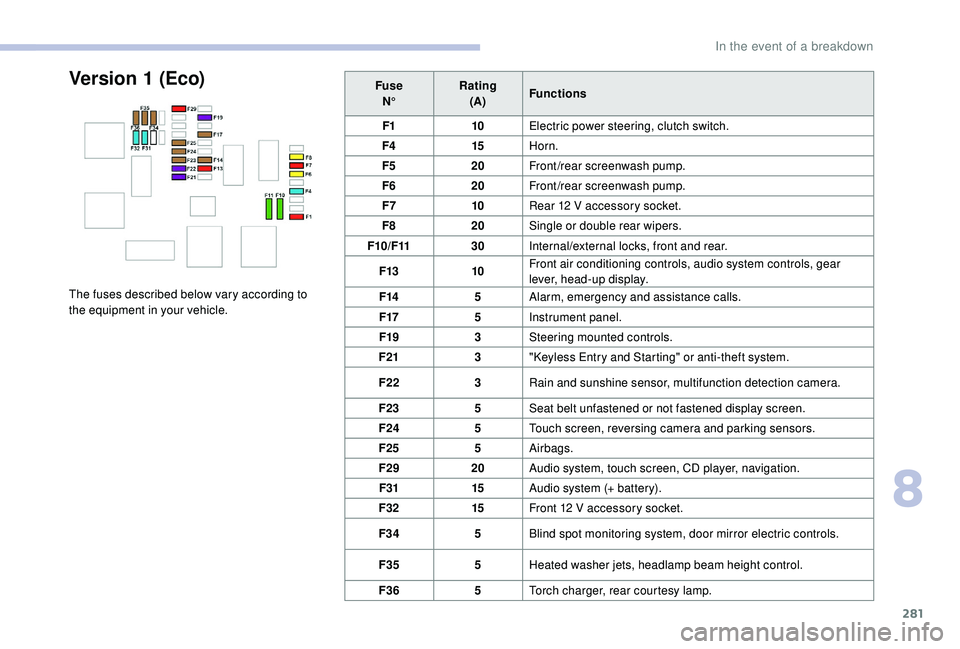
FuseN° Rating
(A) Functions
F1 10Electric power steering, clutch switch.
F4 15Horn.
F5 20Front/rear screenwash pump.
F6 20Front/rear screenwash pump.
F7 10Rear 12
V accessory socket.
F8 20Single or double rear wipers.
F10/F11 30Internal/external locks, front and rear.
F13 10Front air conditioning controls, audio system controls, gear
lever, head-up display.
F14 5Alarm, emergency and assistance calls.
F17 5Instrument panel.
F19 3Steering mounted controls.
F21 3"
K
eyless Entry and Starting" or anti-theft system.
F22 3Rain and sunshine sensor, multifunction detection camera.
F23 5Seat belt unfastened or not fastened display screen.
F24 5Touch screen, reversing camera and parking sensors.
F25 5Airbags.
F29 20Audio system, touch screen, CD player, navigation.
F31 15Audio system (+ battery).
F32 15Front 12
V accessory socket.
F34 5Blind spot monitoring system, door mirror electric controls.
F35 5Heated washer jets, headlamp beam height control.
F36 5Torch charger, rear courtesy lamp.Version 1 (Eco)
The fuses described below vary according to
the equipment in your vehicle.
8
In the event of a breakdown
Page 284 of 400

282
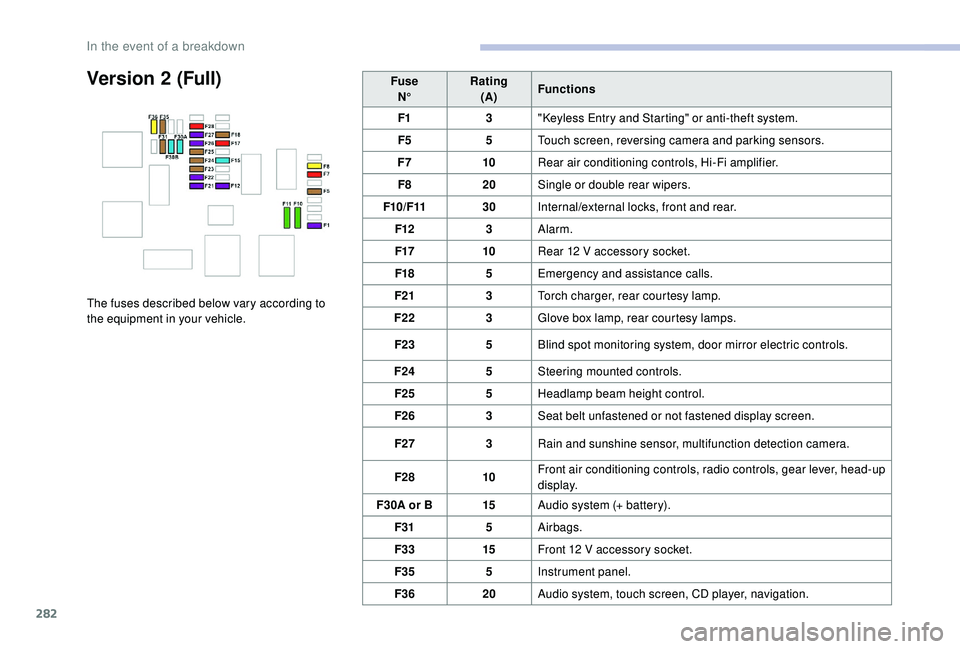
Version 2 (Full)
The fuses described below vary according to
the equipment in your vehicle.Fuse
N° Rating
(A) Functions
F1 3"
K
eyless Entry and Starting" or anti-theft system.
F5 5Touch screen, reversing camera and parking sensors.
F7 10Rear air conditioning controls, Hi-Fi amplifier.
F8 20Single or double rear wipers.
F10/F11 30Internal/external locks, front and rear.
F12 3Alarm.
F17 10Rear 12 V accessory socket.
F18 5Emergency and assistance calls.
F21 3Torch charger, rear courtesy lamp.
F22 3Glove box lamp, rear courtesy lamps.
F23 5Blind spot monitoring system, door mirror electric controls.
F24 5Steering mounted controls.
F25 5Headlamp beam height control.
F26 3Seat belt unfastened or not fastened display screen.
F27 3Rain and sunshine sensor, multifunction detection camera.
F28 10Front air conditioning controls, radio controls, gear lever, head-up
display.
F30A or B 15Audio system (+ battery).
F31 5Airbags.
F33 15Front 12
V accessory socket.
F35 5Instrument panel.
F36 20Audio system, touch screen, CD player, navigation.
In the event of a breakdown
Page 285 of 400

283
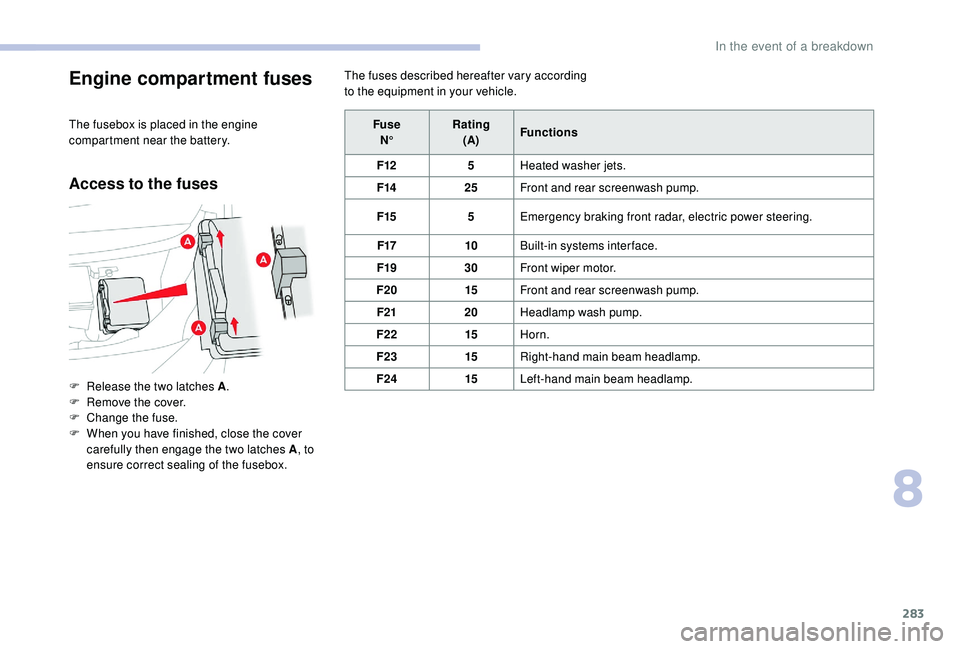
Engine compartment fuses
The fusebox is placed in the engine
compartment near the battery.
Access to the fuses
The fuses described hereafter vary according
to the equipment in your vehicle.
F
R
elease the two latches A .
F
R
emove the cover.
F
C
hange the fuse.
F
W
hen you have finished, close the cover
carefully then engage the two latches A , to
ensure correct sealing of the fusebox. Fuse
N° Rating
(A) Functions
F12 5Heated washer jets.
F14 25Front and rear screenwash pump.
F15 5Emergency braking front radar, electric power steering.
F17 10Built-in systems inter face.
F19 30Front wiper motor.
F20 15Front and rear screenwash pump.
F21 20Headlamp wash pump.
F22 15Horn.
F23 15Right-hand main beam headlamp.
F24 15Left-hand main beam headlamp.
8
In the event of a breakdown