air condition CITROEN DISPATCH SPACETOURER DAG 2020 Handbook (in English)
[x] Cancel search | Manufacturer: CITROEN, Model Year: 2020, Model line: DISPATCH SPACETOURER DAG, Model: CITROEN DISPATCH SPACETOURER DAG 2020Pages: 324, PDF Size: 10.89 MB
Page 91 of 324

89
Temperature
The driver and front passenger can each set
the temperature to suit their requirements.
The value shown on the display is a level
of comfort, not a temperature in Celsius or
Fahrenheit.
F
P
ush button 1 down to decrease the value
or up to increase it.
A setting of around 21 provides optimum
comfort. Depending on your requirements,
a setting between 18 and 24 is normal.
In addition, it is recommended that you
avoid a left /right setting difference of more
than 3.
On entering the vehicle, if the interior
temperature is much colder or warmer
than the comfort value setting, there is no
need to alter the value displayed in order
to reach the required level of comfort. The
system compensates automatically and
corrects the temperature difference as
quickly as possible. For maximum cooling or heating of the
passenger compartment, it is possible
to exceed the minimum value 14 or the
maximum value 28.
F
P
ush button 1 down until "LO" is
displayed or up until "HI" is displayed.
"Mono" function
The comfort setting for the passenger's side
can be indexed to the driver's comfort setting
(mono-zone).
Rear heating - air
conditioning
For more information, refer to the Rear
heating - air conditioning section.
Visibility programme
F Press button 7 "Visibility" to demist or
defrost the windscreen and side windows
more quickly.
F
P
ress the corresponding button 8
to activate/deactivate the function.
The indicator lamp in the button is on
when the function is activated.
The function is deactivated automatically if a
passenger uses the temperature control.
F
P
ress the corresponding button 8
to activate/deactivate the function. The system automatically manages the air
conditioning, air flow and air intake, and
provides optimum distribution towards the
windscreen and side windows.
F
P
ress button 7 " Visibility" again to stop the
programme.
Or
F
P
ress button 6 " AUTO" to return to the
automatic comfort programme.
Air conditioning
With the engine running, the air conditioning is
designed to operate effectively in all seasons,
with the windows closed.
It is used to:
-
l
ower the temperature in summer,
-
i
ncrease the effectiveness of the demisting
in winter, above 3°C.
On/off
F Press button 5 to activate/deactivate the air conditioning system.
3
Ease of use and comfort
Page 92 of 324

90
When the air conditioning is in operation, to
cool the air more quickly, you can use interior
air recirculation for a few moments by pressing
button 4. Then return to the intake of exterior
a i r.
The air conditioning does not operate
when the air flow adjustment is set to off.
Switching the system off may result in
some discomfort (humidity, misting).
Air distribution
F Press button 3 successively to direct the air flow towards:
-
t
he windscreen, the side windows and the
footwells,
-
t
he footwells.
-
t
he central vents, the side vents and the
footwells,
-
t
he windscreen, the side windows, the
central vents, the side vents and the
footwells,
-
t
he central and side vents,
-
t
he windscreen and side windows
(demisting or defrosting).
Air flow
F Press buttons 2 to increase/decrease the air f low.
The symbol for air flow (a fan) appears. It is
filled in or emptied progressively according to
the value requested.
Recirculation of interior air
The intake of exterior air prevents the formation
of mist on the windscreen and side windows.
Recirculation of the interior air isolates the
passenger compartment from exterior odours
and fumes.
This allows hot or cold air to be delivered more
quickly when required.
Avoid prolonged use of recirculation
of the interior air - risk of misting and
deterioration of air quality! F
P
ress button 4 to recirculate the
interior air/permit the intake of
exterior air.
When the interior air recirculation is active, the
symbol appears or the indicator lamp comes on
(depending on version).
Front demisting -
defrosting
These markings on the control
panel indicate the positioning of
the controls for rapid demisting or
defrosting of the windscreen and
side windows.
Heating or manual air
conditioning
F For air conditioning, press this button ; its indicator lamp comes
on.
F
P
ut the air flow, temperature and distribution
controls to the appropriately marked
position.
Ease of use and comfort
Page 93 of 324

91
Dual-zone automatic air
conditioning
F Press this button to demist or defrost the windscreen and side
windows as quickly as possible.
The system automatically manages the air
conditioning, air flow and air intake, and
provides optimum distribution towards the
windscreen and side windows. F
T
o turn it off, press this button
again or press “ AUTO”.
The system is reactivated with the values prior
to the deactivation.
Heated windscreen and
washer jets
Depending on country of sale.
This function heats the windscreen and washer
jets under cold conditions.
In area 1 , the heating frees the wiper blades
from the windscreen when they are stuck by
snow or ice.
In area 2 , the heating improves visibility by
avoiding the accumulation of snow when the
wipers are operating.
Switching on
The period of operation depends on the
exterior temperature.
Pressing this button again switches the function
off
; its indicator lamp goes off.
F
W
ith the engine running, press this button ;
its indicator lamp comes on.
Rear screen and/or
door mirrors demisting -
defrosting
On/Off
F Press this button to switch on/off the defrosting of the rear screen and door
mirrors (if the vehicle is so equipped).
The indicator lamp in the button is on when the
function is activated .
Demisting/defrosting switches off automatically
to prevent an excessive consumption of
current.
3
Ease of use and comfort
Page 94 of 324

92
Switch off the defrosting as soon as
it is no longer necessary, as reducing
the consumption of electrical current
reduces fuel consumption.
Demisting and defrosting only operates
with the engine running.
Rear heating - air
conditioning
If the vehicle is fitted with a rear air conditioning
unit, located in the roof, this system allows the
distribution of air conditioned and heated air via
a distribution rail and individual outlets.
Air flow
F Turn the dial to increase or decrease the air flow.
Comfort temperature
- Turn the thumbwheel from blue (cold) to red (hot) to modulate
the temperature to your liking.
This control simultaneously adjusts the
temperature and the location of the air delivery:
-
b
lue: the air is delivered mainly at roof level, -
r
ed: the air is delivered mainly by the vent
located in row 3 on the right.
Activation/Deactivation
Depending on version, this button is accessible
at the front, from the automatic dual-zone air
conditioning control panel.
F
P
ress this button to activate/
deactivate the operation of the
rear controls.
Additional Heating /
Ventilation
Ease of use and comfort
Page 107 of 324

105
The screenwash then the windscreen wipers
operate for a pre-determined time.
The headlamp washers only operate when
the dipped beam headlamps are on and the
vehicle is moving.
With daytime running lamps on, to activate the
headlamp wash, position the lighting control
stalk in the dipped beam headlamps position.
On vehicles fitted with automatic air
conditioning, any action on the windscreen
wash control results in temporary closing
of the air intake to avoid odours inside the
passenger compartment.
Screenwash/headlamp wash
level low
For vehicles fitted with headlamp
washers, when the fluid reservoir
low level is reached, this warning
lamp comes on in the instrument
panel, accompanied by an audible
signal and a message.
It comes on when the ignition is switched on,
or every time the stalk is operated, until the
reservoir is refilled.
Next time you stop, refill the screenwash/
headlamp wash reservoir.
Special position of the
windscreen wipers
This maintenance position is used for cleaning
or replacement of the wiper blades. It can also
be useful, in winter (ice, snow), to release the
wiper blades from the windscreen.
To maintain the effectiveness of the flat
wiper blades, it is advisable to:
-
h
andle them with care,
-
c
lean them regularly using soapy
water,
-
a
void using them to retain cardboard
on the windscreen,
-
r
eplace them at the first signs of wear.
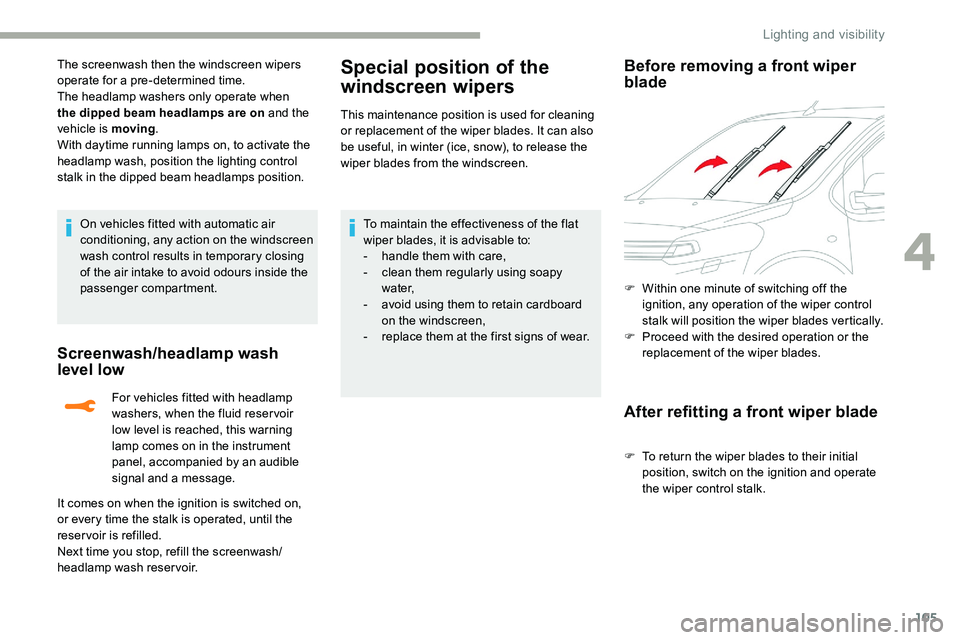
Before removing a front wiper
blade
F Within one minute of switching off the
ignition, any operation of the wiper control
stalk will position the wiper blades vertically.
F
P
roceed with the desired operation or the
replacement of the wiper blades.
After refitting a front wiper blade
F To return the wiper blades to their initial position, switch on the ignition and operate
the wiper control stalk.
4
Lighting and visibility
Page 110 of 324

108
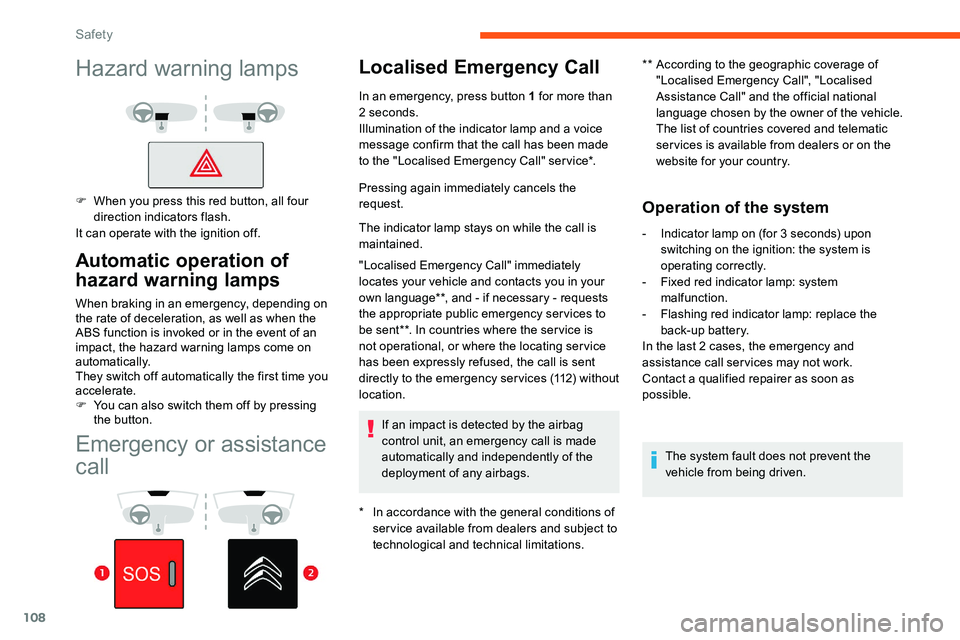
Emergency or assistance
call
Localised Emergency Call
* In accordance with the general conditions of ser vice available from dealers and subject to
technological and technical limitations. **
A
ccording to the geographic coverage of
"Localised Emergency Call", "Localised
Assistance Call" and the official national
language chosen by the owner of the vehicle.
The list of countries covered and telematic
ser vices is available from dealers or on the
website for your country.
In an emergency, press button 1 for more than
2 seconds.
Illumination of the indicator lamp and a voice
message confirm that the call has been made
to the "Localised Emergency Call" service*.
Pressing again immediately cancels the
request.
The indicator lamp stays on while the call is
maintained.
"Localised Emergency Call" immediately
locates your vehicle and contacts you in your
own language**, and - if necessary - requests
the appropriate public emergency services to
be sent**. In countries where the ser vice is
not operational, or where the locating ser vice
has been expressly refused, the call is sent
directly to the emergency services (112) without
location.
If an impact is detected by the airbag
control unit, an emergency call is made
automatically and independently of the
deployment of any airbags.
Operation of the system
- Indicator lamp on (for 3 seconds) upon switching on the ignition: the system is
operating correctly.
-
F
ixed red indicator lamp: system
malfunction.
-
F
lashing red indicator lamp: replace the
back-up battery.
In the last 2 cases, the emergency and
assistance call ser vices may not work.
Contact a qualified repairer as soon as
possible.
The system fault does not prevent the
vehicle from being driven.
Automatic operation of
hazard warning lamps
When braking in an emergency, depending on
the rate of deceleration, as well as when the
ABS function is invoked or in the event of an
impact, the hazard warning lamps come on
automatically.
They switch off automatically the first time you
accelerate.
F
Y
ou can also switch them off by pressing
the button.
Hazard warning lamps
F When you press this red button, all four
direction indicators flash.
It can operate with the ignition off.
Safety
Page 114 of 324

112
ASR / DSC
T hese systems offer increased safety
in normal driving, but they should not
encourage the driver to take extra risks or
drive at high speed.
It is in conditions of reduced grip (rain,
snow, black ice) that the risk of loss of grip
increases. It is therefore important for your
safety to keep these systems activated in
all conditions, and particularly in difficult
conditions.
The correct operation of these
systems depends on obser vation of
the manufacturer's recommendations
regarding as much the wheels (tyres and
rims), braking and electronic components
as the assembly and repair procedures
used by CITROËN dealers.
The use of snow tyres is recommended,
in order to be able to benefit from the
efficiency of these systems in winter
conditions.
In this case, it is essential to equip the
four wheels with tyres approved for your
vehicle.Advanced Grip Control
Special patented traction control system which
improves driveability on snow, mud and sand.
This system, whose operation has been
optimised for each situation, allows you to
manoeuvre in most conditions of poor grip
(encountered during passenger vehicle use).
Associated with all-seasons Peak Mountain
Snow Flake tyres, this system offers a
compromise between safety, adhesion and
traction.
The accelerator pedal should be pressed
sufficiently to allow the system to use the power
of the engine. Operation at high engine speeds
is completely normal.
A five-position selector knob allows you to
choose the setting best suited to the driving
conditions encountered.
An indicator lamp associated with each mode
comes on, accompanied by the display of a
message to confirm your choice.
Operating modes
Standard (ESC)
This mode is calibrated for a low level
of wheel spin, based on the different
levels of grip normally encountered on
the road.
Every time the ignition is switched off, the
system automatically resets to this mode.
Snow
This mode adapts its strategy to the
conditions of grip encountered for each
of the two front wheels on moving off.
(mode active up to 50 mph (80 km/h))
Safety
Page 119 of 324

117
Instructions for children
Use a suitable child seat, if the passenger
is less than 12 years old or shorter than
one and a half metres.
Never use the same seat belt to secure
more than one person.
Never allow a child to travel on your lap.
For more information on Child seats, refer
to the corresponding section.
In case of impact
Depending on the nature and
seriousness of the impact , the
pyrotechnic system may be deployed
before and independent of the airbags.
Deployment of the pretensioners is
accompanied by a slight discharge of
harmless smoke and a noise, due to the
activation of the pyrotechnic cartridge
incorporated in the system.
In all cases, the airbag warning lamp is lit.
After an impact, get the seat belt system
checked and if necessary have it replaced
by a CITROËN dealer or a qualified
workshop.Airbags
System designed to contribute towards
improving the safety of the occupants (with the
exception of the centre seat in rows 2 and 3,
if fitted to your vehicle) in the event of violent
collisions.
The airbags supplement the action of the force-
limiting seat belts.
If a collision occurs, the electronic detectors
record and analyse the front and side impacts
sustained in the impact detection zones:
-
i
n the event of a serious impact, the airbags
are deployed instantly and contribute
towards better protection of the occupants
(with the exception of the centre seat in
rows 2 and 3, if fitted to your vehicle)
;
immediately after the impact, the airbags
deflate rapidly so that they do not hinder
visibility or the exit of the occupants,
-
i
n the case of a minor or rear impact or
in certain rollover conditions, the airbags
may not be deployed
; the seat belt
alone contributes towards ensuring your
protection in these situations.
The airbags do not operate when the
ignition is switched off.
This equipment will only deploy once. If a
second impact occurs (during the same or
a subsequent accident), the airbag will not
be deployed again.
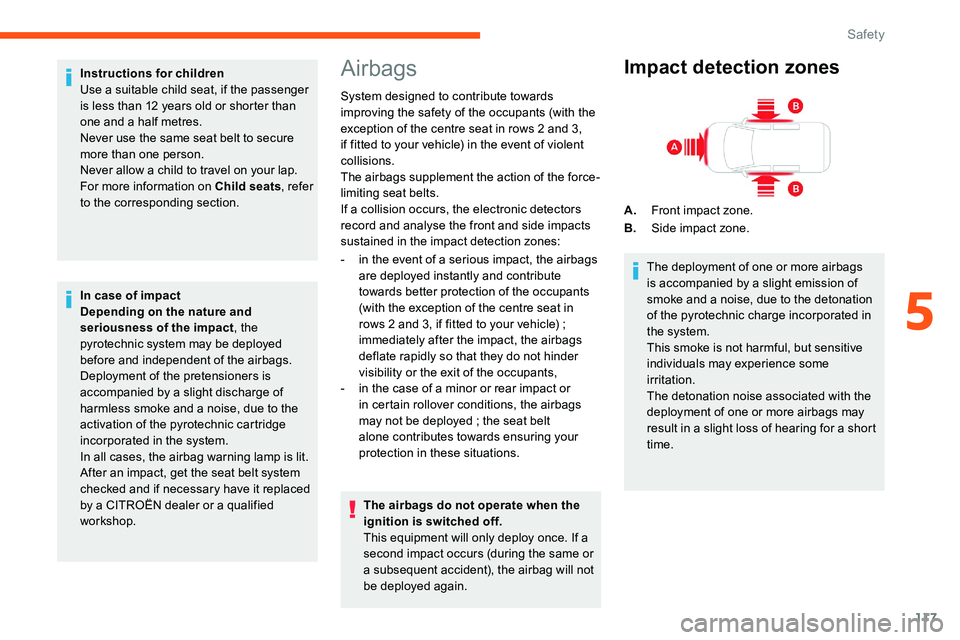
Impact detection zones
A. Front impact zone.
B. Side impact zone.
The deployment of one or more airbags
is accompanied by a slight emission of
smoke and a noise, due to the detonation
of the pyrotechnic charge incorporated in
the system.
This smoke is not harmful, but sensitive
individuals may experience some
irritation.
The detonation noise associated with the
deployment of one or more airbags may
result in a slight loss of hearing for a short
time.
5
Safety
Page 141 of 324

139
In case of towing
Driving with a trailer places greater
demands on the towing vehicle and
requires extra care from the driver.Respect the maximum towable weights.
At altitude:
reduce the maximum load
by 10% per 1,000 metres of altitude ; the
density of the air decreases with altitude
and the performance of the engine
reduces.
New vehicle: do not pull a trailer before
having driven at least 620 miles (1,000
kilometres).
If the outside temperature is high, let the
engine idle for 1 to 2 minutes after the
vehicle comes to a stop, to help it to cool.
Before setting off
Nose weight
F Distribute the load in the trailer so that the heaviest items are as close as possible to
the axle and the nose weight (at the point
where it joins your vehicle) approaches the
maximum permitted without exceeding it.
Ty r e s
F Check the tyre pressures of the towing vehicle and of the trailer, observing the
recommended pressures.
Lighting
F Check the electrical signalling on the trailer and the headlamp beam height of your
vehicle.
If a genuine CITROËN towing device is
used, the rear parking sensors will be
deactivated automatically to avoid the
audible signal.
When driving
Cooling
Towing a trailer uphill increases the
temperature of the coolant. The maximum
towable load depends on the gradient and the
exterior temperature. The cooling capacity of
the fan does not increase with engine speed.
F
T
o reduce the heating up, reduce the
vehicle speed and the engine speed.
In all cases, keep a check on the coolant
temperature.
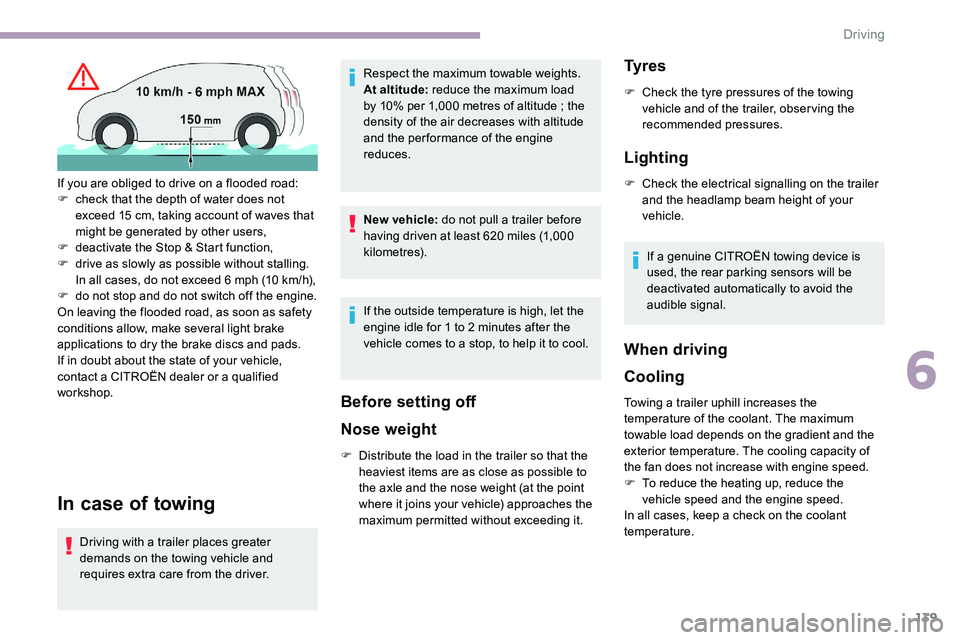
If you are obliged to drive on a flooded road:
F
c
heck that the depth of water does not
exceed 15
cm, taking account of waves that
might be generated by other users,
F
d
eactivate the Stop & Start function,
F
d
rive as slowly as possible without stalling.
In all cases, do not exceed 6 mph (10
km/h),
F
d
o not stop and do not switch off the engine.
On leaving the flooded road, as soon as safety
conditions allow, make several light brake
applications to dry the brake discs and pads.
If in doubt about the state of your vehicle,
contact a CITROËN dealer or a qualified
workshop.
6
Driving
Page 157 of 324

155
The inflation pressures specified for the
vehicle can be found on the tyre pressure
label.
For more information on the
Identification markings, refer to the
corresponding section.
Checking tyre pressures
This check should be done when the tyres
are "cold" (vehicle stopped for 1 hour or
after a journey of less than 6
miles (10 km)
at moderate speeds).
Other wise, add 0.3
bar to the pressures
shown on the label. Snow chains
The system does not have to be
reinitialised after fitting or removing snow
chains.
Spare wheel
The steel spare wheel does not have an
under-inflation detection sensor.
Under-inflation alert
Under-inflation detection does not replace
the need for vigilance on the part of the
driver.
This system does not avoid the need
to regularly check the tyre pressures
(including the spare wheel) as well as
before a long journey.
Driving with under-inflated tyres,
particularly in adverse conditions (heavy
load, high speed, long journey):
-
w
orsens road-holding,
-
l
engthens braking distances,
-
c
auses premature wear of the tyres,
-
i
ncreases fuel consumption. This is signalled by the fixed
illumination of this warning lamp,
accompanied by an audible signal
and, depending on equipment, the
display of a message.
F
R
educe speed immediately, avoid excessive
steering movements and avoid sudden
braking.
F
S
top the vehicle as soon as it is safe to do
so.
The loss of pressure detected does not
always cause visible bulging of the tyre.
Do not rely on just a visual check. F
I f it is not possible to make this check
immediately, drive carefully at reduced
speed.
F
I
n the event of a puncture, use the
temporary puncture repair kit or the spare
wheel (depending on equipment).
The alert is kept active until the system is
reinitialised.
Reinitialisation
Reinitialise the system after adjusting one or
more tyre pressures and after changing one or
more wheels.
Before reinitialising the system, make
sure that the pressures of the four tyres
are correct for the conditions of use of the
vehicle and conform to the values written
on the tyre pressure label.
Check the pressures of the four tyres
before performing the reinitialisation.
The system does not advise if a pressure
is incorrect at the time of reinitialisation.
F
U
sing a compressor, such as the one in the
temporary puncture repair kit, check the
pressures of the four tyres when cold.
6
Driving