light CITROEN DISPATCH SPACETOURER DAG 2020 Handbook (in English)
[x] Cancel search | Manufacturer: CITROEN, Model Year: 2020, Model line: DISPATCH SPACETOURER DAG, Model: CITROEN DISPATCH SPACETOURER DAG 2020Pages: 324, PDF Size: 10.89 MB
Page 85 of 324

83
Retractable sliding table
Shine, Business Lounge
It comprises a closed central storage space
with a lid. Unfolded, it provides a table with
two tops on which objects can be placed. The
central area includes two cup holders and can
also be used to place small objects (credit card,
pen, etc.).
The assembly is mounted on a runner allowing
it to be positioned either in row 2 or row 3.
Storage
F Slide back the cover for access to 11 litres
of storage space.
The storage space can only support a
maximum weight of 3
kg ; do not exceed
this maximum load in use.
Moving forward or
backward
F Lift the control (without going beyond the point of resistance) and slide the assembly
forwards or backwards. F
R
elease the control when it is in the desired
position.
F
C
heck that the table is secured on the
runner. If this is not the case, move the
assembly slightly to the next notch on the
r u n n e r.
You can move the table in both the open
and stowed position. However, to ensure
safety, it is advised that you handle the
assembly in the stowed position.
For the table to run smoothly, ensure that
no objects are blocking the space used by
the runner on the floor.
Before manoeuvring the table, check that
there is nothing on the table.
Unfolding
F Operate the control on the top and pull the table assembly up until it clicks into place.
3
Ease of use and comfort
Page 87 of 324

85
F Check that the control is in the high position (locking mechanism engaged). Otherwise,
lift the control as far as it can go to engage
the mechanism.
F
P
lace the front of the table on the runner.
F
T
aking care not to inter fere with the control,
tip the assembly down at the rear until it
clicks into place.
F
C
heck that the assembly is locked in the
runner. If this is not the case, move the
assembly slightly to the next notch on the
r u n n e r.
Other wise there is a risk of injury in the
event of an accident or sudden braking.
F
R
elease the control until the guide latches
in the runner. Be careful of passengers' feet when
manoeuvring the assembly.
Storage off the runner
If removing and storing the table out of
the vehicle, ensure that it is placed in a
clean area, so as to avoid introducing any
foreign bodies into the mechanisms.
The table must be placed outside the
vehicle on a flat and level sur face, resting
on the guide so as not to damage visible
parts.
Incorrect use of the table could cause
serious injury.
Never use the table in the open or
unfolded position while the vehicle is
in motion. Any object on the table will
become a dangerous projectile in the
event of sudden braking.
Ensure that the table is correctly stowed in
the low position before moving off.
Never use the table tops as seats or lean
on them.
A label affixed to the side of the table
gives a reminder of this.
Caution, when out of the
vehicle, the table leans to
the right or left when put
down. Never place hot objects such as
saucepans or frying pans on the table, as
you risk damaging its surface (risk of fire).
With the table deployed, each top can
bear a maximum load of 10
kg. If you
do not obser ve this load limit, you risk
damaging a part of or the whole table.
Never raise the table when it is between
individual seats
; this risks damaging the
table tops.
3
Ease of use and comfort
Page 89 of 324

87
Servicing the ventilation and air
conditioning system
F
E
nsure that the cabin filter is in good
condition and have the filter elements
replaced regularly.
It is recommend to use a combined
passenger compartment filter. Thanks to
its special active additive, it contributes
to the purification of the air breathed by
the occupants and the cleanliness of the
passenger compartment (reduction of
allergic symptoms, bad odours and greasy
deposits).
F
T
o ensure correct operation of the air
conditioning system, have it checked
according to the recommendations in
the Maintenance and Warranty Guide. Stop & Star t
The heating and air conditioning systems
only work when the engine is running.
Temporarily deactivate the Stop &
Start system to maintain a comfortable
temperature in the passenger
compartment.
For more information on Stop & Star t
,
refer to the corresponding section.
Contains fluorinated greenhouse gas
R13 4A
Depending on version and country
of sale, the air conditioning system
contains fluorinated greenhouse
gas R134A. Gas charge: 0.5
kg (+/-
0.025
kg), GWP index 1,430 t (equivalent
in CO
2: 0.751 t).
Heating
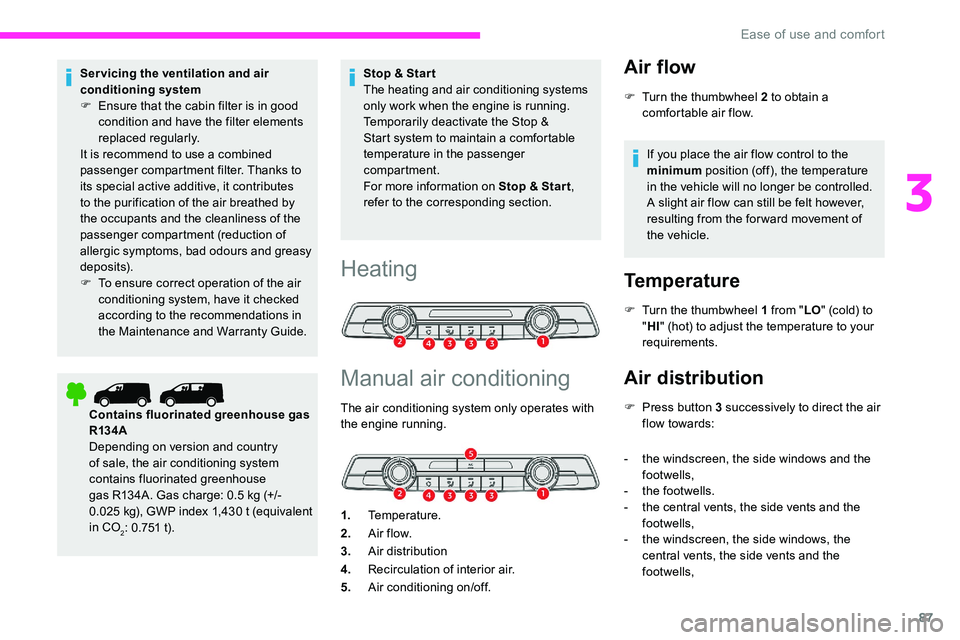
Manual air conditioning
The air conditioning system only operates with
the engine running.
1. Temperature.
2. A ir f low.
3. Air distribution
4. Recirculation of interior air.
5. Air conditioning on/off.
Air flow
F Turn the thumbwheel 2 to obtain a
comfortable air flow.
If you place the air flow control to the
minimum position (off), the temperature
in the vehicle will no longer be controlled.
A slight air flow can still be felt however,
resulting from the for ward movement of
the vehicle.
Temperature
F Turn the thumbwheel 1 from " LO" (cold) to
" HI " (hot) to adjust the temperature to your
requirements.
Air distribution
F Press button 3 successively to direct the air flow towards:
-
t
he windscreen, the side windows and the
footwells,
-
t
he footwells.
-
t
he central vents, the side vents and the
footwells,
-
t
he windscreen, the side windows, the
central vents, the side vents and the
footwells,
3
Ease of use and comfort
Page 90 of 324

88
- the central and side vents,
- t he windscreen and side windows
(demisting or defrosting).
Air conditioning
With the engine running, the air conditioning is
designed to operate effectively in all seasons,
with the windows closed.
It allows you:
-
i
n summer, to lower the temperature,
-
t
o increase the effectiveness of the
demisting in winter, above 3°C.
On/off
F Press button 5 to activate/deactivate the air conditioning system.
When the air conditioning is in operation, to
cool the air more quickly, you can use interior
air recirculation for a few moments by pressing
button 4 . Then return to the intake of exterior
a i r.
The air conditioning does not operate
when the air flow adjustment is set to off.
Switching the system off may result in
some discomfort (humidity, misting).
Dual-zone automatic air
conditioning
1. Temperature.
2. A ir f low.
3. Air distribution.
4. Recirculation of interior air.
5. Air conditioning on/off.
6. Automatic comfort mode.
7. Visibility programme.
8. "Mono" function or Rear heating and air
conditioning on/off (depending on version).
Automatic comfort mode
F Press the " AUTO" button 6 su c c e s s i ve l y.
The active mode appears in the display screen,
as described below: Provides soft and quiet operation by
limiting air flow.
Offers the best compromise between
a comfortable temperature and quiet
operation. When the engine is cold, the air flow will
only reach its optimum level gradually
to prevent too much cold air being
distributed.
In cold weather, it favours the distribution
of warm air to the windscreen, the side
windows and the footwells only.
Manual mode
It is possible to make a different choice
from that offered by the system by changing
a setting. The other functions will still be
managed automatically.
As soon as a setting is changed, the "
AUTO"
symbol disappears.
Deactivating the system
F Press button 2 " -" until the fan symbol
disappears.
This action switches off all of the functions of
the system.
Temperature is no longer controlled. A slight air
flow can still be felt, however, resulting from the
for ward movement of the vehicle.
F
P
ress button 2 " +" to switch the system on
again. Provides dynamic and effective air
f low.
Ease of use and comfort
Page 99 of 324

97
Lighting control stalk
In some weather conditions (e.g. low
temperature or humidity), the presence
of misting on the internal sur face of the
glass of the headlamps and rear lamps is
normal ; it disappears after the lamps have
been on for a few
minutes.
Travelling abroad
If using your vehicle in a country that
drives on the other side of the road, the
headlamps must be adjusted to avoid
dazzling on-coming drivers.
Contact a CITROËN dealer or a qualified
workshop.
Main lighting
Lighting off (ignition off)/
Daytime running lamps (engine
running). Operation of the selected lighting is
confirmed by the illumination of the
corresponding indicator lamp.
Headlamp dipping
In the lighting off and sidelamps modes, the
driver can switch on the main beam headlamps
temporarily ("headlamp flash") by maintaining a
pull on the stalk.
Without AUTO lighting
Automatic illumination of headlamps/
Daytime running lamps.
Sidelamps only.
Dipped or main beam headlamps.
Pull the stalk to switch between dipped and
main beam headlamps.With AUTO lighting
Fog light selection ring
With rear foglamp only
It operates with the sidelamps on.
F
T
urn the ring for wards to switch it on and
backwards to switch it off.
When the lighting is switched off automatically
(version with AUTO lighting), the foglamp and
the dipped beam headlamps will remain on.
4
Lighting and visibility
Page 100 of 324

98
With front and rear foglamps
They operate with the dipped beam
headlamps on, in manual or auto
mode.
Turn and release the ring:
F
o
nce for wards to switch on the front
foglamps and then a second time for the
rear foglamps.
F
o
nce backwards to switch off the rear
foglamps and then a second time for the
front foglamps.
If the lighting is switched off automatically (with
AUTO model) or the dipped beam headlamps
are switched off manually, the foglamps and
sidelamps will remain on.
F
T
urn the ring backwards to switch the
foglamps off
; the sidelamps will then switch
of f. When the lighting is left on
An audible signal when a front door is
opened warns the driver that the vehicle's
exterior lighting is on, with the ignition off
and in manual lighting mode.
In this case, switching off the lighting
stops the audible signal.
The lighting goes off when you switch off
the ignition, but you can always switch it
on again using the lighting control stalk.
In good or rainy weather, by both day and
night, use of the front foglamps and the
rear foglamps are prohibited. In these
situations, the power of their beams may
dazzle other drivers. They should only be
used in fog or falling snow.
In these weather conditions, it is your
responsibility to switch on the foglamps
and dipped headlamps manually as the
sunshine sensor may detect sufficient
light.
Switch off the front and rear foglamps
when they are no longer necessary.
Direction indicators
F Left or right: lower or raise the lighting
control stalk, beyond the point of resistance.
If you forget to cancel the direction
indicators for more than 20 seconds, the
volume of the audible signal will increase if
the speed is above 50 mph (80
km/h).
Three flashes
F Press briefly upwards or downwards, without going beyond the point of
resistance
; the direction indicators will flash
3 times.
Lighting and visibility
Page 101 of 324

99
Daytime running lamps/
Sidelamps
If the vehicle is so equipped, they come on
automatically when the engine is started, when
the lighting control stalk is in position "0" or
" AUTO ".
Automatic headlamp
illumination
When a low level of ambient light is detected
by a sunshine sensor, the number plate
lamps,
sidelamps and dipped beam headlamps
are switched on automatically, without any F
T
urn the ring to the "AUTO"
position. When
the function is activated, a message is
displayed.
F
T
urn the ring to another position
.
Deactivation of the function is accompanied
by the display of a message.
Malfunction
In the event of a malfunction of
the sunshine sensor, the lighting
comes on and this warning lamp is
displayed in the instrument panel,
accompanied by an audible signal
and/or a message.
Contact a CITROËN dealer or a qualified
workshop.
In fog or snow, the sunshine sensor may
detect sufficient light. In this case, the
lighting will not come on automatically.
Do not cover the sunshine sensor,
integrated with the rain sensor and located
at the top of the windscreen behind the
rear view mirror
; the associated functions
would no longer be controlled.
Guide-me-home and
welcome lightingaction on the part of the driver. They can also
come on if rain is detected, at the same time as
the automatic rain sensitive wipers.
As soon as the brightness returns to a
sufficient level or after the windscreen wipers
are switched off, the lamps are switched off
automatically.
Guide-me-home lighting
Manual
Switching on/off
F W ith the ignition off, "flash" the headlamps
using the lighting control stalk to switch the
function on/off.
Manual guide-me-home lighting goes off
automatically at the end of a given period of
time.
Automatic
With the "Automatic headlamp illumination"
function activated (lighting control stalk
in the " AUTO" position), when the light is
poor, the dipped beam headlamps come on
automatically when the ignition is switched off.
With the ring in the " AUTO" position, when the
light is poor, the dipped beam headlamps come
on automatically when the ignition is switched
of f.
4
Lighting and visibility
Page 102 of 324

100
Switching off
The system does not operate:
- b elow a certain angle of rotation of the
steering wheel,
-
a
bove 25 mph (40 km/h),
-
w
hen reverse gear is engaged.
Programming
With audio system or touch
screen
The system is activated or
deactivated via the vehicle
configuration menu.
This system is activated by default.
With audio system or touch screen
Exterior welcome lighting
The remote operation of the lighting makes
your approach to the vehicle easier in poor
light. It is activated when the lighting control
is in the " AUTO" position and the level of light
detected by the sunshine sensor is low.
Switching on
Press the open padlock on the
remote control or one of the front
door handles with the "Keyless Entry
and Starting" system.
The dipped beam headlamps and the
sidelamps come on
; your vehicle is also
unlocked.
Switching off
The exterior welcome lighting switches off
automatically after a set time, when the ignition
is switched on or on locking the vehicle.
Programming
With audio system or touch screen
The activation, deactivation and
duration of the welcome lighting can
be set via the vehicle configuration
menu.
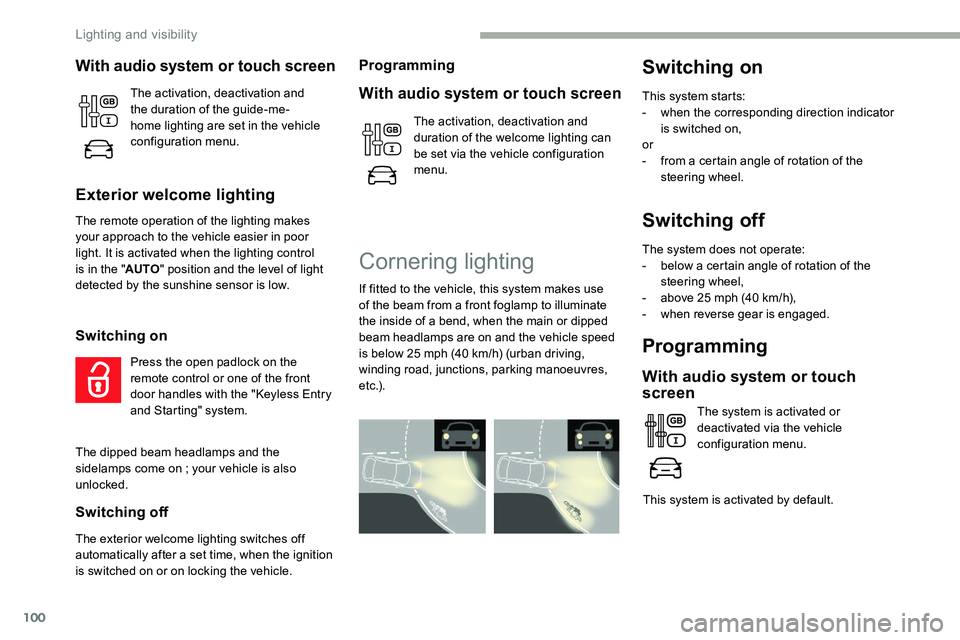
Cornering lighting
If fitted to the vehicle, this system makes use
of the beam from a front foglamp to illuminate
the inside of a bend, when the main or dipped
beam headlamps are on and the vehicle speed
is below 25 mph (40
km/h) (urban driving,
winding road, junctions, parking manoeuvres,
e t c .) .
Switching on
This system starts:
- w hen the corresponding direction indicator
is switched on,
or
-
f
rom a certain angle of rotation of the
steering wheel.
The activation, deactivation and
the duration of the guide-me-
home lighting are set in the vehicle
configuration menu.
Lighting and visibility
Page 103 of 324

101
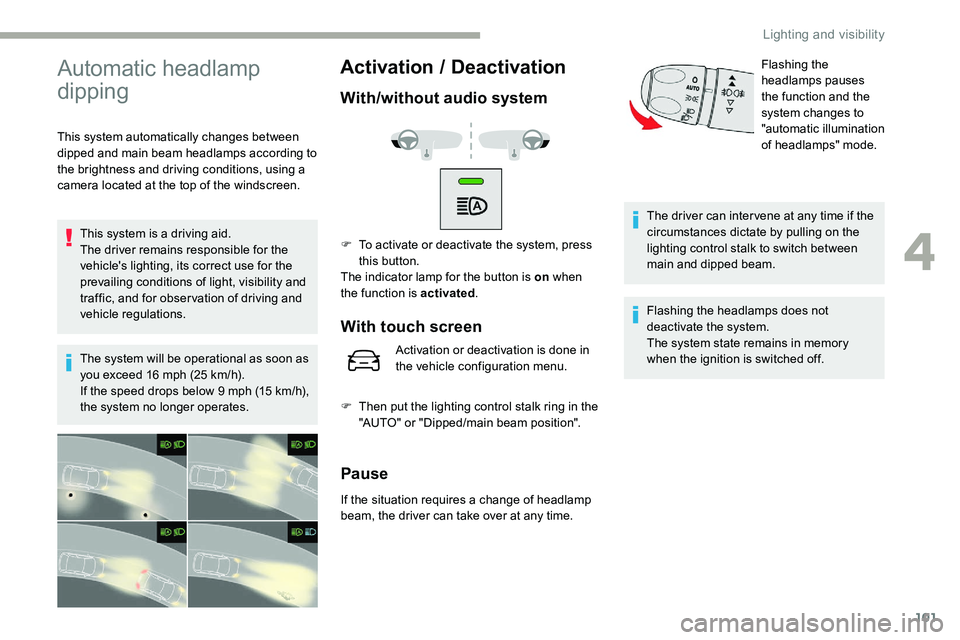
Automatic headlamp
dipping
This system automatically changes between
dipped and main beam headlamps according to
the brightness and driving conditions, using a
camera located at the top of the windscreen.This system is a driving aid.
The driver remains responsible for the
vehicle's lighting, its correct use for the
prevailing conditions of light, visibility and
traffic, and for obser vation of driving and
vehicle regulations.
The system will be operational as soon as
you exceed 16 mph (25
km/h).
If the speed drops below 9 mph (15
km/h),
the system no longer operates.
Activation / D eactivation
With/without audio system
F To activate or deactivate the system, press
this button.
The indicator lamp for the button is on when
the function is activated .
With touch screen
Activation or deactivation is done in
the vehicle configuration menu.
F
T
hen put the lighting control stalk ring in the
"AUTO" or "Dipped/main beam position".
Pause
If the situation requires a change of headlamp
beam, the driver can take over at any time. The driver can inter vene at any time if the
circumstances dictate by pulling on the
lighting control stalk to switch between
main and dipped beam.
Flashing the
headlamps pauses
the function and the
system changes to
"automatic illumination
of headlamps" mode.
Flashing the headlamps does not
deactivate the system.
The system state remains in memory
when the ignition is switched off.
4
Lighting and visibility
Page 104 of 324

102
Interior ambient lighting
The dimmed passenger compartment lighting
improves visibility in the vehicle when the light
i s p o o r.
Switching on
At night, the front roof lighting and panoramic
roof lighting (if fitted to your vehicle) comes on
automatically when the sidelamps are switched
on.
The ambient lighting switches off automatically
when the sidelamps are switched off.
Programming
With audio system or touch
screen
The activation, deactivation and
the choice of brightness of the
ambience lighting can be set via the
vehicle configuration menu.
The system may suffer inter ference or not
work correctly:
-
u
nder conditions of poor visibility (for
example, snowfall, heavy rain or thick
f o g , e t c .),
-
i
f the windscreen is dirty, misted or
obscured (by a sticker, etc.) in front of
the camera,
-
i
f the vehicle is facing highly reflective
signs.
If the fog is too dense, the system is
automatically deactivated.
The system is not able to detect:
-
r
oad users that do not have their own
lighting, such as pedestrians,
-
r
oad users whose lighting is obscured,
such as vehicles running behind a
safety barrier (on a motor way, for
example),
-
r
oad users at the top or bottom of
a steep slope, on twisty roads, on
crossroads.
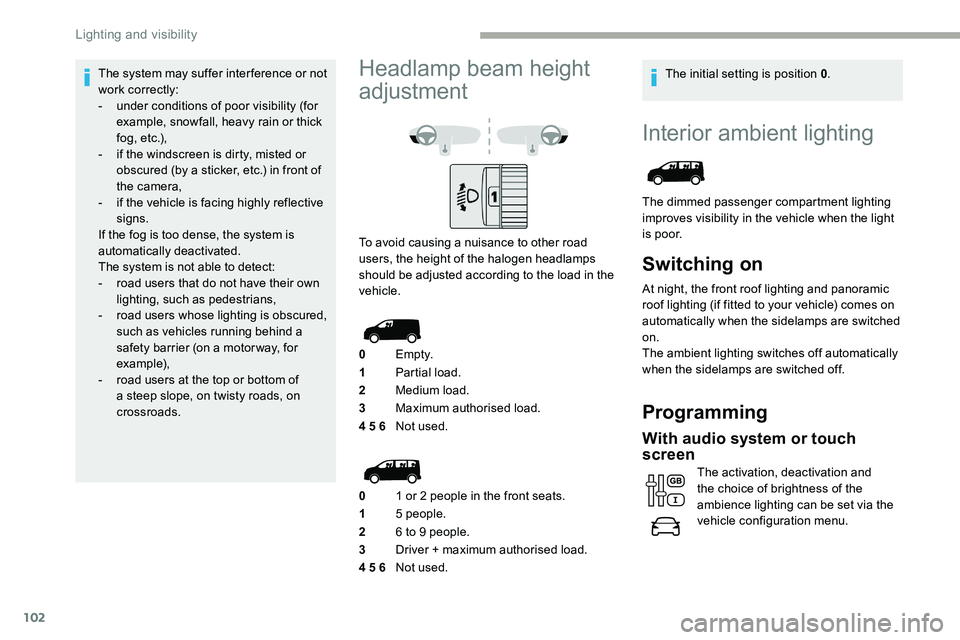
Headlamp beam height
adjustment
To avoid causing a nuisance to other road
users, the height of the halogen headlamps
should be adjusted according to the load in the
vehicle.
0 Em pt y.
1 Partial load.
2 Medium load.
3 Maximum authorised load.
4 5 6 Not used.
0 1 or 2 people in the front seats.
1 5 people.
2 6 to 9 people.
3 Driver + maximum authorised load.
4 5 6 Not used. The initial setting is position 0
.
Lighting and visibility