window CITROEN DISPATCH SPACETOURER DAG 2020 Handbook (in English)
[x] Cancel search | Manufacturer: CITROEN, Model Year: 2020, Model line: DISPATCH SPACETOURER DAG, Model: CITROEN DISPATCH SPACETOURER DAG 2020Pages: 324, PDF Size: 10.89 MB
Page 89 of 324

87
Servicing the ventilation and air
conditioning system
F
E
nsure that the cabin filter is in good
condition and have the filter elements
replaced regularly.
It is recommend to use a combined
passenger compartment filter. Thanks to
its special active additive, it contributes
to the purification of the air breathed by
the occupants and the cleanliness of the
passenger compartment (reduction of
allergic symptoms, bad odours and greasy
deposits).
F
T
o ensure correct operation of the air
conditioning system, have it checked
according to the recommendations in
the Maintenance and Warranty Guide. Stop & Star t
The heating and air conditioning systems
only work when the engine is running.
Temporarily deactivate the Stop &
Start system to maintain a comfortable
temperature in the passenger
compartment.
For more information on Stop & Star t
,
refer to the corresponding section.
Contains fluorinated greenhouse gas
R13 4A
Depending on version and country
of sale, the air conditioning system
contains fluorinated greenhouse
gas R134A. Gas charge: 0.5
kg (+/-
0.025
kg), GWP index 1,430 t (equivalent
in CO
2: 0.751 t).
Heating
Manual air conditioning
The air conditioning system only operates with
the engine running.
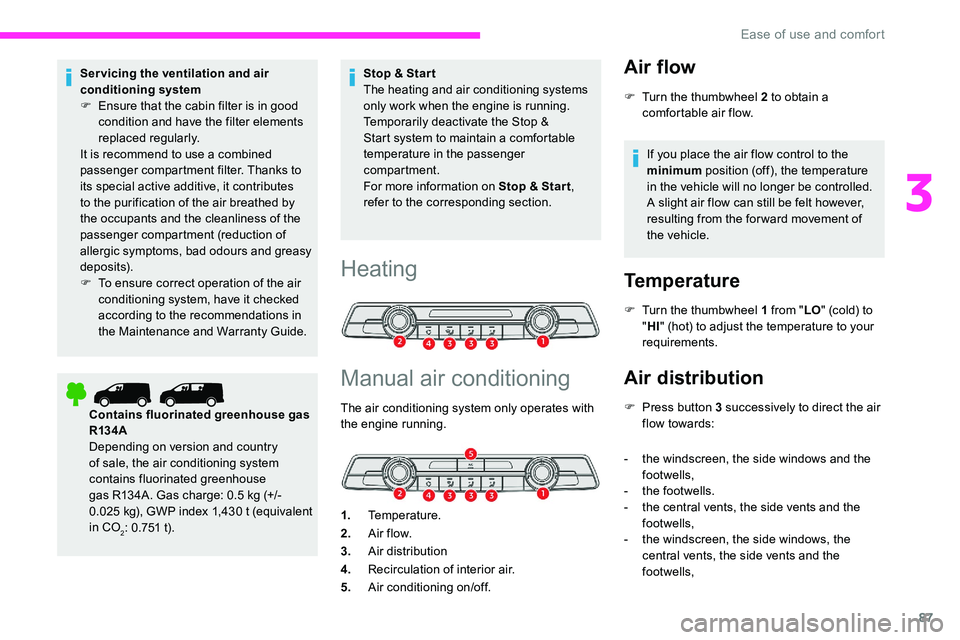
1. Temperature.
2. A ir f low.
3. Air distribution
4. Recirculation of interior air.
5. Air conditioning on/off.
Air flow
F Turn the thumbwheel 2 to obtain a
comfortable air flow.
If you place the air flow control to the
minimum position (off), the temperature
in the vehicle will no longer be controlled.
A slight air flow can still be felt however,
resulting from the for ward movement of
the vehicle.
Temperature
F Turn the thumbwheel 1 from " LO" (cold) to
" HI " (hot) to adjust the temperature to your
requirements.
Air distribution
F Press button 3 successively to direct the air flow towards:
-
t
he windscreen, the side windows and the
footwells,
-
t
he footwells.
-
t
he central vents, the side vents and the
footwells,
-
t
he windscreen, the side windows, the
central vents, the side vents and the
footwells,
3
Ease of use and comfort
Page 90 of 324

88
- the central and side vents,
- t he windscreen and side windows
(demisting or defrosting).
Air conditioning
With the engine running, the air conditioning is
designed to operate effectively in all seasons,
with the windows closed.
It allows you:
-
i
n summer, to lower the temperature,
-
t
o increase the effectiveness of the
demisting in winter, above 3°C.
On/off
F Press button 5 to activate/deactivate the air conditioning system.
When the air conditioning is in operation, to
cool the air more quickly, you can use interior
air recirculation for a few moments by pressing
button 4 . Then return to the intake of exterior
a i r.
The air conditioning does not operate
when the air flow adjustment is set to off.
Switching the system off may result in
some discomfort (humidity, misting).
Dual-zone automatic air
conditioning
1. Temperature.
2. A ir f low.
3. Air distribution.
4. Recirculation of interior air.
5. Air conditioning on/off.
6. Automatic comfort mode.
7. Visibility programme.
8. "Mono" function or Rear heating and air
conditioning on/off (depending on version).
Automatic comfort mode
F Press the " AUTO" button 6 su c c e s s i ve l y.
The active mode appears in the display screen,
as described below: Provides soft and quiet operation by
limiting air flow.
Offers the best compromise between
a comfortable temperature and quiet
operation. When the engine is cold, the air flow will
only reach its optimum level gradually
to prevent too much cold air being
distributed.
In cold weather, it favours the distribution
of warm air to the windscreen, the side
windows and the footwells only.
Manual mode
It is possible to make a different choice
from that offered by the system by changing
a setting. The other functions will still be
managed automatically.
As soon as a setting is changed, the "
AUTO"
symbol disappears.
Deactivating the system
F Press button 2 " -" until the fan symbol
disappears.
This action switches off all of the functions of
the system.
Temperature is no longer controlled. A slight air
flow can still be felt, however, resulting from the
for ward movement of the vehicle.
F
P
ress button 2 " +" to switch the system on
again. Provides dynamic and effective air
f low.
Ease of use and comfort
Page 91 of 324

89
Temperature
The driver and front passenger can each set
the temperature to suit their requirements.
The value shown on the display is a level
of comfort, not a temperature in Celsius or
Fahrenheit.
F
P
ush button 1 down to decrease the value
or up to increase it.
A setting of around 21 provides optimum
comfort. Depending on your requirements,
a setting between 18 and 24 is normal.
In addition, it is recommended that you
avoid a left /right setting difference of more
than 3.
On entering the vehicle, if the interior
temperature is much colder or warmer
than the comfort value setting, there is no
need to alter the value displayed in order
to reach the required level of comfort. The
system compensates automatically and
corrects the temperature difference as
quickly as possible. For maximum cooling or heating of the
passenger compartment, it is possible
to exceed the minimum value 14 or the
maximum value 28.
F
P
ush button 1 down until "LO" is
displayed or up until "HI" is displayed.
"Mono" function
The comfort setting for the passenger's side
can be indexed to the driver's comfort setting
(mono-zone).
Rear heating - air
conditioning
For more information, refer to the Rear
heating - air conditioning section.
Visibility programme
F Press button 7 "Visibility" to demist or
defrost the windscreen and side windows
more quickly.
F
P
ress the corresponding button 8
to activate/deactivate the function.
The indicator lamp in the button is on
when the function is activated.
The function is deactivated automatically if a
passenger uses the temperature control.
F
P
ress the corresponding button 8
to activate/deactivate the function. The system automatically manages the air
conditioning, air flow and air intake, and
provides optimum distribution towards the
windscreen and side windows.
F
P
ress button 7 " Visibility" again to stop the
programme.
Or
F
P
ress button 6 " AUTO" to return to the
automatic comfort programme.
Air conditioning
With the engine running, the air conditioning is
designed to operate effectively in all seasons,
with the windows closed.
It is used to:
-
l
ower the temperature in summer,
-
i
ncrease the effectiveness of the demisting
in winter, above 3°C.
On/off
F Press button 5 to activate/deactivate the air conditioning system.
3
Ease of use and comfort
Page 92 of 324

90
When the air conditioning is in operation, to
cool the air more quickly, you can use interior
air recirculation for a few moments by pressing
button 4. Then return to the intake of exterior
a i r.
The air conditioning does not operate
when the air flow adjustment is set to off.
Switching the system off may result in
some discomfort (humidity, misting).
Air distribution
F Press button 3 successively to direct the air flow towards:
-
t
he windscreen, the side windows and the
footwells,
-
t
he footwells.
-
t
he central vents, the side vents and the
footwells,
-
t
he windscreen, the side windows, the
central vents, the side vents and the
footwells,
-
t
he central and side vents,
-
t
he windscreen and side windows
(demisting or defrosting).
Air flow
F Press buttons 2 to increase/decrease the air f low.
The symbol for air flow (a fan) appears. It is
filled in or emptied progressively according to
the value requested.
Recirculation of interior air
The intake of exterior air prevents the formation
of mist on the windscreen and side windows.
Recirculation of the interior air isolates the
passenger compartment from exterior odours
and fumes.
This allows hot or cold air to be delivered more
quickly when required.
Avoid prolonged use of recirculation
of the interior air - risk of misting and
deterioration of air quality! F
P
ress button 4 to recirculate the
interior air/permit the intake of
exterior air.
When the interior air recirculation is active, the
symbol appears or the indicator lamp comes on
(depending on version).
Front demisting -
defrosting
These markings on the control
panel indicate the positioning of
the controls for rapid demisting or
defrosting of the windscreen and
side windows.
Heating or manual air
conditioning
F For air conditioning, press this button ; its indicator lamp comes
on.
F
P
ut the air flow, temperature and distribution
controls to the appropriately marked
position.
Ease of use and comfort
Page 93 of 324

91
Dual-zone automatic air
conditioning
F Press this button to demist or defrost the windscreen and side
windows as quickly as possible.
The system automatically manages the air
conditioning, air flow and air intake, and
provides optimum distribution towards the
windscreen and side windows. F
T
o turn it off, press this button
again or press “ AUTO”.
The system is reactivated with the values prior
to the deactivation.
Heated windscreen and
washer jets
Depending on country of sale.
This function heats the windscreen and washer
jets under cold conditions.
In area 1 , the heating frees the wiper blades
from the windscreen when they are stuck by
snow or ice.
In area 2 , the heating improves visibility by
avoiding the accumulation of snow when the
wipers are operating.
Switching on
The period of operation depends on the
exterior temperature.
Pressing this button again switches the function
off
; its indicator lamp goes off.
F
W
ith the engine running, press this button ;
its indicator lamp comes on.
Rear screen and/or
door mirrors demisting -
defrosting
On/Off
F Press this button to switch on/off the defrosting of the rear screen and door
mirrors (if the vehicle is so equipped).
The indicator lamp in the button is on when the
function is activated .
Demisting/defrosting switches off automatically
to prevent an excessive consumption of
current.
3
Ease of use and comfort
Page 121 of 324

119
Deployment
They are deployed on one side in the event
of a serious side impact applied to all or part
of the side impact zone, perpendicular to the
longitudinal centreline of the vehicle on a
horizontal plane and directed from the outside
towards the inside of the vehicle.
The curtain airbag inflates between the outer
rear passenger and the windows.
Malfunction
If this warning lamp comes on in the
instrument panel, you must contact
a CITROËN dealer or a qualified
workshop to have the system
checked.
The airbags may no longer be deployed in the
event of a serious impact.
In the event of a minor impact or bump on
the side of the vehicle or if the vehicle rolls
over, the airbags may not be deployed.
In the event of a rear or front collision,
none of the lateral airbags are deployed.
Advice
For the airbags to be fully effective,
observe the safety recommendations
below.
Adopt a normal upright sitting position.
Fasten the seat belt ensuring it is correctly
positioned and adjusted.
Do not leave anything between the
occupants and the airbags (a child, pet,
object, etc.), nor fix or attach anything
close to or in the way of the airbag release
trajectory
; this could cause injuries during
their deployment.
Never modify the original definition of your
vehicle, particularly in the area directly
around the airbags.
After an accident or if the vehicle has
been stolen, have the airbag systems
checked.
All work on the airbag systems must only
be per formed by a CITROËN dealer or a
qualified workshop.
Even if all of the precautions mentioned
are obser ved, a risk of injury or of minor
burns to the head, chest or arms cannot
be ruled out when an airbag is deployed.
The airbag inflates almost instantly (within
a few milliseconds) then deflates within
the same time discharging the hot gas via
openings provided for this purpose. Front airbags
Do not drive holding the steering wheel
by its spokes or resting your hands on the
centre part of the wheel.
Passengers must not place their feet on
the dashboard.
Do not smoke as deployment of the
airbags can cause burns or the risk of
injury from a cigarette or pipe.
Never remove or pierce the steering wheel
or hit it violently.
Do not fix or attach anything to the
steering wheel or dashboard, as this
could cause injuries when the airbags are
deployed.
5
Safety
Page 123 of 324

121
Advice
An incorrectly installed child seat
compromises the child's safety in the
event of an accident.
Ensure that there is no seat belt or seat
belt buckle under the child seat, as this
could destabilise it.
Remember to fasten the seat belts or the
harness of child seats, keeping the slack
relative to the child's body to a minimum,
even for short journeys.
When installing a child seat using the seat
belt, ensure that the seat belt is tightened
correctly on the child seat and that it
secures the child seat firmly on the seat
of the vehicle. If the passenger seat is
adjustable, move it forwards if necessary.
Remove the head restraint before
installing a child seat with a backrest
on a passenger seat.
Ensure that the head restraint is stored or
attached securely to prevent it from being
thrown around the vehicle in the event
of sharp braking. Refit the head restraint
once the child seat has been removed.Installing a booster seat
The chest part of the seat belt must be
positioned on the child's shoulder without
touching the neck.
Ensure that the lap part of the seat belt
passes correctly over the child's thighs.
Use a booster seat with backrest,
equipped with a belt guide at shoulder
level.
Additional protections
To prevent accidental opening of the doors
and rear windows, use the "Child lock".
Take care not to open the rear windows by
more than one third.
To protect young children from the rays
of the sun, fit side blinds on the rear
windows.
As a safety precaution, do not leave:
-
a c
hild alone and unattended in a
vehicle,
-
a c
hild or an animal in a vehicle
which is exposed to the sun, with the
windows closed,
-
t
he keys within reach of children inside
the vehicle.
Child seat at the front
F Adjust the passenger seat to the highest
and fully back longitudinal position , with
the backrest straightened .
"Forward facing"
You must leave the front passenger airbag
active.
"Rearward facing"
5
Safety
Page 139 of 324

137
F Press this button again ; its indicator
remains off for as long as the child lock
is deactivated. A message confirms the
deactivation.
In the event of a serious impact, the
electric child lock is deactivated (child lock
off) automatically.
Any other state of the indicator lamp
indicates a fault with the electric child lock.
Have it checked by a CITROËN dealer or
a qualified workshop.
This system is independent and in no
circumstances does it take the place of
the central locking control.
Do not drive with the sliding side door
open.
Check the status of the child lock each
time you switch on the ignition.
Always remove the key from the ignition
when leaving the vehicle, even for a short
time.Child lock on rear
windows
This mechanical system prevents
opening of the left and/or right rear
side windows.
F
L
ock /unlock the system using the remote
control key or the back-up key of the
Keyless Entry and Starting system.
5
Safety
Page 224 of 324

222
Disconnecting the battery
In order to maintain an adequate state
of charge for starting the engine, it is
recommended that the battery be disconnected
if the vehicle is taken out of ser vice for a long
period.
Before disconnecting the battery:
F
c
lose the windows and the doors before
disconnecting the battery,
F
s
witch off all electrical consumers (audio
system, wipers, lighting, etc.).
F
s
witch off the ignition and wait for
four
minutes.
At the battery, detach the (+) terminal only.
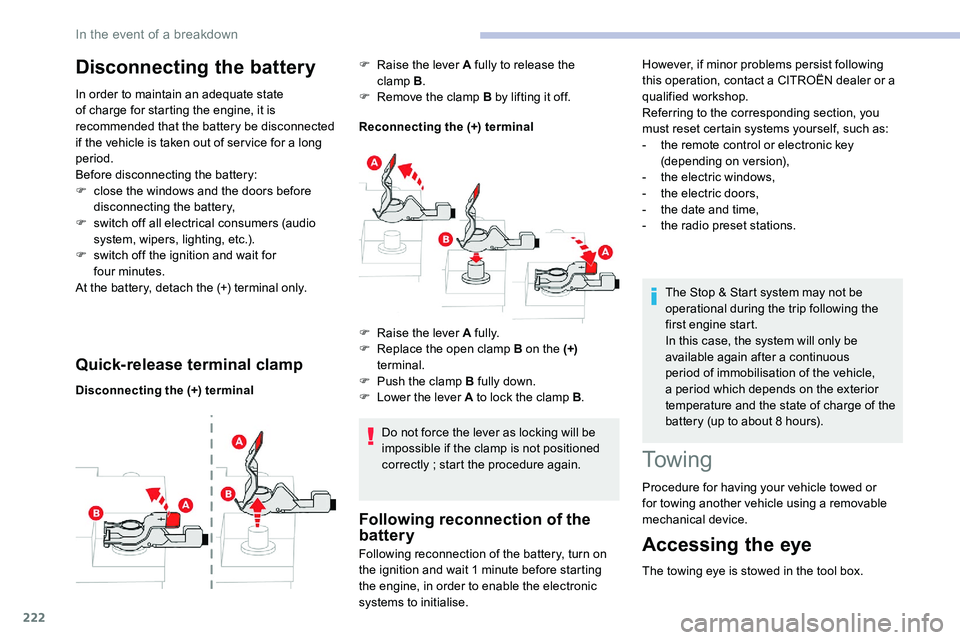
Quick-release terminal clamp
Disconnecting the (+) terminal Reconnecting the (+) terminal
Do not force the lever as locking will be
impossible if the clamp is not positioned
correctly ; start the procedure again.
Following reconnection of the
battery
F Raise the lever A fully to release the clamp B.
F
R
emove the clamp B by lifting it off.
Following reconnection of the battery, turn on
the ignition and wait 1
minute before starting
the engine, in order to enable the electronic
systems to initialise. The Stop & Start system may not be
operational during the trip following the
first engine start.
In this case, the system will only be
available again after a continuous
period of immobilisation of the vehicle,
a period which depends on the exterior
temperature and the state of charge of the
battery (up to about 8 hours).
To w i n g
Procedure for having your vehicle towed or
for towing another vehicle using a removable
mechanical device.
Accessing the eye
The towing eye is stowed in the tool box.
F
Ra
ise the lever A fully.
F
R
eplace the open clamp B on the (+)
terminal.
F
P
ush the clamp B fully down.
F
L
ower the lever A to lock the clamp B
.However, if minor problems persist following
this operation, contact a CITROËN dealer or a
qualified workshop.
Referring to the corresponding section, you
must reset certain systems yourself, such as:
-
t
he remote control or electronic key
(depending on version),
-
t
he electric windows,
-
t
he electric doors,
-
t
he date and time,
-
t
he radio preset stations.
In the event of a breakdown
Page 245 of 324

11
Procedure from the telephone
Select the name of the system in the
list of devices detected.
Procedure from the system
Press the MENU button.
Select " Connections ".
Confirm with OK.
Select " Search for a device ".
Confirm with OK.
A window is displayed with a search in progress
message.
In the list of devices detected, select a
telephone to pair. Only one telephone can be
paired at a time.
Completing the pairing
To complete the pairing, whichever
procedure is used (from the telephone or
from the system), ensure that the code
is the same in the system and in the
telephone.
If pairing fails, the number of attempts is not
restricted.
A message appears in the screen confirming
the pairing.
Information and advice
The " Telephone " menu gives access to the
following functions in particular: " Directory", if
your telephone equipment is fully compatible,
" Call log ", "View paired devices ".
Depending on the type of telephone, you may
be asked to accept or confirm access by the
system to each of these functions.
Go to the Brand's website for more
information (compatibility, more help, etc.).
Manage connections
The telephone connection automatically
includes hands free operation and audio
streaming.
The ability of the system to connect to just
one profile depends on the telephone.
Both profiles may connect by default. Press the MENU button.
Select " Connections ".
Confirm with OK.
Select " Connections
management " and confirm. The list
of paired devices is displayed.
Confirm with OK.
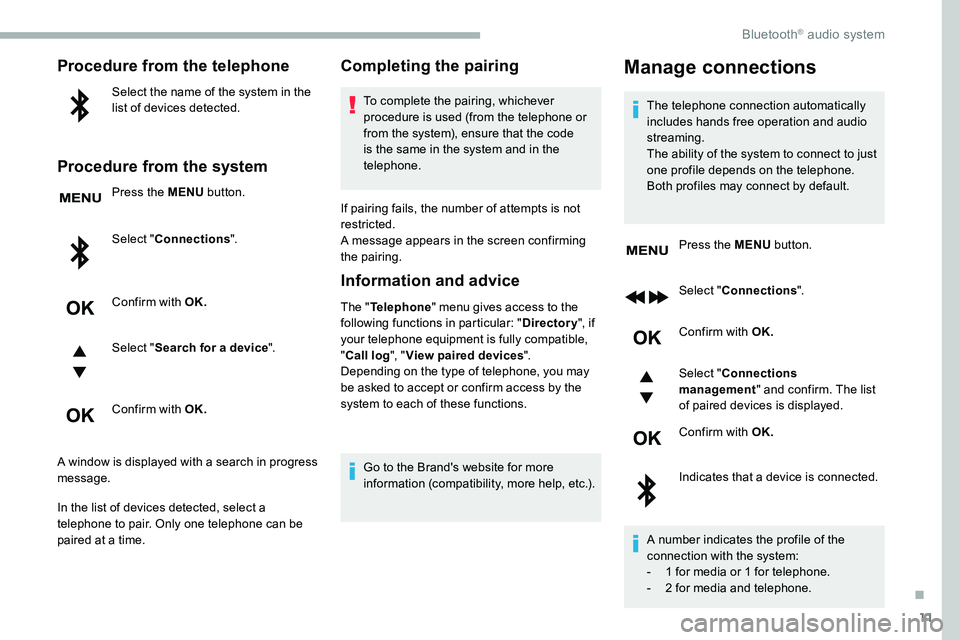
Indicates that a device is connected.
A number indicates the profile of the
connection with the system:
-
1 f
or media or 1 for telephone.
-
2 f
or media and telephone.
.
Bluetooth® audio system