steering wheel CITROEN DISPATCH SPACETOURER DAG 2020 Handbook (in English)
[x] Cancel search | Manufacturer: CITROEN, Model Year: 2020, Model line: DISPATCH SPACETOURER DAG, Model: CITROEN DISPATCH SPACETOURER DAG 2020Pages: 324, PDF Size: 10.89 MB
Page 163 of 324
161
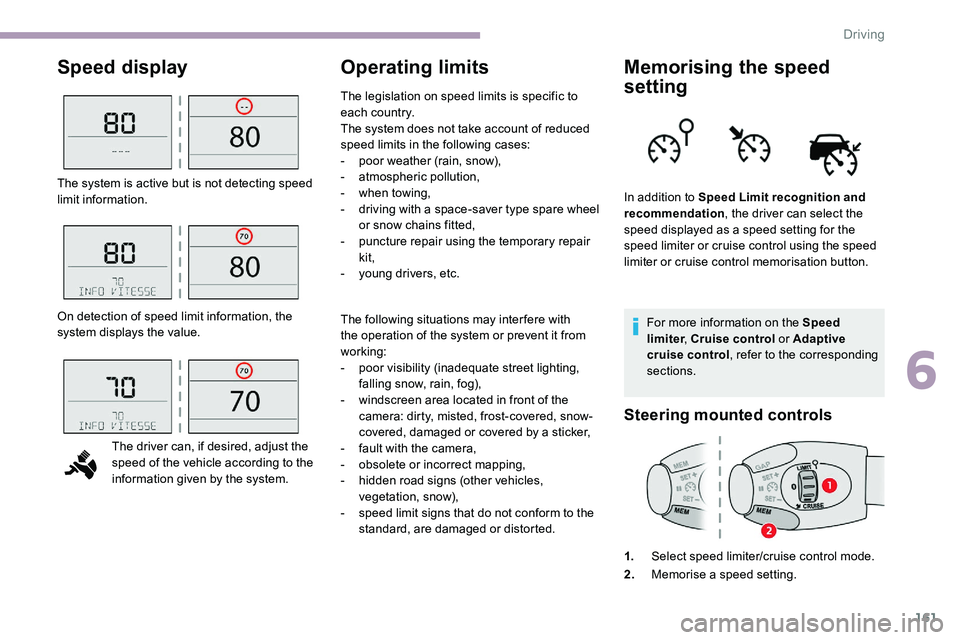
Speed displayOperating limitsMemorising the speed
setting
For more information on the Speed
limiter, Cruise control or Adaptive
cruise control , refer to the corresponding
sections.
Steering mounted controls
1. Select speed limiter/cruise control mode.
2. Memorise a speed setting.
The system is active but is not detecting speed
limit information.
On detection of speed limit information, the
system displays the value.
The driver can, if desired, adjust the
speed of the vehicle according to the
information given by the system. The following situations may interfere with
the operation of the system or prevent it from
working:
-
p
oor visibility (inadequate street lighting,
falling snow, rain, fog),
-
w
indscreen area located in front of the
camera: dirty, misted, frost-covered, snow-
covered, damaged or covered by a sticker,
-
f
ault with the camera,
-
o
bsolete or incorrect mapping,
-
h
idden road signs (other vehicles,
vegetation, snow),
-
s
peed limit signs that do not conform to the
standard, are damaged or distorted. In addition to Speed Limit recognition and
recommendation
, the driver can select the
speed displayed as a speed setting for the
speed limiter or cruise control using the speed
limiter or cruise control memorisation button.
The legislation on speed limits is specific to
each country.
The system does not take account of reduced
speed limits in the following cases:
-
p
oor weather (rain, snow),
-
a
tmospheric pollution,
-
w
hen towing,
-
d
riving with a space-saver type spare wheel
or snow chains fitted,
-
p
uncture repair using the temporary repair
kit,
-
y
oung drivers, etc.
6
Driving
Page 165 of 324
163
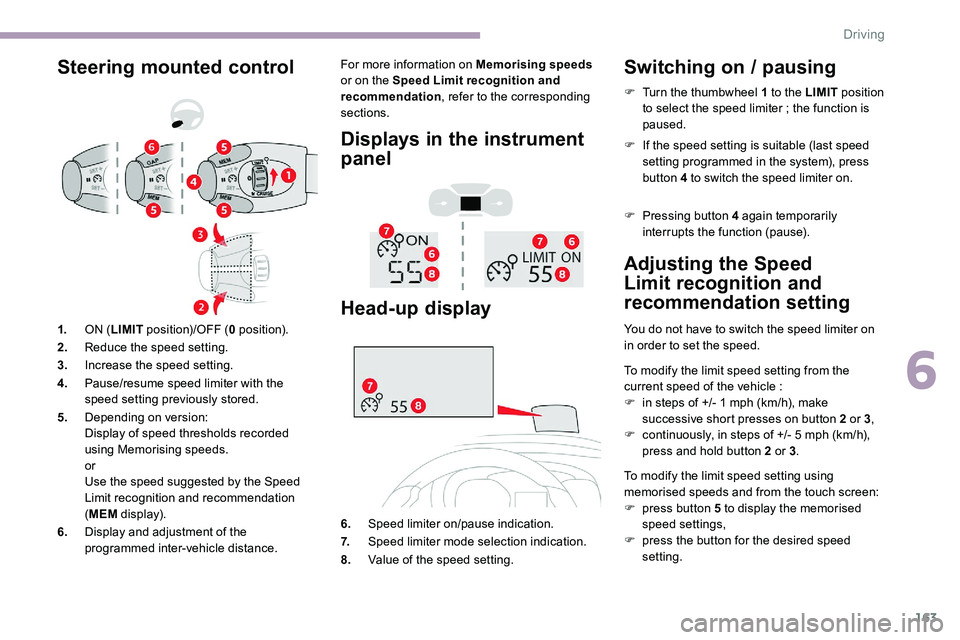
Steering mounted controlFor more information on Memorising speeds
or on the Speed Limit recognition and
recommendation , refer to the corresponding
sections.
Displays in the instrument
panel
Head-up display
6. Speed limiter on/pause indication.
7. Speed limiter mode selection indication.
8. Value of the speed setting.
Switching on / pausing
Adjusting the Speed
Limit recognition and
recommendation setting
You do not have to switch the speed limiter on
in order to set the speed.
To modify the limit speed setting from the
current speed of the vehicle :
F
i
n steps of +/- 1 mph (km/h), make
successive short presses on button 2 or 3 ,
F
c
ontinuously, in steps of +/- 5 mph (km/h),
press and hold button 2 or 3 .
To modify the limit speed setting using
memorised speeds and from the touch screen:
F
p
ress button 5 to display the memorised
speed settings,
F
p
ress the button for the desired speed
setting.
1.
ON (LIMIT position)/OFF ( 0 position).
2. Reduce the speed setting.
3. Increase the speed setting.
4. Pause/resume speed limiter with the
speed setting previously stored.
5. Depending on version:
Display of speed thresholds recorded
using Memorising speeds.
or
Use the speed suggested by the Speed
Limit recognition and recommendation
(MEM display).
6. Display and adjustment of the
programmed inter-vehicle distance. F
T
urn the thumbwheel 1 to the LIMIT
position
to select the speed limiter ; the function is
paused.
F
I
f the speed setting is suitable (last speed
setting programmed in the system), press
button 4 to switch the speed limiter on.
F
P
ressing button 4 again temporarily
interrupts the function (pause).
6
Driving
Page 170 of 324
168
Primarily designed for driving on main
roads and motor ways, this system only
works with moving vehicles driving in the
same direction as your vehicle.
If the driver operates a direction indicator
to overtake a slower vehicle, the cruise
control allows your vehicle to temporarily
approach the vehicle in front to assist
the overtaking manoeuvre, without ever
exceeding the speed setting.
Some vehicles present on the road
may not be properly seen or may be
poorly interpreted by radar (e.g. a lorry),
which may lead to a poor assessment
of the distances and lead to the vehicle
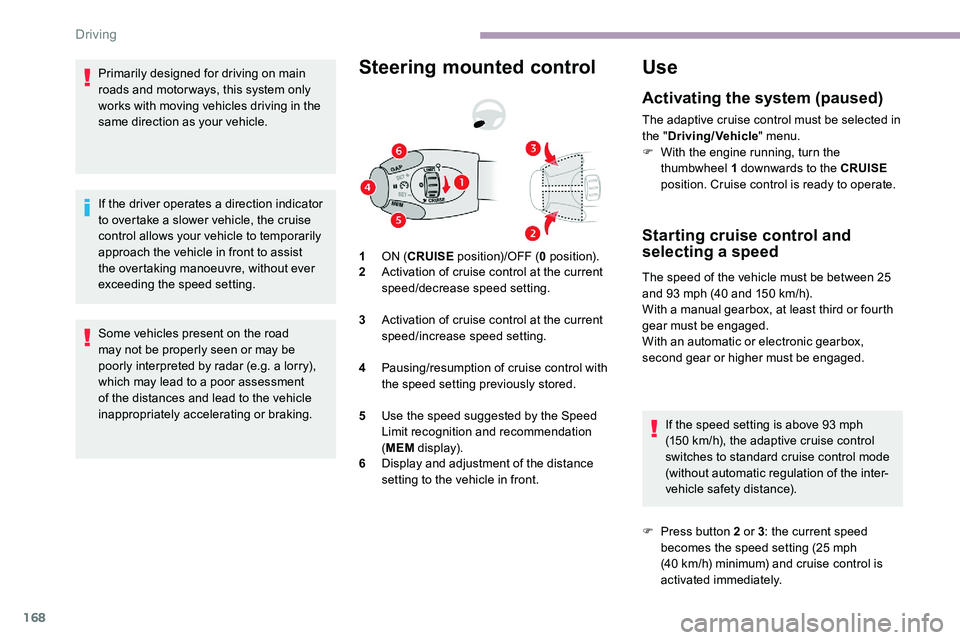
inappropriately accelerating or braking.Steering mounted control
1ON ( CRUISE position)/OFF ( 0 position).
2 Activation of cruise control at the current
speed/decrease speed setting.
3 Activation of cruise control at the current
speed/increase speed setting.
4 Pausing/resumption of cruise control with
the speed setting previously stored.
5 Use the speed suggested by the Speed
Limit recognition and recommendation
(MEM display).
6 Display and adjustment of the distance
setting to the vehicle in front.
Use
Activating the system (paused)
The adaptive cruise control must be selected in
the " Driving/Vehicle " menu.
F
W
ith the engine running, turn the
thumbwheel 1 downwards to the CRUISE
position. Cruise control is ready to operate.
Starting cruise control and
selecting a speed
The speed of the vehicle must be between 25
and 93 mph (40 and 150 km/h).
With a manual gearbox, at least third or fourth
gear must be engaged.
With an automatic or electronic gearbox,
second gear or higher must be engaged.
If the speed setting is above 93
mph
(150
km/h), the adaptive cruise control
switches to standard cruise control mode
(without automatic regulation of the inter-
vehicle safety distance).
F
P
ress button 2 or 3 : the current speed
becomes the speed setting (25
mph
(40
km/h) minimum) and cruise control is
activated immediately.
Driving
Page 176 of 324
174
The driver can maintain control of the
vehicle at any time by sharply turning
the steering wheel and/or pressing the
accelerator pedal.
Operation of the function may be felt by
slight vibration in the brake pedal.
If the vehicle comes to a complete stop,
the automatic braking is maintained for 1
to 2 seconds.
Deactivation/Activation
By default, the system is automatically
activated at every engine start.This system can be deactivated
or activated via the vehicle
configuration menu.
Deactivation of the system is
signalled by the illumination of this
indicator lamp, accompanied by the
display of a message.
Malfunction
In the event of a fault with the system,
you are alerted by the continuous
illumination of this warning lamp,
accompanied by the display of a
message and an audible signal.
If these warning lamps come
on after the engine has been
switched off and restarted, contact
a CITROËN dealer or a qualified
workshop to have the system
checked.
Lane departure warning
system
Refer to the General recommendations on
the use of driving and manoeuvring aids .
System that uses a camera to recognise
continuous or broken lines on traffic lanes and
triggers an alert if the vehicle wanders off line.
If the direction indicator is not activated at a
speed of over 50 mph (80
km/h) and there is a
risk of one of these lines on the ground being
crossed, the system triggers the alert.
Detection - Alert
You are alerted by the flashing of
this warning lamp in the instrument
panel, accompanied by an audible
signal.
No warning is transmitted while the
direction indicator is active and for
approximately 20 seconds after the
direction indicator is switched off.
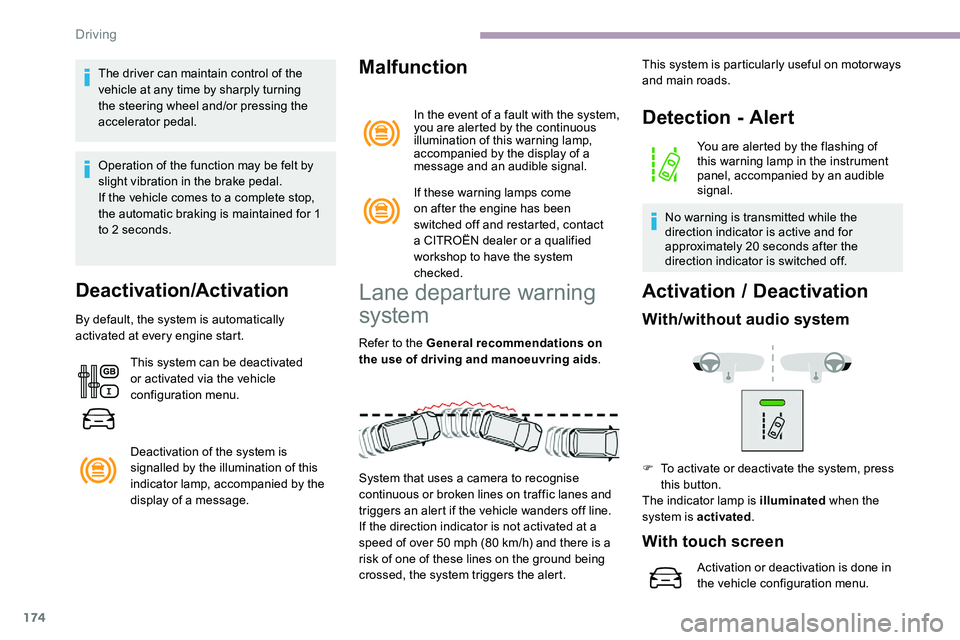
Activation / D eactivation
With/without audio system
This system is particularly useful on motor ways
and main roads.
F
T
o activate or deactivate the system, press
this button.
The indicator lamp is illuminated when the
system is activated .
With touch screen
Activation or deactivation is done in
the vehicle configuration menu.
Driving
Page 184 of 324
182
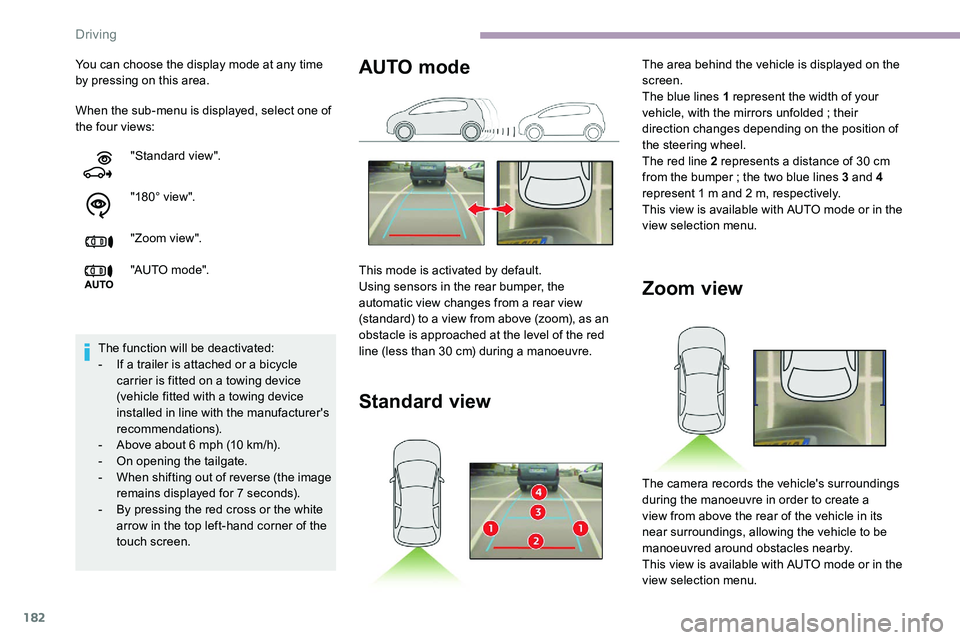
When the sub-menu is displayed, select one of
the four views: You can choose the display mode at any time
by pressing on this area."Standard view".
"180° view".
"Zoom view".
"AUTO m o de".
The function will be deactivated:
-
I
f a trailer is attached or a bicycle
carrier is fitted on a towing device
(vehicle fitted with a towing device
installed in line with the manufacturer's
recommendations).
-
A
bove about 6 mph (10 km/h).
-
O
n opening the tailgate.
-
W
hen shifting out of reverse (the image
remains displayed for 7 seconds).
-
B
y pressing the red cross or the white
arrow in the top left-hand corner of the
touch screen.
Zoom view
The camera records the vehicle's surroundings
during the manoeuvre in order to create a
view from above the rear of the vehicle in its
near surroundings, allowing the vehicle to be
manoeuvred around obstacles nearby.
This view is available with AUTO mode or in the
view selection menu.
AUTO mode
This mode is activated by default.
Using sensors in the rear bumper, the
automatic view changes from a rear view
(standard) to a view from above (zoom), as an
obstacle is approached at the level of the red
line (less than 30
cm) during a manoeuvre.
Standard view
The area behind the vehicle is displayed on the
screen.
The blue lines 1 represent the width of your
vehicle, with the mirrors unfolded ; their
direction changes depending on the position of
the steering wheel.
The red line 2 represents a distance of 30
cm
from the bumper
; the two blue lines 3 and 4
represent 1
m and 2 m, respectively.
This view is available with AUTO mode or in the
view selection menu.
Driving
Page 225 of 324
223
For more information on the Tool box,
refer to the corresponding section.
With a manual gearbox, move the gear
lever into neutral.
With an automatic or electronic gearbox,
place the gear selector in position N .
Failure to adhere to this instruction
may lead to damage to braking system
components and the lack of braking
assistance on restarting the engine.
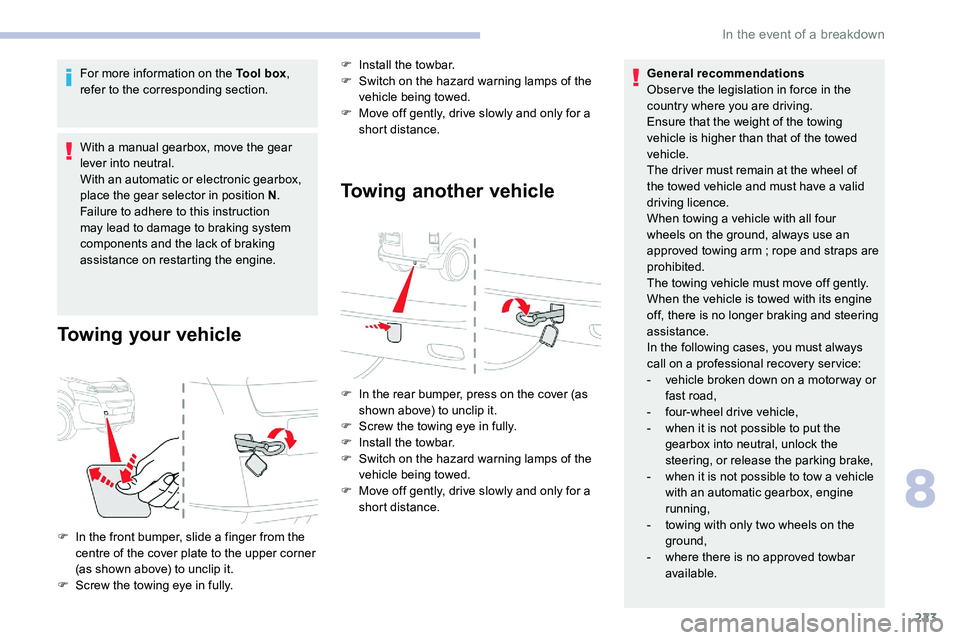
Towing your vehicle
F Install the towbar.
F S witch on the hazard warning lamps of the
vehicle being towed.
F
M
ove off gently, drive slowly and only for a
short distance.
Towing another vehicle
F In the rear bumper, press on the cover (as shown above) to unclip it.
F
S
crew the towing eye in fully.
F
I
nstall the towbar.
F
S
witch on the hazard warning lamps of the
vehicle being towed.
F
M
ove off gently, drive slowly and only for a
short distance.
F
I
n the front bumper, slide a finger from the
centre of the cover plate to the upper corner
(as shown above) to unclip it.
F
S
crew the towing eye in fully. General recommendations
Obser ve the legislation in force in the
country where you are driving.
Ensure that the weight of the towing
vehicle is higher than that of the towed
vehicle.
The driver must remain at the wheel of
the towed vehicle and must have a valid
driving licence.
When towing a vehicle with all four
wheels on the ground, always use an
approved towing arm
; rope and straps are
prohibited.
The towing vehicle must move off gently.
When the vehicle is towed with its engine
off, there is no longer braking and steering
assistance.
In the following cases, you must always
call on a professional recovery ser vice:
- v ehicle broken down on a motor way or
fast road,
-
f
our-wheel drive vehicle,
-
w
hen it is not possible to put the
gearbox into neutral, unlock the
steering, or release the parking brake,
-
w
hen it is not possible to tow a vehicle
with an automatic gearbox, engine
running,
-
t
owing with only two wheels on the
ground,
-
w
here there is no approved towbar
available.
8
In the event of a breakdown
Page 246 of 324
12
Indicates connection of the audio
steaming profile.
Indicates the hands-free telephone
profile.
Select a telephone.
Confirm with OK.
Then select and confirm:
- "Connect telephone "
/
" Disconnect telephone ":
to connect
/ disconnect the
telephone or the hands-free kit
o n l y.
-
"Connect media player "
/
" Disconnect media player ":
to connect
/ disconnect
streaming only.
-
"Connect telephone +
media player "
/ "Disconnect
telephone + media player ":
to connect
/ disconnect the
telephone (hands-free kit and
streaming).
-
"Delete connection ": to delete
the pairing. When you delete a pairing in the system,
remember to delete it from your telephone
as well.
Confirm with OK.
Receiving a call
An incoming call is announced by a ring and a
superimposed display in the screen.
Select the " YES" tab in the screen
using the buttons.
Confirm with OK.
Press this button at the steering
mounted controls to accept the call.
Making a call
In the " Telephone " menu.
Select " Call".
Select " Dial".
Or
Select " Directory ". Or
Select "
Calls list ".
Confirm with OK.
Press this button for more than
two seconds for access to your
directory, then navigate using the
thumb wheel.
Ending a call
In the " Telephone " menu.
Select " End call".
Confirm with OK to end the call.
During a call, press one of these
buttons for more than two seconds.
The system accesses the telephone's
contacts directory, depending on its
compatibility, and while it is connected via
Bluetooth.
Bluetooth® audio system
Page 255 of 324
3
Increase volume.
Decrease volume.
Mute/restore sound by
simultaneously pressing the
increase and decrease volume
buttons.
Steering mounted controls
- Type 2
Voice commands:
This control is located on the
steering wheel or at the end of the
lighting control stalk (depending on
equipment).
Short press, smartphone voice
commands via the system.
Increase volume.
Decrease volume.
Mute by pressing the volume
increase and decrease buttons
simultaneously (depending on
equipment).
Restore the sound by pressing one
of the two volume buttons. Media
(short press): change the
multimedia source.
Telephone (short press): start
telephone call.
Call in progress (short press):
access telephone menu.
Telephone (long press): reject an
incoming call, end call ; when no
call is in progress, access telephone
menu.
Radio (rotate): automatic search for
the previous/next station.
Media (rotate): previous/next track,
move in a list.
Short press : confirm a selection ; if
nothing selected, access to presets.
Radio : display the list of stations.
Media : display the list of tracks.
Radio (press and hold): update the
list of stations received.
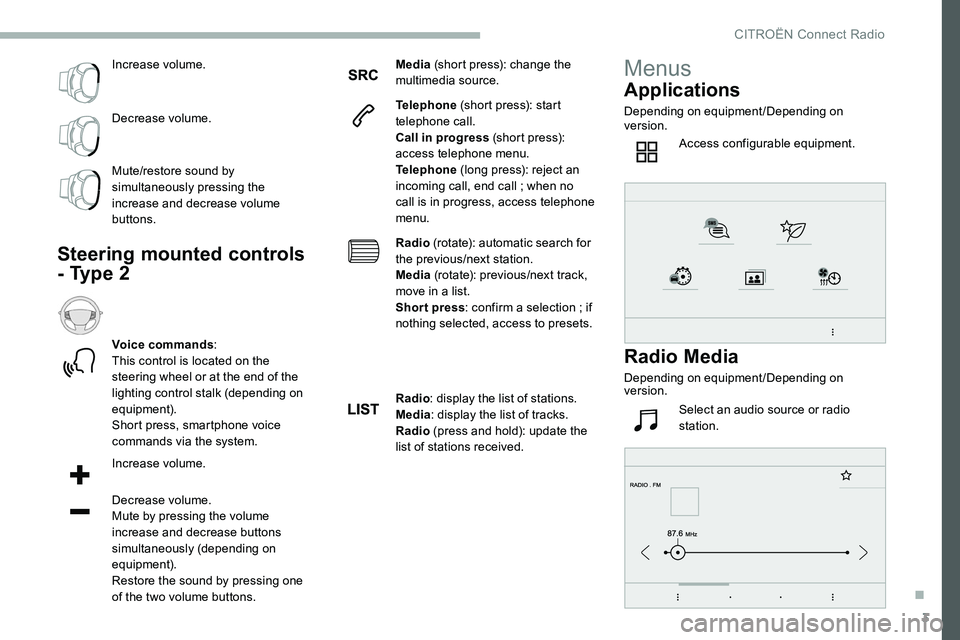
Menus
Applications
Depending on equipment/Depending on
version.
Access configurable equipment.
Radio Media
Depending on equipment/Depending on
version.
Select an audio source or radio
station.
.
CITROËN Connect Radio
Page 274 of 324
2
The touch screen is of the "capacitive"
type.
To clean the screen, use a soft, non-
abrasive cloth (e.g. spectacles cloth) with
no additional product.
Do not use sharp objects on the screen.
Do not touch the screen with wet hands.
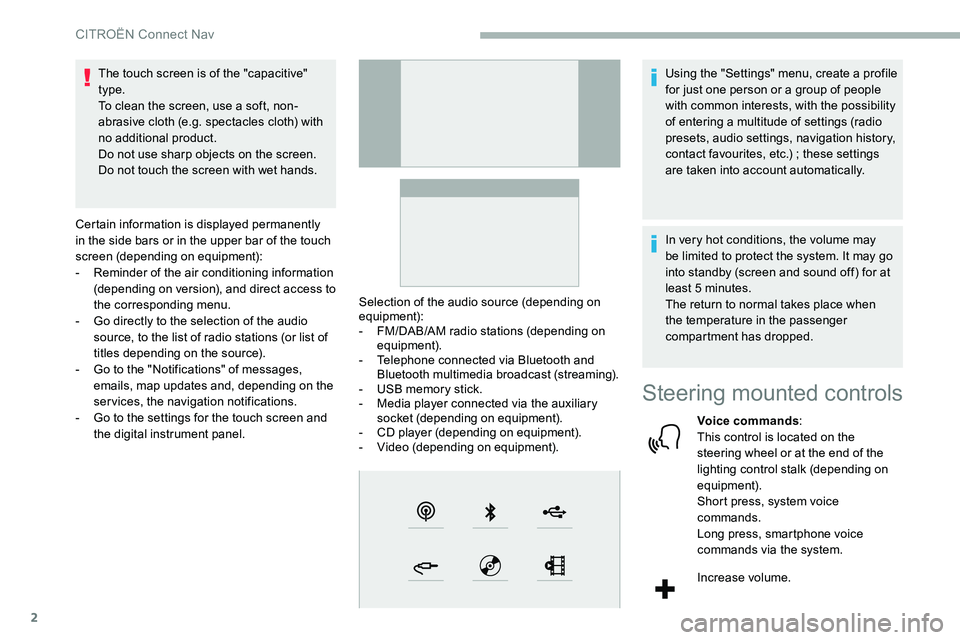
Certain information is displayed permanently
in the side bars or in the upper bar of the touch
screen (depending on equipment):
-
R
eminder of the air conditioning information
(depending on version), and direct access to
the corresponding menu.
-
G
o directly to the selection of the audio
source, to the list of radio stations (or list of
titles depending on the source).
-
G
o to the "Notifications" of messages,
emails, map updates and, depending on the
services, the navigation notifications.
-
G
o to the settings for the touch screen and
the digital instrument panel. Selection of the audio source (depending on
equipment):
-
F
M/DAB/AM radio stations (depending on
equipment).
-
T
elephone connected via Bluetooth and
Bluetooth multimedia broadcast (streaming).
-
U
SB memory stick.
-
M
edia player connected via the auxiliary
socket (depending on equipment).
-
C
D player (depending on equipment).
-
V
ideo (depending on equipment).Using the "Settings" menu, create a profile
for just one person or a group of people
with common interests, with the possibility
of entering a multitude of settings (radio
presets, audio settings, navigation history,
contact favourites, etc.)
; these settings
are taken into account automatically.
In very hot conditions, the volume may
be limited to protect the system. It may go
into standby (screen and sound off) for at
least 5
minutes.
The return to normal takes place when
the temperature in the passenger
compartment has dropped.
Steering mounted controls
Voice commands :
This control is located on the
steering wheel or at the end of the
lighting control stalk (depending on
equipment).
Short press, system voice
commands.
Long press, smartphone voice
commands via the system.
Increase volume.
CITROËN Connect Nav
Page 276 of 324
4
21,518,5
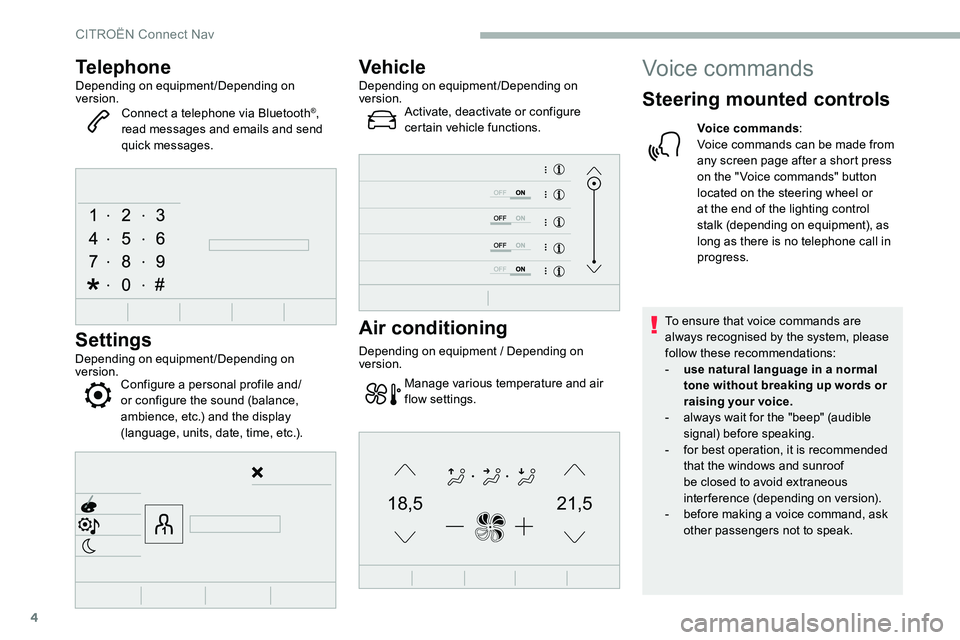
TelephoneDepending on equipment/Depending on
version.Connect a telephone via Bluetooth
®,
read messages and emails and send
quick messages.
Settings
Depending on equipment/Depending on
version. Configure a personal profile and/
or configure the sound (balance,
ambience, etc.) and the display
(language, units, date, time, etc.).
VehicleDepending on equipment/Depending on
version.
Activate, deactivate or configure
certain vehicle functions.
Air conditioning
Depending on equipment / Depending on
version.
Manage various temperature and air
flow settings.
Voice commands
Steering mounted controls
Voice commands :
Voice commands can be made from
any screen page after a short press
on the " Voice commands" button
located on the steering wheel or
at the end of the lighting control
stalk (depending on equipment), as
long as there is no telephone call in
progress.
To ensure that voice commands are
always recognised by the system, please
follow these recommendations:
-
u
se natural language in a normal
tone without breaking up words or
raising your voice.
-
a
lways wait for the "beep" (audible
signal) before speaking.
-
f
or best operation, it is recommended
that the windows and sunroof
be closed to avoid extraneous
interference (depending on version).
-
b
efore making a voice command, ask
other passengers not to speak.
CITROËN Connect Nav