check engine CITROEN DISPATCH SPACETOURER DAG 2020 Handbook (in English)
[x] Cancel search | Manufacturer: CITROEN, Model Year: 2020, Model line: DISPATCH SPACETOURER DAG, Model: CITROEN DISPATCH SPACETOURER DAG 2020Pages: 324, PDF Size: 10.89 MB
Page 200 of 324

198
Keep AdBlue® out of the reach of children,
in its original container.
Procedure
Before starting the top-up procedure, ensure
that the vehicle is parked on a flat and level
sur face.
In wintry conditions, ensure that the
temperature of the vehicle is above -11
°C.
Otherwise the AdBlue
® may be frozen and so
cannot be poured into its tank. Park the vehicle
in a warmer area for a few hours to allow the
top-up to be carried out.
Never put the AdBlue
® into the Diesel fuel
tank.
If any AdBlue
® is splashed, or if there
are any spillages on the bodywork, rinse
immediately with cold water or wipe with a
damp cloth.
If the fluid has crystallised, clean it off
using a sponge and hot water. F
S
witch off the ignition and remove the key
from the switch to switch off the engine.
or
F
W
ith Keyless Entry and Starting, press the
" START/STOP " button to switch off the
engine.
Access to the AdBlue® tank
F From below, pull the black c ove r.
In certain conditions (high temperature, for
example), risks of the release of ammonia
cannot be excluded: do not inhale the vapour.
Vapours containing ammonia have an irritant
effect on mucous membranes (eyes, nose and
throat).
F
T
urn the blue cap 1/6 of a turn anti-
clockwise.
F
L
ift off the cap.
F
O
btain a container of AdBlue
®. After first
checking the use-by date, carefully read
the instructions for use on the label before
pouring the contents of the container into
the vehicle's AdBlue tank.
Or F
I
nsert the AdBlue
® pump nozzle and refill
the tank until the nozzle stops automatically.
F
A
fter refilling, carry out the same operations
in reverse order.
F
R
efit the black cover, starting
at the top.
F
F
or access to the AdBlue
® tank, open the
front left-hand door. To avoid over flowing the AdBlue
® tank:
•
T
op up between 10 and 13
litres using
AdBlue
® containers.
Or
•
D
o not continue after the nozzle’s first
automatic cut-off if you are refilling at a
service station.
Practical information
Page 206 of 324

204
F Connect the compressor's electrical plug to the vehicle's 12 V socket.
F
A
ffix the speed limit sticker.
The speed limit sticker must be secured
to the interior of the vehicle in the driver's
field of vision, to remind you that a wheel
is in temporary use.
F
S
tart the vehicle and leave the engine
running.
Do not start the compressor before
connecting the white pipe to the tyre valve:
the sealant product would be expelled
through the pipe.
F
S
witch on the compressor by moving
switch B to position I until the tyre pressure
reaches 2.0 bars. The sealant product is
injected under pressure into the tyre
; do not
disconnect the pipe from the valve during
this operation (risk of blowback). If after approximately seven
minutes this
pressure is not reached, this indicates
that the tyre is not repairable
; contact a
CITROËN dealer or a qualified workshop
for assistance.
F
R
emove the kit and screw the cap back
on the white pipe. Take care to avoid
contaminating the vehicle with traces of
fluid. Keep the kit to hand.
Take care, the sealant product is harmful
if swallowed and causes irritation to the
eyes.
Keep this product out of the reach of
children.
The use-by date of the fluid is marked on
the bottle.
After use, do not discard the bottle in
standard waste, take it to a CITROËN
dealer or an authorised waste disposal
site.
Do not forget to obtain a new bottle of
sealant, available from a CITROËN dealer
or a qualified workshop.
Inflation, occasional
inflation and checking
pressure
F Drive immediately for approximately three miles (five kilometres), at reduced
speed (between 12 and 37
mph (20 and
60
km/h)), to plug the puncture.
F
S
top to check the repair and measure the
tyre pressure using the kit.
In the event of a breakdown
Page 207 of 324
205
F Turn selector A to the "Inflation" position.
F
U
ncoil the white pipe G fully.
F
C
onnect the white pipe to the
valve of the repaired wheel.
F
C
onnect the compressor's electrical plug to
the vehicle's 12
V socket again.
F
S
tart the vehicle and leave the engine
running.
As soon as possible, go to a CITROËN
dealer or a qualified workshop.
You must inform the technician that this kit
was used. After inspection, the technician
will tell you whether the tyre can be
repaired or if it must be replaced.
F
A
djust the pressure using the compressor
(to inflate: switch B in position " I"
; to
deflate: switch B
in position " O" and press
button
C ), in accordance with the vehicle's
tyre pressure label, located on the driver’s
door aperture.
A significant loss of pressure indicates that
the puncture has not been fully plugged
;
contact a CITROËN dealer or a qualified
workshop for assistance.
F
R
emove the kit and stow it. F
D rive at reduced speed (50 mph
(80
km/h) max.) limiting the distance
travelled to approximately 125
miles
(2 0 0
k m).
It is also possible to use the compressor,
without injecting sealant, to check and, if
necessary, adjust the tyre pressures.
If after 7
minutes this pressure is not
reached, this indicates that the tyre is not
repairable
; contact a CITROËN dealer or
a qualified workshop for assistance.
Do not drive more than 125
miles (200 km)
with a repaired tyre
; contact a CITROËN
dealer or a qualified workshop to change
the tyre.
Should the pressure of one or more tyres
be adjusted, it is necessary to reinitialise
the under-inflation detection system.
For more information on Tyre under-
inflation detection , refer to the
corresponding section.Removing the pipe and
cartridge
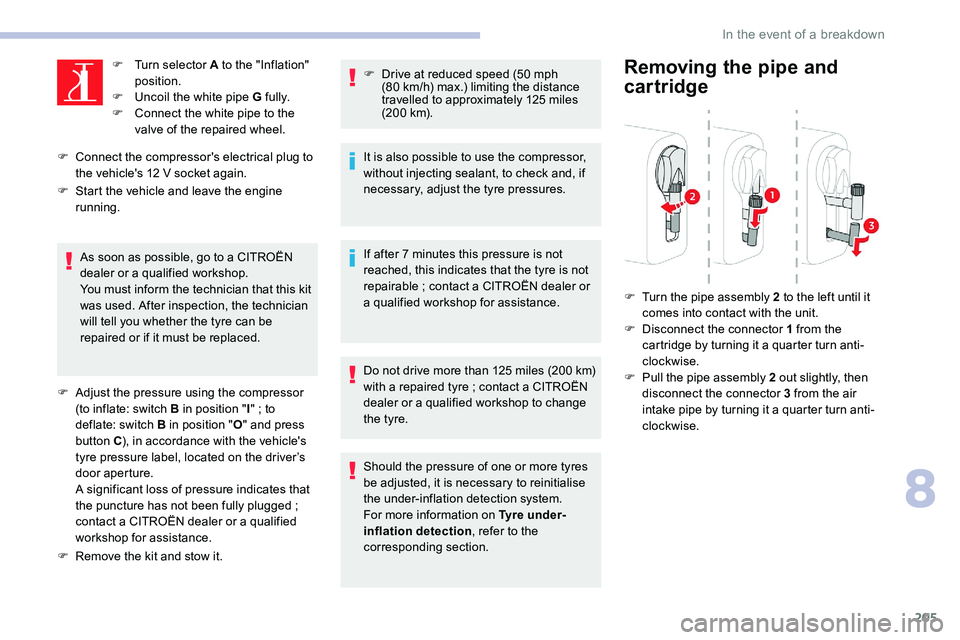
F Turn the pipe assembly 2 to the left until it comes into contact with the unit.
F
D
isconnect the connector 1 from the
cartridge by turning it a quarter turn anti-
clockwise.
F
P
ull the pipe assembly 2 out slightly, then
disconnect the connector 3 from the air
intake pipe by turning it a quarter turn anti-
clockwise.
8
In the event of a breakdown
Page 213 of 324
211
Changing a bulb
The headlamps have polycarbonate
lenses with a protective coating:
F
d
o not clean them using a dr y or
abrasive cloth, nor with a detergent
or solvent product,
F
u
se a sponge and soapy water or a pH
neutral product,
F
w
hen using a high pressure washer
on persistent marks, do not keep the
lance directed towards the lamps or
their edges for too long, so as not to
damage their protective coating and
seals.
Changing a bulb must only be done with
the ignition off and after the lamp has
been switched off for several
minutes -
Risk of serious burns!
F
D
o not touch the bulb directly with your
fingers, use a lint-free cloth.
It is essential only to use anti-ultraviolet
(UV) type bulbs, so as not to damage the
headlamp.
Always replace a failed bulb with a new
bulb with the same type and specification. Halogen bulbs
To ensure good quality lighting, check
that the bulb is correctly positioned in its
housing.
After changing a bulb
To refit, carry out the operations in reverse
order to removal.
Close the protective cover very carefully to
guarantee the sealing of the lamps. Opening the bonnet /Access to bulbs
With the engine warm, proceed with
caution - risk of burns!
Take care with objects or clothing that
could be caught in the blades of the
engine cooling fan - risk of strangulation!
In some weather conditions (e.g. low
temperature or humidity), the presence
of misting on the internal sur face of the
glass of the headlamps and rear lamps is
normal
; it disappears after the lamps have
been on for a few
minutes.
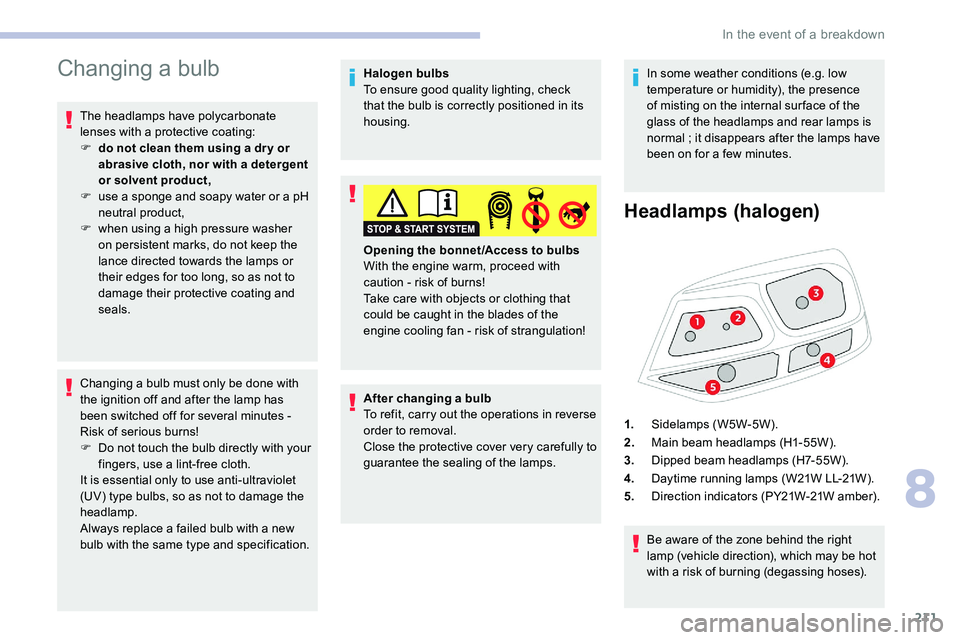
Headlamps (halogen)
Be aware of the zone behind the right
lamp (vehicle direction), which may be hot
with a risk of burning (degassing hoses).
1.
Sidelamps (W5W-5W).
2. Main beam headlamps (H1-55W).
3. Dipped beam headlamps (H7-55W).
4. Daytime running lamps (W21W LL-21W).
5. Direction indicators (PY21W-21W amber).
8
In the event of a breakdown
Page 222 of 324

220
The battery is located under the bonnet.
F O pen the bonnet using the interior release
lever, then the exterior safety catch.
F
S
ecure the bonnet stay.
For more information on the Bonnet and
the Engine , refer to the corresponding
sections.
Starting using another
battery
When your vehicle's battery is discharged, the
engine can be started using a backup battery
(external or from another vehicle) and jump
leads or using a battery booster.
Never start the engine by connecting a
battery charger.
Never use a 24
V or higher battery
b o o s t e r.
Check beforehand that the backup
battery has a nominal voltage of 12
V and
a capacity at least equal to that of the
discharged battery.
The two vehicles must not be in contact
with each other.
Switch off all the electrical consumers
on both vehicles (audio system, wipers,
lighting, etc.).
Make sure that the jump leads are not
close to the moving parts of the engine
(fan, belt, etc.).
Do not disconnect the (+) terminal while
the engine is running.
Always replace the battery with one of
equivalent specification.
Access to the battery
F Remove the plastic cover to access the (+)
terminal, if your vehicle has one.
The battery (-) terminal is not accessible.
A remote earth point is provided at the front of
the vehicle. F
L
ift the plastic cover on the (+) terminal, if
your vehicle has one.
F
C
onnect the red cable to the (+) terminal of
flat battery A (at the metal elbow), then to
the (+) terminal of backup battery B or the
b o o s t e r.
F
C
onnect one end of the green or black
cable to the (-) terminal of backup battery B
or the booster (or to an earth point on the
assisting vehicle).
F
C
onnect the other end of the green or black
cable to earth point C on the broken down
vehicle.
F
S
tart the engine of the assisting vehicle and
leave it running for a few
minutes.
F
O
perate the starter on the broken down
vehicle and let the engine run.
If the engine does not start straight away,
switch off the ignition and wait a few moments
before trying again.
In the event of a breakdown
Page 223 of 324

221
24v 12v
F Wait for it to return to idle.
F D isconnect the jump leads in reverse
order .
F
R
efit the plastic cover to the (+) terminal, if
your vehicle has one.
F
A
llow the engine to run for at least
30
minutes, by driving or with the vehicle
stationary, so that the battery reaches an
adequate state of charge.
To disconnect, proceed in reverse order.
Some functions, including Stop & Start,
are not available if the battery is not
sufficiently charged.
Charging the battery using
a battery charger
For optimum ser vice life of the battery, it is
essential to maintain an adequate state of
charge.
In some circumstances, it may be necessary to
charge the battery:
-
i
f you only use your vehicle for short
journeys,
-
i
f the vehicle is to be taken off the road for
several weeks.
Contact a CITROËN dealer or a qualified
workshop. If you wish to charge your vehicle's battery
yourself, use only a charger compatible
with lead-acid batteries with a nominal
voltage of 12
V.
Follow the instructions provided by the
manufacturer of the charger.
Never reverse polarities.
It is not necessary to disconnect the
battery.
F
S
witch off the ignition.
F
S
witch off all electrical consumers (audio
system, lighting, wipers, etc.). F
E
nsure that the charger cables are in good
condition.
F
I
f your vehicle has one, lift the plastic cover
on the (+) terminal.
F
C
onnect the cables of charger B as follows:
-
t
he positive (+) red cable to the (+)
terminal of battery A ,
-
t
he negative (-) black cable to earth
point C on the vehicle.
F
A
t the end of the charging operation, switch
off charger B before disconnecting the
cables from battery A .
F
S
witch off charger B before connecting the
cables to the battery, so as to avoid any
dangerous sparks. If this label is present, it is essential to
use only a 12
V charger to avoid causing
irreversible damage to the electrical
components related to the Stop & Start
system.
Never try to charge a frozen battery - risk
of explosion!
If the battery has frozen, have it checked
by a CITROËN dealer or by a qualified
workshop who will check that the internal
components have not been damaged and
that the container has not cracked, which
would mean a risk of toxic and corrosive
acid leaking.
8
In the event of a breakdown
Page 249 of 324
15
QUESTIONRESPONSESOLUTION
With the engine off, the audio system switches
off after a few
minutes of use. When the engine is switched off, the audio
system operating time depends on the state of
charge of the battery.
The switch-off is normal: the audio system
switches to economy mode and switches off to
prevent discharging the vehicle's battery. Turn the ignition on to increase the charge of
the battery.
The message "the audio system is overheated"
appears on the display. In order to protect the installation if the
surrounding temperature is too high, the audio
system switches to an automatic thermal
protection mode leading to a reduction in
volume or the CD play stopping.Switch the audio system off for a few
minutes
to allow the system to cool.
Radio
QUESTION RESPONSESOLUTION
There is a difference in sound quality between
the different audio sources (radio, CD, etc.). To allow for optimal listening quality, the audio
settings (Volume, Bass, treble, Ambience,
Loudness) can be tailored to different
sound sources, which can generate audible
differences when changing source (radio, CD,
e t c .) .Check that the audio settings (Volume, Bass,
Treble, Ambience and Loudness) are adapted
to the sources listened to. It is advisable to set
the audio functions (Bass, Treble, Front-Rear
Balance and Left-Right Balance) to the middle
position, select the musical ambience "None"
and set the loudness correction to the "Active"
position in CD mode or to the "Inactive"
position in radio mode.
.
Bluetooth® audio system
Page 272 of 324
20
Settings
QUESTIONRESPONSESOLUTION
When changing the setting of treble and bass,
the equalizer setting is deselected.
When changing the equalizer setting, the treble
and bass settings are reset. The selection of an equalizer setting imposes
the settings for treble and bass and vice versa.
Modify the treble and bass or equalizer settings
to obtain the desired musical ambience.
When changing the balance setting, distribution
is deselected.
When changing the distribution setting, the
balance setting is deselected. The selection of a distribution setting imposes
the balance settings and vice versa.
Modify the balance setting or the distribution
setting to obtain the desired sound quality.
There is a difference in sound quality between
the different audio sources. To allow for optimal listening quality, the
audio settings can be tailored to different
sound sources, which can generate audible
differences when changing source.Check that the audio settings are adapted to the
sources listened to. Adjust the audio functions
to the middle position.
When the engine is off, the system switches off
after several
minutes of use. When the engine is switched off, the system's
operating time depends on the state of charge
of the battery.
The switch-off is normal: the system
automatically goes into energy economy mode
and switches off to maintain an adequate
charge in the battery. Start the engine to increase the charge of the
battery.
CITROËN Connect Radio
Page 308 of 324
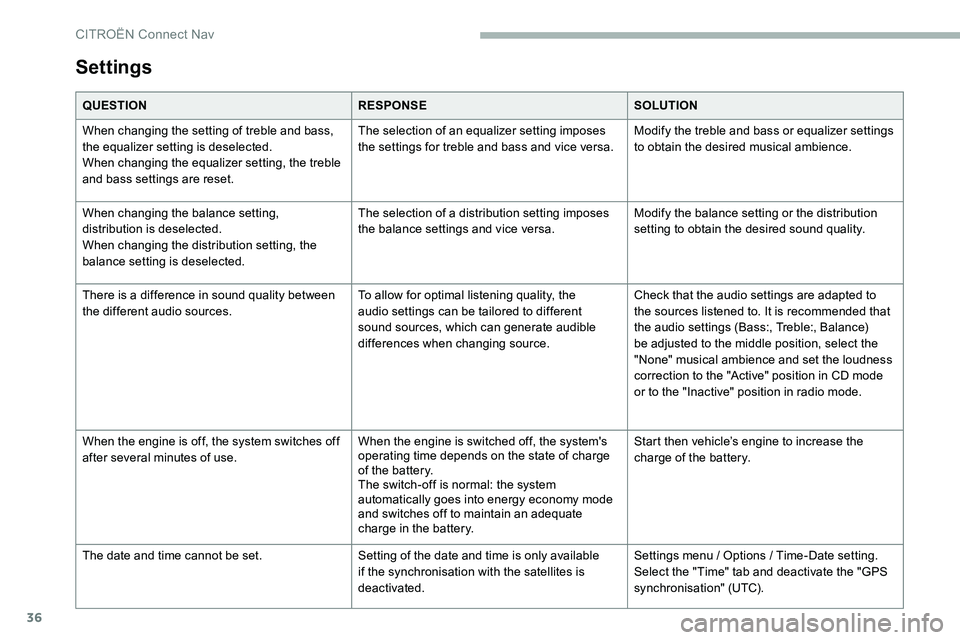
36
Settings
QUESTIONRESPONSESOLUTION
When changing the setting of treble and bass,
the equalizer setting is deselected.
When changing the equalizer setting, the treble
and bass settings are reset. The selection of an equalizer setting imposes
the settings for treble and bass and vice versa.
Modify the treble and bass or equalizer settings
to obtain the desired musical ambience.
When changing the balance setting,
distribution is deselected.
When changing the distribution setting, the
balance setting is deselected. The selection of a distribution setting imposes
the balance settings and vice versa.
Modify the balance setting or the distribution
setting to obtain the desired sound quality.
There is a difference in sound quality between
the different audio sources. To allow for optimal listening quality, the
audio settings can be tailored to different
sound sources, which can generate audible
differences when changing source.Check that the audio settings are adapted to
the sources listened to. It is recommended that
the audio settings (Bass:, Treble:, Balance)
be adjusted to the middle position, select the
"None" musical ambience and set the loudness
correction to the "Active" position in CD mode
or to the "Inactive" position in radio mode.
When the engine is off, the system switches off
after several
minutes of use. When the engine is switched off, the system's
operating time depends on the state of charge
of the battery.
The switch-off is normal: the system
automatically goes into energy economy mode
and switches off to maintain an adequate
charge in the battery. Start then vehicle’s engine to increase the
charge of the battery.
The date and time cannot be set. Setting of the date and time is only available
if the synchronisation with the satellites is
deactivated.Settings menu
/ Options / Time-Date setting.
Select the "Time" tab and deactivate the "GPS
synchronisation" (UTC).
CITROËN Connect Nav
Page 309 of 324
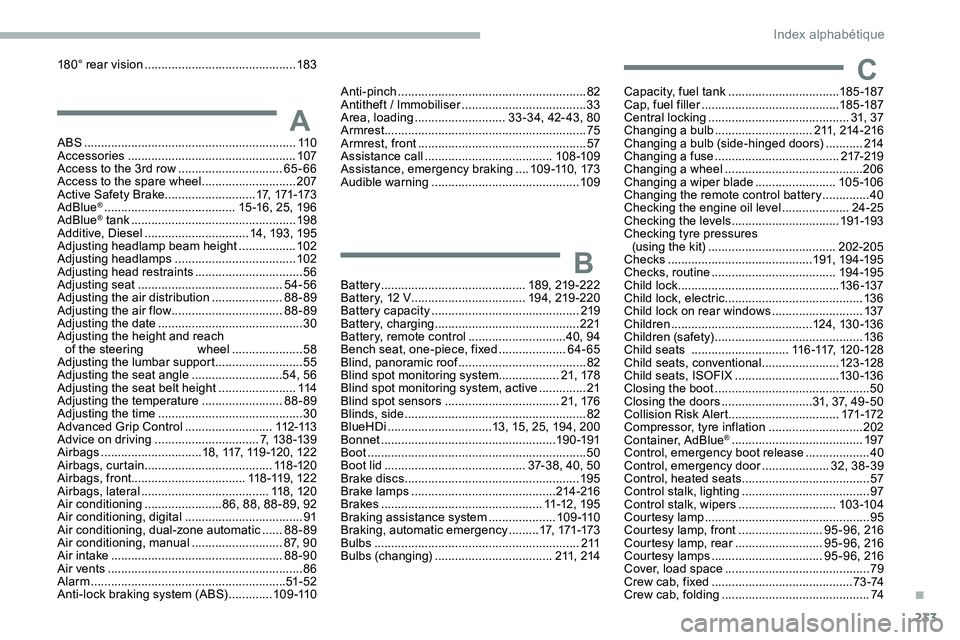
233
ABS ...............................................................11 0
Accessories .................................................. 107
Access to the 3rd row
...............................65-66
Access to the spare wheel
............................207
Active Safety Brake........................... 17, 171-173
AdBlue
® ....................................... 1 5 -16, 25, 196
AdBlue® tank ................................................. 19 8
Additive, Diesel ............................... 14, 193, 195
Adjusting headlamp beam height
................. 10
2
Adjusting headlamps
.................................... 102
Adjusting head restraints
................................ 56
Adjusting seat
........................................... 54-56
Adjusting the air distribution
.....................88-89
Adjusting the air flow
................................. 8
8-89
Adjusting the date
........................................... 30
Adjusting the height and reach of the steering wheel
.....................58
Adjusting the lumbar support
.......................... 55
A
djusting the seat angle
........................... 54, 56
Adjusting the seat belt height
....................... 11
4
Adjusting the temperature
........................88-89
Adjusting the time
........................................... 30
Advanced Grip Control
.......................... 112 -113
Advice on driving
............................... 7, 13 8 -13 9
Airbags
.............................. 1
8, 117, 119 -120, 122
Airbags, curtain
...................................... 11 8 -12 0
Airbags, front .................................. 11 8 -11 9 , 12 2
Airbags, lateral
...................................... 118, 120
Air conditioning
....................... 86, 88, 88 - 89, 92
Air conditioning, digital
................................... 91
Air conditioning, dual-zone automatic
......88-89
Air conditioning, manual
........................... 87
, 90
Air intake
................................................... 88-90
Air vents
.......................................................... 86
Alarm
.......................................................... 51- 5 2
Anti-lock braking system (ABS)
.............109 -110 Anti-pinch
........................................................
8
2
Antitheft / Immobiliser
..................................... 33
A
rea, loading
...........................
3
3 -34, 42- 43, 80
Armrest
................
............................................
75
Armrest, front ..................................................
57
Assistance call
...............................
.......
108 -109
Assistance, emergency braking
....
109 -110, 173
Audible warning
............................................ 10
9Capacity, fuel tank
.................................
185 -187
Cap, fuel filler
...............................
..........
185 -187
Central locking
.......................................... 3
1, 37
Changing a bulb
............................. 21
1, 214 -216
Changing a bulb (side-hinged doors)
........... 2
14
Changing a fuse
..................................... 21
7-219
Changing a wheel
......................................... 20
6
Changing a wiper blade
........................ 10
5 -10 6
Changing the remote control battery
..............
40
Checking the engine oil level ....................
24-25
Checking the levels ................................191-193
Checking tyre pressures (using the kit)
......................................202-205
Checks
...........................................191, 19 4 -195
Checks, routine
.....................................19 4 -195
Child lock
................................................13 6 -137
Child lock, electric
.........................................13 6
Child lock on rear windows
...........................137
Children
..........................................124, 13 0 -13 6
Children (safety)
............................................13 6
Child seats
.............................11
6 -117, 12 0 -12 8
Child seats, conventional
.......................123 -128
Child seats, ISOFIX
...............................13 0 -13 6
Closing the boot
..............................................50
Closing the doors
...........................31, 37, 49 -50
Collision Risk Alert ................................. 171-172
Compressor, tyre inflation
............................202
Container, AdBlue
® ....................................... 19 7
Control, emergency boot release ...................40
Control, emergency door
.................... 3
2, 38 -39
Control, heated seats
...................................... 57
Control stalk, lighting
...................................... 97
Control stalk, wipers
............................. 10
3 -104
Courtesy lamp
................................................. 95
Courtesy lamp, front
......................... 95 - 9 6, 216
Courtesy lamp, rear
.......................... 95 - 9 6, 216
Courtesy lamps
................................. 95 - 9 6, 216
Cover, load space
........................................... 79
Crew cab, fixed
.......................................... 7 3 -74
Crew cab, folding
............................................ 74
A
B
C
Battery ........................................... 189, 219-222
Battery, 12 V ............................... ...19 4, 219 -220
Battery capacity
............................................ 219
Battery, charging
........................................... 221
Battery, remote control
.............................40, 94
Bench seat, one-piece, fixed
.................... 6
4-65
Blind, panoramic roof
...................................... 82
Blind spot monitoring system
..................21, 178
Blind spot monitoring system, active
..............21
Blind spot sensors
.................................. 21, 176
Blinds, side
...................................................... 82
BlueHDi
............................... 13, 15, 25, 194, 200
Bonnet
.................................................... 19 0 -191
Boot
................................................................. 50
Boot lid
.......................................... 37-38, 40, 50
Brake discs
.................................................... 195
Brake lamps
...............................
............214 -216
Brakes
................................................ 11 -12 , 1 9 5
Braking assistance system
....................109 -110
Braking, automatic emergency
.........17, 171-173
Bulbs
............................................................. 2 11
Bulbs (changing)
................................... 211, 214
180° rear vision
.............................................
183
.
Index alphab