charging CITROEN DISPATCH SPACETOURER DAG 2021 Handbook (in English)
[x] Cancel search | Manufacturer: CITROEN, Model Year: 2021, Model line: DISPATCH SPACETOURER DAG, Model: CITROEN DISPATCH SPACETOURER DAG 2021Pages: 324, PDF Size: 10.52 MB
Page 188 of 324
186
Practical information
For domestic or accelerated charging
Before charging
Depending on the context:
► Have a professional check that the
electrical system to be used complies with
applicable standards and is compatible with
the vehicle.
► Have a professional electrician install
a dedicated domestic power socket or
accelerated charging unit (Wallbox)
compatible with the vehicle.
You should preferably use the charging cable
available as an accessory.
For more information, contact a CITROËN
dealer or a qualified workshop.
(During charging)
While charging is in progress, unlocking
the vehicle will cause the charging to stop.
If no action is taken on one of the openings
(door or boot) or on the charging nozzle, the
vehicle will lock again after 30 seconds and
charging will resume automatically.
Never work under the bonnet:
– Some areas remain very hot, even an hour
after charging ends - risk of burns!
– The fan may start at any time - risk of cuts
or strangulation!
After charging
Check that the charging flap is closed.
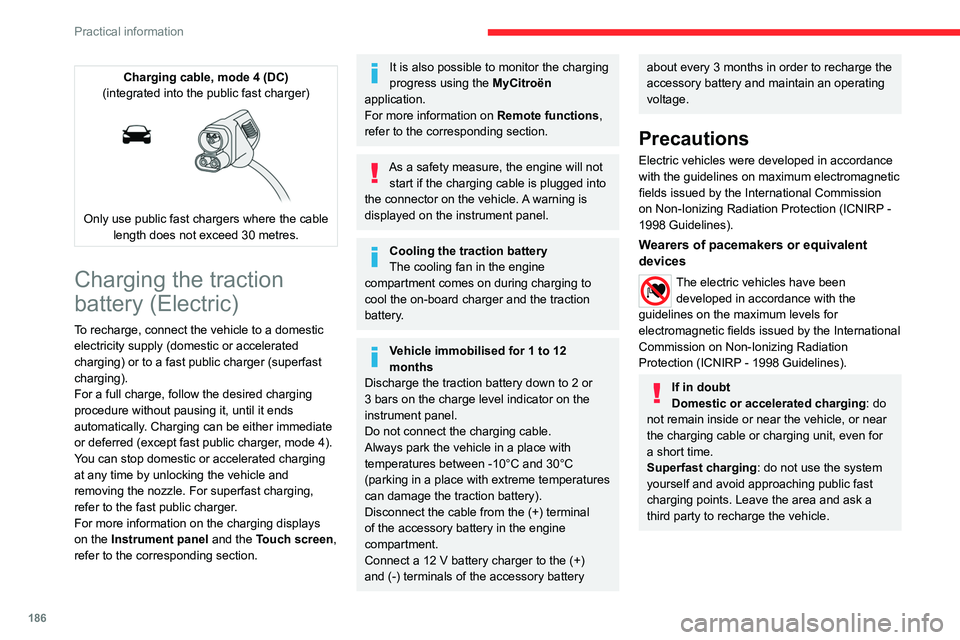
Charging cable, mode 4 (DC)
(integrated into the public fast charger)
Only use public fast chargers where the cable length does not exceed 30 metres.
Charging the traction
battery (Electric)
To recharge, connect the vehicle to a domestic
electricity supply (domestic or accelerated
charging) or to a fast public charger (superfast
charging).
For a full charge, follow the desired charging
procedure without pausing it, until it ends
automatically. Charging can be either immediate
or deferred (except fast public charger, mode 4).
You can stop domestic or accelerated charging
at any time by unlocking the vehicle and
removing the nozzle. For superfast charging,
refer to the fast public charger.
For more information on the charging displays
on the Instrument panel and the Touch screen,
refer to the corresponding section.
It is also possible to monitor the charging
progress using the MyCitroën
application.
For more information on Remote functions,
refer to the corresponding section.
As a safety measure, the engine will not start if the charging cable is plugged into
the connector on the vehicle. A warning is
displayed on the instrument panel.
Cooling the traction battery
The cooling fan in the engine
compartment comes on during charging to
cool the on-board charger and the traction
battery.
Vehicle immobilised for 1 to 12
months
Discharge the traction battery down to 2 or
3 bars on the charge level indicator on the
instrument panel.
Do not connect the charging cable.
Always park the vehicle in a place with
temperatures between -10°C and 30°C
(parking in a place with extreme temperatures
can damage the traction battery).
Disconnect the cable from the (+) terminal
of the accessory battery in the engine
compartment.
Connect a 12 V battery charger to the (+)
and (-) terminals of the accessory battery
about every 3 months in order to recharge the
accessory battery and maintain an operating
voltage.
Precautions
Electric vehicles were developed in accordance
with the guidelines on maximum electromagnetic
fields issued by the International Commission
on Non-Ionizing Radiation Protection
(ICNIRP -
1998 Guidelines).
Wearers of pacemakers or equivalent
devices
The electric vehicles have been developed in accordance with the
guidelines on the maximum levels for
electromagnetic fields issued by the International
Commission on Non-Ionizing Radiation
Protection (ICNIRP - 1998 Guidelines).
If in doubt
Domestic or accelerated charging: do
not remain inside or near the vehicle, or near
the charging cable or charging unit, even for
a short time.
Superfast charging: do not use the system
yourself and avoid approaching public fast
charging points. Leave the area and ask a
third party to recharge the vehicle.
Page 189 of 324
187
Practical information
7For domestic or accelerated charging
Before charging
Depending on the context:
►
Have a professional check that the
electrical system to be used complies with
applicable standards and is compatible with
the vehicle.
►
Have a professional electrician install
a dedicated domestic power socket or
accelerated charging unit (W
allbox)
compatible with the vehicle.
You should preferably use the charging cable
available as an accessory.
For more information, contact a CITROËN
dealer or a qualified workshop.
(During charging)
While charging is in progress, unlocking
the vehicle will cause the charging to stop.
If no action is taken on one of the openings
(door or boot) or on the charging nozzle, the
vehicle will lock again after 30 seconds and
charging will resume automatically.
Never work under the bonnet:
–
Some areas remain very hot, even an hour
after charging ends - risk of burns!
–
The fan may start at any time - risk of cuts
or strangulation!
After charging
Check that the charging flap is closed.
Do not leave the cable connected to the
domestic power socket - risk of short-circuit
or electrocution in the event of contact with or
immersion in water!
For superfast charging
Before charging
Check that the fast public charging
station and its charging cable are compatible
with the vehicle.
If the exterior temperature is below:
–
0°C, charging times may be extended.
–
-20°C, charging is still possible, but
charging times may be extended even further
(the battery has to be heated first).
After charging
Check that the charging flap is closed.
Connection
► Before charging, check that the drive selector
is in mode P, otherwise charging is not possible.
►
Open the charging flap by pressing the
push-button, and check that there are no foreign
bodies on the charging connector
.
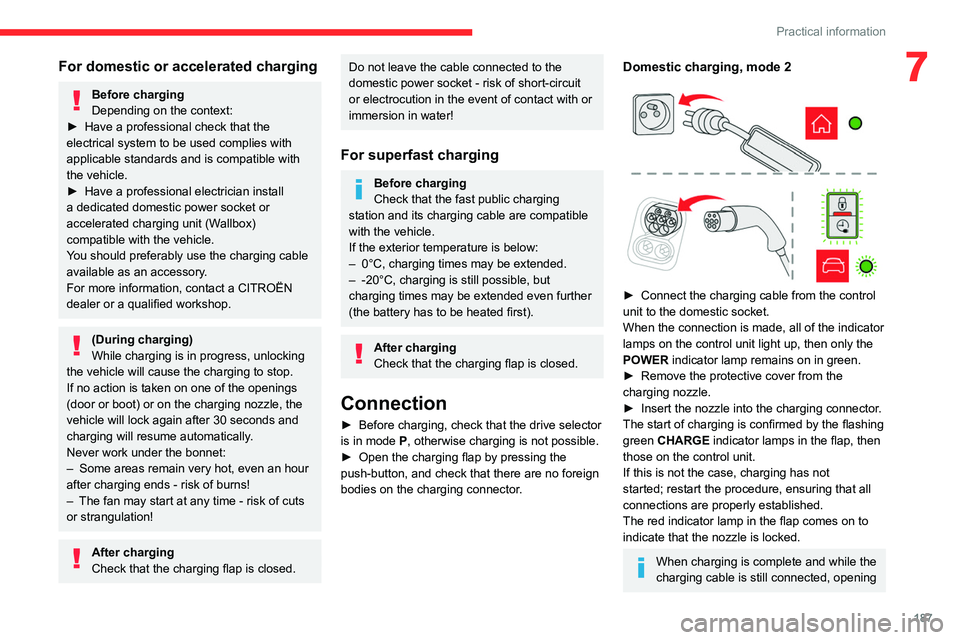
Domestic charging, mode 2
► Connect the charging cable from the control
unit to the domestic socket.
When the connection is made, all of the indicator
lamps on the control unit light up, then only the
POWER
indicator lamp remains on in green.
►
Remove the protective cover from the
charging nozzle.
►
Insert the nozzle into the charging connector
.
The start of charging is confirmed by the flashing
green CHARGE indicator lamps in the flap, then
those on the control unit.
If this is not the case, charging has not
started; restart the procedure, ensuring that all
connections are properly established.
The red indicator lamp in the flap comes on to
indicate that the nozzle is locked.
When charging is complete and while the
charging cable is still connected, opening
Page 190 of 324
188
Practical information
the driver's door will display the charge level
on the instrument panel for about 20 seconds.
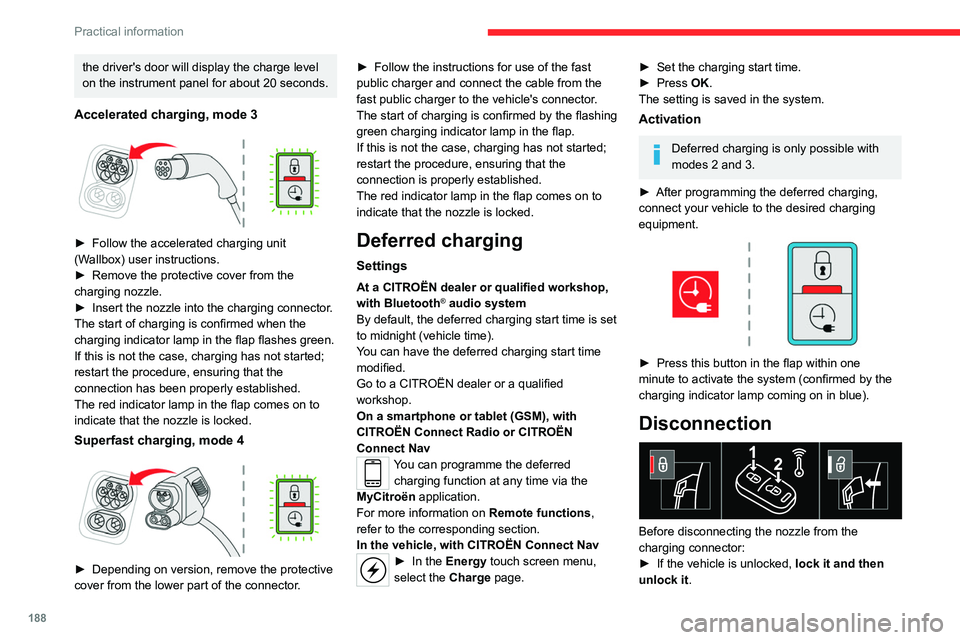
Accelerated charging, mode 3
► Follow the accelerated charging unit
(W allbox) user instructions.
►
Remove the protective cover from the
charging nozzle.
►
Insert the nozzle into the charging connector
.
The start of charging is confirmed when the
charging indicator lamp in the flap flashes green.
If this is not the case, charging has not started;
restart the procedure, ensuring that the
connection has been properly established.
The red indicator lamp in the flap comes on to
indicate that the nozzle is locked.
Superfast charging, mode 4
► Depending on version, remove the protective
cover from the lower part of the connector .►
Follow the instructions for use of the fast
public charger and connect the cable from the
fast public charger
to the vehicle's connector.
The start of charging is confirmed by the flashing
green charging indicator lamp in the flap.
If this is not the case, charging has not started;
restart the procedure, ensuring that the
connection is properly established.
The red indicator lamp in the flap comes on to
indicate that the nozzle is locked.
Deferred charging
Settings
At a CITROËN dealer or qualified workshop,
with Bluetooth® audio system
By default, the deferred charging start time is set
to midnight (vehicle time).
You can have the deferred charging start time
modified.
Go to a CITROËN dealer or a qualified
workshop.
On a smartphone or tablet (GSM), with
CITROËN Connect Radio or CITROËN
Connect Nav
You can programme the deferred charging function at any time via the
MyCitroën application.
For more information on Remote functions,
refer to the corresponding section.
In the vehicle, with CITROËN Connect Nav
► In the Energy touch screen menu,
select the Charge page.
► Set the charging start time.
► Press OK.
The setting is saved in the system.
Activation
Deferred charging is only possible with
modes 2 and 3.
►
After programming the deferred charging,
connect your vehicle to the desired charging
equipment.
► Press this button in the flap within one
minute to activate the system (confirmed by the
charging indicator lamp coming on in blue).
Disconnection
Before disconnecting the nozzle from the
charging connector:
►
If the vehicle is unlocked, lock it and then
unlock it .
Page 191 of 324

189
Practical information
7► If the vehicle is locked, unlock it.
The red indicator lamp in the flap goes out to
confirm that the charging nozzle is unlocked.
►
Within
30 seconds, remove the charging
nozzle.
The charging indicator lamp comes on in white.
With selective door unlocking activated,
press the unlocking button twice to
disconnect the charging nozzle.
When charging is complete, the green
charging indicator lamp in the flap goes
out after about 2 minutes.
Domestic charging, mode 2
The end of charging is confirmed when the green
CHARGE indicator lamp on the control unit and
the green charging indicator lamp in the flap
come on fixed.
►
Replace the protective cover on the charging
nozzle and close the charging flap.
►
Disconnect the control unit end of the
charging cable from the domestic socket.
Accelerated charging , mode 3
The end of charging is indicated by the charging
control unit and by the fixed lighting of the green
indicator lamp in the flap.
►
Hang up the nozzle on the charging unit and
close the charging flap.
Superfast charging, mode 4
The end of charging is indicated by the charger
and by the fixed lighting of the green indicator
lamp in the flap.
► You can also pause charging by
pressing this button in the flap (in mode 4
only).
►
Hang up the nozzle on the charger
.
►
Depending on version, replace the protective
cover on the lower section and close the
charging flap.
Energy economy mode
This system manages the duration of use of
certain functions, in order to conserve a sufficient
level of charge in the battery with the ignition off.
After switching off the engine, you can still
use functions such as the audio and telematic
system, the wipers and the dipped beam
headlamps or courtesy lamps, for a combined
duration of approximately 40 minutes.
Selecting the mode
A confirmation message is displayed when
energy economy mode is entered, and the active
functions are placed on standby.
If a telephone call is in progress at the
time, it will be maintained for around 10
minutes via the audio system’s hands-free
system.
Exiting the mode
These functions are automatically reactivated the
next time the vehicle is used.
To restore the use of these functions
immediately, start the engine and let it run:
–
For less than 10 minutes, to use the
equipment for approximately 5 minutes.
–
For more than 10 minutes, to use the
equipment for approximately 30 minutes.
Let the engine run for the specified duration to
ensure that the battery charge is sufficient.
T
o recharge the battery, avoid repeatedly or
continuously restarting the engine.
A flat battery prevents the engine from starting.
For more information on the 12
V battery,
refer to the corresponding section.
Load reduction mode
This system manages the use of certain
functions according to the level of charge
remaining in the battery.
When the vehicle is being driven, the load
reduction function temporarily deactivates certain
functions, such as the air conditioning and the
heated rear screen.
The deactivated functions are reactivated
automatically as soon as conditions permit.
Page 194 of 324
192
Practical information
Diesel engine
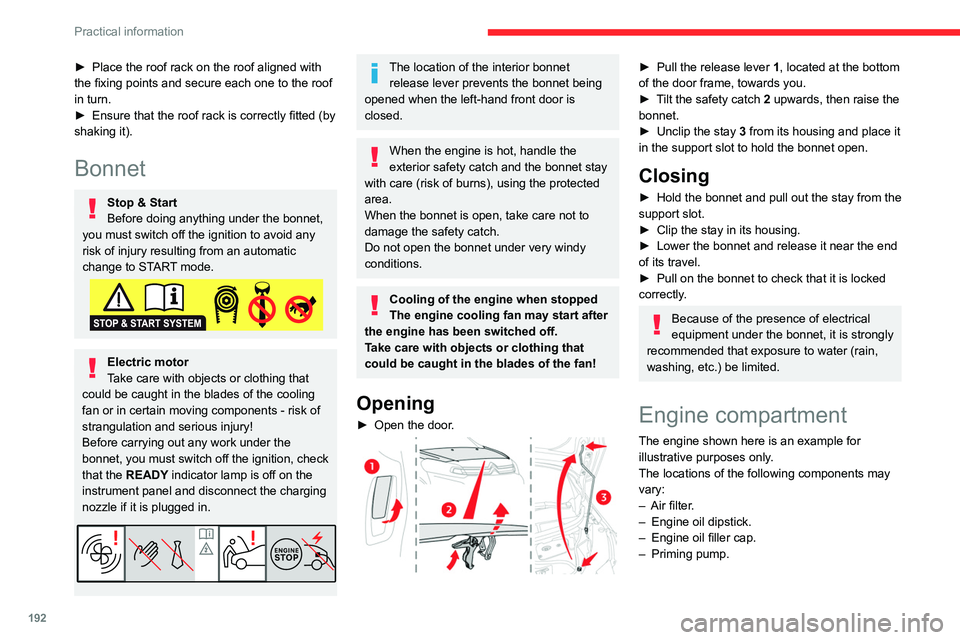
1.Screenwash fluid reservoir
2. Engine coolant reservoir
3. Brake fluid reservoir
4. Battery
5. Remote earth point (-)
6. Fusebox
7. Air filter
8. Engine oil filler cap
9. Engine oil dipstick
10. Priming pump*
11 . Power steering fluid reservoir
Diesel fuel system
This system is under very high pressure.
All work must be carried out only by a
CITROËN dealer or a qualified workshop.
* Depending on engine.
► Place the roof rack on the roof aligned with
the fixing points and secure each one to the roof
in turn.
►
Ensure that the roof rack is correctly fitted (by
shaking it).
Bonnet
Stop & Start
Before doing anything under the bonnet,
you must switch off the ignition to avoid any
risk of injury resulting from an automatic
change to START mode.
Electric motor
Take care with objects or clothing that
could be caught in the blades of the cooling
fan or in certain moving components - risk of
strangulation and serious injury!
Before carrying out any work under the
bonnet, you must switch off the ignition, check
that the READY indicator lamp is off on the
instrument panel and disconnect the charging
nozzle if it is plugged in.
The location of the interior bonnet release lever prevents the bonnet being
opened when the left-hand front door is
closed.
When the engine is hot, handle the
exterior safety catch and the bonnet stay
with care (risk of burns), using the protected
area.
When the bonnet is open, take care not to
damage the safety catch.
Do not open the bonnet under very windy
conditions.
Cooling of the engine when stopped
The engine cooling fan may start after
the engine has been switched off.
Take care with objects or clothing that
could be caught in the blades of the fan!
Opening
► Open the door .
► Pull the release lever 1 , located at the bottom
of the door frame, towards you.
►
T
ilt the safety catch 2 upwards, then raise the
bonnet.
►
Unclip the stay
3 from its housing and place it
in the support slot to hold the bonnet open.
Closing
► Hold the bonnet and pull out the stay from the
support slot.
►
Clip the stay in its housing.
►
Lower the bonnet and release it near the end
of its travel.
►
Pull on the bonnet to check that it is locked
correctly
.
Because of the presence of electrical
equipment under the bonnet, it is strongly
recommended that exposure to water (rain,
washing, etc.) be limited.
Engine compartment
The engine shown here is an example for
illustrative purposes only.
The locations of the following components may
vary:
–
Air filter
.
–
Engine oil dipstick.
–
Engine oil filler cap.
–
Priming pump.
Page 195 of 324
193
Practical information
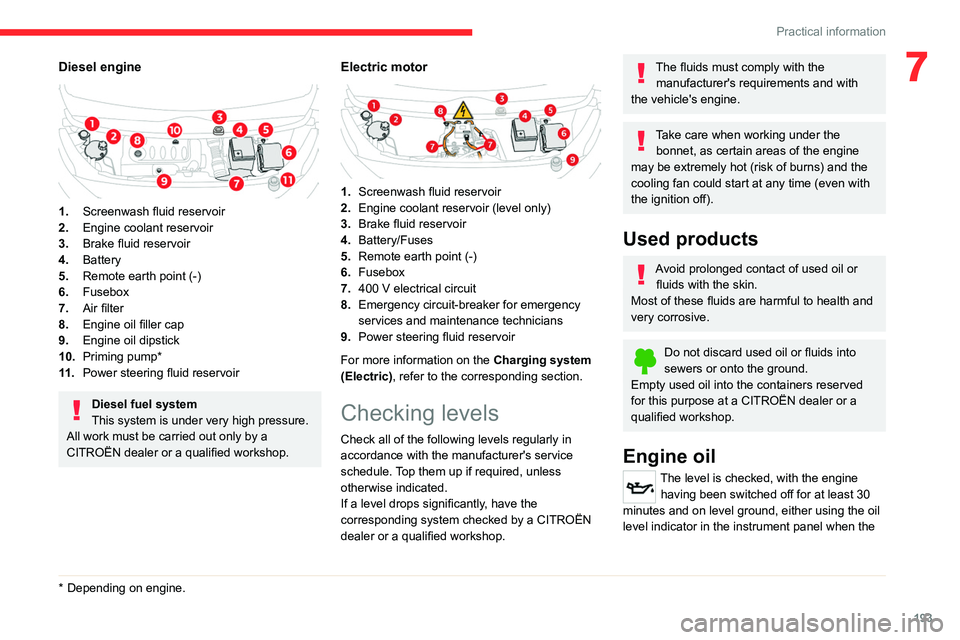
7Diesel engine
1.Screenwash fluid reservoir
2. Engine coolant reservoir
3. Brake fluid reservoir
4. Battery
5. Remote earth point (-)
6. Fusebox
7. Air filter
8. Engine oil filler cap
9. Engine oil dipstick
10. Priming pump*
11 . Power steering fluid reservoir
Diesel fuel system
This system is under very high pressure.
All work must be carried out only by a
CITROËN dealer or a qualified workshop.
* Depending on engine.
Electric motor
1. Screenwash fluid reservoir
2. Engine coolant reservoir (level only)
3. Brake fluid reservoir
4. Battery/Fuses
5. Remote earth point (-)
6. Fusebox
7. 400
V electrical circuit
8. Emergency circuit-breaker for emergency
services and maintenance technicians
9. Power steering fluid reservoir
For more information on the Charging system
(Electric), refer to the corresponding section.
Checking levels
Check all of the following levels regularly in
accordance with the manufacturer's service
schedule. Top them up if required, unless
otherwise indicated.
If a level drops significantly, have the
corresponding system checked by a CITROËN
dealer or a qualified workshop.
The fluids must comply with the manufacturer's requirements and with
the vehicle's engine.
Take care when working under the bonnet, as certain areas of the engine
may be extremely hot (risk of burns) and the
cooling fan could start at any time (even with
the ignition off).
Used products
Avoid prolonged contact of used oil or fluids with the skin.
Most of these fluids are harmful to health and
very corrosive.
Do not discard used oil or fluids into
sewers or onto the ground.
Empty used oil into the containers reserved
for this purpose at a CITROËN dealer or a
qualified workshop.
Engine oil
The level is checked, with the engine having been switched off for at least 30
minutes and on level ground, either using the oil
level indicator in the instrument panel when the
Page 221 of 324
219
In the event of a breakdown
8Fuse N° Rating(Amps) Functions
F5 5 Touch screen, reversing
camera and parking
sensors.
F8 20 Single or double rear
wipers.
F10/ F 11 30
Internal/external locks,
front and rear.
F12 3 Alarm.
F17 10 Rear 12
V accessory
socket.
F33 15 Front 12
V accessory
socket.
F36 20 Audio system, touch
screen, CD player,
navigation.
Engine compartment fuses
The fusebox is placed in the engine
compartment near the battery.
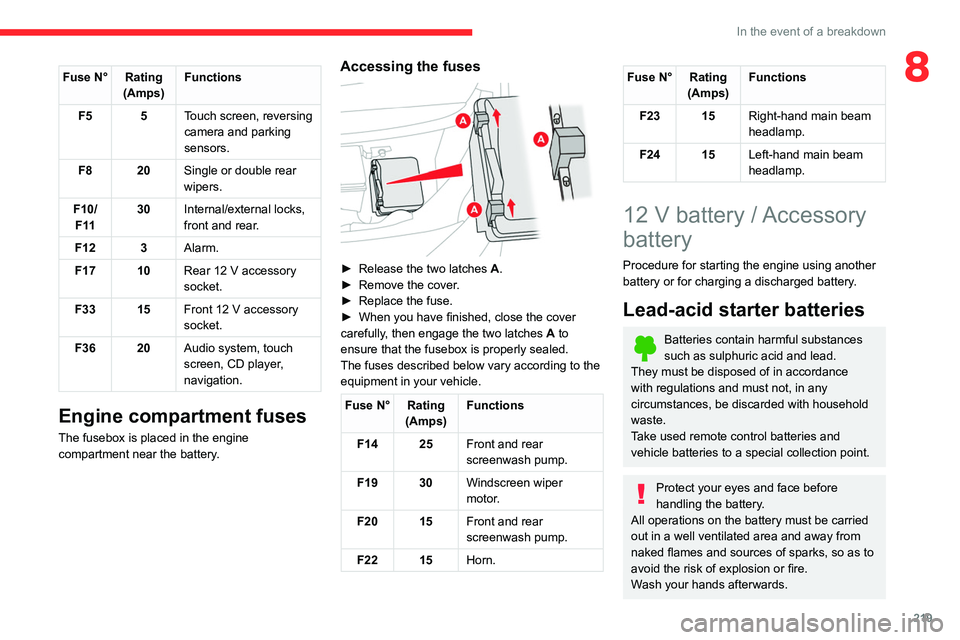
Accessing the fuses
► Release the two latches A.
► Remove the cover .
►
Replace the fuse.
►
When you have finished, close the cover
carefully
, then engage the two latches A
to
ensure that the fusebox is properly sealed.
The fuses described below vary according to the equipment in your vehicle.
Fuse N° Rating (Amps) Functions
F14 25 Front and rear
screenwash pump.
F19 30 Windscreen wiper
motor.
F20 15 Front and rear
screenwash pump.
F22 15 Horn.
Fuse N° Rating
(Amps) Functions
F23 15 Right-hand main beam
headlamp.
F24 15 Left-hand main beam
headlamp.
12 V battery / Accessory
battery
Procedure for starting the engine using another
battery or for charging a discharged battery.
Lead-acid starter batteries
Batteries contain harmful substances
such as sulphuric acid and lead.
They must be disposed of in accordance
with regulations and must not, in any
circumstances, be discarded with household
waste.
Take used remote control batteries and
vehicle batteries to a special collection point.
Protect your eyes and face before
handling the battery.
All operations on the battery must be carried
out in a well ventilated area and away from
naked flames and sources of sparks, so as to
avoid the risk of explosion or fire.
Wash your hands afterwards.
Page 223 of 324
221
In the event of a breakdown
8the booster (or to an earth point on the assisting
vehicle).
►
Connect the other end of the green or black
cable to the earth point
C
.
►
Start the engine on the assisting vehicle and
leave it running for a few minutes.
►
Operate the starter on the broken down
vehicle and let the engine run.
If the engine does not start immediately
, switch
off the ignition and wait a few moments before
trying again.
►
W
ait for it to return to idle.
►
Disconnect the jump leads in reverse order.
►
Refit the plastic cover to the (+) terminal, if
the vehicle has one.
►
Allow the engine to run for at least
30
minutes, with the vehicle stationary, so that
the battery reaches an adequate state of charge.
Driving immediately without having
reached a sufficient level of charge may
affect some of the vehicle's functionalities.
To disconnect, proceed in reverse order.
Automatic gearbox
Never try to start the engine by pushing
the vehicle.
Charging the battery using a
battery charger
For optimum service life of the battery, it is
essential to maintain an adequate state of
charge.
In some circumstances, it may be necessary to
charge the battery:
–
When using the vehicle mainly for short
journeys.
–
If the vehicle is to be taken off the road for
several weeks.
Consult a CITROËN dealer or a qualified
workshop.
To charge the vehicle's battery yourself, use only a charger compatible with
lead-acid batteries with a nominal voltage of
12
V.
Follow the instructions provided by the
manufacturer of the charger.
Never reverse polarities.
It is not necessary to disconnect the
battery.
►
Switch the ignition off.
►
Switch off all electrical consumers (audio
system, lighting, wipers, etc.).
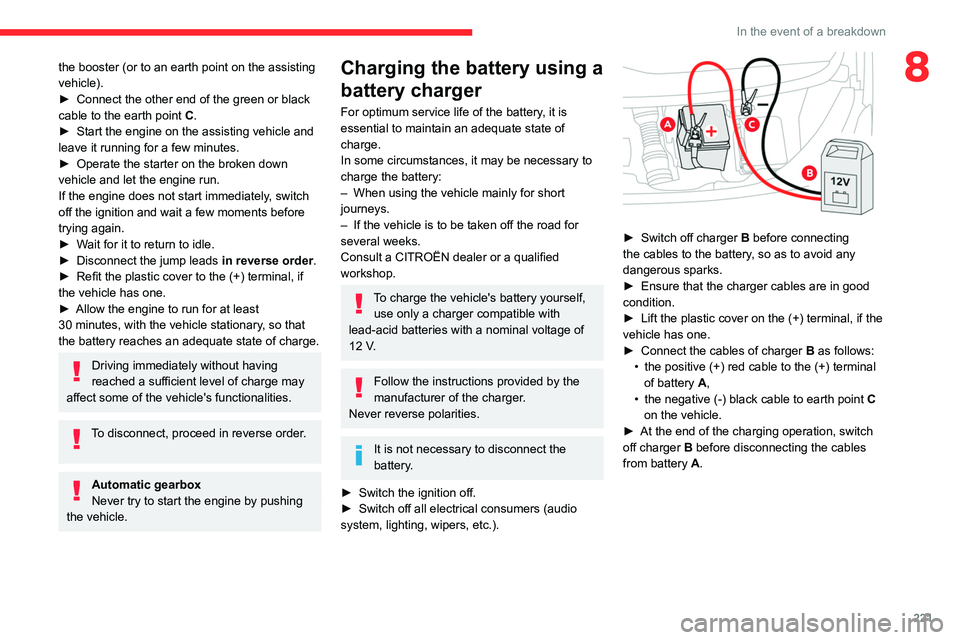
► Switch off charger B before connecting
the cables to the battery, so as to avoid any
dangerous sparks.
►
Ensure that the charger cables are in good
condition.
►
Lift the plastic cover on the (+) terminal, if the
vehicle has one.
►
Connect the cables of charger B
as follows:
•
the positive (+) red cable to the (+) terminal
of battery
A,
•
the negative (-) black cable to earth point C
on the vehicle.
►
At the end of the charging operation, switch
off charger B
before disconnecting the cables
from battery A.
Page 232 of 324

230
Technical data
Motor and towed loads - Electric
Electric motor
Electric motor
TechnologySynchronous with permanent magnets
Max. power : EC standard (kW)/(hp) 100/136
Traction battery
Technology Lithium-Ion
Battery pack S: 18 modules (L1/L2/L3)
XL: 27 modules (L2/L3)*
Installed capacity (kWh) 50 or 75
Domestic charging Mode 2
Alternating current (AC) voltage
Rating (A) 230
8 or 16
Accelerated charging Mode 3
Alternating current (AC) voltage
Rating (A) 230 (single-phase or three-phase)
16 or 32
Superfast charging Mode 4
Direct current (DC) voltage 400
* Battery pack not available for right-hand drive Combi, Business, Feel, S\
hine, Business Lounge vehicles.
Engines BlueHDi 140 S&S EAT8BlueHDi 180 S&S EAT8
Gearboxes Automatic 8-speedAutomatic 8-speed
Code DW10FDDU - AMN8 - STTDW10FDCU - AMN8 - STT
Cubic capacity (cc) 1,9971,499
Max. power: EC standard (kW) 103130
Fuel DieselDiesel
Length XS/M/XL
(L1/L2/L3) M*/XL*
(L2/L3)* XS/M/XL
(L1/L2/L3) M*/XL*
(L2/L3)*
Braked trailer (within the
GTW limit) (kg)
on a 10% or 12% gradient 6-7-8-9 seats
1,9001,8001,9001,800
Unbraked trailer (kg) 750750750750
Maximum authorised nose
weight (kg) 84
848484
Page 233 of 324

231
Technical data
9Motor and towed loads - Electric
Electric motor
Electric motor
TechnologySynchronous with permanent magnets
Max. power : EC standard (kW)/(hp) 100/136
Traction battery
Technology Lithium-Ion
Battery pack S: 18 modules (L1/L2/L3)
XL: 27 modules (L2/L3)*
Installed capacity (kWh) 50 or 75
Domestic charging Mode 2
Alternating current (AC) voltage
Rating (A) 230
8 or 16
Accelerated charging Mode 3
Alternating current (AC) voltage
Rating (A) 230 (single-phase or three-phase)
16 or 32
Superfast charging Mode 4
Direct current (DC) voltage 400
* Battery pack not available for right-hand drive Combi, Business, Feel, S\
hine, Business Lounge vehicles.