bonnet Citroen DS3 2015 1.G Owner's Manual
[x] Cancel search | Manufacturer: CITROEN, Model Year: 2015, Model line: DS3, Model: Citroen DS3 2015 1.GPages: 415, PDF Size: 11.95 MB
Page 7 of 415

DS3_en_Chap00a_sommaire_ed01-2015
CHECKSTECHn ICAL dA TAAUdI O and
TELEMATICS
239 Bonnet
240 Pe trol engines
241
D
iesel
eng
ines
242
C
hecking levels
246
C
hecks 250 Pe
trol engines
253 Pe trol weights
256
LP
G
e
ngine
257
L
PG weights
258
D
iesel
eng
ines
259
D
iesel
eng
ines
260
D
imensions
262
I
dentification
ma
rkings266 E
mergency or assistance
269 7 -inch touch screen tablet
331
A
udio system
0100 11009
Page 41 of 415

39
DS3_en_Chap01_controle-de-marche_ed01-2015
On vehicles fitted with an electric oil level
indicator, information on the oil level is
d
isplayed in the instrument panel for a few
s
econds when the ignition is switched on, after
t
he service information.
Engine oil level indicator*
The level shown will only be correct
if the vehicle is on level ground and
t
he engine has been off for more than
3
0 minutes.
Oil level correct
Oil level low
This is indicated by the flashing of " O I L" ,
a ccompanied by illumination of the service
w
arning lamp, an audible signal and a
m
essage.
If
the low oil level is confirmed by a check using
t
he dipstick, the level must be topped up to
p
revent damage to the engine.
Refer
to the "Checking levels" section.
Oil level indicator fault
This is signaled by the flashing of "OIL- -".
C ontact a CITROËN dealer or a qualified
w
orkshop.
In the event of a fault with the electric oil level
indicator,
the engine oil level is no longer
mon
itored.
While
the system is faulty, you should check
t
he engine oil level using the manual dipstick
l
ocated under the bonnet.
Refer
to the "Checking levels" section.
*
Depending on version.
Monitoring
Page 137 of 415

135
DS3_en_Chap05_visibilite_ed01-2015
Travelling abroad
LEd / Xenon front lamps
For motoring in countries that drive on the other s
ide of the road, it is necessary to adjust the
d
ipped beams so as to not dazzle the drivers of
a
pproaching
v
ehicles.
F
R
aise the bonnet for access to the adjuster
(
one adjuster per headlamp).
F
I
nsert a suitable allen key (not supplied)
i
nto the hexagonal head of the adjuster.
F
T
urn the allen key half a turn clockwise.
Headlamp adjustment
To avoid causing a nuisance to other road u
sers, the height of the headlamps should be
a
djusted in relation to the load in the vehicle.
0.
D
river only or driver + front passenger.
-.
I
ntermediate
s
etting.
1.
5
people.
-.
5
people + load in the boot.
2.
D
river only + maximum authorised load in
t
he boot.
This
position is sufficient to avoid causing
d
azzle.
Higher
settings may limit the spread of light
f
rom the headlamps.
The
initial setting is position "0". On
your return, don't forget to
a
djust your headlamps back to their
i
nitial setting, by carrying out these
o
perations in reverse order.
Visibility
Page 141 of 415
139
DS3_en_Chap05_visibilite_ed01-2015
Operating fault
If an automatic wiping fault occurs, the wipers will operate in intermittent mode.
Have
it checked by a CITROËN dealer or a
q
ualified
w
orkshop.
To retain the effectiveness of the flat
wiper
blades, it is advisable to:
-
h
andle them with care,
-
c
lean them regularly using soapy
w
ater,
-
n
ot use them to hold a sheet of
c
ardboard against the windscreen,
-
r
eplace them at the first signs of
w
e a r.
Do
not cover the rain sensor, linked
w
ith the sunshine sensor and located in
the centre of the windscreen behind the
rear
view mirror.
Switch
off the automatic wiping when
u
sing an automatic car wash.
In winter, it is advisable to wait until the
windscreen
is completely clear of ice
b
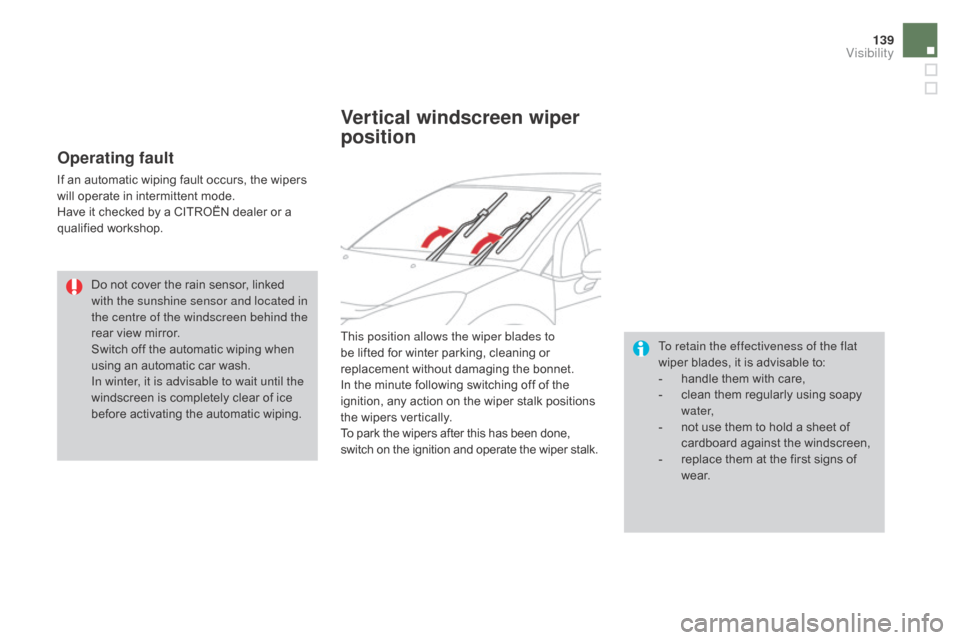
efore activating the automatic wiping.This position allows the wiper blades to
be
lifted for winter parking, cleaning or
r
eplacement without damaging the bonnet.
In
the minute following switching off of the
i
gnition, any action on the wiper stalk positions
t
he wipers vertically.
To
park the wipers after this has been done,
s
witch on the ignition and operate the wiper stalk.
Vertical windscreen wiper
position
Visibility
Page 158 of 415
Operating faults
In the event of an impact to the windscreen at the sensor, deactivate
the
system and contact a CITROËN
d
ealer or a qualified workshop to have
y
our windscreen replaced.
Never
try to remove, adjust or test
t
he sensor.
Only
a CITROËN dealer or a qualified
w
orkshop is able to work on the system.
When
towing a trailer or when the
v
ehicle is being towed, the system must
b
e deactivated.Do not stick or other wise fix any object on the windscreen in front of the sensor.
Sensor fault
The operation of the laser sensor may suffer inter ference from accumulations of dirt or
m
isting of the windscreen. In this case you are
w
arned by the display of a message.
Use
the windscreen demisting and regularly
c
lean the area of the windscreen in front of the
sensor.
System fault
In the event of a malfunction of the system, you a re warned by an audible signal and the display
o
f the message "Automatic braking system
fault" .
Have
the system checked by a CITROËN
d
ealer or a qualified workshop.
In
difficult
weather
conditions
(very
h
eavy
rain,
snow,
fog,
hail...),
braking
d
istances increase, which can reduce
the
ability
of
the
system
to
avoid
a
c
ollision.
The
driver
must
therefore
remain
par
ticularly
v
igilant.
Never
leave
accumulations
of
snow
or
a
ny
object
projecting
above
the
bonnet
o
r
in
front
of
the
roof:
this
might
fall
into
t
he field of vision of the sensor and
generate
a
detection.
Page 189 of 415
187
DS3_en_Chap08_info-pratiques_ed01-2015
Running out of fuel (Diesel)If your vehicle has an HDi engine, the fuel system must be primed if you run out of fuel.
T his system consists of a priming pump and a transparent pipe under the bonnet.
F
F
ill the fuel tank with at least five litres of
D
iesel.
F
O
pen the bonnet.
F
D
epending on version, unclip the cover to
g
ain access to the priming pump.
F
S
queeze and release the priming pump
u
ntil resistance is felt (could be from the
f
irst application) and fuel appears in the
t
ransparent pipe with the green connector.
F
O
perate the starter until the engine starts.
F
D
epending on version, put the cover back
i
n position and clip it in place.
F
C
lose the bonnet.
BlueHdi 100 engines
F Fill the fuel tank with at least five litres of D
iesel.
F
S
witch on the ignition (without starting the
e
ngine).
F
W
ait around 6 seconds and switch off the
ignition.
F
R
epeat the operation 10 times.
F
O
perate the starter to run the engine.
If
the
engine
does
not
start
at
the
first
a
ttempt,
do
not
try
again.
Operate
the
priming
pump
again,
then
t
he
starter.
Practical information
Page 225 of 415
223
DS3_en_Chap08_info-pratiques_ed01-2015
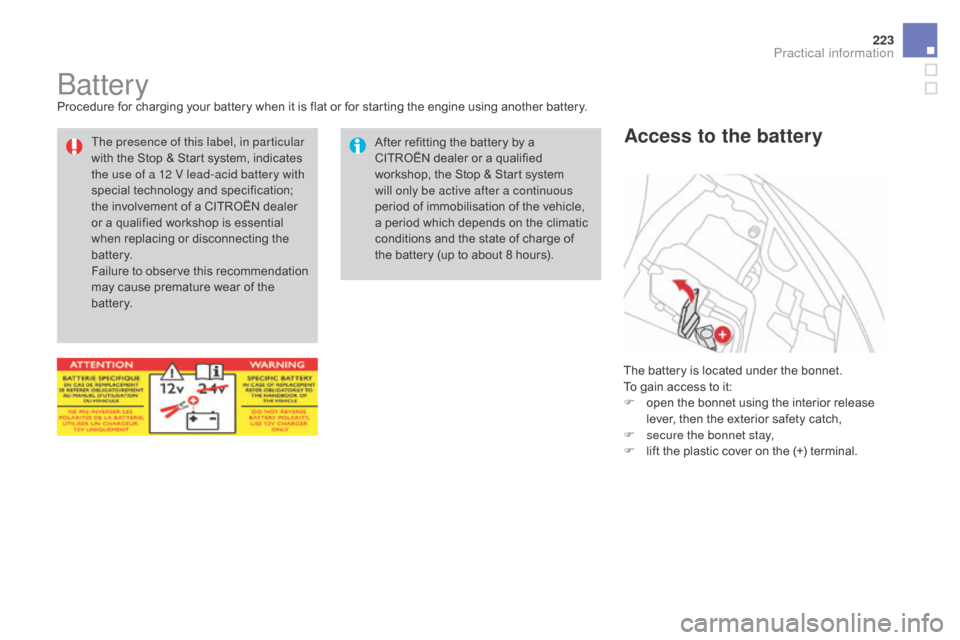
BatteryProcedure for charging your battery when it is flat or for starting the engine using another battery.T he battery is located under the bonnet.
To
gain access to it:
F
o
pen the bonnet using the interior release
l
ever, then the exterior safety catch,
F
s
ecure the bonnet stay,
F
l
ift the plastic cover on the (+) terminal.
Access to the batteryAfter refitting the battery by a CITROËN dealer or a qualified
w
orkshop, the Stop & Start system
w
ill only be active after a continuous
period
of immobilisation of the vehicle,
a
period which depends on the climatic
c
onditions and the state of charge of
t
he battery (up to about 8 hours).
The presence of this label, in particular
with
the
Stop
&
Start
system,
indicates
t
he use of a 12 V lead-acid battery with
special
t
echnology
a
nd
s
pecification;
t
he
involvement
of
a
CITROËN
dealer
o
r
a
qualified
workshop
is
essential
w
hen
replacing
or
disconnecting
the
b
attery.
Failure
t
o
o
bserve
t
his
r
ecommendation
m
ay
cause
premature
wear
of
the
b
attery.
Practical information
Page 229 of 415
227
DS3_en_Chap08_info-pratiques_ed01-2015
Changing a front or rear wiper bladeProcedure for replacing a worn wiper blade with a new one without the use of tools.
Before removing a front
wiper blade
F Within one minute after switching off the i
gnition, operate the wiper stalk to position
t
he wiper blades in the vertical position.
This
position must be used in order to avoid
d
amaging the wiper blade and the bonnet.
Removal
F Raise the corresponding wiper arm.
F U nclip the wiper blade and remove it.
Fitting
F At the front, check the size of the wiper b
lade as the shorter blade is fitted to the
passenger
side of the vehicle.
F
P
ut the corresponding new wiper blade in
p
lace and clip it.
F
F
old down the wiper arm carefully.
After fitting a front wiper
blade
F Switch on the ignition.
F O perate the wiper stalk again to park the
w
iper blades.
Practical information
Page 241 of 415
239
DS3_en_Chap09_verifications_ed01-2015
Bonnet
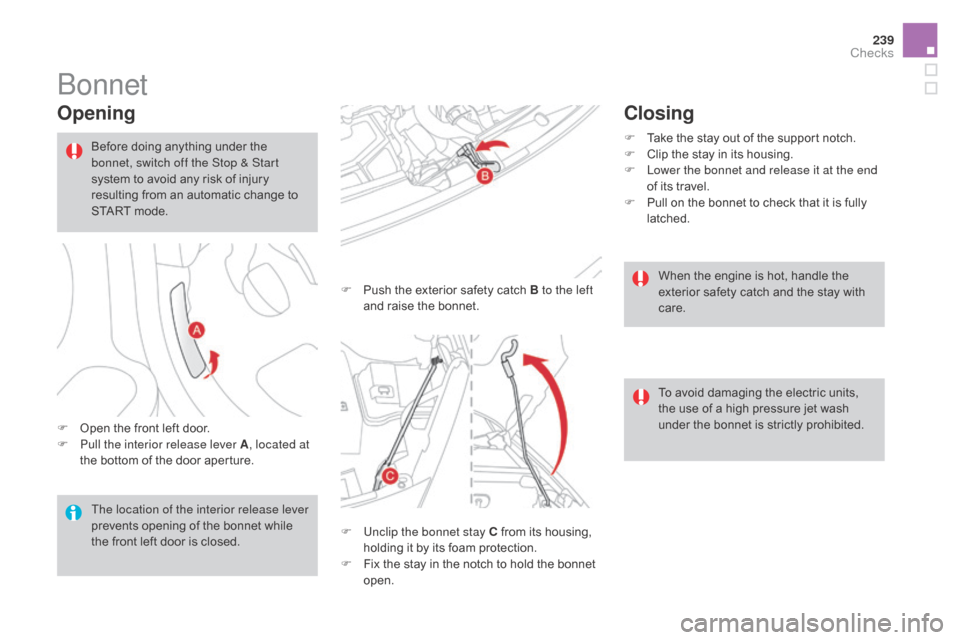
Opening
F Open the front left door.
F P ull the interior release lever A , located at
the
bottom of the door aperture.F
P
ush the exterior safety catch B to the left
and raise the bonnet.
Before doing anything under the
b
onnet, switch off the Stop & Start
system to avoid any risk of injury
r
esulting from an automatic change to
S
TART mode.
The location of the interior release lever
prevents opening of the bonnet while
t
he front left door is closed.F
U
nclip the bonnet stay C from its housing,
h
olding it by its foam protection.
F
F
ix the stay in the notch to hold the bonnet
ope
n.
Closing
F Take the stay out of the support notch.
F C lip the stay in its housing.
F
L
ower the bonnet and release it at the end
of
its travel.
F
P
ull on the bonnet to check that it is fully
l
atched.When
the engine is hot, handle the
e
xterior safety catch and the stay with
c
are.
To
avoid damaging the electric units,
t
he use of a high pressure jet wash
u
nder the bonnet is strictly prohibited.
Checks
Page 264 of 415
DS3_en_Chap10_caracteristiques_ed01-2015
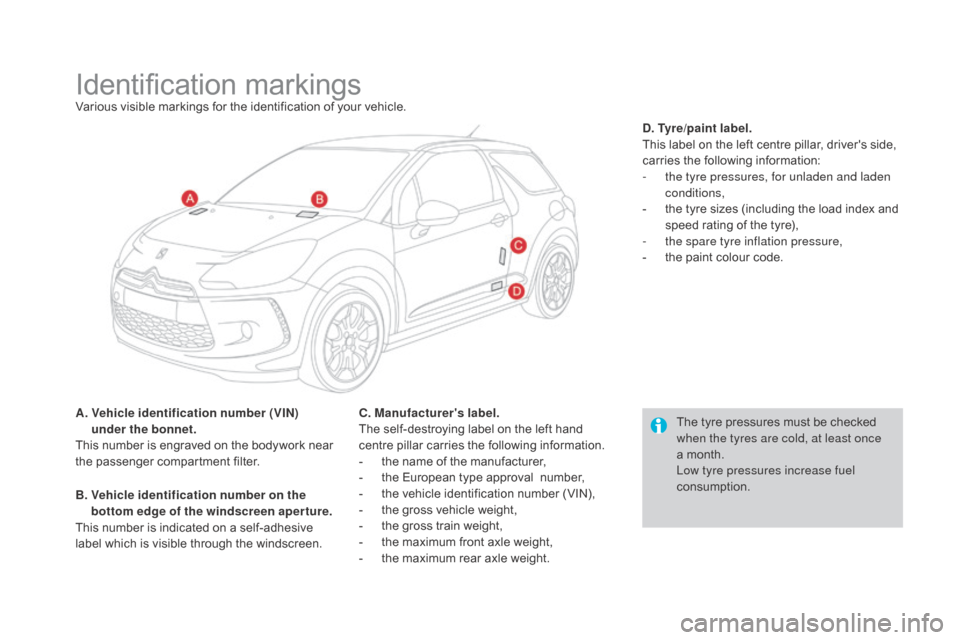
Identification markingsVarious visible markings for the identification of your vehicle.
A .
V
ehicle identification number (VI
n)
under the bonnet.
This
number is engraved on the bodywork near
t
he
p
assenger
c
ompartment
f
ilter.
B.
V
ehicle identification number on the
bottom edge of the windscreen aper ture.
This
number is indicated on a self-adhesive
l
abel which is visible through the windscreen. The
tyre pressures must be checked
w
hen the tyres are cold, at least once
a
month.
Low tyre pressures increase fuel
consumption.
C. Manufacturer's label.
The
self-destroying label on the left hand
c
entre pillar carries the following information.
-
t
he name of the manufacturer,
-
t
he European type approval number,
-
t
he vehicle identification number (VIN),
-
t
he gross vehicle weight,
-
t
he gross train weight,
-
t
he maximum front axle weight,
-
t
he maximum rear axle weight.
d. T
yre/paint label.
This
label on the left centre pillar, driver's side,
c
arries the following information:
-
t
he tyre pressures, for unladen and laden
conditions,
-
t
he tyre sizes (including the load index and
s
peed rating of the tyre),
-
t
he spare tyre inflation pressure,
-
t
he paint colour code.