bulb Citroen DS3 2015 1.G Owner's Manual
[x] Cancel search | Manufacturer: CITROEN, Model Year: 2015, Model line: DS3, Model: Citroen DS3 2015 1.GPages: 415, PDF Size: 11.95 MB
Page 99 of 415
97
DS3_en_Chap03_confort_ed01-2015
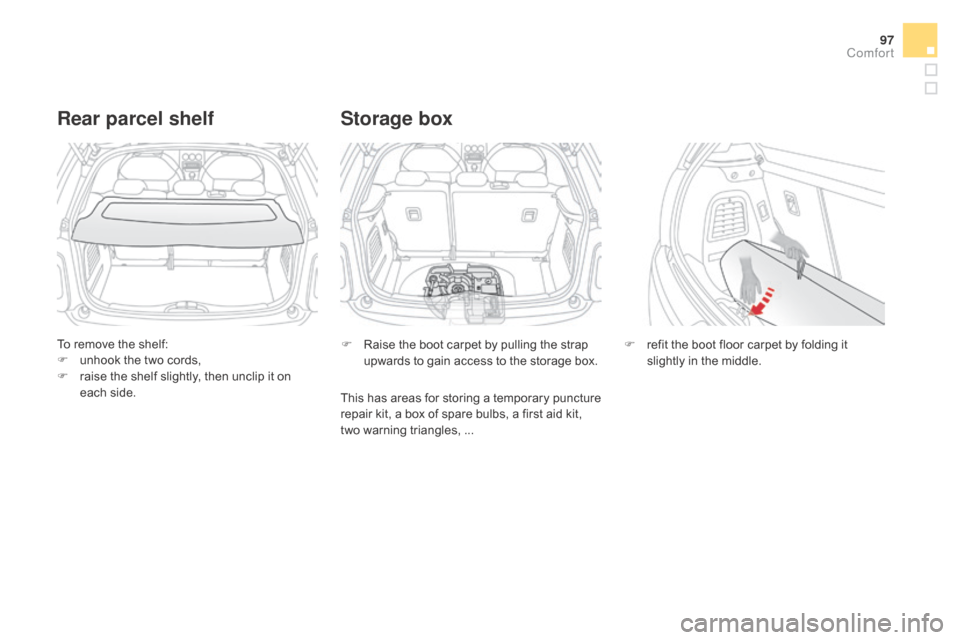
To remove the shelf:
F u nhook the two cords,
F
r
aise the shelf slightly, then unclip it on
e
ach side.
Rear parcel shelf
F Raise the boot carpet by pulling the strap u
pwards to gain access to the storage box.
Storage box
F refit the boot floor carpet by folding it s
lightly in the middle.
This
has
areas
for
storing
a
temporary
puncture
r
epair
kit,
a
box
of
spare
bulbs,
a
first
aid
kit,
t
wo
warning
triangles,
...
Comfort
Page 210 of 415

DS3_en_Chap08_info-pratiques_ed01-2015
Changing a bulb
The headlamps are fitted with polycarbonate glass with a protective
c
oating:
F
d
o not clean them using a dr y
or abrasive cloth, nor with a
detergent or solvent product,
F
u
se a sponge and soapy water or a
p
H neutral product,
F
w
hen using a high pressure
w
asher on persistent marks, do not
k
eep the lance directed towards
t
he lamps or their edges for too
l
ong, so as not to damage their
p
rotective coating and seals.
Halogen headlamps
1. Direction indicators (PY21W amber).
2. S idelamps ( W5W).
3.
M
ain beam headlamps (H1-55W).
4.
D
ipped beam headlamps (H7-55W).
5.
F
ront foglamps (PSX24W).
6.
L
ED lamps (LEDs).
Changing
a
bulb
should
only
be
done
a
fter
the
headlamp
has
been
switched
o
ff
for
several
minutes
(risk
of
serious
b
urns).
F
D
o not touch the bulb directly with
your
fingers,
use
a
lint-free
cloth.
It
is
imperative
to
use
only
anti-
ultraviolet
(UV)
type
bulbs
to
avoid
d
amaging
t
he
h
eadlamp.
Always replace a failed bulb with a
new
bulb
with
the
same
type
and
s
pecification.
Page 211 of 415
209
DS3_en_Chap08_info-pratiques_ed01-2015
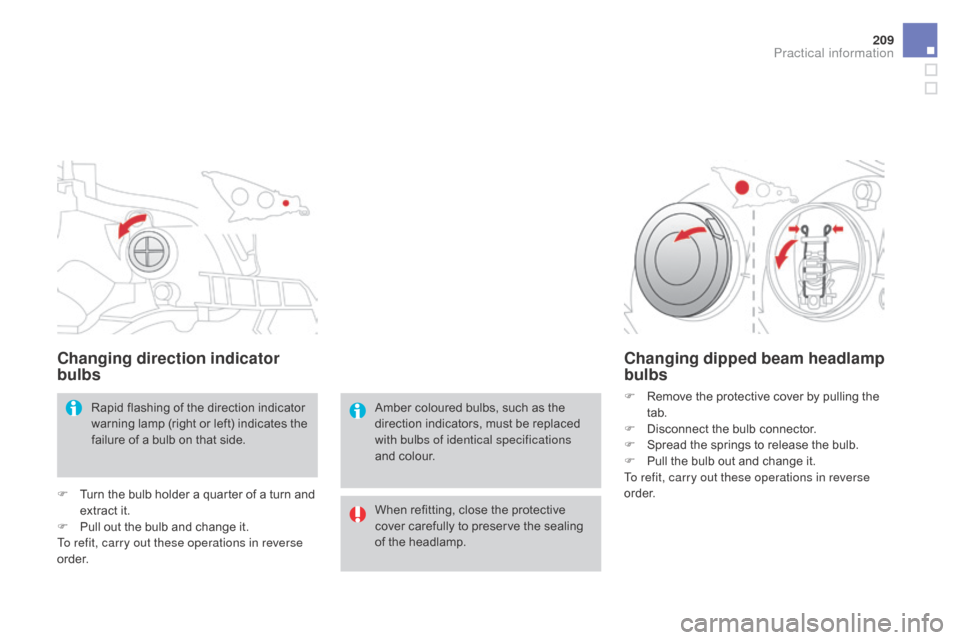
Changing direction indicator
bulbs
Rapid flashing of the direction indicator warning lamp (right or left) indicates the
f
ailure of a bulb on that side.
F
T
urn the bulb holder a quarter of a turn and
e
xtract it.
F
P
ull out the bulb and change it.
To refit, carry out these operations in reverse
o r d e r.
Changing dipped beam headlamp
bulbs
F Remove the protective cover by pulling the t
ab.
F
D
isconnect the bulb connector.
F
S
pread the springs to release the bulb.
F
P
ull the bulb out and change it.
To refit, carry out these operations in reverse
o r d e r.
Amber
coloured
bulbs,
such
as
the
d
irection
indicators,
must
be
replaced
w
ith bulbs of identical specifications
and
colour.
When
refitting,
close
the
protective
c
over
carefully
to
preserve
the
sealing
o
f
the
headlamp.
Practical information
Page 212 of 415
DS3_en_Chap08_info-pratiques_ed01-2015
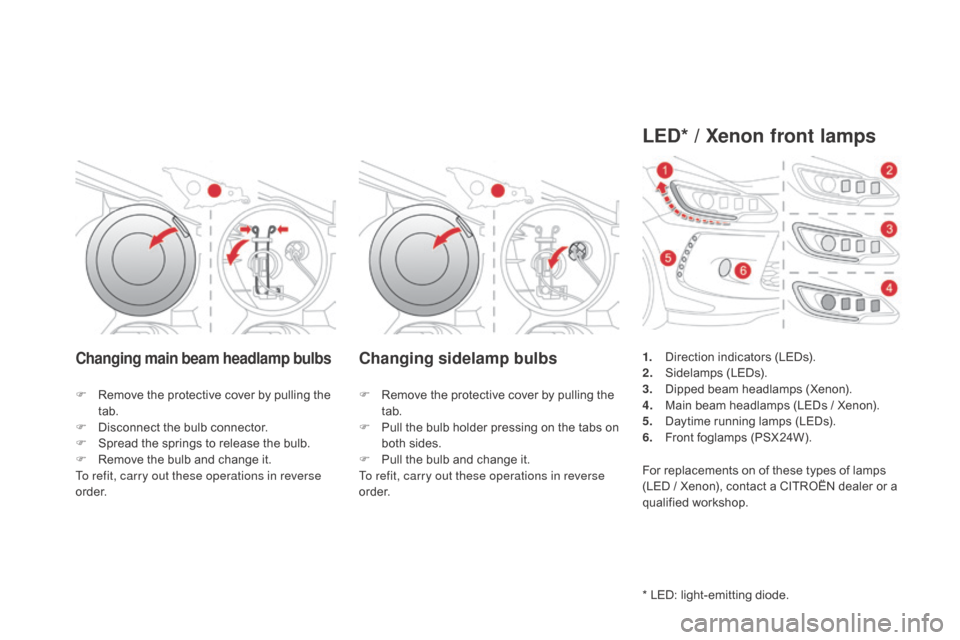
Changing main beam headlamp bulbsChanging sidelamp bulbs
F Remove the protective cover by pulling the t
ab.
F
D
isconnect the bulb connector.
F
S
pread the springs to release the bulb.
F
R
emove the bulb and change it.
To refit, carry out these operations in reverse
o r d e r. F
R emove the protective cover by pulling the t
ab.
F
P
ull the bulb holder pressing on the tabs on
bo
th
s
ides.
F
P
ull the bulb and change it.
To refit, carry out these operations in reverse
o r d e r.
LEd* / Xenon front lamps
* LED: light-emitting diode.
1.
D
irection indicators (LEDs).
2.
S
idelamps
(
LEDs).
3.
D
ipped beam headlamps (Xenon).
4.
M
ain beam headlamps (LEDs / Xenon).
5.
D
aytime running lamps (LEDs).
6.
F
ront foglamps (PSX24W).
For replacements on of these types of lamps
(
LED / Xenon), contact a CITROËN dealer or a
q
ualified
w
orkshop.
Page 213 of 415
2 11
DS3_en_Chap08_info-pratiques_ed01-2015
To obtain a replacement module, contact your CITROËN dealer or a qualified workshop.
I f you experience any difficulty in replacing bulbs, contact your CITROËN dealer or a
q
ualified
w
orkshop.
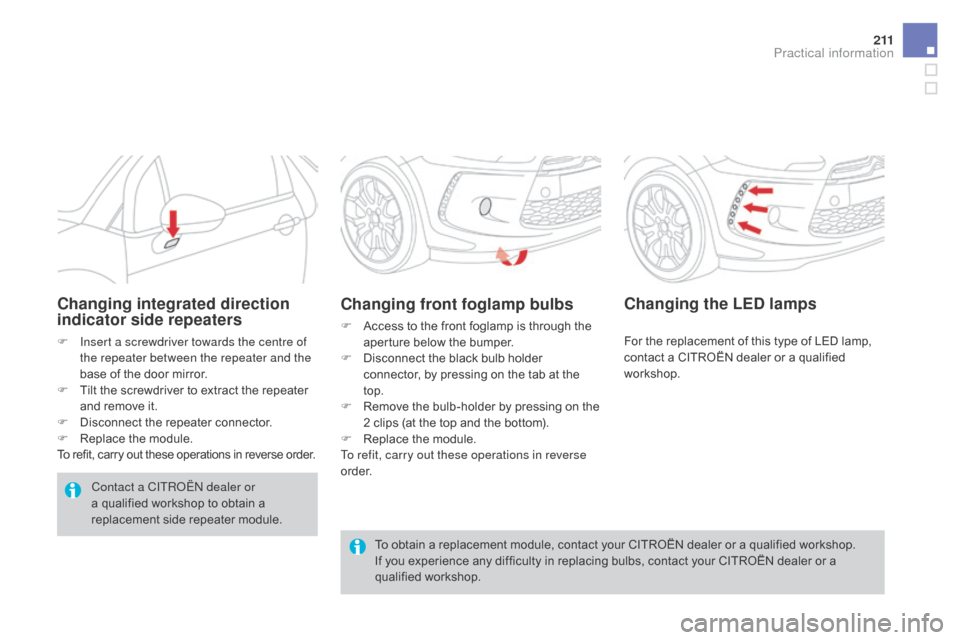
Changing front foglamp bulbs
F Access to the front foglamp is through the a
perture below the bumper.
F
D
isconnect the black bulb holder
c
onnector, by pressing on the tab at the
t
op.
F
R
emove the bulb-holder by pressing on the
2
clips (at the top and the bottom).
F
R
eplace the module.
To refit, carry out these operations in reverse
o r d e r.
Changing integrated direction
indicator side repeaters
F Insert a screwdriver towards the centre of the repeater between the repeater and the
base
of the door mirror.
F
T
ilt the screwdriver to extract the repeater
a
nd remove it.
F
D
isconnect the repeater connector.
F
R
eplace the module.
To
refit, carry out these operations in reverse order.
Contact a CITROËN dealer or
a
qualified workshop to obtain a
r
eplacement side repeater module.
Changing the LEd lamps
For the replacement of this type of LED lamp, c
ontact a CITROËN dealer or a qualified
w
orkshop.
Practical information
Page 214 of 415
DS3_en_Chap08_info-pratiques_ed01-2015
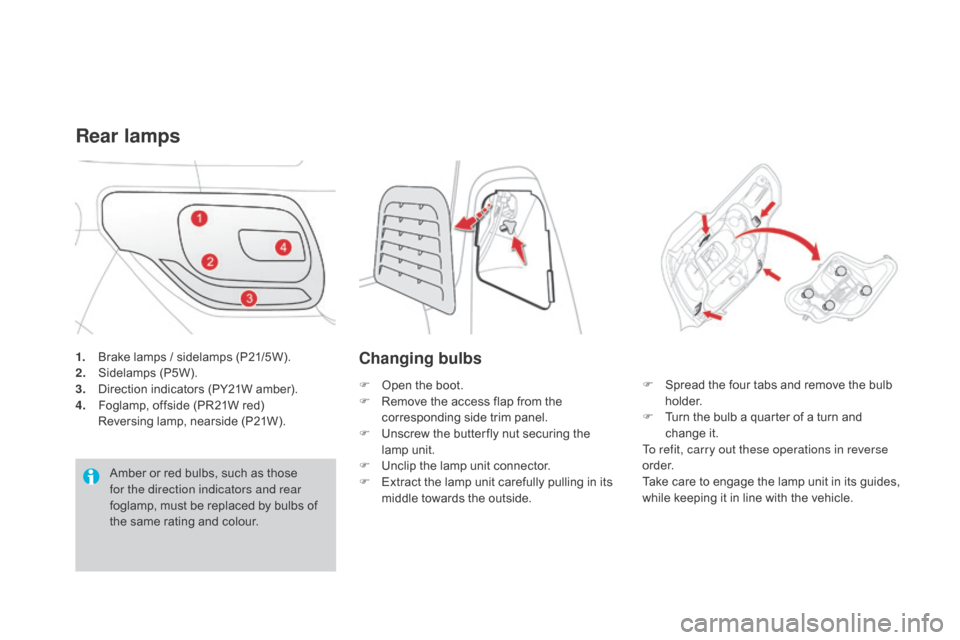
1. Brake lamps / sidelamps (P21/5W).
2. S idelamps ( P5W).
3.
D
irection indicators (PY21W amber).
4.
F
oglamp, offside (PR21W red)
R
eversing lamp, nearside (P21W).
Rear lamps
Amber or red bulbs, such as those for the direction indicators and rear
foglamp,
must be replaced by bulbs of
t
he same rating and colour.
Changing bulbs
F Open the boot.
F R emove the access flap from the
c
orresponding side trim panel.
F
U
nscrew the butter fly nut securing the
lam
p
u
nit.
F
U
nclip the lamp unit connector.
F
E
xtract the lamp unit carefully pulling in its
m
iddle towards the outside. F
S pread the four tabs and remove the bulb h
o l d e r.
F
T
urn the bulb a quarter of a turn and
c
hange
it
.
To refit, carry out these operations in reverse
o r d e r.
Take
care to engage the lamp unit in its guides,
w
hile keeping it in line with the vehicle.
Page 215 of 415
213
DS3_en_Chap08_info-pratiques_ed01-2015
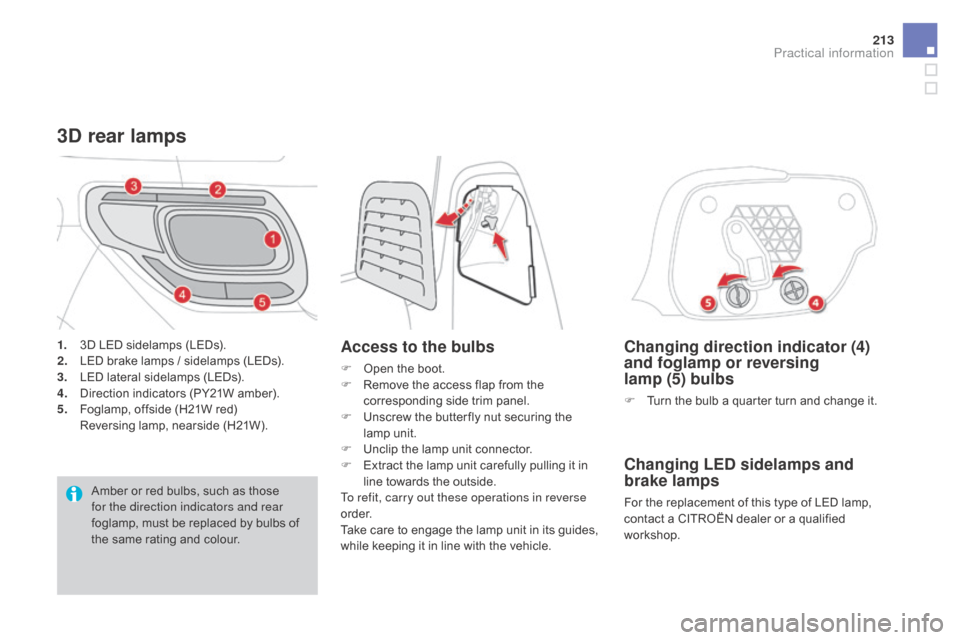
Changing direction indicator (4)
and foglamp or reversing
lamp
(5) bulbs
F Turn the bulb a quarter turn and change it.
Changing LEd sidelamps and
brake lamps
For the replacement of this type of LED lamp, c
ontact a CITROËN dealer or a qualified
w
orkshop.
3d rear lamps
Access to the bulbs
F Open the boot.
F R emove the access flap from the
c
orresponding side trim panel.
F
U
nscrew the butter fly nut securing the
lam
p
u
nit.
F
U
nclip the lamp unit connector.
F
E
xtract the lamp unit carefully pulling it in
l
ine towards the outside.
To refit, carry out these operations in reverse
o r d e r.
Take
care to engage the lamp unit in its guides,
w
hile keeping it in line with the vehicle.
1.
3
D
LED
sidelamps
(LEDs).
2. L
ED
brake
lamps
/
sidelamps
(LEDs).
3. L
ED
lateral
sidelamps
(LEDs).
4.
D
irection
indicators
(PY21W
amber).
5.
F
oglamp,
offside
(H21W
red)
R
eversing
lamp,
nearside
(H21W).
Amber
or
red
bulbs,
such
as
those
f
or the direction indicators and rear
foglamp,
must
be
replaced
by
bulbs
of
t
he
same
rating
and
colour.
Practical information
Page 216 of 415
DS3_en_Chap08_info-pratiques_ed01-2015
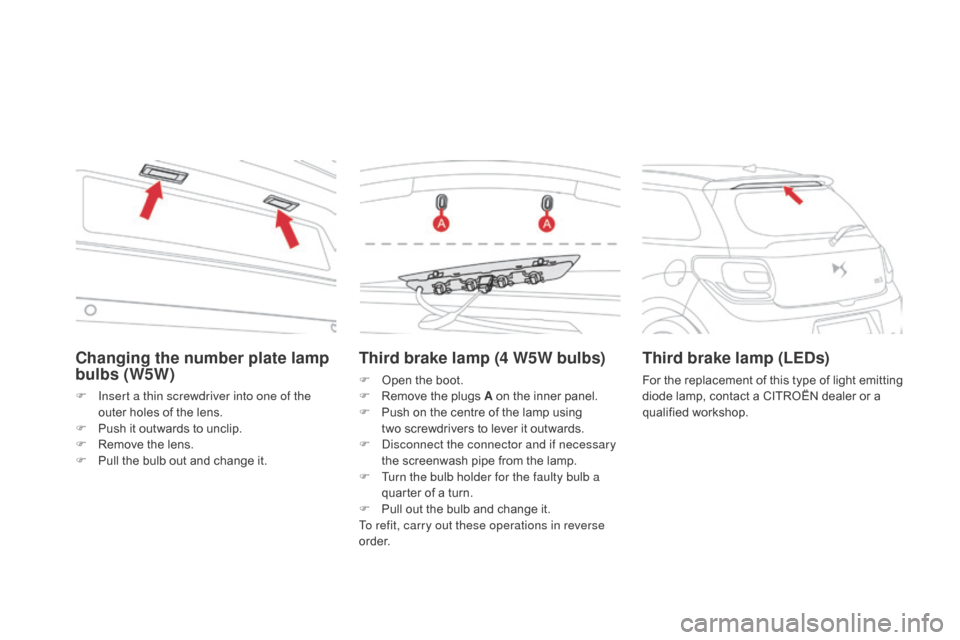
Third brake lamp (4 W5W bulbs)
F Open the boot.
F R emove the plugs A on the inner panel.
F
P
ush on the centre of the lamp using
t
wo screwdrivers to lever it outwards.
F
D
isconnect the connector and if necessary
the
screenwash pipe from the lamp.
F
T
urn the bulb holder for the faulty bulb a
quarter
of a turn.
F
P
ull out the bulb and change it.
To refit, carry out these operations in reverse
o r d e r.
Third brake lamp (LEds )
For the replacement of this type of light emitting d
iode lamp, contact a CITROËN dealer or a
q
ualified
w
orkshop.
Changing the number plate lamp
bulbs (W5W)
F Insert a thin screwdriver into one of the outer holes of the lens.
F
P
ush it outwards to unclip.
F
R
emove the lens.
F
P
ull the bulb out and change it.
Page 217 of 415
215
DS3_en_Chap08_info-pratiques_ed01-2015
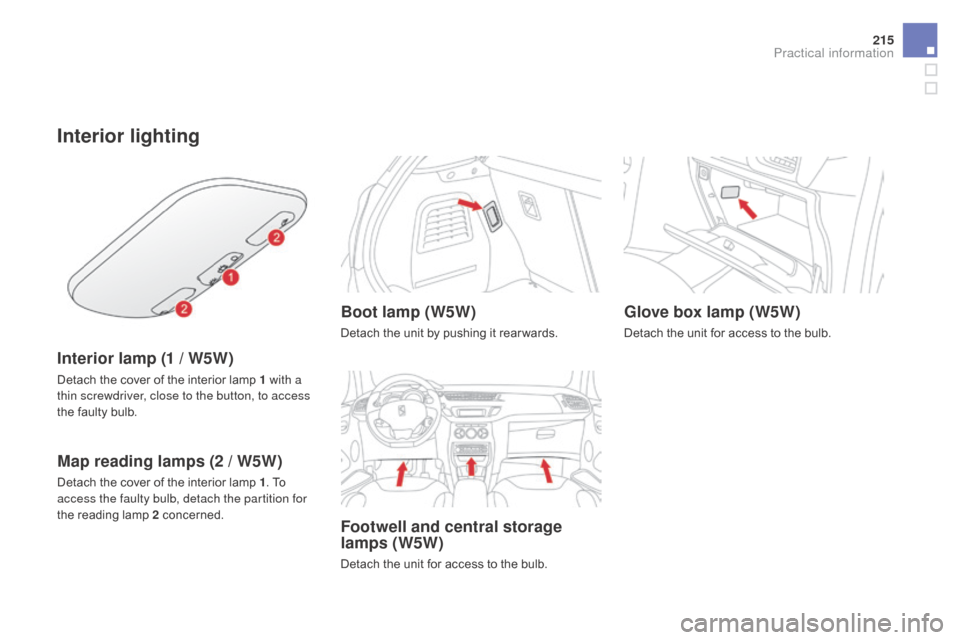
Interior lighting
Interior lamp (1 / W5W)
Detach the cover of the interior lamp 1 with a
t hin screwdriver, close to the button, to access
the
faulty bulb.
Map reading lamps (2 / W5W)
Detach the cover of the interior lamp 1. To a
ccess the faulty bulb, detach the partition for
the
reading lamp 2
c
oncerned.
Boot lamp (W5W)
Detach the unit by pushing it rear wards.
Footwell and central storage
lamps (W5W)
Detach the unit for access to the bulb.
glove box lamp (W5W)
Detach the unit for access to the bulb.
Practical information
Page 237 of 415
235
DS3_en_Chap08_info-pratiques_ed01-2015
"Multimedia":
hands-free system, audio systems, semi-
i ntegral satellite navigation system, portable
n
avigation systems, mapping updates, driving
a
ssistant system, DVD player, reversing
c
amera, USB Box, speakers, Hi-Fi module,
2
30V socket, telephone/smartphone carrier,
r
ear multimedia carrier... By
visiting a CITROËN dealer, you can also o
btain cleaning and maintenance products (
interior and exterior) - including ecological
p
roducts from the "TECHNATURE" range,
p
roducts for topping up (screenwash fluid...),
t
ouch-up pens and paint aerosols for the exact
c
olour of your vehicle, refills (cartridge for the
t
emporary puncture repair kit...), ...
Installation of radio
communication transmitters
Before installing any after-market radio communication transmitter, you can
c
ontact a CITROËN dealer for the
specification
of transmitters which can
b
e fitted (frequency, maximum power,
a
erial position, specific installation
requirements),
in line with the Vehicle
E
lectromagnetic
C
ompatibility
D
irective (2004/104/EC). The
fitting of electrical equipment
o
r accessories which are not
recommended by CITROËN may result i
n a failure of your vehicle's electronic
s
ystem and excessive electrical
c
onsumption.
Contact a CITROËN dealer
for
information on the range of
r
ecommended equipment and
a
ccessories.
Depending
on the legislation in force in
t
he country, certain safety equipment m
ay be compulsory: high visibility s
afety vests, warning triangles,
b
reathalyzers, spare bulbs, spare
fuses,
fire extinguisher, first aid kit,
m
ud flaps at the rear of the vehicle.
Practical information