stop start CITROEN DS3 CABRIO 2014 Handbook (in English)
[x] Cancel search | Manufacturer: CITROEN, Model Year: 2014, Model line: DS3 CABRIO, Model: CITROEN DS3 CABRIO 2014Pages: 384, PDF Size: 11.85 MB
Page 231 of 384
229Practical information
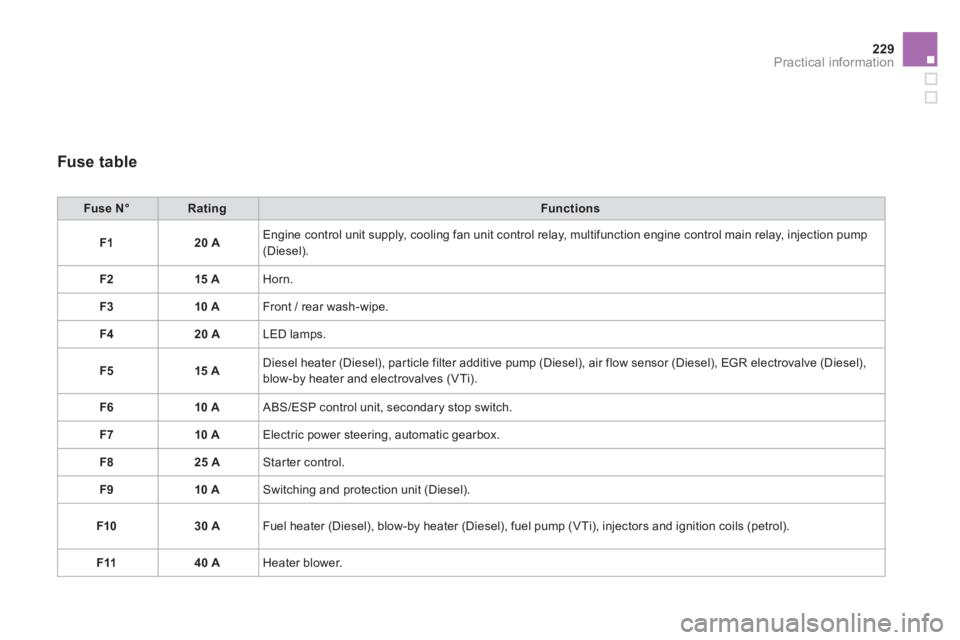
Fuse table
Fuse N°RatingFunctions
F120 A
Engine control unit supply, cooling fan unit control relay, multifunction engine control main relay, injection pump(Diesel).
F
215 A Horn.
F
310 A Front / rear wash-wipe.
F420 A LED lamps.
F5
15 A Diesel heater (Diesel), particle filter additive pump (Diesel), air flow sensor (Diesel), EGR electrovalve (Diesel),
blow-by heater and electrovalves (VTi).
F
610 A ABS/ESP control unit, secondary stop switch.
F
710 A Electric power steering, automatic gearbox.
F8
25 A Starter control.
F
910 A Switching and protection unit (Diesel).
F10 30 A
Fuel heater
(Diesel), blow-by heater (Diesel), fuel pump (VTi), injectors and ignition coils (petrol).
F1140 A Heater blower.
Page 234 of 384
Battery Procedure for charging your battery when it is flat or for starting the engine using another battery.
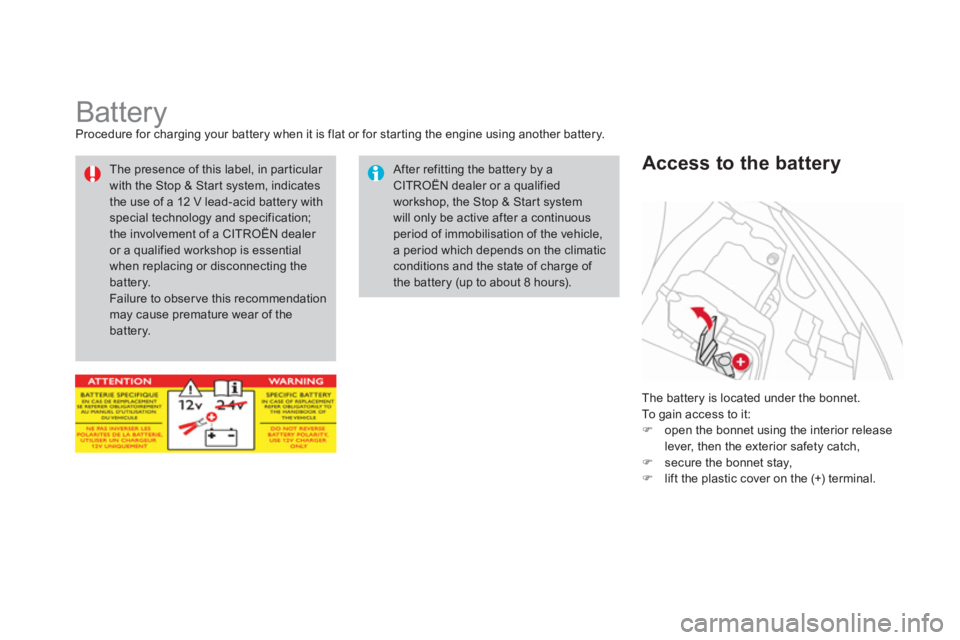
The battery is located under the bonnet.
To gain access to it:
�)
open the bonnet using the interior release
lever, then the exterior safety catch, �) secure the bonnet stay, �)
lift the plastic cover on the (+) terminal.
Access to the battery
After refitting the battery by aCITROËN dealer or a qualified workshop, the Stop & Start systemwill only be active after a continuous period of immobilisation of the vehicle, a period which depends on the climatic conditions and the state of charge of the battery (up to about 8 hours).
The presence of this label, in particular with the Stop & Start system, indicatesthe use of a 12 V lead-acid battery withspecial technology and specification;the involvement of a CITROËN dealer or a qualified workshop is essential when replacing or disconnecting thebattery. Failure to observe this recommendation may cause premature wear of thebattery.
Page 237 of 384
235
Practical information
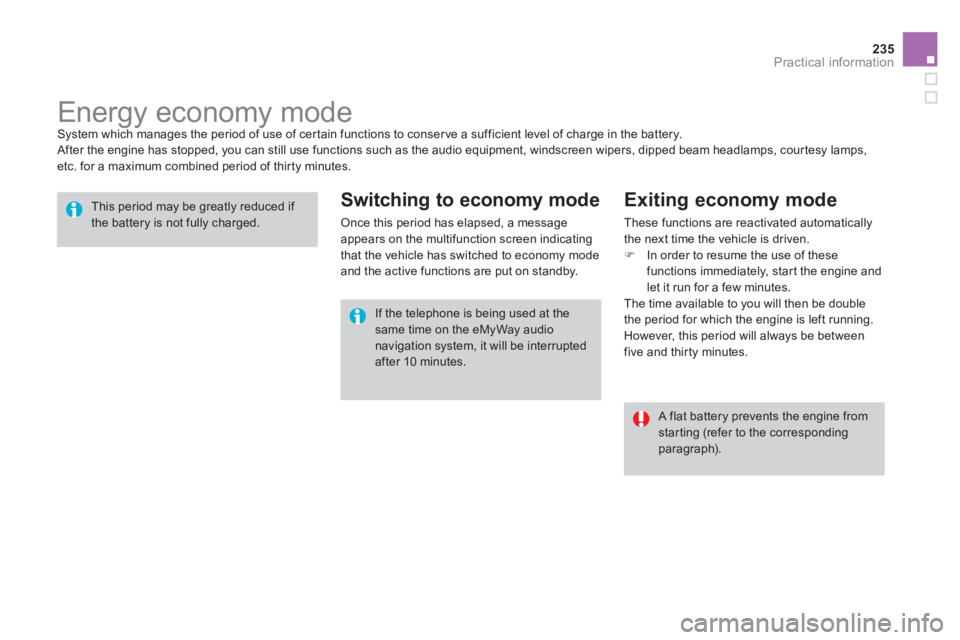
Energy economy mode System which manages the period of use of cer tain functions to conser ve a sufficient level of charge in the battery.
After the engine has stopped, you can still use functions such as the audio equipment, windscreen wipers, dipped beam headlamps, cour tesy lamps,etc. for a maximum combined period of thir ty minutes.
This period may be greatly reduced if the battery is not fully charged.
A flat battery prevents the engine from starting (refer to the correspondingparagraph).
If the telephone is being used at thesame time on the eMyWay audionavigation system, it will be interrupted after 10 minutes.
Switching to economy mode
Once this period has elapsed, a message appears on the multifunction screen indicating
that the vehicle has switched to economy mode and the active functions are put on standby.
Exiting economy mode
These functions are reactivated automatically
the next time the vehicle is driven. �) In order to resume the use of thesefunctions immediately, star t the engine and
let it run for a few minutes.
The time available to you will then be double
the period for which the engine is left running. However, this period will always be between five and thir ty minutes.
Page 250 of 384
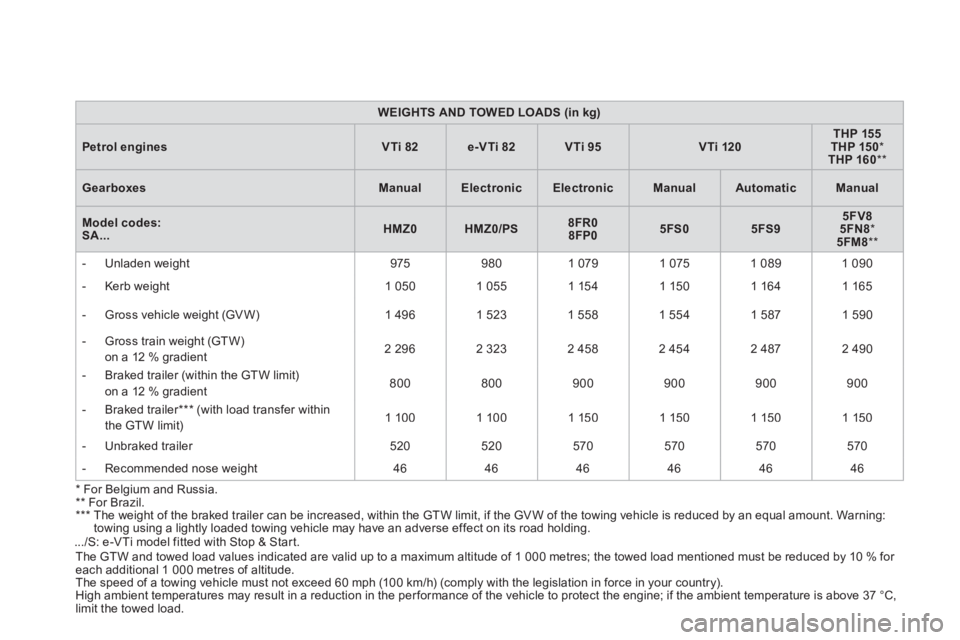
*For Belgium and Russia. **
For Brazil.***
The weight of the braked trailer can be increased, within the GTW limit, if the GVW of the towing vehicle is reduced by an equal amount. Warning:
towing using a lightly loaded towing vehicle may have an adverse effect on its road holding.
.../S: e-VTi model fitted with Stop & Start.
The GTW and towed load values indicated are valid up to a maximum altitude of 1 000 metres; the towed load mentioned must be reduced by 10 % for each additional 1 000 metres of altitude.
The speed of a towing vehicle must not exceed 60 mph (10 0 km/h) (comply with the legislation in force in your country).
High ambient temperatures may result in a reduction in the per formance of the vehicle to protect the engine; if the ambient temperature is above 37 °C,
limit the towed load.
WEIGHTS AND TOWED LOADS (in kg)
Petrol enginesVTi 82e-VTi 82VTi 95VTi 120THP 155THP 150*THP 160
**
GearboxesManualElectronicElectronicManualAutomaticManual
Model codes: SA...HMZ0HMZ0/PS8FR08FP05FS05FS95FV85FN8*5FM8**
- Unladen weight
975
980 1 079 1 075
1 089 1 090
-
Kerb weight
1 050
1 0551 1541 150
1 164
1 165
- Gross vehicle wei
ght (GV W)
1 4961 523
1 558
1 554 1 587 1 590
-
Gross train weight (GTW) on a 12 % gradient
2 296
2 323
2 458
2 454
2 487 2 490
- Braked trailer
(within the GTW limit) on a 12 % gradient 800
800
900
900
900900
- Braked trailer *** (with load transfer within
the GTW limit)1 100
1 1001 1501 150
1 150
1 150
-
Unbraked trailer
520
520
570
570
570570
-
Recommended nose weight
46
46
46
46
46
46
Page 254 of 384
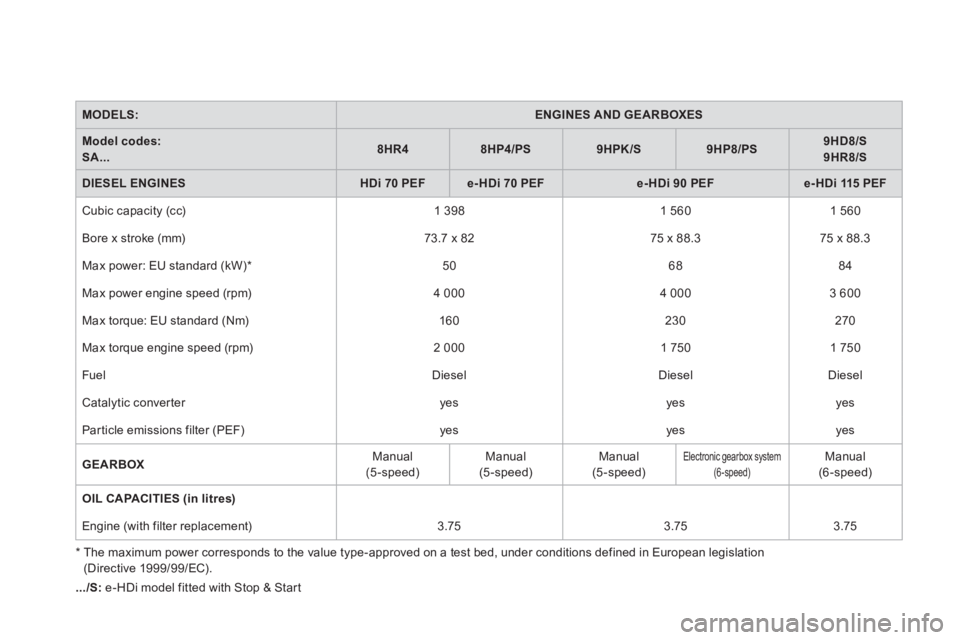
MODELS:ENGINES AND GEARBOXES
Model codes: SA...8HR48HP4/PS9HPK/S9HP8/PS9HD8/S9HR8/S
DIESEL ENGINESHDi 70PEFe- HDi 70 PEFe-HDi 90 PEFe-HDi 115 PEF
Cubic capacity (cc) 1 398
1 560 1 560
Bore x stroke
(mm)
73.7 x 8275 x 88.3
75 x 88.3
Max power: EU standard (kW) * 50
68
84
Max power en
gine speed (rpm)
4 000
4 0003 600
Max torque: EU standard
(Nm) 160
230 270
Max torque en
gine speed (rpm)
2 000
1 7501 750
Fuel Diesel
Diesel
Diesel
Catal
ytic conver ter yes
yes
yes
Particle emissions filter (PEF) yes
yes
yes
GEARBOX
Manual(5-speed)
Manual
(5-speed)
Manual
(5-speed)
Electronic gearbox system (6-speed)
Manual(6-speed)
OIL CAPACITIES (in litres)
Engine (with filter replacement) 3.75 3.75 3.75
.../S
:e-HDi model fitted with Stop & Start
*
The maximum power corresponds to the value type-approved on a test bed, under conditions defined in European legislation (Directive 1999/99/EC).
Page 339 of 384
337
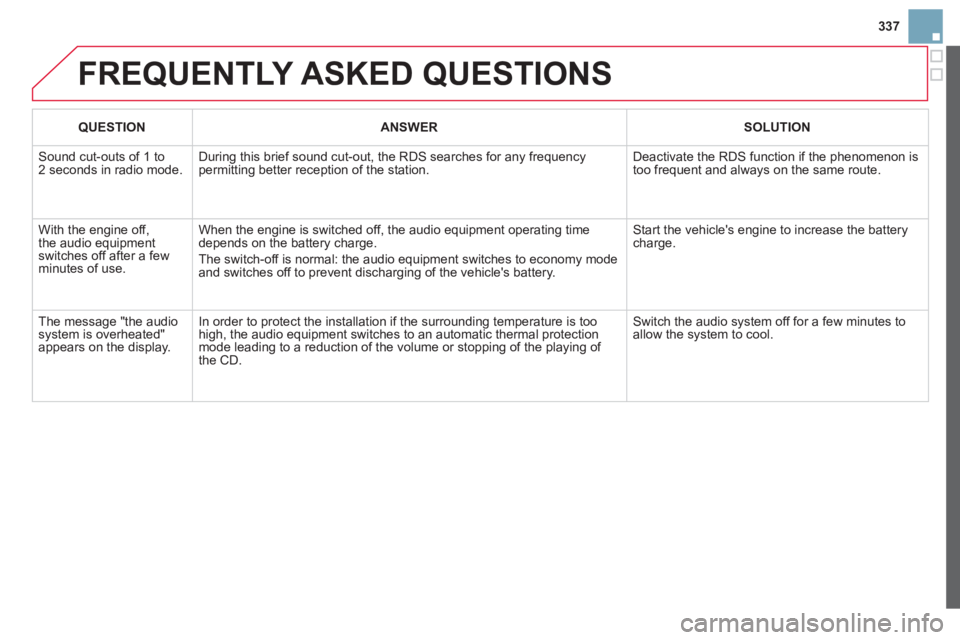
FREQUENTLY ASKED QUESTIONS
QUESTIONANSWERSOLUTION
Sound cut-outs of 1 to2 seconds in radio mode.During this brief sound cut-out, the RDS searches for any frequency permitting better reception of the station.
Deactivate the RDS function if the phenomenon is too frequent and always on the same route.
With the engine off, the audio equipment switches off after a few minutes of use.
When the engine is switched off, the audio equipment operating timedepends on the battery charge.
The switch-off is normal: the audio equipment switches to economy mode and switches off to prevent discharging of the vehicle's battery.
Start the vehicle's engine to increase the batterycharge.
The message "the audio system is overheated" appears on the display.
In order to protect the installation if the surrounding temperature is toohigh, the audio equipment switches to an automatic thermal protectionmode leading to a reduction of the volume or stopping of the playing of the CD.
Switch the audio system off for a few minutes toallow the system to cool.
Page 344 of 384
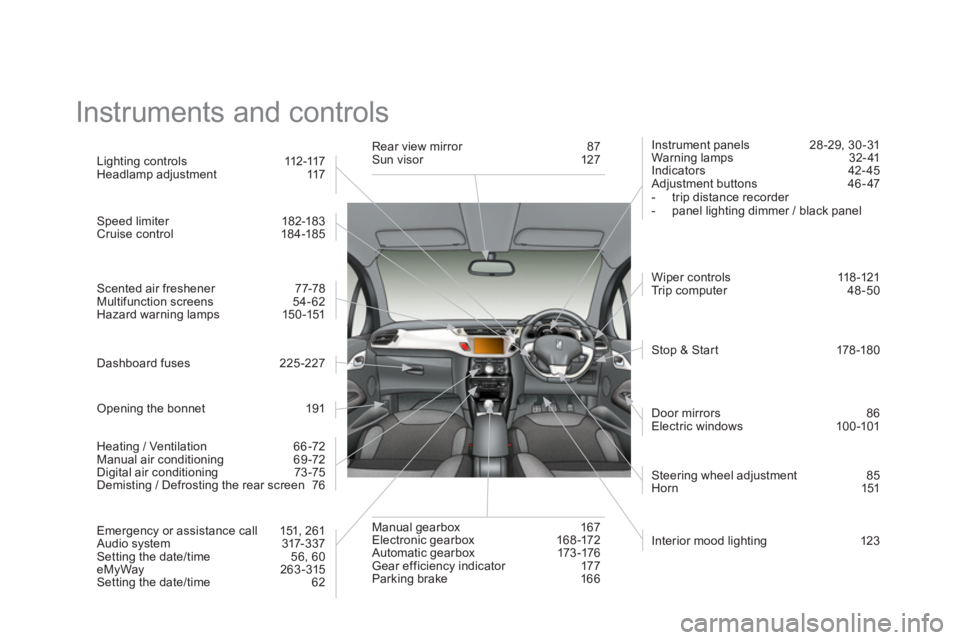
Instruments and controls
Interior mood lighting 123
Li
ghting controls 112-117
Headlamp adjustment 117
Speed limiter 182-183 Cruise control 184-185
Scented air freshener 77-78
Multifunction screens 54-62
Hazard warning lamps 150 -151
Dashboard fuses 225 -227
Opening the bonnet 191
Heatin
g / Ventilation 66 -72
Manual air conditioning 69-72
Digital air conditioning 73-75
Demisting / Defrosting the rear screen 76
Emer
gency or assistance call 151, 261
Audio system 317-337
Setting the date/time 56, 60
eMyWay 263-315 Setting the date/time 62 R
ear view mirror 87 Sun visor 127
Manual
gearbox 167
Electronic gearbox 168-172
Automatic gearbox 173-176 Gear efficiency indicator 177
Parking brake 166 Instrument
panels 28 -29, 30 -31
Warning lamps 32- 41
Indicators 42- 45
Adjustment buttons 46 - 47
- trip distance recorder
- panel lighting dimmer / black panel
Wi
per controls 118-121
Tr ip computer 48-50
Stop & Start 178-180
Door mirrors
86
Electric windows 100-101
Steerin
g wheel adjustment 85
Horn 151
Page 349 of 384
347
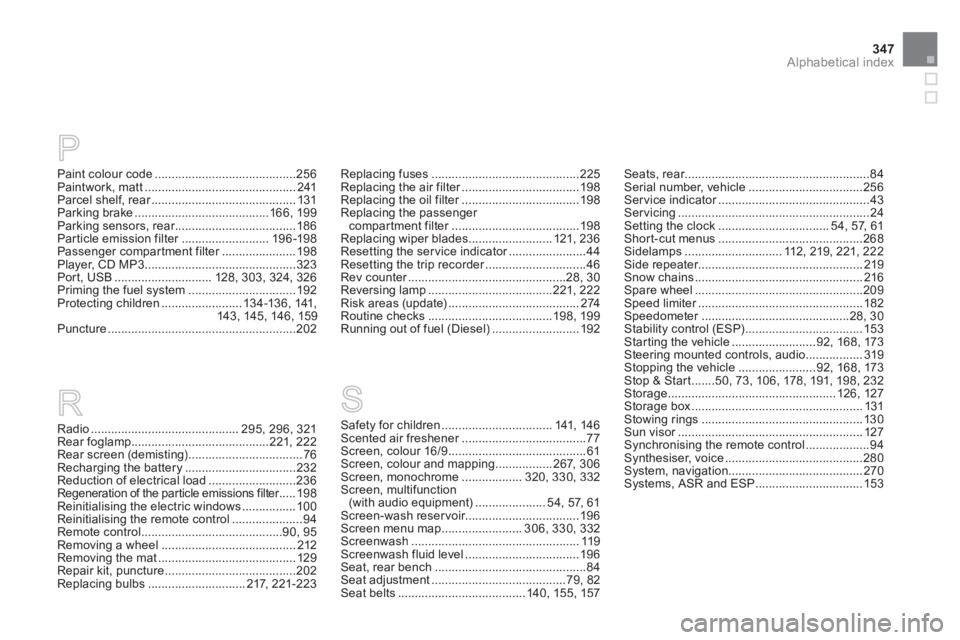
Alphabetical index
R P
Paint colour code..........................................256Paintwork, matt.............................................241Parcel shelf, rear...........................................r131Parking brake........................................166, 199Parking sensors, rear....................................r186Particle emission filter..........................r196-198Passenger compartment filter......................r198Player, CD MP3.............................................323Port, USB.............................128, 303, 324,326Priming the fuel system................................192Protecting children........................134-136, 141,143,145, 146, 159Puncture........................................................202
Radio............................................295,296,321Rear foglamp.........................................221, 222Rear screen (demisting)..................................76Recharging the battery.................................232Reduction of electrical load..........................236Regeneration of the particle emissions filter.....r198Reinitialising the electric windows ................ 100Reinitialising the remote control .....................94Remote control..........................................90,95Removing a wheel........................................212Removing the mat.........................................129Repair kit, puncture.......................................202Replacing bulbs .............................217, 221-223
Safety for children.................................141,146Scented air freshener.....................................r77Screen, colour 16/9.........................................61Screen, colour and mapping.................267,306Screen, monochrome ..................320, 330, 332Screen, multifunction (with audio equipment).....................54,57,61Screen-wash reservoir.................................. 196Screen menu map........................306, 330, 332Screenwash..................................................119Screenwash fluid level..................................196Seat, rear bench.............................................84Seat adjustment........................................79, 82Seat belts ......................................140,155,157
S
Replacing fuses............................................225Replacing the air filter...................................r198Replacing the oil filter...................................r198Replacing the passengercompartment filter......................................r198Replacing wiper blades .........................121, 236Resetting the service indicator.......................r44Resetting the trip recorder..............................r46Rev counter...............................................r28, 30Reversing lamp.....................................221,222Risk areas (update).......................................274Routine checks.....................................198,199Running out of fuel (Diesel) ..........................192
Seats, rear.......................................................r84Serial number, vehicle..................................256Ser vice indicator.............................................r43Servicing.........................................................24Setting the clock.................................54, 57, 61Shor t-cut menus ...........................................268Sidelamps ............................. 112, 219, 221, 222Side repeater.................................................219Snow chains..................................................216Spare wheel..................................................209Speed limiter.................................................r182Speedometer............................................r28,30Stability control (ESP) ...................................153Starting the vehicle .........................92,168, 173Steering mounted controls, audio.................319Stopping the vehicle .......................92,168, 173Stop & Start.......50, 73,106,178,191, 198, 232Storage..................................................126,127Storage box...................................................131Stowing rings................................................130Sun visor.......................................................r127Synchronising the remote control...................94Synthesiser, voice .........................................280System, navigation ........................................270Systems, ASR and ESP ................................153
Page 361 of 384

3Access
In order to maintain the state of charge of
the battery, it is recommended that the roof
be operated with the engine running
.
Operation of the roof is possible:
- engine running, or
- ignition on.
During operation of the roof with just
the ignition on, starting the engine may
cause the roof to stop, depending on
the state of charge of the battery. To
have the roof continue the operation,
operate the control again after the
engine has started.
Operating zones
There are two operating zones:
Zone A
: horizontal operating zone, in manual
or automatic mode.
Zone B
: vertical operating zone, in automatic
mode only.
Before operating the roof, ensure that no occupant of the vehicle or person outside the
vehicle could be subject to any risk related to the movement of the roof or the rear screen
and that no object could inter fere with the operation.
Roof positions
Position 0
: Roof completely closed.
Position 1
: Stop position for automatic roof
closing.
Position 2
: Roof open horizontally.
Position 3
: Roof completely open.
Page 366 of 384
8Access
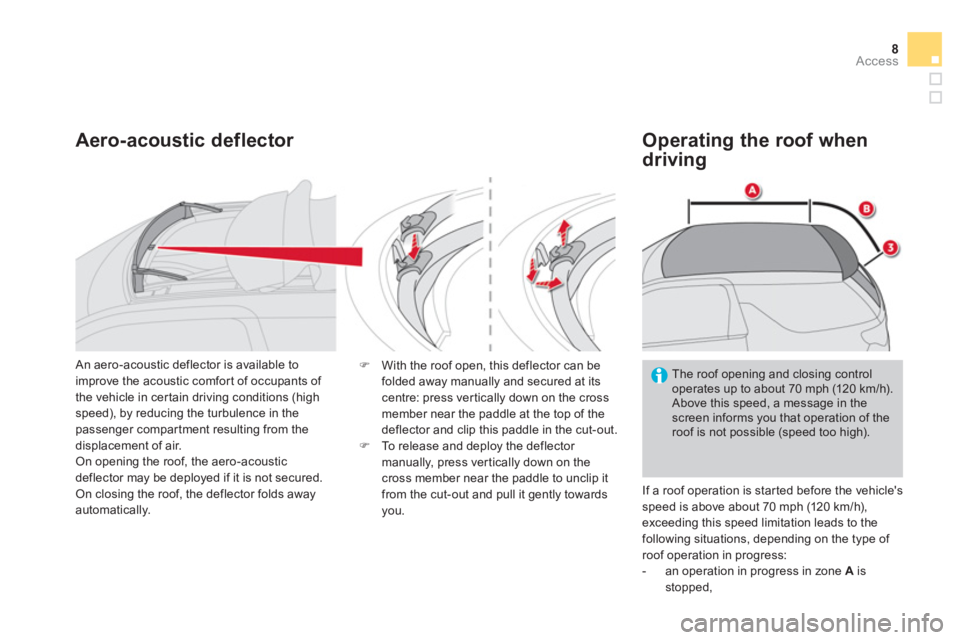
Aero-acoustic deflector
Operating the roof when
driving
If a roof operation is started before the vehicle's
speed is above about 70 mph (120 km/h),
exceeding this speed limitation leads to the
following situations, depending on the type of
roof operation in progress:
- an operation in progress in zone A
is
stopped,
The roof opening and closing control
operates up to about 70 mph (120 km/h).
Above this speed, a message in the
screen informs you that operation of the
roof is not possible (speed too high). An aero-acoustic deflector is available to
improve the acoustic comfort of occupants of
the vehicle in certain driving conditions (high
speed), by reducing the turbulence in the
passenger compartment resulting from the
displacement of air.
On opening the roof, the aero-acoustic
deflector may be deployed if it is not secured.
On closing the roof, the deflector folds away
automatically.
�)
With the roof open, this deflector can be
folded away manually and secured at its
centre: press vertically down on the cross
member near the paddle at the top of the
deflector and clip this paddle in the cut-out.
�)
To release and deploy the deflector
manually, press vertically down on the
cross member near the paddle to unclip it
from the cut-out and pull it gently towards
you.