height CITROEN DS3 CABRIO DAG 2016 Handbook (in English)
[x] Cancel search | Manufacturer: CITROEN, Model Year: 2016, Model line: DS3 CABRIO DAG, Model: CITROEN DS3 CABRIO DAG 2016Pages: 458, PDF Size: 14.51 MB
Page 13 of 458
11
DS3_en_Chap00b_vue-ensemble_ed01-2015
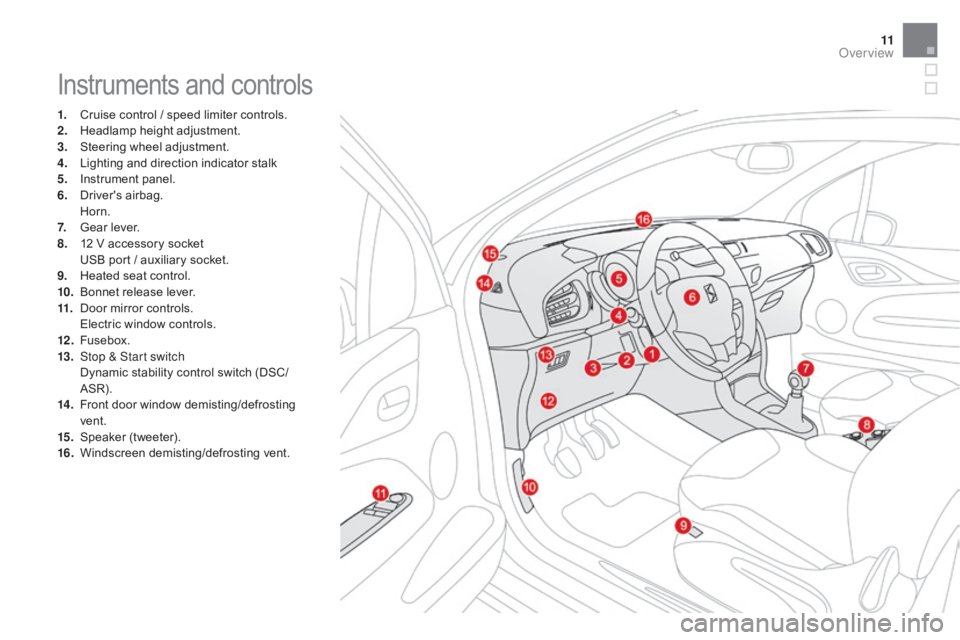
Instruments and controls
1. Cruise control / speed limiter controls.
2. H eadlamp height adjustment.
3.
S
teering wheel adjustment.
4.
L
ighting and direction indicator stalk
5.
I
nstrument panel.
6.
D
river's
ai
rbag.
H
orn.
7.
G
ear lever.
8.
1
2 V accessory socket
U
SB port / auxiliary socket.
9.
H
eated seat control.
10.
B
onnet release lever.
11.
D
oor mirror controls.
E
lectric window controls.
12 .
F
usebox.
13.
S
top & Start switch
D
ynamic stability control switch (DSC/
ASR).
14 .
F
ront door window demisting/defrosting
ve
nt.
15.
S
peaker
(
tweeter).
16.
W
indscreen
d
emisting/defrosting
v
ent.
Over view
Page 74 of 458
DS3_en_Chap03_confort_ed01-2015
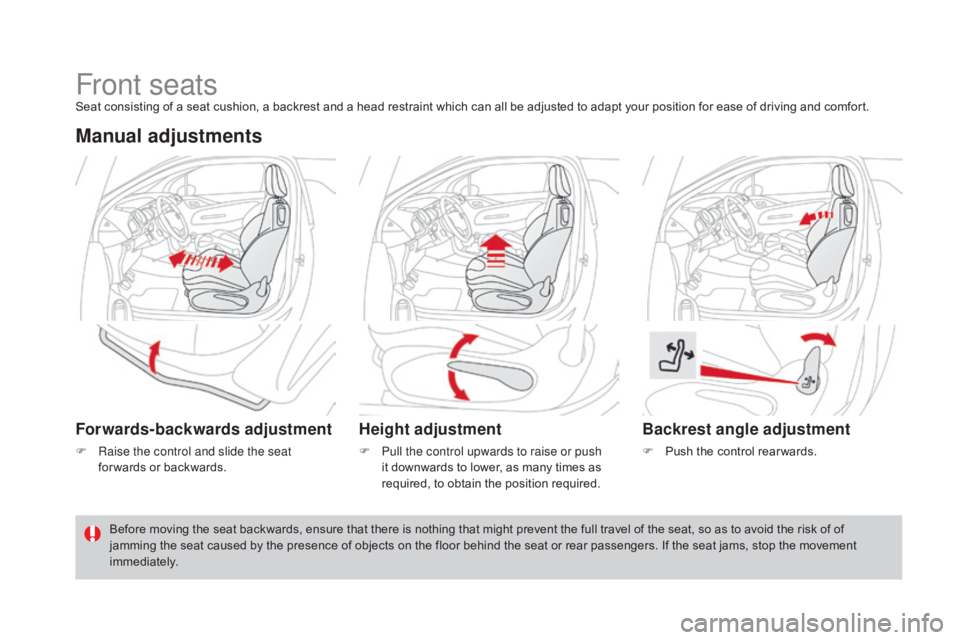
Front seatsSeat consisting of a seat cushion, a backrest and a head restraint which can all be adjusted to adapt your position for ease of driving and comfort.
Manual adjustments
Forwards-backwards adjustment
F Raise the control and slide the seat for wards or backwards.
Height adjustment
F Pull the control upwards to raise or push it downwards to lower, as many times as
r
equired, to obtain the position required.
Backrest angle adjustment
F Push the control rear wards.
Before
moving
the
seat
backwards,
ensure
that
there
is
nothing
that
might
prevent
the
full
travel
of the seat, so as to avoid the risk of of
j
amming
the
seat
caused
by
the
presence
of
objects
on
the
floor
behind
the
seat
or
rear
passengers. If the seat jams, stop the movement
i
mmediately.
Page 75 of 458
73
DS3_en_Chap03_confort_ed01-2015
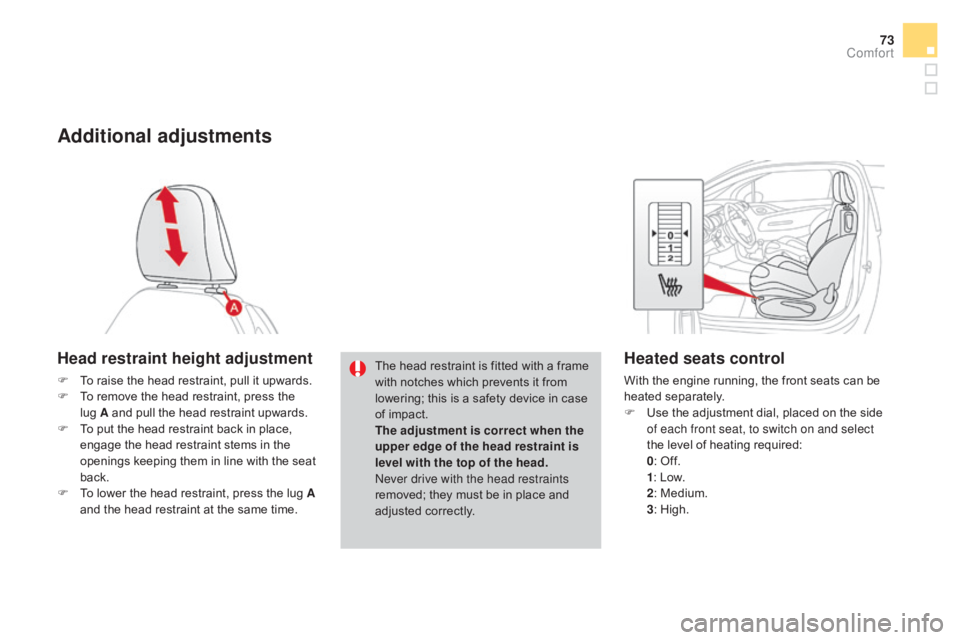
Additional adjustments
Head restraint height adjustment
F To raise the head restraint, pull it upwards.
F T o remove the head restraint, press the
l
ug A and pull the head restraint upwards.
F
T
o put the head restraint back in place,
e
ngage the head restraint stems in the
o
penings keeping them in line with the seat
b
ack.
F
T
o lower the head restraint, press the lug A
and
the head restraint at the same time.The
head restraint is fitted with a frame w
ith notches which prevents it from
l
owering; this is a safety device in case
o
f impact.
The adjustment is correct when the
upper edge of the head restraint is
level with the top of the head.
Never drive with the head restraints
removed;
they must be in place and
adj
usted
c
orrectly.
Heated seats control
With the engine running, the front seats can be heated s eparately.
F
U
se the adjustment dial, placed on the side
o
f each front seat, to switch on and select
the
level of heating required:
0:
Off.
1:
Low.
2:
Medium.
3:
High.
Comfort
Page 77 of 458
75
DS3_en_Chap03_confort_ed01-2015
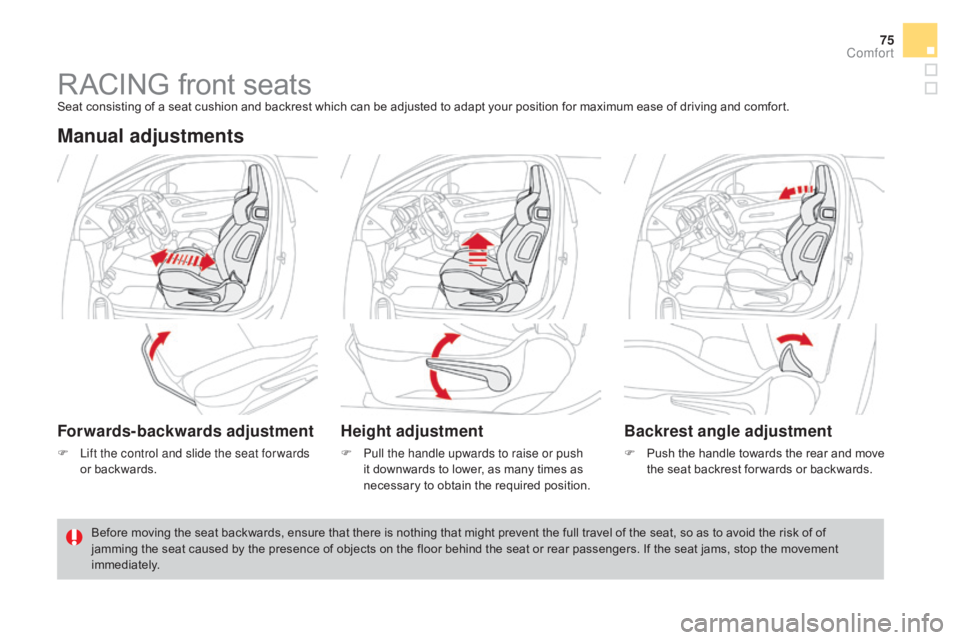
RACING front seatsSeat consisting of a seat cushion and backrest which can be adjusted to adapt your position for maximum ease of driving and comfort.
Manual adjustments
Forwards-backwards adjustment
F Lift the control and slide the seat for wards or backwards.
Height adjustment
F Pull the handle upwards to raise or push it downwards to lower, as many times as
n
ecessary to obtain the required position.
Backrest angle adjustment
F Push the h andle t owards t he r ear a nd m ove t
he seat backrest for wards or backwards.
Before
moving
the
seat
backwards,
ensure
that
there
is
nothing
that
might
prevent
the
full
travel
of the seat, so as to avoid the risk of of
j
amming
the
seat
caused
by
the
presence
of
objects
on
the
floor
behind
the
seat
or
rear
passengers. If the seat jams, stop the movement
i
mmediately.
Comfort
Page 80 of 458
DS3_en_Chap03_confort_ed01-2015
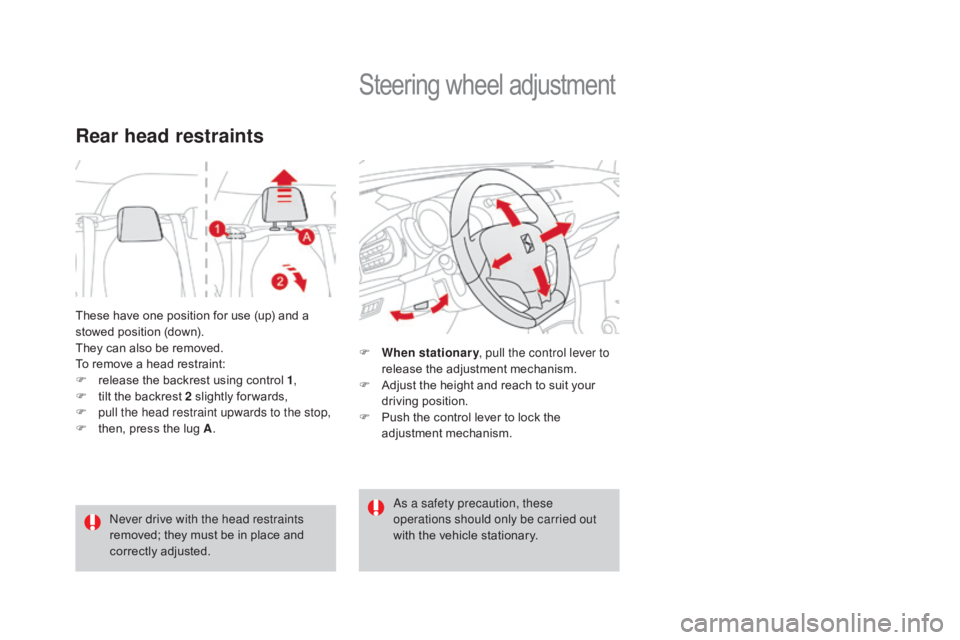
These have one position for use (up) and a stowed position (down).
They
can also be removed.
To
remove a head restraint:
F
r
elease the backrest using control 1,
F
t
ilt the backrest 2 slightly for wards,
F
p
ull the head restraint upwards to the stop,
F
t
hen, press the lug A.
Rear head restraints
Never drive with the head restraints
removed;
they must be in place and
c
orrectly
adj
usted.
Steering wheel ad justment
F When stationary , pull the control lever to
release the adjustment mechanism.
F
A
djust the height and reach to suit your
d
riving position.
F
P
ush the control lever to lock the
a
djustment
m
echanism.
As a safety precaution, these
operations should only be carried out
with
the vehicle stationary.
Page 137 of 458

135
DS3_en_Chap05_visibilite_ed01-2015
Travelling abroad
LEd / Xenon front lamps
For motoring in countries that drive on the other s
ide of the road, it is necessary to adjust the
d
ipped beams so as to not dazzle the drivers of
a
pproaching
v
ehicles.
F
R
aise the bonnet for access to the adjuster
(
one adjuster per headlamp).
F
I
nsert a suitable allen key (not supplied)
i
nto the hexagonal head of the adjuster.
F
T
urn the allen key half a turn clockwise.
Headlamp adjustment
To avoid causing a nuisance to other road u
sers, the height of the headlamps should be
a
djusted in relation to the load in the vehicle.
0.
D
river only or driver + front passenger.
-.
I
ntermediate
s
etting.
1.
5
people.
-.
5
people + load in the boot.
2.
D
river only + maximum authorised load in
t
he boot.
This
position is sufficient to avoid causing
d
azzle.
Higher
settings may limit the spread of light
f
rom the headlamps.
The
initial setting is position "0". On
your return, don't forget to
a
djust your headlamps back to their
i
nitial setting, by carrying out these
o
perations in reverse order.
Visibility
Page 177 of 458
175
DS3_en_Chap07_securite-enfants_ed01-2015
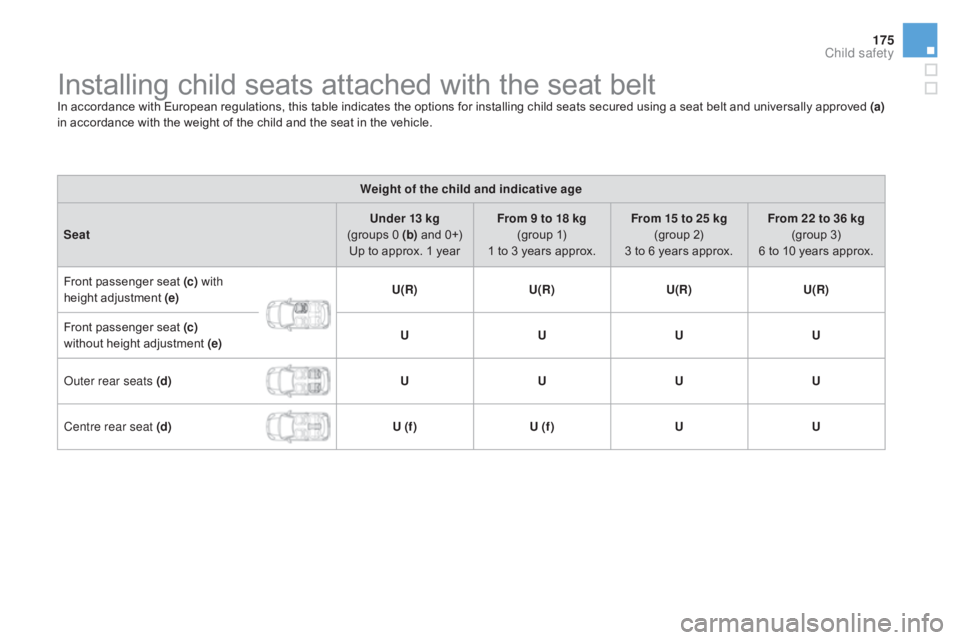
Installing child seats attached with the seat beltIn accordance w ith European regulations, t his t able i ndicates t he o ptions for i nstalling c hild s eats s ecured using a seat b elt and u niversally approved (a)
in accordance with the weight of the child and the seat in the vehicle.
Weight of the child and indicative age
Seat Under 13 kg
(groups
0 (b) and 0+)
Up
to approx. 1 yearFrom 9 to 18 kg
(group
1)
1
to 3 years approx.From 15 to 25 kg
(group
2)
3
to 6 years approx.From 22 to 36 kg
(group
3)
6
to 10 years approx.
Front
p
assenger
sea
t
(c)
with
height
adjustment (e) U(R)
U(R)U(R)U(R)
Front
p
assenger
sea
t
(c)
without
height adjustment (e) U
UUU
Outer rear seats (d) UUUU
Centre rear seat (d) U (f )U (f ) UU
Child safety
Page 359 of 458

357
DS3_en_Chap12_index-recherche_ed01-2015
EBA (Emergency braking assistance) .....15 0, 151
Eco-driving ...............................
......................14
Economy
mode
...............................
..............226
Electric window controls
................................. 64
E
lectronic brake force distribution (EBFD)
...15
0
Electronic
eng
ine
i
mmobiliser.................63, 101
Emergency
b
oot
r
elease
................................. 69
E
mergency braking system
..........................1
51
Emergency
c
all
..................................... 14
5, 26 6
Emergency
w
arning
lam
ps
...........................14
4
Emissions
control system, SCR
......3
3, 34, 188
Energy
economy mode
.................................2
26
Engine
c
ompartment
............................ 24
0, 241
Engine
c
ompartment
f
usebox
.......................2
19
Engine,
Diesel
......................... 2
4, 185, 241, 258
Engine
oil
...................................................... 2
42
Engine
oil level indicator
.........................3
9, 242
Engine,
petrol
....................... 1
85, 240, 250, 253
Environment
............... 1
4, 63, 90, 146, 194, 245
Equipment
se
ttings
.....................4
2, 45, 51, 343
Filling
with fuel
...................................... 18
4 -18 6
Fitting
a wheel
...............................
................205
Fittings,
boot
................................................... 96
F
lashing
in
dicators
........................................ 14
4
Foglamps,
f
ront
...............................
......13 2 , 2 11
Foglamps,
re
ar
...................................... 13
2, 213
Fragrance
c
artridge
........................................ 90
F
requency (radio)
................................. 29
4, 295
Front seats
..............................
..................72, 75
Fuel .......................................................... 14, 18 5
Fuel
c
onsumption
............................................ 14
F
uel filler flap
......................................... 18
4, 18 6
Gearbox, automatic ................1 4, 111, 225, 247
Gearbox, e lectronic ........1
4, 106, 116, 225, 247
Gearbox,
m
anual
.................... 1
4, 105, 116, 247
Gear
lever, automatic gearbox
.....................111
G
ear lever, manual gearbox
.........................10
5
Gear
selector,
electronic
ge
arbox
.............................. 1
06, 247
Gear
shift indicator
....................................... 11
5
Glove
box
........................................................ 93
G
rab
han
dles
............................................ 74
, 76
Halogen headlamps ......................................20 8
Hands-free kit .............................. .320, 321, 340
Hazard
w
arning
lam
ps
.................................. 14
4
Head restraints, front
...................................... 73
H
ead restraints, rear
....................................... 77
H
eated seats
...............................
....................73
Heating
................
............................... 83, 84, 86
Height
and reach adjustment,
steering
w
heel
..............................
................78
Hill start assist
............................................... 11
9
Horn ............................................................... 145
Fuel
gauge
........................................
18
, 20, 18 4
Fuel tank................................................
18 4, 18 6
Fusebox,
das
hboard
.....................................
2
17
Fuses
................
.............................................
216Indicators, direction
......................................
14
4
Inflating accessories (using the kit)
..............
19
8
Inflating tyres
..............................
............
14, 26 0
Instrument panel lighting
................................
41
In
strument
p
anels
...............................
......
18, 20
Instrument panel screen
...................
1
8, 20, 115
Interior
f
ittings
...........................................
9
2, 93
Interior lamp
...............................
...................
140
Interior
m
ood
l
ighting
....................................
1
41
Internet
...............
...................................
310, 311
ISOFIX
...............
....................................
178 -18 0
ISOFIX
m
ountings
................................. 178 , 18 0
Jack ............................................................... 200
Jack cable ............................................ 2
98, 337
JACK
socket
...............................
....94, 298, 337
Jukebox
...............
.......................................... 301
Keeping
children safe
...........1
59, 162, 166 -180
Key
in ignition warning
..................................10
3
Key
with remote control
....................6
0 - 63, 101
Labels, identification .....................................2 62
Lamps, front .......................................... 20
8, 210
Lamps,
re
ar
...............................
....................212
Alphabetical index