brake CITROEN DS3 CABRIO DAG 2018 Handbook (in English)
[x] Cancel search | Manufacturer: CITROEN, Model Year: 2018, Model line: DS3 CABRIO DAG, Model: CITROEN DS3 CABRIO DAG 2018Pages: 248, PDF Size: 8.79 MB
Page 158 of 248
156
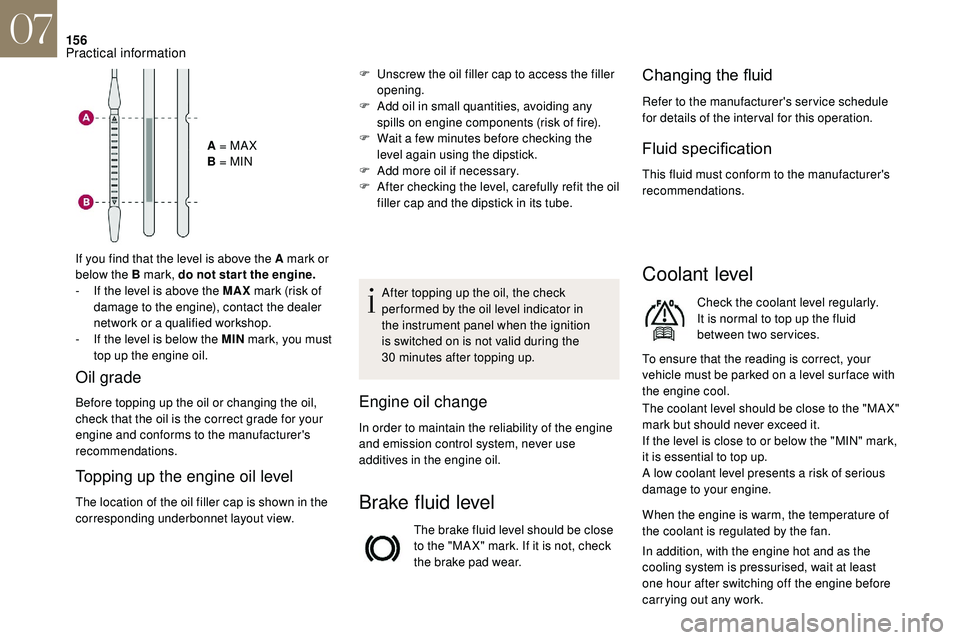
A = MA X
B = MIN
If you find that the level is above the A mark or
below the B mark, do not star t the engine.
-
I
f the level is above the MAX mark (risk of
damage to the engine), contact the dealer
network or a
qualified workshop.
-
I
f the level is below the MIN mark, you must
top up the engine oil.
Topping up the engine oil level
The location of the oil filler cap is shown in the
corresponding underbonnet layout view. After topping up the oil, the check
per formed by the oil level indicator in
the instrument panel when the ignition
is switched on is not valid during the
30
minutes after topping up.
Engine oil change
In order to maintain the reliability of the engine
and emission control system, never use
additives in the engine oil.
Brake fluid level
The brake fluid level should be close
to the "MA X" mark. If it is not, check
the brake pad wear.
Changing the fl
uid
Refer to the manufacturer's service schedule
for details of the inter val for this operation.
Fluid specification
This fluid must conform to the manufacturer's
recommendations.
Coolant level
Check the coolant level regularly.
It is normal to top up the fluid
between two services.
To ensure that the reading is correct, your
vehicle must be parked on a
level sur face with
the engine cool.
The coolant level should be close to the "MA X"
mark but should never exceed it.
If the level is close to or below the "MIN" mark,
it is essential to top up.
A low coolant level presents a
risk of serious
damage to your engine.
When the engine is warm, the temperature of
the coolant is regulated by the fan.
F
U
nscrew the oil filler cap to access the filler
opening.
F
A
dd oil in small quantities, avoiding any
spills on engine components (risk of fire).
F
W
ait a
few minutes before checking the
level again using the dipstick.
F
A
dd more oil if necessary.
F
A
fter checking the level, carefully refit the oil
filler cap and the dipstick in its tube.
Oil grade
Before topping up the oil or changing the oil,
check that the oil is the correct grade for your
engine and conforms to the manufacturer's
recommendations.
In addition, with the engine hot and as the
cooling system is pressurised, wait at least
one hour after switching off the engine before
carrying out any work.
07
Practical information
Page 160 of 248
158
Air filter
Depending on the environment
(e.g. dusty atmosphere) and the
use of the vehicle (e.g. city driving),
replace it twice as often if
necessary.
Passenger compartment filter
Depending on the environment
(e.g. dusty atmosphere) and the
use of the vehicle (e.g. city driving),
replace it twice as often if
necessary.
A clogged passenger compartment
filter may have an adverse effect on
the per formance of the air conditioning
system and generate undesirable odours.
Oil filter
Replace the oil filter each time the
engine oil is changed.
Particle filter (Diesel)
The start of saturation of the particle
filter is indicated by the temporary
illumination of this warning lamp
accompanied by the display of
a
message.
As soon as the traffic conditions permit,
regenerate the filter by driving at a
speed of at
least 40
mph (60 km/h) until the warning lamp
goes off.
If the warning lamp stays on, this indicates
a
low Diesel additive level.
For more information on Checking levels ,
refer to the corresponding section.
On a
new vehicle, the first particle
filter regeneration operations may be
accompanied by a "burning" smell, which
is per fectly normal.
Following prolonged operation of the
vehicle at very low speed or at idle,
you may, in exceptional circumstances,
notice the emission of water vapour at the
exhaust on acceleration. This does not
affect the behaviour of the vehicle or the
environment.
Manual gearbox
The gearbox does not require any
maintenance (no oil change).
Electronic gearbox
The gearbox does not require any
maintenance (no oil change).
Automatic gearbox
The gearbox does not require any
maintenance (no oil change).
Parking brake
If excessive travel or a loss of
e ffectiveness of this system is
noticed, the parking brake must
be checked, even between two
services.
This system must be checked in the dealer
network or by a
qualified workshop.
07
Practical information
Page 161 of 248
159
Brake pads
Brake wear depends on the style
of driving, particularly in the case
of vehicles used in town, over short
distances. It may be necessary to
have the condition of the brakes
checked, even between vehicle
services.
Unless there is a
leak in the circuit, a drop in
the brake fluid level indicates that the brake
pads are worn.
Brake disc/drum wear
For information on checking brake
disc wear, contact the dealer
network or a
qualified workshop. Only use products recommended by
DS
AUTOMOBILES or products of
equivalent quality and specification.
In order to optimise the operation of
components as important as those in
the braking system, DS AUTOMOBILES
selects and offers very specific products.
After washing the vehicle, dampness, or
in wintry conditions, ice can form on the
brake discs and pads: braking efficiency
may be reduced. Make light brake
applications to dry and defrost the brakes.
AdBlue® (BlueHDi
engines)
To respect the environment and ensure
compliance with the Euro 6
standard,
without adversely affecting the performance
or fuel consumption of diesel engines,
DS
AUTOMOBILES has taken the decision to
equip its vehicles with a
system that combines
SCR (Selective Catalytic Reduction) with
a
diesel particle filter (DPF) for the treatment of
exhaust gases.
SCR system
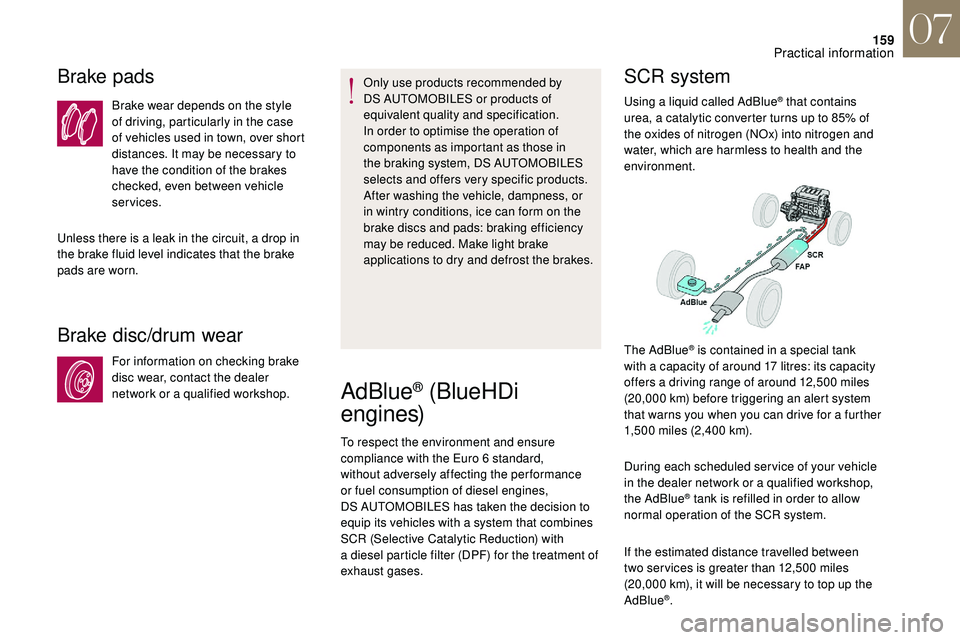
Using a liquid called AdBlue® that contains
urea, a catalytic converter turns up to 85% of
the oxides of nitrogen (NOx) into nitrogen and
water, which are harmless to health and the
environment.
During each scheduled ser vice of your vehicle
in the dealer network or a
qualified workshop,
the AdBlue
® tank is refilled in order to allow
normal operation of the SCR system.
If the estimated distance travelled between
two ser vices is greater than 12,500
miles
(20,000
km), it will be necessary to top up the
AdBlue
®.
The AdBlue
® is contained in a special tank
w
ith a
capacity of around 17 litres: its capacity
offers a
driving range of around 12,500 miles
(20,000
km) before triggering an alert system
that warns you when you can drive for a
further
1,500
miles (2,400 km).
07
Practical information
Page 168 of 248

166
Access to the kit
This kit is installed in the under floor storage,
under the boot floor.
Composition of the kit
1.12 V compressor, with built-in pressure
gauge.
2. Bottle of sealant, with built-in hose.
3. Speed limit sticker.
Repair procedure
F Park the vehicle without obstructing any
traffic and apply the parking brake.
F
F
ollow the safety instructions (hazard
warning lamps, warning triangle, wearing
high visibility vest, etc.) according to the
legislation in force in the country where you
are driving.
F
S
witch off the ignition.
F
U
ncoil the pipe stowed under the
compressor.
Avoid removing any foreign bodies which
have penetrated the tyre. F
R
emove the valve cap from the tyre to be
repaired and keep it in a
clean place.
F
C
onnect the pipe from the compressor to
the bottle of sealant. F
T
urn over the sealant bottle and secure it in
the cut-out provided on the compressor.
F
C
onnect the hose from the bottle of sealant
to the valve of the tyre to be repaired and
tighten firmly.
08
In the event of a breakdown
Page 173 of 248
171
Removing a wheel
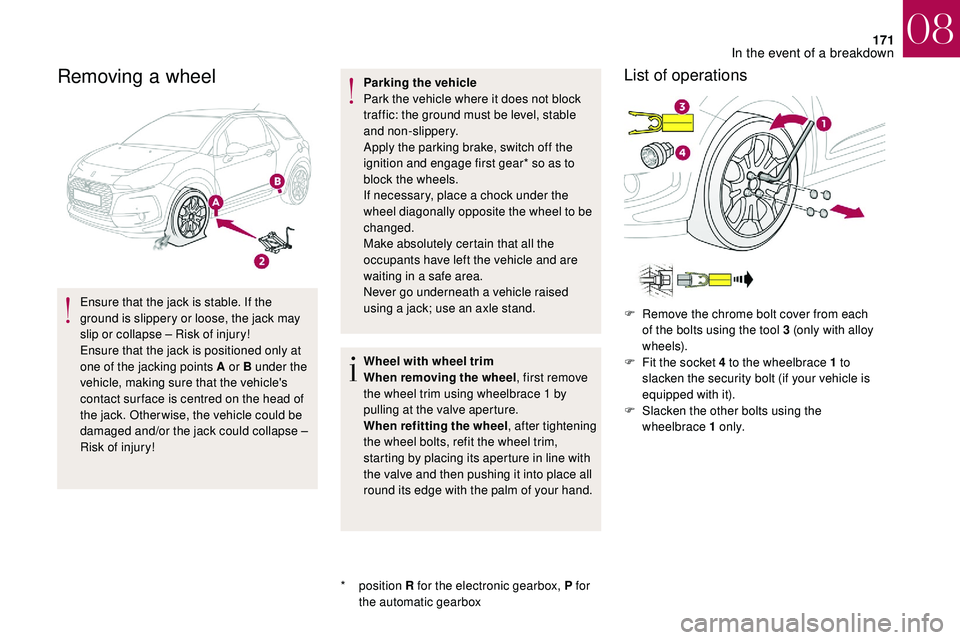
Ensure that the jack is stable. If the
ground is slippery or loose, the jack may
slip or collapse – Risk of injury!
Ensure that the jack is positioned only at
one of the jacking points A or B under the
vehicle, making sure that the vehicle's
contact sur face is centred on the head of
the jack. Otherwise, the vehicle could be
damaged and/or the jack could collapse –
Risk of injury!
*
position R for the electronic gearbox, P for
the automatic gearbox Parking the vehicle
Park the vehicle where it does not block
traffic: the ground must be level, stable
and non-slippery.
Apply the parking brake, switch off the
ignition and engage first gear* so as to
block the wheels.
If necessary, place a
chock under the
wheel diagonally opposite the wheel to be
changed.
Make absolutely certain that all the
occupants have left the vehicle and are
waiting in a safe area.
Never go underneath a vehicle raised
using a jack; use an axle stand.
Wheel with wheel trim
When removing the wheel , first remove
the wheel trim using wheelbrace 1
by
pulling at the valve aperture.
When refitting the wheel , after tightening
the wheel bolts, refit the wheel trim,
starting by placing its aperture in line with
the valve and then pushing it into place all
round its edge with the palm of your hand.
List of operations
F Remove the chrome bolt cover from each of the bolts using the tool 3 (only with alloy
w h e e l s).
F
F
it the socket 4 to the wheelbrace 1 to
slacken the security bolt (if your vehicle is
equipped with it).
F
S
lacken the other bolts using the
wheelbrace 1
o n l y.
08
In the event of a breakdown
Page 178 of 248

176
Integrated direction indicator side
repeaters
Contact the dealer network or a qualified
w orkshop to obtain the module.
LED foglamps
LED daytime running lampsRear lamps
Model with conventional bulb lamps
1. Brake/sidelamps (P21/5W).
2. Sidelamps (P5W).
3. Direction indicators (PY21W amber).
4. Foglamp (PR21W red) or reversing lamp
(P21W ).
Model with rear 3D lamps
F Insert a screwdriver towards the centre of
the repeater between the repeater and the
base of the mirror.
F
L
ever with the screwdriver to extract the
repeater and pull it out.
F
D
isconnect the connector from the repeater.
F
R
eplace the module.
To refit, carry out these operations in reverse
o r d e r. For the replacement of this type of diode
lamp, contact the dealer network or a
qualified
workshop.
For the replacement of this type of diode
lamp, contact the dealer network or a
qualified
workshop. 1.
3D LED sidelamps.
2. LED brake/sidelamps.
08
In the event of a breakdown
Page 180 of 248

178
Ty p e 2
Changing bulbs
Model with conventional bulb lampsModel with rear 3D lamps
Direction indicators (4) and foglamp or
reversing lamp (5)
Replacing LED sidelamps and brake
lamps (diodes)
For the replacement of this type of diode
lamp, contact the dealer network or a
qualified
workshop.
F
T
ip the cover upwards and position the
hooks B under the boot trim.
F
Ra
ise the cover.
F
S
lide the cover so as to put it properly back
in place. F
P
osition the cover in the lower part.
F
T
ip the cover upwards.
F
T
urn the bulb a quarter of a turn and change
it.
F
S
pread the four tabs and remove the bulb
h o l d e r.
F
T
urn the bulb a
quarter turn and change it.
08
In the event of a breakdown
Page 181 of 248

179
Number plate lamps (LED)
Third brake lamp (4 x W5W bulbs)F Push centrally on the lamp body, while levering it with two screwdrivers to extract it
to the outside.
F
D
isconnect the connector and, if necessary,
the lamp screenwash tube.
F
T
urn the bulb holder corresponding to the
faulty bulb a
quarter turn.
F
P
ull the bulb out and change it.
To refit, carry out these operations in reverse
o r d e r.Third brake lamp (LED)
For the replacement of this type of LED lamp,
contact the dealer network or a qualified
workshop.
F
O
pen the boot.
F
R
emove the two blanking plugs A located
on the lining. For the replacement of this type of light emitting
diode lamp, contact the dealer network or
a
qualified workshop.
08
In the event of a breakdown
Page 188 of 248
186
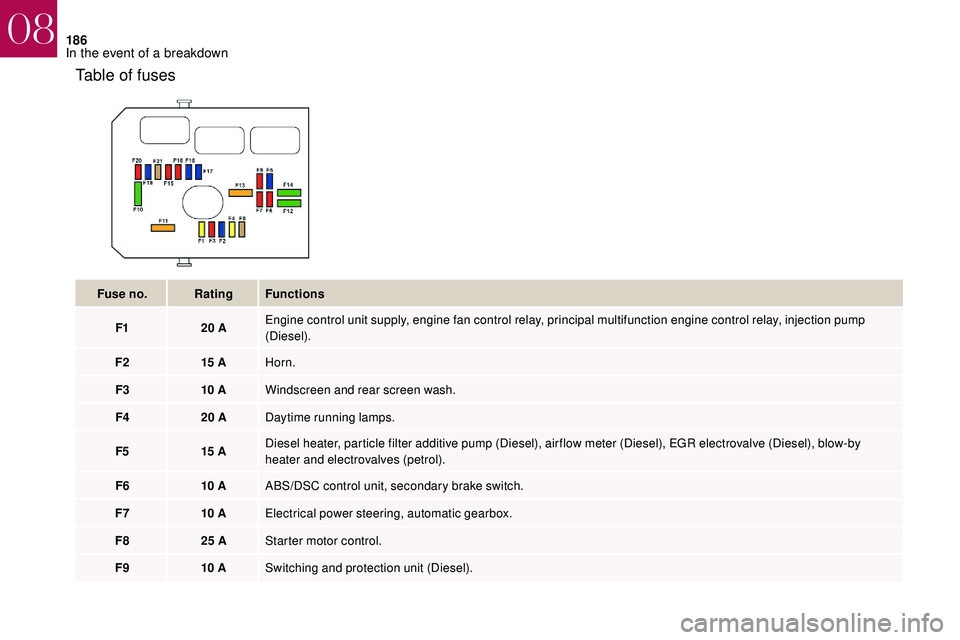
Table of fuses
Fuse no.Rating Functions
F1 20
AEngine control unit supply, engine fan control relay, principal multifunction engine control relay, injection pump
(Diesel).
F2 15
AHorn.
F3 10
AWindscreen and rear screen wash.
F4 20
ADaytime running lamps.
F5 15
ADiesel heater, particle filter additive pump (Diesel), air flow meter (Diesel), EGR electrovalve (Diesel), blow-by
heater and electrovalves (petrol).
F6 10
AABS/DSC control unit, secondary brake switch.
F7 10
AElectrical power steering, automatic gearbox.
F8 25
AStarter motor control.
F9 10
ASwitching and protection unit (Diesel).
08
In the event of a breakdown
Page 194 of 248
192
General recommendations
Obser ve the legislation in force in your
c o u nt r y.
Ensure that the weight of the towing
vehicle is higher than that of the towed
vehicle.
The driver must remain at the wheel of
the towed vehicle and must have a valid
driving licence.
When towing a
vehicle with all four
wheels on the ground, always use an
approved towing arm; rope and straps are
prohibited.
The towing vehicle must move off gently.
When the vehicle is towed with its engine
off, there is no longer braking and steering
assistance.
In the following cases, you must always
call on a
professional recovery ser vice:
-
v
ehicle broken down on a motor way or
main road,
-
f
our-wheel drive vehicle,
-
w
hen it is not possible to put the
gearbox into neutral, unlock the
steering, or release the parking brake,
-
t
owing with only two wheels on the
ground,
-
w
here there is no approved towbar
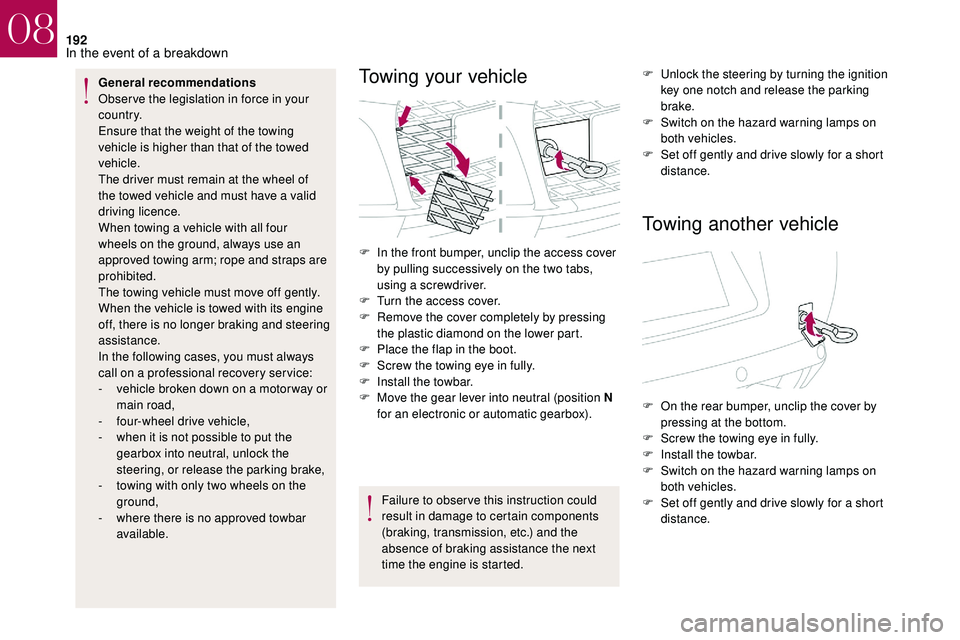
available.Towing your vehicle
Failure to obser ve this instruction could
result in damage to certain components
(braking, transmission, etc.) and the
absence of braking assistance the next
time the engine is started. F
U
nlock the steering by turning the ignition
key one notch and release the parking
brake.
F
S
witch on the hazard warning lamps on
both vehicles.
F
S
et off gently and drive slowly for a short
distance.
Towing another vehicle
F In the front bumper, unclip the access cover by pulling successively on the two tabs,
using a
screwdriver.
F
T
urn the access cover.
F
R
emove the cover completely by pressing
the plastic diamond on the lower part.
F
P
lace the flap in the boot.
F
S
crew the towing eye in fully.
F
I
nstall the towbar.
F
M
ove the gear lever into neutral (position N
for an electronic or automatic gearbox). F
O
n the rear bumper, unclip the cover by
pressing at the bottom.
F
S
crew the towing eye in fully.
F
I
nstall the towbar.
F
S
witch on the hazard warning lamps on
both vehicles.
F
S
et off gently and drive slowly for a short
distance.
08
In the event of a breakdown