stop start CITROEN DS3 CROSSBACK 2020 Owners Manual
[x] Cancel search | Manufacturer: CITROEN, Model Year: 2020, Model line: DS3 CROSSBACK, Model: CITROEN DS3 CROSSBACK 2020Pages: 244, PDF Size: 7.7 MB
Page 4 of 244
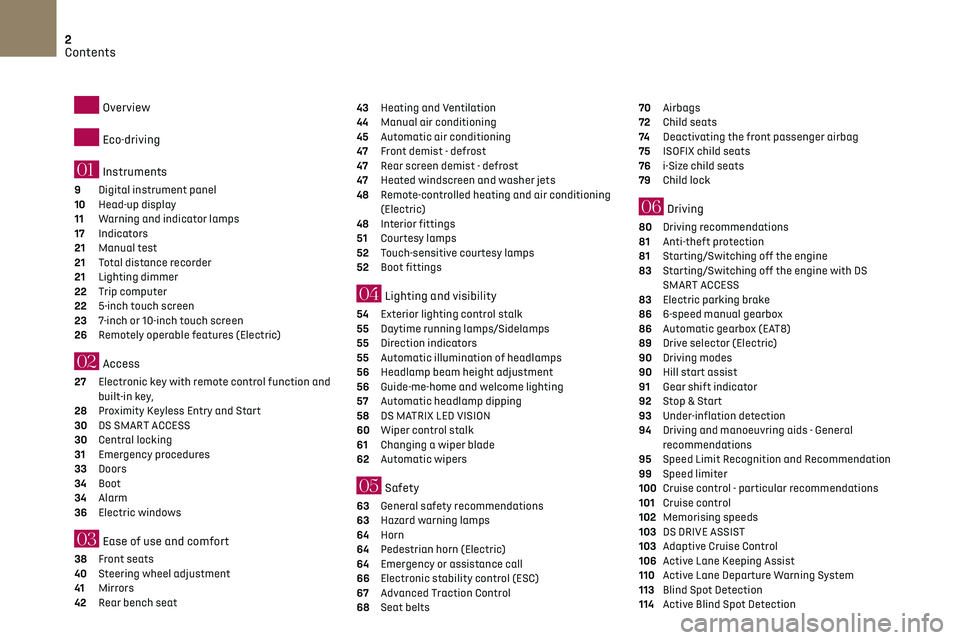
2
Contents
Overview
Eco-driving
01 Instruments
9 Digital instrument panel
10 Head-up display
11 Warning and indicator lamps
17 Indicators
21 Manual test
21 Total distance recorder
21 Lighting dimmer
22 Trip computer
22 5-inch touch screen
23 7-inch or 10-inch touch screen
26 Remotely operable features (Electric)
02 Access
27 Electronic key with remote control function and
built-in key,
28
Proximity Keyless Entry and Start
30 DS SMART ACCESS
30 Central locking
31 Emergency procedures
33 Doors
34 Boot
34 Alarm
36 Electric windows
03 Ease of use and comfort
38 Front seats
40 Steering wheel adjustment
41 Mirrors
42 Rear bench seat
43 Heating and Ventilation
44 Manual air conditioning
45 Automatic air conditioning
47 Front demist - defrost
47 Rear screen demist - defrost
47 Heated windscreen and washer jets
48 Remote-controlled heating and air conditioning
(Electric)
48
Interior fittings
51 Courtesy lamps
52 Touch-sensitive courtesy lamps
52 Boot fittings
04 Lighting and visibility
54 Exterior lighting control stalk
55 Daytime running lamps/Sidelamps
55 Direction indicators
55 Automatic illumination of headlamps
56 Headlamp beam height adjustment
56 Guide-me-home and welcome lighting
57 Automatic headlamp dipping
58 DS MATRIX LED VISION
60 Wiper control stalk
61 Changing a wiper blade
62 Automatic wipers
05 Safety
63 General safety recommendations
63 Hazard warning lamps
64 Horn
64 Pedestrian horn (Electric)
64 Emergency or assistance call
66 Electronic stability control (ESC)
67 Advanced Traction Control
68 Seat belts
70 Airbags
72 Child seats
74 Deactivating the front passenger airbag
75 ISOFIX child seats
76 i-Size child seats
79 Child lock
06 Driving
80 Driving recommendations
81 Anti-theft protection
81 Starting/Switching off the engine
83 Starting/Switching off the engine with DS
SMART ACCESS
83
Electric parking brake
86 6-speed manual gearbox
86 Automatic gearbox (EAT8)
89 Drive selector (Electric)
90 Driving modes
90 Hill start assist
91 Gear shift indicator
92 Stop & Start
93 Under-inflation detection
94 Driving and manoeuvring aids - General
recommendations
95
Speed Limit Recognition and Recommendation
99 Speed limiter
100 Cruise control - particular recommendations
101 Cruise control
102 Memorising speeds
103 DS DRIVE ASSIST
103 Adaptive Cruise Control
106 Active Lane Keeping Assist
110 Active Lane Departure Warning System
113 Blind Spot Detection
114 Active Blind Spot Detection
Page 14 of 244
12Instruments01
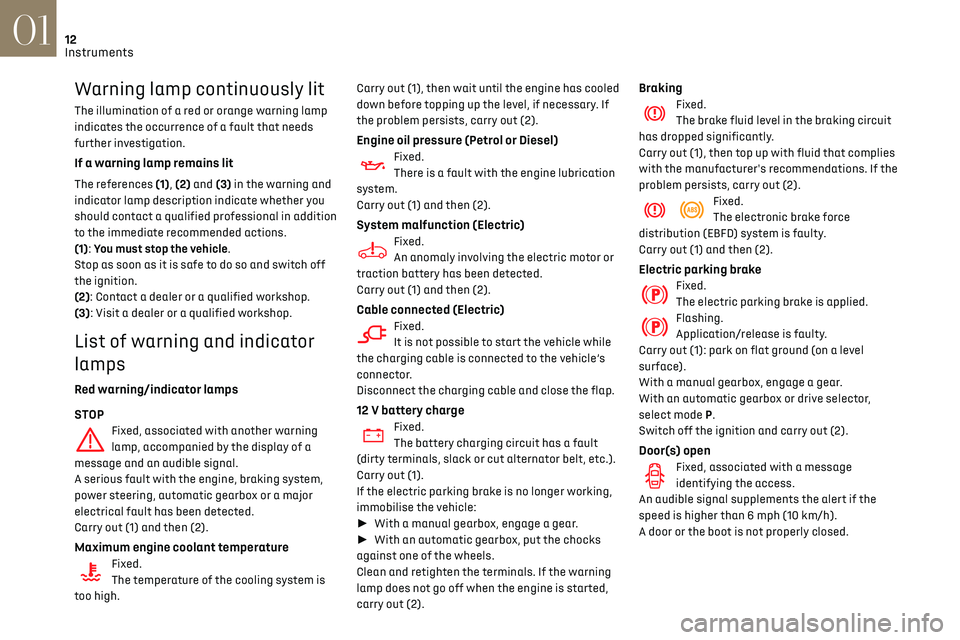
Warning lamp continuously lit
The illumination of a red or orange warning lamp
indicates the occurrence of a fault that needs
further investigation.
If a warning lamp remains lit
The references (1), (2) and (3) in the warning and
indicator lamp description indicate whether you
should contact a qualified professional in addition
to the immediate recommended actions.
(1): You must stop the vehicle.
Stop as soon as it is safe to do so and switch off
the ignition.
(2): Contact a dealer or a qualified workshop.
(3): Visit a dealer or a qualified workshop.
List of warning and indicator
lamps
Red warning/indicator lamps
STOP
Fixed, associated with another warning
lamp, accompanied by the display of a
message and an audible signal.
A serious fault with the engine, braking system,
power steering, automatic gearbox or a major
electrical fault has been detected.
Carry out (1) and then (2).
Maximum engine coolant temperatureFixed.
The temperature of the cooling system is
too high. Carry out (1), then wait until the engine has cooled
down before topping up the level, if necessary. If
the problem persists, carry out (2).
Engine oil pressure (Petrol or Diesel)Fixed.
There is a fault with the engine lubrication
system.
Carry out (1) and then (2).
System malfunction (Electric)Fixed.
An anomaly involving the electric motor or
traction battery has been detected.
Carry out (1) and then (2).
Cable connected (Electric)Fixed.
It is not possible to start the vehicle while
the charging cable is connected to the vehicle’s
connector.
Disconnect the charging cable and close the flap.
12 V battery chargeFixed.
The battery charging circuit has a fault
(dirty terminals, slack or cut alternator belt, etc.).
Carry out (1).
If the electric parking brake is no longer working,
immobilise the vehicle:
► With a manual gearbox, engage a gear.
► With an automatic gearbox, put the chocks
against one of the wheels.
Clean and retighten the terminals. If the warning
lamp does not go off when the engine is started,
carry out (2).
BrakingFixed.
The brake fluid level in the braking circuit
has dropped significantly.
Carry out (1), then top up with fluid that complies
with the manufacturer's recommendations. If the
problem persists, carry out (2).
Fixed.
The electronic brake force
distribution (EBFD) system is faulty.
Carry out (1) and then (2).
Electric parking brakeFixed.
The electric parking brake is applied.
Flashing.
Application/release is faulty.
Carry out (1): park on flat ground (on a level
surface).
With a manual gearbox, engage a gear.
With an automatic gearbox or drive selector,
select mode P.
Switch off the ignition and carry out (2).
Door(s) openFixed, associated with a message
identifying the access.
An audible signal supplements the alert if the
speed is higher than 6 mph (10 km/h).
A door or the boot is not properly closed.
Page 17 of 244
15
Instruments01
In this case, do NOT install a "rearward facing"
child seat on the front passenger seat - risk of
serious injury!
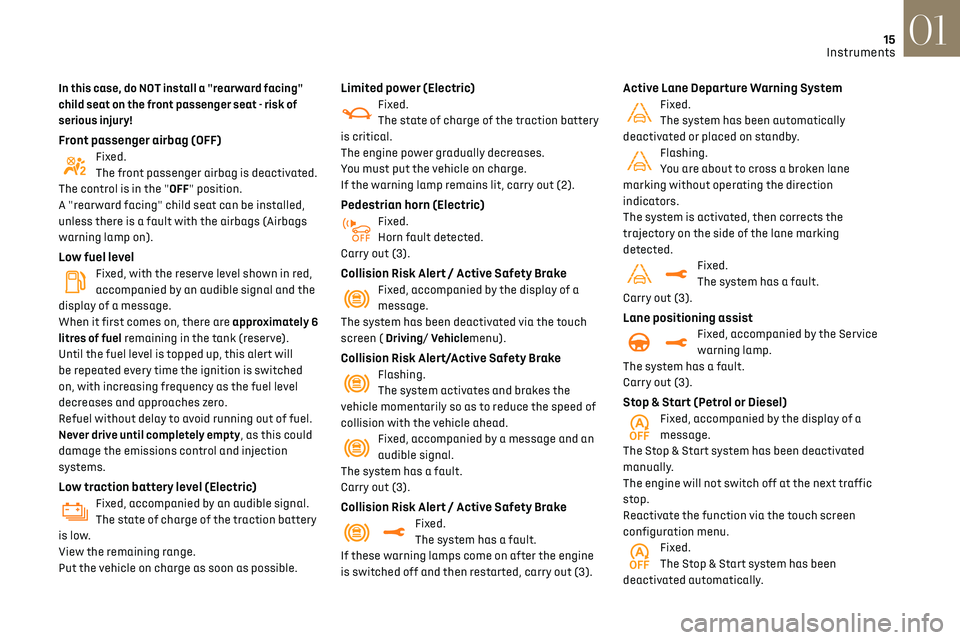
Front passenger airbag (OFF)Fixed.
The front passenger airbag is deactivated.
The control is in the "OFF" position.
A "rearward facing" child seat can be installed,
unless there is a fault with the airbags (Airbags
warning lamp on).
Low fuel levelFixed, with the reserve level shown in red,
accompanied by an audible signal and the
display of a message.
When it first comes on, there are approximately 6
litres of fuel remaining in the tank (reserve).
Until the fuel level is topped up, this alert will
be repeated every time the ignition is switched
on, with increasing frequency as the fuel level
decreases and approaches zero.
Refuel without delay to avoid running out of fuel.
Never drive until completely empty, as this could
damage the emissions control and injection
systems.
Low traction battery level (Electric)Fixed, accompanied by an audible signal.
The state of charge of the traction battery
is low.
View the remaining range.
Put the vehicle on charge as soon as possible.
Limited power (Electric)Fixed.
The state of charge of the traction battery
is critical.
The engine power gradually decreases.
You must put the vehicle on charge.
If the warning lamp remains lit, carry out (2).
Pedestrian horn (Electric)Fixed.
Horn fault detected.
Carry out (3).
Collision Risk Alert / Active Safety BrakeFixed, accompanied by the display of a
message.
The system has been deactivated via the touch
screen ( Driving/ Vehiclemenu).
Collision Risk Alert/Active Safety BrakeFlashing.
The system activates and brakes the
vehicle momentarily so as to reduce the speed of
collision with the vehicle ahead.
Fixed, accompanied by a message and an
audible signal.
The system has a fault.
Carry out (3).
Collision Risk Alert / Active Safety BrakeFixed.
The system has a fault.
If these warning lamps come on after the engine
is switched off and then restarted, carry out (3).
Active Lane Departure Warning SystemFixed.
The system has been automatically
deactivated or placed on standby.
Flashing.
You are about to cross a broken lane
marking without operating the direction
indicators.
The system is activated, then corrects the
trajectory on the side of the lane marking
detected.
Fixed.
The system has a fault.
Carry out (3).
Lane positioning assistFixed, accompanied by the Service
warning lamp.
The system has a fault.
Carry out (3).
Stop & Start (Petrol or Diesel)Fixed, accompanied by the display of a
message.
The Stop & Start system has been deactivated
manually.
The engine will not switch off at the next traffic
stop.
Reactivate the function via the touch screen
configuration menu.
Fixed.
The Stop & Start system has been
deactivated automatically.
Page 18 of 244
16
Instruments01
The engine will not switch off at the next traffic
stop, if the exterior temperature is:
–
belo
w 0°C.
–
abo
ve +35°C.
Flashing then fixed, accompanied by a
message.
The system has a fault.
Carry out (3).
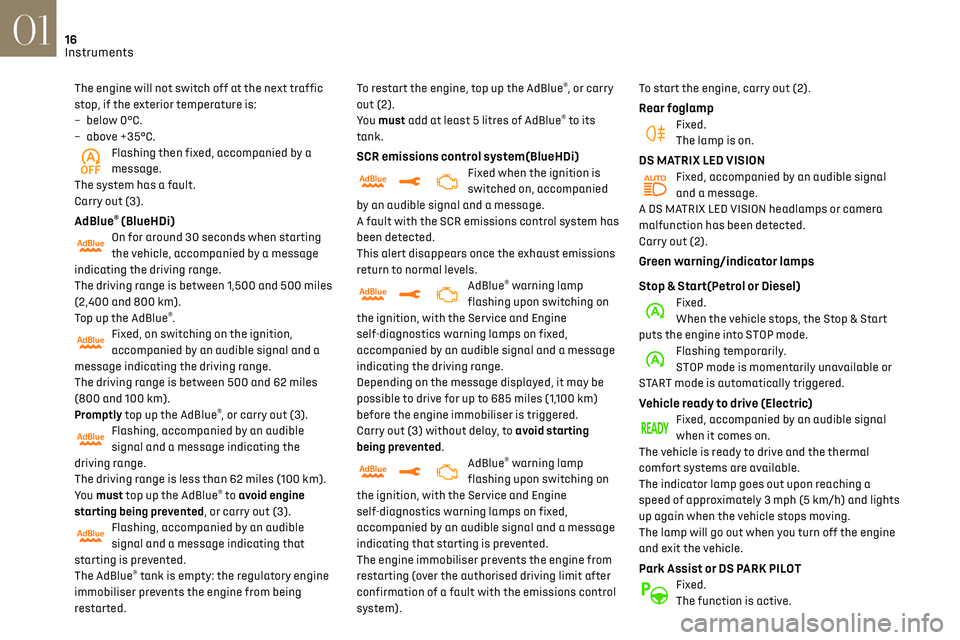
AdBlue® (BlueHDi)On for around 30 seconds when starting
the vehicle, accompanied by a message
indicating the driving range.
The driving range is between 1,500 and 500 miles
(2,400 and 800 km).
Top up the AdBlue
®.Fixed, on switching on the ignition,
accompanied by an audible signal and a
message indicating the driving range.
The driving range is between 500 and 62 miles
(800 and 100 km).
Promptly top up the AdBlue
®, or carry out (3).
Flashing, accompanied by an audible
signal and a message indicating the
driving range.
The driving range is less than 62 miles (100 km).
You must top up the AdBlue
® to avoid engine
starting being prevented, or carry out (3).
Flashing, accompanied by an audible
signal and a message indicating that
starting is prevented.
The AdBlue
® tank is empty: the regulatory engine
immobiliser prevents the engine from being
restarted. To restart the engine, top up the AdBlue
®, or carry
out (2).
You must add at least 5 litres of AdBlue
® to its
tank.
SCR emissions control system(BlueHDi)Fixed when the ignition is
switched on, accompanied
by an audible signal and a message.
A fault with the SCR emissions control system has
been detected.
This alert disappears once the exhaust emissions
return to normal levels.
AdBlue® warning lamp
flashing upon switching on
the ignition, with the Service and Engine
self-diagnostics warning lamps on fixed,
accompanied by an audible signal and a message
indicating the driving range.
Depending on the message displayed, it may be
possible to drive for up to 685 miles (1,100 km)
before the engine immobiliser is triggered.
Carry out (3) without delay, to avoid starting
being prevented.
AdBlue® warning lamp
flashing upon switching on
the ignition, with the Service and Engine
self-diagnostics warning lamps on fixed,
accompanied by an audible signal and a message
indicating that starting is prevented.
The engine immobiliser prevents the engine from
restarting (over the authorised driving limit after
confirmation of a fault with the emissions control
system). To start the engine, carry out (2).
Rear foglampFixed.
The lamp is on.
DS MATRIX LED VISIONFixed, accompanied by an audible signal
and a message.
A DS MATRIX LED VISION headlamps or camera
malfunction has been detected.
Carry out (2).
Green warning/indicator lamps
Stop & Start(Petrol or Diesel)
Fixed.
When the vehicle stops, the Stop & Start
puts the engine into STOP mode.
Flashing temporarily.
STOP mode is momentarily unavailable or
START mode is automatically triggered.
Vehicle ready to drive (Electric)Fixed, accompanied by an audible signal
when it comes on.
The vehicle is ready to drive and the thermal
comfort systems are available.
The indicator lamp goes out upon reaching a
speed of approximately 3 mph (5 km/h) and lights
up again when the vehicle stops moving.
The lamp will go out when you turn off the engine
and exit the vehicle.
Park Assist or DS PARK PILOTFixed.
The function is active.
Page 19 of 244
17
Instruments01
Active Lane Keeping AssistFixed.
The function has been activated.
All the conditions have been met: the system is
operating.
Automatic wipingFixed.
Automatic windscreen wiping is activated.
Direction indicatorsDirection indicators with audible signal.
The direction indicators are on.
SidelampsFixed.
The lamps are on.
Dipped beam headlampsFixed.
The lamps are on.
DS MATRIX LED VISIONFixed.
The function is activated.
Automatic headlamp dippingFixed.
The function has been activated via
the touch screen (Driving / Vehicle menu).
The lighting control stalk is in the "AUTO" position.
Blue warning/indicator lamps
Main beam headlamps
Fixed.
The lamps are on.
Indicators
Service indicator
The servicing information is expressed in terms of
distance (kilometres or miles) and time (months
or days).
The alert is given at whichever of these two terms
is reached first.
The servicing information is displayed in the
instrument panel. Depending on the version of the
vehicle:
–
The dist
ance recorder display line indicates
the distance remaining before the next service
is due, or the distance travelled since it was due
preceded by the "-" sign.
–
An alert me
ssage indicates the distance
remaining, as well as the period before the next
service is due or how long it is overdue.
The value indicated is calculated
according to the distance covered and the
time elapsed since the last service.
The alert may also be triggered close to a due
date.
Service spannerOn temporarily when the ignition is
switched on.
Between 620 and 1,860 miles (1,000 and 3,000
km) remain before the next service is due.
Fixed, when the ignition is switched on.
The next service is due in less than 620
miles (1,000 km).
Have your vehicle serviced very soon.
Service spanner flashingFlashing then fixed, when the
ignition is switched on.
(With BlueHDi Diesel engines, combined with the
Service warning lamp.)
The servicing interval has been exceeded.
Have your vehicle serviced as soon as possible.
Resetting the service indicator
The service indicator must be reset after each
service.
If you have serviced your vehicle yourself:
► Switch off the ignition.
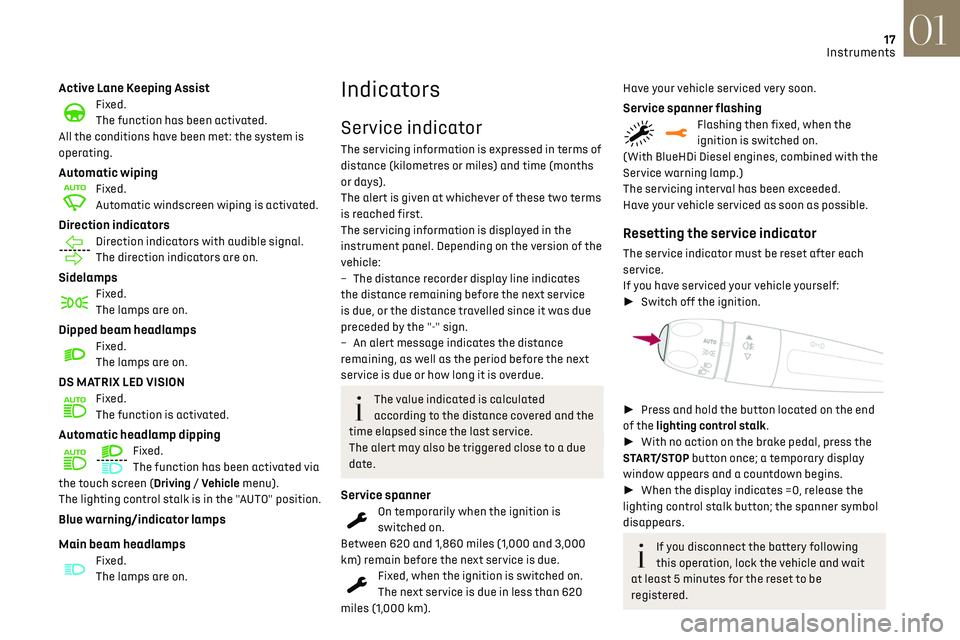
► Press and hold the button located on the end
of the lighting control stalk.
► With no action on the brake pedal, press the
START/STOP button once; a temporary display
window appears and a countdown begins.
► When the display indicates =0, release the
lighting control stalk button; the spanner symbol
disappears.
If you disconnect the battery following
this operation, lock the vehicle and wait
at least 5 minutes for the reset to be
registered.
Page 20 of 244
18
Instruments01
Retrieving the servicing information
You can view the servicing information by
pressing the “Check" button in the Driving
/ Vehicle touch screen menu.
Engine coolant temperature
indicator
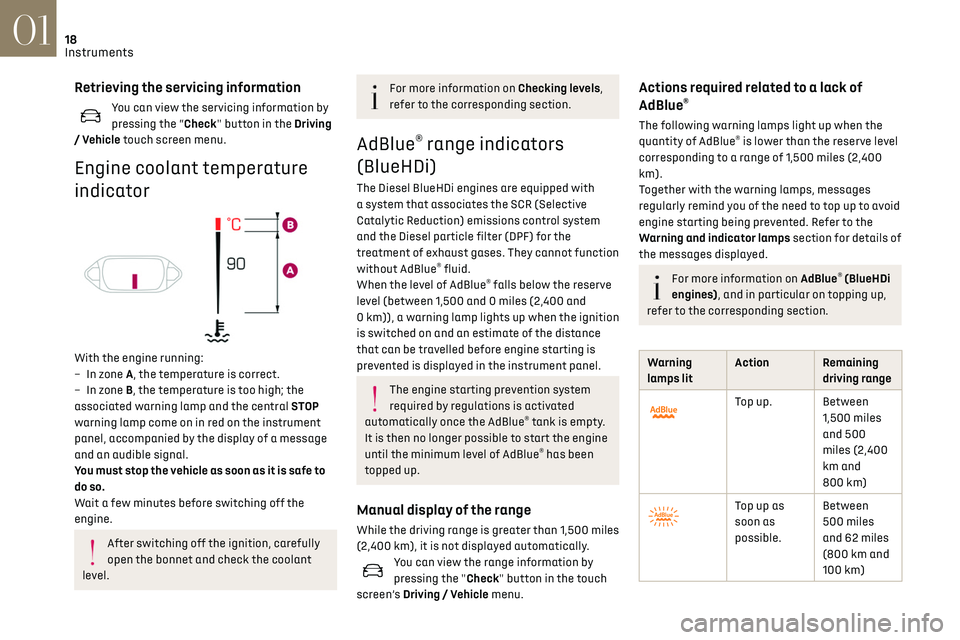
With the engine running:
– In z one A, the temperature is correct.
–
In z
one B, the temperature is too high; the
associated warning lamp and the central STOP
warning lamp come on in red on the instrument
panel, accompanied by the display of a message
and an audible signal.
You must stop the vehicle as soon as it is safe to
do so.
Wait a few minutes before switching off the
engine.
After switching off the ignition, carefully
open the bonnet and check the coolant
level.
For more information on Checking levels,
refer to the corresponding section.
AdBlue® range indicators
(BlueHDi)
The Diesel BlueHDi engines are equipped with
a system that associates the SCR (Selective
Catalytic Reduction) emissions control system
and the Diesel particle filter (DPF) for the
treatment of exhaust gases. They cannot function
without AdBlue
® fluid.
When the level of AdBlue® falls below the reserve
level (between 1,500 and 0 miles (2,400 and
0 km)), a warning lamp lights up when the ignition
is switched on and an estimate of the distance
that can be travelled before engine starting is
prevented is displayed in the instrument panel.
The engine starting prevention system
required by regulations is activated
automatically once the AdBlue
® tank is empty.
It is then no longer possible to start the engine
until the minimum level of AdBlue
® has been
topped up.
Manual display of the range
While the driving range is greater than 1,500 miles
(2,400 km), it is not displayed automatically.
You can view the range information by
pressing the "Check" button in the touch
screen’s Driving / Vehicle menu.
Actions required related to a lack of
AdBlue®
The following warning lamps light up when the
quantity of AdBlue® is lower than the reserve level
corresponding to a range of 1,500 miles (2,400
km).
Together with the warning lamps, messages
regularly remind you of the need to top up to avoid
engine starting being prevented. Refer to the
Warning and indicator lamps section for details of
the messages displayed.
For more information on AdBlue® (BlueHDi
engines), and in particular on topping up,
refer to the corresponding section.
Warning
lamps lit Action Remaining
driving range
Top up. Between 1,500 miles
and 500
miles (2,400
km and
800 km)
Top up as
soon as
possible.Between
500 miles
and 62 miles
(800 km and
100 km)
Page 24 of 244
22
Instruments01
Trip computer
Information displayed about the current journey
(range, fuel consumption, average speed, etc.).
Data displayed on the
instrument panel
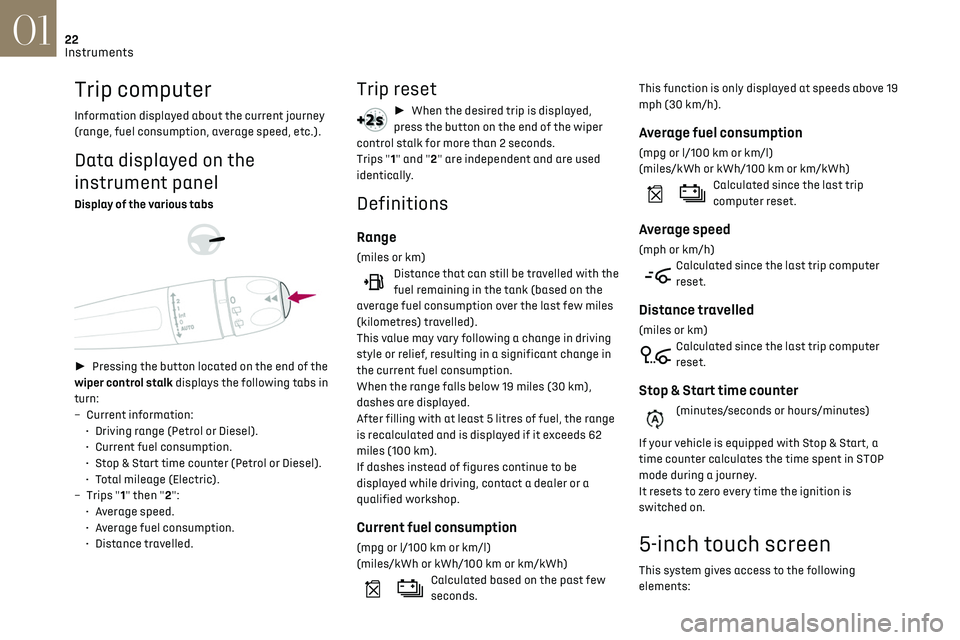
Display of the various tabs
► Pressing the button located on the end of the
wiper control stalk displays the following tabs in
turn:
–
Curren
t information:
•
D
riving range (Petrol or Diesel).
•
Curren
t fuel consumption.
•
St
op & Start time counter (Petrol or Diesel).
•
T
otal mileage (Electric).
–
Trip
s "1" then "2":
•
A
verage speed.
•
A
verage fuel consumption.
•
Dist
ance travelled.
Trip reset
► When the desired trip is displayed,
press the button on the end of the wiper
control stalk for more than 2 seconds.
Trips "1" and "2" are independent and are used
identically.
Definitions
Range
(miles or km)Distance that can still be travelled with the
fuel remaining in the tank (based on the
average fuel consumption over the last few miles
(kilometres) travelled).
This value may vary following a change in driving
style or relief, resulting in a significant change in
the current fuel consumption.
When the range falls below 19 miles (30 km),
dashes are displayed.
After filling with at least 5 litres of fuel, the range
is recalculated and is displayed if it exceeds 62
miles (100 km).
If dashes instead of figures continue to be
displayed while driving, contact a dealer or a
qualified workshop.
Current fuel consumption
(mpg or l/100 km or km/l)
(miles/kWh or kWh/100 km or km/kWh)
Calculated based on the past few
seconds. This function is only displayed at speeds above 19
mph (30 km/h).
Average fuel consumption
(mpg or l/100 km or km/l)
(miles/kWh or kWh/100 km or km/kWh)
Calculated since the last trip
computer reset.
Average speed
(mph or km/h)Calculated since the last trip computer
reset.
Distance travelled
(miles or km)Calculated since the last trip computer
reset.
Stop & Start time counter
(minutes/seconds or hours/minutes)
If your vehicle is equipped with Stop & Start, a
time counter calculates the time spent in STOP
mode during a journey.
It resets to zero every time the ignition is
switched on.
5-inch touch screen
This system gives access to the following
elements:
Page 25 of 244
23
Instruments01
– Audio system and telephone controls and
display of related information.
–
V
ehicle function and equipment setting menus.
–
Air c
onditioning system controls (depending on
version).
For safety reasons, always stop the
vehicle before performing operations that
require sustained attention.
Some functions are not accessible while
driving.
Recommendations
Do not use pointed objects on the touch screen.
Do not touch the touch screen with wet hands.
Use a soft, clean cloth to clean the touch screen.
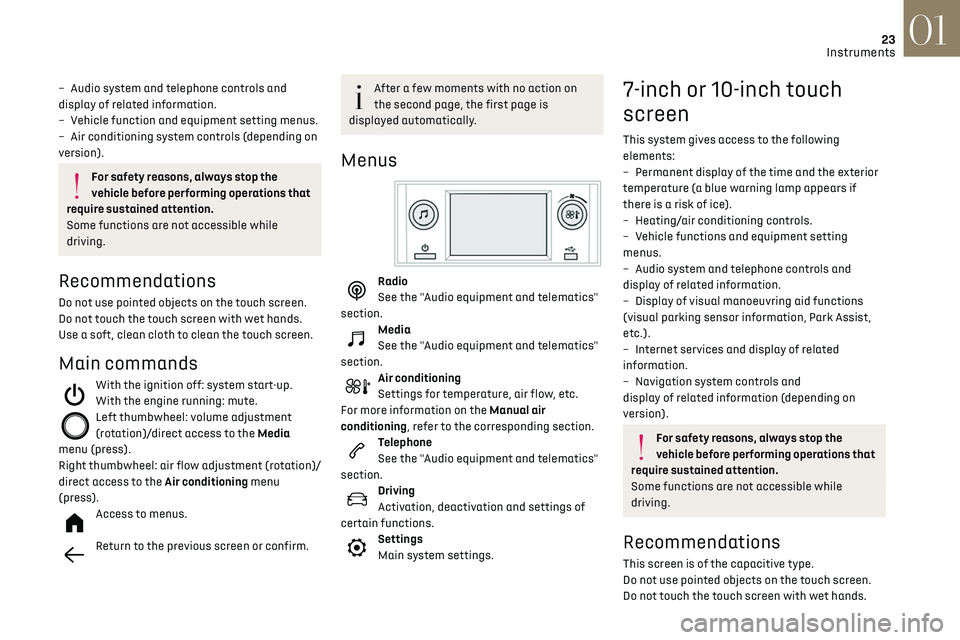
Main commands
With the ignition off: system start-up.
With the engine running: mute.
Left thumbwheel: volume adjustment
(rotation)/direct access to the Media
menu (press).
Right thumbwheel: air flow adjustment (rotation)/
direct access to the Air conditioning menu
(press).
Access to menus.
Return to the previous screen or confirm.
After a few moments with no action on
the second page, the first page is
displayed automatically.
Menus
Radio
See the "Audio equipment and telematics"
section.
Media
See the "Audio equipment and telematics"
section.
Air conditioning
Settings for temperature, air flow, etc.
For more information on the Manual air
conditioning, refer to the corresponding section.
Telephone
See the "Audio equipment and telematics"
section.
Driving
Activation, deactivation and settings of
certain functions.
Settings
Main system settings.
7-inch or 10-inch touch
screen
This system gives access to the following
elements:
–
Permanen
t display of the time and the exterior
temperature (a blue warning lamp appears if
there is a risk of ice).
–
Hea
ting/air conditioning controls.
–
V
ehicle functions and equipment setting
menus.
–
Audio s
ystem and telephone controls and
display of related information.
–
Displa
y of visual manoeuvring aid functions
(visual parking sensor information, Park Assist,
etc.).
–
In
ternet services and display of related
information.
–
Na
vigation system controls and
display of related information (depending on
version).
For safety reasons, always stop the
vehicle before performing operations that
require sustained attention.
Some functions are not accessible while
driving.
Recommendations
This screen is of the capacitive type.
Do not use pointed objects on the touch screen.
Do not touch the touch screen with wet hands.
Page 35 of 244
33
Access02
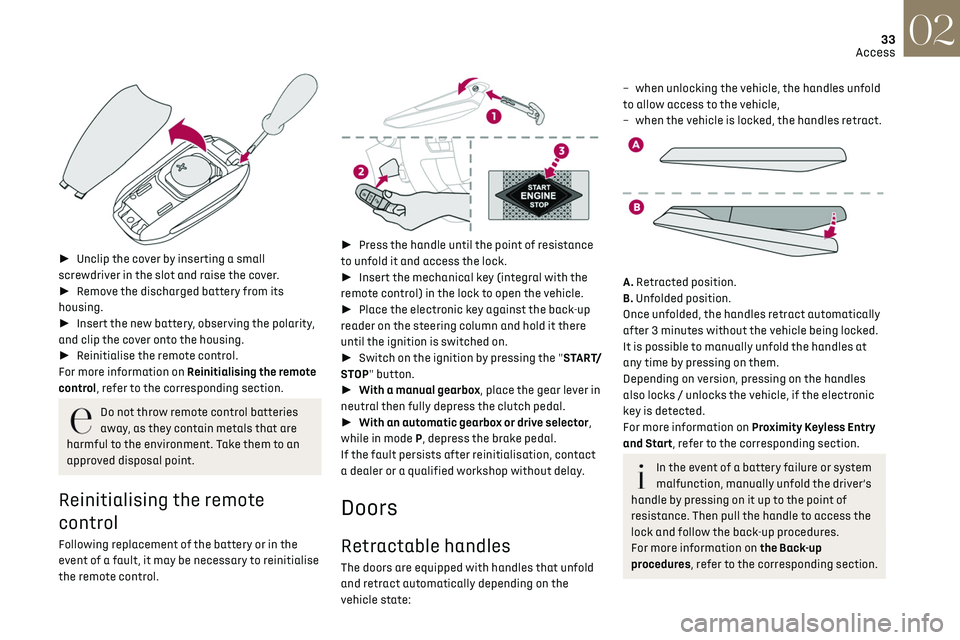
► Unclip the cover by inserting a small
screwdriver in the slot and raise the cover.
► Remove the discharged battery from its
housing.
► Insert the new battery, observing the polarity,
and clip the cover onto the housing.
► Reinitialise the remote control.
For more information on Reinitialising the remote
control, refer to the corresponding section.
Do not throw remote control batteries
away, as they contain metals that are
harmful to the environment. Take them to an
approved disposal point.
Reinitialising the remote
control
Following replacement of the battery or in the
event of a fault, it may be necessary to reinitialise
the remote control.
► Press the handle until the point of resistance
to unfold it and access the lock.
► Insert the mechanical key (integral with the
remote control) in the lock to open the vehicle.
► Place the electronic key against the back-up
reader on the steering column and hold it there
until the ignition is switched on.
► Switch on the ignition by pressing the "START/
STOP" button.
► With a manual gearbox, place the gear lever in
neutral then fully depress the clutch pedal.
► With an automatic gearbox or drive selector,
while in mode P, depress the brake pedal.
If the fault persists after reinitialisation, contact
a dealer or a qualified workshop without delay.
Doors
Retractable handles
The doors are equipped with handles that unfold
and retract automatically depending on the
vehicle state:
– when unlocking the v ehicle, the handles unfold
to allow access to the vehicle,
–
when the v
ehicle is locked, the handles retract.
A. Retracted position.
B. Unfolded position.
Once unfolded, the handles retract automatically
after 3 minutes without the vehicle being locked.
It is possible to manually unfold the handles at
any time by pressing on them.
Depending on version, pressing on the handles
also locks / unlocks the vehicle, if the electronic
key is detected.
For more information on Proximity Keyless Entry
and Start, refer to the corresponding section.
In the event of a battery failure or system
malfunction, manually unfold the driver’s
handle by pressing on it up to the point of
resistance. Then pull the handle to access the
lock and follow the back-up procedures.
For more information on the Back-up
procedures, refer to the corresponding section.
Page 38 of 244
36
Access02
Operating the switch again stops the movement
of the window.Window controls remain operational for
approximately 45 seconds after switching
off the ignition or after locking the vehicle.
After that time, the controls are disabled.
To reactivate them, switch on the ignition or
unlock the vehicle.
Anti-pinch
If the window meets an obstacle while rising, it
stops and immediately partially lowers again.
Deactivation of the rear
controls for the rear electric
windows
For children's safety, press switch 5 to
deactivate the rear electric windows
controls.
The indicator lamp for the button comes on,
accompanied by a message confirming activation.
With the ignition on, it remains lit, as long as the
child lock remains activated.
Use of the rear electric windows from the driver's
controls remains possible.
For versions fitted with an electric child
lock, this control also deactivates the
interior rear door controls.
For more information on the Child lock, refer to
the corresponding section.
Reactivating interior volumetric
monitoring
► Deactivate exterior perimeter monitoring by
unlocking the vehicle using the remote control or
by pressing a door handle.
The indicator lamp in the button goes off.
► Reactivate the full alarm system by locking
the vehicle using the remote control or by
pressing one of the front door handles.
The red indicator lamp in the button once again
flashes every second.
Triggering of the alarm
This is indicated by sounding of the siren and
flashing of the direction indicators for 30
seconds.
The interior volumetric and anti-tilt monitoring
functions remain active until the alarm has been
triggered ten times in succession.
When the vehicle is unlocked, rapid flashing of
the indicator lamp in the button indicates that the
alarm was triggered during your absence. When
the ignition is switched on, this flashing stops
immediately.
Failure of the remote control
To deactivate the monitoring functions:
► Unlock the vehicle using the key in the driver's
door lock.
► Open the door; the alarm is triggered.
► Switch on the ignition; this stops the alarm.
The indicator lamp in the button goes off.
Locking the vehicle without
activating the alarm
► Lock or deadlock the vehicle using the key
(integral to the remote control) in the driver's door
lock.
Automatic activation
(Depending on version)
The system is activated automatically 2 minutes
after the last door or the boot is closed.
► To avoid triggering the alarm on entering the
vehicle, first press the unlocking button on the
remote control or unlock the vehicle using the
“Keyless Entry and Starting” system.
Malfunction
When the ignition is switched on, fixed
illumination of the red indicator lamp in the
button indicates a malfunction of the system.
Have it checked by a dealer or a qualified
workshop.
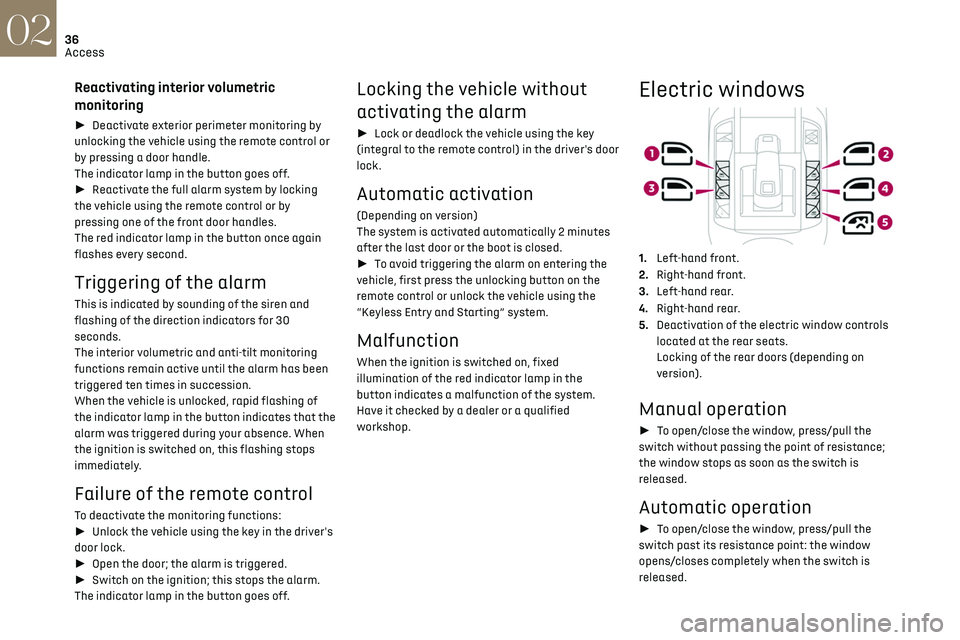
Electric windows
1. Left-hand front.
2. Right-hand front.
3. Left-hand rear.
4. Right-hand rear.
5. Deactivation of the electric window controls
located at the rear seats.
Locking of the rear doors (depending on
version).
Manual operation
► To open/close the window, press/pull the
switch without passing the point of resistance;
the window stops as soon as the switch is
released.
Automatic operation
► To open/close the window, press/pull the
switch past its resistance point: the window
opens/closes completely when the switch is
released.