service CITROEN DS3 CROSSBACK 2022 User Guide
[x] Cancel search | Manufacturer: CITROEN, Model Year: 2022, Model line: DS3 CROSSBACK, Model: CITROEN DS3 CROSSBACK 2022Pages: 244, PDF Size: 7.7 MB
Page 33 of 244
31
Access02
Manual
► Press this button to lock/unlock the vehicle
(doors and boot) from inside the vehicle.
The indicator lamp comes on to confirm central
locking of the vehicle.
The central locking does not take place if
one of the doors is open.
To unfold the exterior handles, press the
button once when the vehicle is locked or
twice when it is unlocked.
When locking / deadlocking from the
outside
When the vehicle is locked or deadlocked from
the outside, the indicator lamp flashes and the
button is inoperative.
► After normal locking, pull one of the interior
door controls to unlock the vehicle.
► After deadlocking, it is necessary to use
the remote control, the “Keyless Entry and
Starting” system or the integral key to unlock
the vehicle.
Automatic (anti-intrusion
security)
The doors and boot lock automatically when
driving (speed above 6 mph (10 km/h)).
To deactivate/reactivate this function (activated
by default):
► Press the button until a confirmation message
appears.
Transporting long or bulky objects
Press the central locking control to drive
with the boot open and the doors locked.
Otherwise, every time the speed of the vehicle
exceeds 6 mph (10 km/h), the locks will
rebound and an alert will appear.
Advice
Remote control
The remote control is a sensitive, high-
frequency device; avoid handling it in your
pocket, due to the risk of unintentionally
unlocking the vehicle.
Avoid pressing the remote control buttons
while out of range of the vehicle, due to
the risk of rendering the remote control
inoperative. It would then be necessary to
reset it.
Anti-theft protection
Do not modify the electronic vehicle
immobiliser, as this might result in
malfunctions.
Locking the vehicle
Driving with the doors locked could make
it more difficult for the emergency services to
enter the vehicle in an emergency.
As a safety precaution, take the electronic key
with you when leaving the vehicle, even for a
short time.
Purchasing a second-hand vehicle
Have the key codes memorised by
a dealer, to ensure that the keys in your
possession are the only ones able to start the
vehicle.
Emergency procedures
Lost keys, remote control,
electronic key
Go to a dealer with the vehicle’s registration
certificate and your personal identification
documents.
The dealer will be able to retrieve the key code
and the transponder code, enabling a new key to
be ordered.
Page 36 of 244
34
Access02
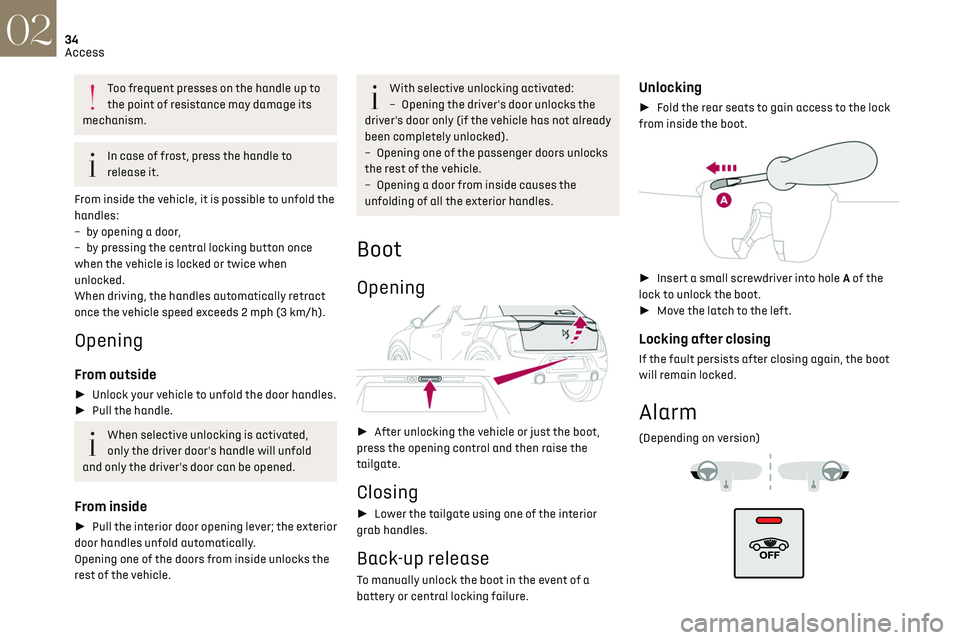
System which protects and provides a deterrent
against theft and break-ins.
Exterior perimeter monitoring
The system checks for opening of the vehicle.
The alarm is triggered if anyone tries to open a
door, the boot or the bonnet, for example.
Interior volumetric monitoring
The system checks for any variation in volume in
the passenger compartment.
The alarm is triggered if anyone breaks a window,
enters the passenger compartment or moves
inside the vehicle.
Self-protection function
The system checks for the putting out of service
of its components.
The alarm is triggered if the battery, the central
control or the siren wiring is put out of service or
damaged.For all work on the alarm system, contact
a dealer or a qualified workshop.
Locking the vehicle with full
alarm system
Activation
► Switch off the ignition and exit the vehicle.
► Lock or deadlock the vehicle using the remote
control or by pressing on one of the front door
handles.
Too frequent presses on the handle up to
the point of resistance may damage its
mechanism.
In case of frost, press the handle to
release it.
From inside the vehicle, it is possible to unfold the
handles:
–
b
y opening a door,
–
b
y pressing the central locking button once
when the vehicle is locked or twice when
unlocked.
When driving, the handles automatically retract
once the vehicle speed exceeds 2 mph (3 km/h).
Opening
From outside
► Unlock your vehicle to unfold the door handles.
► Pull the handle.
When selective unlocking is activated,
only the driver door's handle will unfold
and only the driver's door can be opened.
From inside
► Pull the interior door opening lever; the exterior
door handles unfold automatically.
Opening one of the doors from inside unlocks the
rest of the vehicle.
With selective unlocking activated:
– O pening the driver's door unlocks the
driver's door only (if the vehicle has not already
been completely unlocked).
–
O
pening one of the passenger doors unlocks
the rest of the vehicle.
–
O
pening a door from inside causes the
unfolding of all the exterior handles.
Boot
Opening
► After unlocking the vehicle or just the boot,
press the opening control and then raise the
tailgate.
Closing
► Lower the tailgate using one of the interior
grab handles.
Back-up release
To manually unlock the boot in the event of a
battery or central locking failure.
Unlocking
► Fold the rear seats to gain access to the lock
from inside the boot.
► Insert a small screwdriver into hole A of the
lock to unlock the boot.
► Move the latch to the left.
Locking after closing
If the fault persists after closing again, the boot
will remain locked.
Alarm
(Depending on version)
Page 37 of 244

35
Access02
System which protects and provides a deterrent
against theft and break-ins.
Exterior perimeter monitoring
The system checks for opening of the vehicle.
The alarm is triggered if anyone tries to open a
door, the boot or the bonnet, for example.
Interior volumetric monitoring
The system checks for any variation in volume in
the passenger compartment.
The alarm is triggered if anyone breaks a window,
enters the passenger compartment or moves
inside the vehicle.
Self-protection function
The system checks for the putting out of service
of its components.
The alarm is triggered if the battery, the central
control or the siren wiring is put out of service or
damaged.
For all work on the alarm system, contact
a dealer or a qualified workshop.
Locking the vehicle with full
alarm system
Activation
► Switch off the ignition and exit the vehicle.
► Lock or deadlock the vehicle using the remote
control or by pressing on one of the front door
handles.
When the monitoring system is active, the red
indicator lamp in the button flashes once per
second and the direction indicators come on for
about 2 seconds.
The exterior perimeter monitoring is activated
after 5 seconds and the interior volumetric
monitoring after 45 seconds.
The alarm does not activate when locking
automatically from a distance.
If an opening (door, boot or bonnet) is not
properly closed, the vehicle is not locked,
but the exterior perimeter monitoring will be
activated after 45 seconds, at the same time
as the interior volumetric monitoring.
Deactivation
► Press one of the remote control unlocking
buttons:
short press
long press
or
► Unlock the vehicle using the remote control or
by pressing one of the front door handles.
The monitoring system is deactivated: the
indicator lamp in the button goes off and the
direction indicators flash for about 2 seconds.
After unlocking using the remote control
If the vehicle automatically locks itself
again (as happens if a door or the boot is not
opened within 30 seconds of unlocking), the
monitoring system is automatically activated.
Locking the vehicle with
exterior perimeter monitoring
only
Disable volumetric monitoring to avoid unwanted
alarm triggering in certain cases, such as:
–
Sligh
tly open window.
–
W
ashing the vehicle.
–
C
hanging a wheel.
–
T
owing your vehicle.
–
Transport on a ship or ferry
.
Deactivating interior volumetric
monitoring
► Switch off the ignition and within 10 seconds
press the alarm button until the indicator lamp is
on fixed.
► Exit the vehicle.
► Immediately lock the vehicle using the remote
control or by pressing one of the front door
handles.
Only exterior perimeter monitoring is activated;
the red indicator lamp in the button flashes every
second.
To take effect, this deactivation must be
performed whenever the ignition is switched off.
Page 65 of 244

63Safety05
General safety
recommendations
Do not remove the labels attached in
different places on your vehicle. They
include safety warnings as well as
identification information for the vehicle.
For any work on your vehicle, use a
qualified workshop that has the technical
information, skills and equipment required, all
of which a dealer is able to provide.
Depending on country regulations, some
safety equipment may be compulsory:
high visibility safety vests, warning triangles,
breathalysers, spare bulbs, spare fuses, fire
extinguisher, first aid kit, mud flaps at the rear
of the vehicle, etc.
Installing electrical accessories:
– The fitting o f electrical equipment or
accessories not approved by the Manufacturer
may cause excessive current consumption
and faults and failures with the electrical
system of your vehicle. Contact a dealer
for information on the range of approved
accessories.
–
As a sa
fety measure, access to the
diagnostic socket, used for the vehicle's
electronic systems, is reserved strictly for
authorised dealers or qualified workshops,
equipped with the special tools required (risk
of malfunctions of the vehicle's electronic
systems that could cause breakdowns or
serious accidents). The Manufacturer cannot
be held responsible if this advice is not
followed.
–
An
y modification or adaptation not
intended or authorised by the Manufacturer
or carried out without meeting the technical
requirements defined by the Manufacturer
will result in the suspension of the commercial
warranty.
Installation of accessory radio
communication transmitters
Before installing a radio communication
transmitter with an external aerial, you
must without fail contact a dealer for the
specification of transmitters which can be
fitted (frequency, maximum power, aerial
position, specific installation requirements),
in line with the Vehicle Electromagnetic
Compatibility Directive (2004/104/EC).
Declarations of conformity for radio
equipment
The relevant certificates are available on the
http://service.dsautomobiles.com website.
Hazard warning lamps
► Pressing the red button causes all the
direction indicators to flash.
They can operate with the ignition off.
Automatic operation of hazard
warning lamps
When braking in an emergency, depending on
the rate of deceleration, the hazard warning
lamps come on automatically. They switch off
automatically when you next accelerate.
They can be turned off by pressing the button
again.
Page 66 of 244
64Safety05
Horn
► Press the central part of the steering wheel.
Pedestrian horn (Electric)
The pedestrian horn operates once the vehicle is
moving and at speeds of up to 19 mph (30 km/h),
in forward or reverse gear.
Malfunction
In the event of a malfunction, this warning
lamp comes on on the instrument panel.
Contact a dealer or a qualified workshop to have
the system checked.
* In accordance with the general conditions of use of the service, available from dealers and subject to technological and technical limitations.
** In areas c overed by ‘Localised Emergency Call’ and ‘Localised Assistance Call’.
The list of countries covered and telematic services provided is available from dealers or on the website for your country.
Emergency or assistance
call
Localised Emergency Call
(PE112)
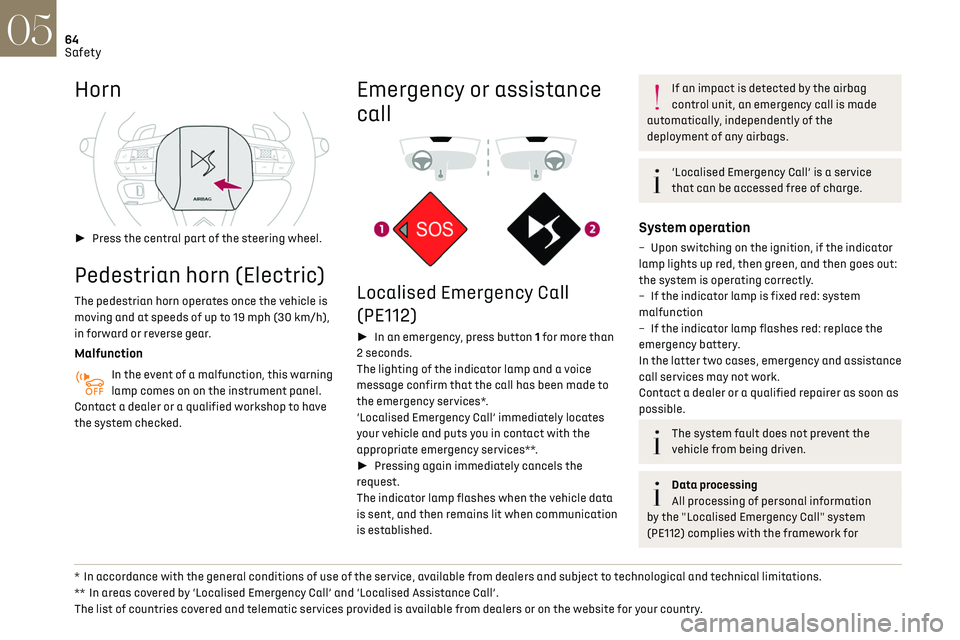
► In an emergency, press button 1 for more than
2 seconds.
The lighting of the indicator lamp and a voice
message confirm that the call has been made to
the emergency services*.
‘Localised Emergency Call’ immediately locates
your vehicle and puts you in contact with the
appropriate emergency services**.
► Pressing again immediately cancels the
request.
The indicator lamp flashes when the vehicle data
is sent, and then remains lit when communication
is established.
If an impact is detected by the airbag
control unit, an emergency call is made
automatically, independently of the
deployment of any airbags.
‘Localised Emergency Call’ is a service
that can be accessed free of charge.
System operation
– Upon switching on the ignition, if the indicator
lamp lights up red, then green, and then goes out:
the system is operating correctly.
–
If the indic
ator lamp is fixed red: system
malfunction
–
If the indic
ator lamp flashes red: replace the
emergency battery.
In the latter two cases, emergency and assistance
call services may not work.
Contact a dealer or a qualified repairer as soon as
possible.
The system fault does not prevent the
vehicle from being driven.
Data processing
All processing of personal information
by the "Localised Emergency Call" system
(PE112) complies with the framework for
Page 67 of 244
65Safety05
protection of personal information established
by Regulation 2016/679 (GDPR) and Directive
2002/58/EC of the European Parliament and
the Council, and in particular, seeks to protect
the vital interests of the data subject, in
accordance with Article 6.1, paragraph d) of
Regulation 2016/679.
Personal information processing is strictly
limited to the management of the "Localised
Emergency Call" system used with the “112”
European single emergency call number.
The "Localised Emergency Call" system is
able to collect and process only the following
data relating to the vehicle: chassis number,
type (passenger vehicle or light commercial
vehicle), fuel type or power source, most
recent three locations and direction of travel,
and a timestamped log file recording the
automatic activation of the system.
The recipients of the processed data are the
emergency call handling centres designated
by the relevant national authorities in the
territory in which they are located, enabling
priority reception and handling of calls to the
“112” emergency number.
Data storage
Data contained in the system’s memory is
not accessible from outside the system until a
* According to the geographic coverage of ‘Localised Emergency Call’, ‘Localised Assistance Call’ and the official national language chosen by the owner of
the vehicle.
The list of countries covered and telematic services provided is available from dealers or on the website for your country.
call is made. The system is not traceable and
is not continuously monitored in its normal
operating mode.
The data in the system's internal memory is
automatically and continuously erased. Only
the vehicle’s three most recent locations are
stored.
When an emergency call is triggered, the data
log is stored for no more than 13 hours.
Access to data
You have the right to access the data and,
if necessary, submit a request to rectify, erase
or restrict the processing of any personal
information not processed in accordance
with the provisions of Regulation 2016/679
(GDPR). Third parties to which data has
been communicated shall be notified of any
rectification, erasure or restriction carried
out in accordance with the aforementioned
Directive, unless doing so would be impossible
or require a disproportionate effort.
You also have the right to lodge a complaint
with the relevant data protection authority.
Localised Assistance Call
► If the vehicle breaks down, press button 2
for more than 2 seconds to request assistance
(confirmed by a voice message*).
► Pressing again immediately cancels the
request.
Privacy mode allows you to manage the
level of sharing (data and/or position)
between your vehicle and the DS
AUTOMOBILES brand.
It can be configured in the Settings menu on
the touch screen.
By default, depending on equipment,
deactivate/reactivate geolocation by
simultaneously pressing the 2 buttons, then
press the "Localised Assistance Call" button
to confirm.
If you purchased your vehicle outside the
dealer network, we invite you to have a
dealer check the configuration of these
services and, if desired, modify it to suit your
wishes. In a multilingual country, configuration
is possible in the official national language of
your choice.
Page 68 of 244

66Safety05
Deactivation / Reactivation
In exceptional conditions (starting a vehicle stuck
in mud, immobilised in snow, on soft ground, etc.),
it may be useful to deactivate the ASR system to
freely spin the wheels and regain traction.
Reactivate the system as soon as the level of grip
permits.
It is set via the Driving / Vehicle touch
screen menu.
Deactivation is confirmed by the
illumination of this indicator lamp in the
instrument panel and the display of a message.
The ASR system is reactivated automatically
every time the ignition is switched back on or
from 31 mph (50 km/h).
Reactivation is manual below 31 mph (50 km/h).
Malfunction
In the event of a system malfunction, this
warning lamp comes on, accompanied by
an onscreen message and audible signal.
Contact a dealer or a qualified workshop to have
the systems checked.
ASR / DSC
These systems enhance safety during
normal driving, but should not encourage the
driver to take extra risks or drive at high speed.
It is in conditions of reduced grip (rain, snow,
ice) that the risk of loss of grip increases. It
is therefore important for your safety to keep
these systems activated in all conditions, and
particularly in difficult conditions.
For technical reasons, in particular to
improve the quality of telematic services
for customers, the Manufacturer reserves the
right to carry out updates to the vehicle's
on-board telematic system at any time.
If you benefit from the DS CONNECT BOX
offer with the SOS and Assistance Pack
included, you have available additional
services in your personal space, via the
website in your country.
For information about the SOS and Assistance
Pack, please refer to the general conditions for
these services.
Electronic stability control
(ESC)
The electronic stability control programme
includes the following systems:
–
An
ti-lock braking system (ABS) and Electronic
brake force distribution (EBFD).
–
Emergenc
y braking assistance (EBA).
–
An
ti-slip regulation (ASR).
–
Dynamic st
ability control (DSC).
Anti-lock braking system (ABS)
and Electronic brake force
distribution (EBFD)
These systems enhance the vehicle’s stability
and handling during braking, and enable greater
control while cornering, particularly on poor or
slippery road surfaces.
ABS prevents wheel locking in the event of
emergency braking.
EBFD manages the braking pressure wheel by
wheel.
This warning lamp comes on fixed in the
event of an ABS malfunction.
The vehicle retains conventional braking. Drive
carefully at a moderate speed.
Contact a dealer or a qualified workshop as soon
as possible.
This warning lamp, when lit together with
the STOP and ABS warning lamps,
accompanied by a message and an audible signal,
indicates an EBFD malfunction.
You must stop as soon as it is safe to do so.
Contact a dealer or a qualified workshop.
The normal operation of the ABS may
result in slight vibrations in the brake
pedal.
When braking in an emergency, press very
firmly and maintain this pressure.
When changing wheels (tyres and rims),
ensure that these are approved for your
vehicle.
After an impact, have these systems
checked by a dealer or a qualified
workshop.
Emergency braking assistance
(EBA)
In an emergency, this system enables you to reach
the optimum braking pressure more quickly and
therefore reduce the stopping distance.
It is triggered in relation to the speed at which the
brake pedal is pressed. This is felt by a reduction
in the resistance of the pedal and an increase in
braking efficiency.
Anti-slip regulation (ASR) /
Dynamic stability control (DSC)
Anti-slip regulation optimises traction using
engine braking and by applying the brakes on the
driving wheels to avoid wheel spinning. It also
enhances the vehicle's directional stability while
accelerating.
If there is a difference between the vehicle’s
trajectory and the path desired by the driver, the
dynamic stability control system automatically
uses engine braking and the brakes on one or
more wheels to return the vehicle to the desired
path, within the limits of the laws of physics.
These systems are activated automatically every
time the vehicle is started.
They come into operation in the event of a grip or
trajectory problem.
This warning lamp on the instrument panel
flashes to indicate that they are operating.
Page 112 of 244

110
Driving06
The system must not be activated in the
following situations:
–
D
riving with a "space-saver" type spare
wheel.
–
When t
owing, especially with an
unconnected or unapproved trailer.
–
Poor w
eather conditions.
–
D
riving on slippery road surfaces (risk of
aquaplaning, snow, ice).
–
D
riving on racing circuits.
–
D
riving on a rolling road.
Malfunction
A system malfunction is indicated
by the Service warning lamp coming
on and this (orange) symbol, accompanied by an
alert message and an audible signal.
Active Lane Departure
Warning System
Refer to the General recommendations on the use
of driving and manoeuvring aids.
Using a camera located at the top of the
windscreen to identify lane markings on the
road and at the edges of the road (depending on
version), the system corrects the trajectory of the
vehicle while alerting the driver if it detects a risk
of unintentionally crossing a line or hard shoulder
(depending on version).
This system is particularly useful on motorways
and main roads.
Conditions for operation
– Vehicle speed between 40 and 112 mph (65 and
180 km/h).
–
R
oad marked with a central dividing line.
–
St
eering wheel held in both hands.
–
Direction indic
ators not activated.
–
ESC s
ystem activated and operational.
The system helps the driver only if there is
a risk of the vehicle unintentionally
wandering from the lane it is being driven in. It
does not manage the safe driving distance,
vehicle speed or brakes.
The driver must hold the steering wheel with
both hands in a way that allows control to
be maintained in circumstances where the
system is not able to intervene (for example, if
the central dividing line disappears).
Operation
Once the system identifies a risk of the vehicle
involuntarily crossing one of the lane markings
detected or a lane limit (e.g. grass border), it
makes the necessary trajectory correction to
return the vehicle to its initial path.
The driver will notice a turning movement of the
steering wheel.
This warning lamp flashes during
trajectory correction.
The driver can prevent the correction by
keeping a firm grip on the wheel (during
an avoiding manoeuvre, for example).
The correction is interrupted immediately if
the direction indicators are operated.
While the direction indicators are on and for
a few seconds after switching them off, the
system considers that any change of trajectory is
intentional and no correction is triggered during
this period.
However, with the Blind Spot Detection system
activated, if the driver starts changing lanes and
another vehicle is detected in the vehicle's blind
spot, the system will correct the trajectory even
though the direction indicators are on.
For more information on the Blind Spot Detection,
refer to the corresponding section.
Driving situations and related alerts
The table below describes the alerts and messages displayed in different driving situations.
These alerts are not displayed sequentially.
Function status Indicator lamp Display and/or associated
messageComments
OFF
(grey)
Function deactivated.
ON
(grey) System active, conditions not met:
–
speed below 40 mph (65 km/h),
– no lane marking recognised,
– ASR/DSC systems deactivated or operation of ESC
system triggered,
– "sport" driving.
ON
(grey)
Automatic deactivation/standby of the function (for
example, due to detection of a trailer or use of the "space-
saver" spare wheel provided with the vehicle).
ON
(green) Lane marking detection.
Speed above 40 mph (65 km/h).
Page 133 of 244

131
Practical information07
This label is intended solely for use by
firefighters responding to an incident
involving the vehicle and for maintenance
technicians.
Never allow water or dust to enter the
connector or charging nozzle - risk of
electrocution or fire!
Never connect / disconnect the charging
nozzle or cable with wet hands - risk of
electrocution!
In the event of an accident or impact
The electrical system or the traction
battery may be seriously damaged in the event
of an accident or impact involving the vehicle
underbody.
Stop as soon as it is safe to do so and switch
off the ignition.
Contact a dealer or a qualified workshop
without delay.
In the event of exposure to a fire
Immediately exit and evacuate all
passengers from the vehicle. Never attempt to
fight the fire yourself - risk of electrocution!
You must immediately contact the emergency
services, informing them that the incident
involves an electric vehicle.
When washing
Before washing the vehicle, always check
that the charging flap is closed correctly.
Never wash the vehicle while the battery is on
charge.
High-pressure washing
To avoid damaging electrical components,
it is expressly prohibited to use high-pressure
washing to clean the front compartment or the
vehicle underbody.
Do not use a pressure greater than 80 bar
when washing the bodywork.
Traction battery
This battery stores the energy that powers
the electric motor and the thermal comfort
equipment in the passenger compartment. It is
discharged during use, and must therefore be
regularly recharged. There is no need to wait for
the traction battery to fall to its reserve level
before recharging.
Battery life may vary according to the type of
driving, the route, thermal comfort equipment
usage and battery component ageing.
The traction battery ageing process is
influenced by multiple factors, including
climate conditions, the distance travelled and
how often it has been fast-charged.
In the event of damage to the traction
battery
It is strictly prohibited to work on the vehicle
yourself.
Do not touch liquids coming from the battery,
and in the event of skin contact with these
products, wash abundantly with water and
contact a doctor as soon as possible.
Contact a dealer or a qualified workshop to
have the system checked.
Charging connectors and
indicator lamps
1. Charging connectors
2. Deferred charge activation button
Page 142 of 244
140
Practical information07
► Clip the stay in its housing.
► Lower the bonnet and release it near the end
of its travel.
► Pull on the bonnet to check that it is locked
correctly.
Because of the presence of electrical
equipment under the bonnet, it is
recommended that exposure to water (rain,
washing, etc.) be limited.
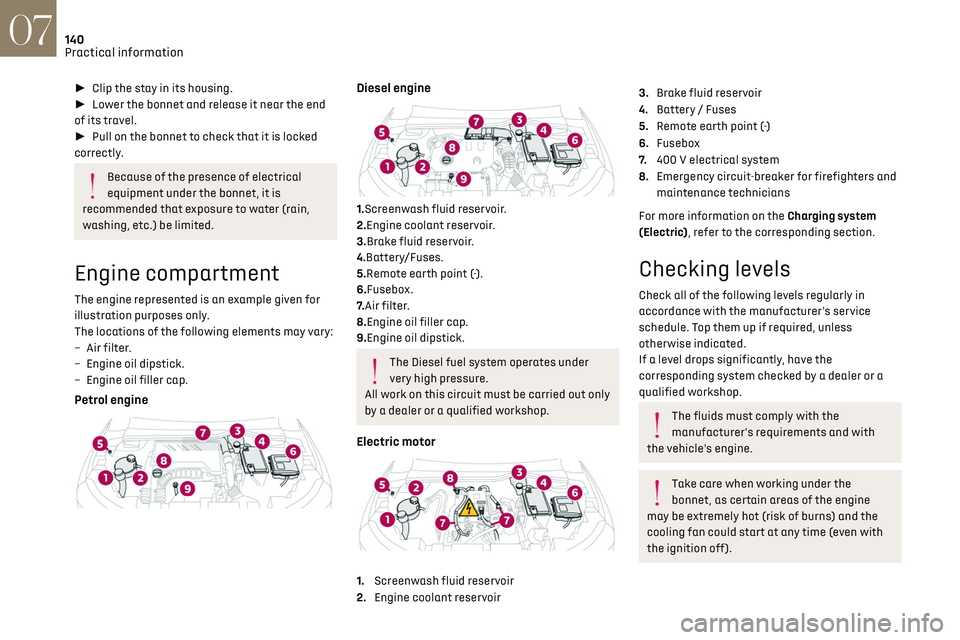
Engine compartment
The engine represented is an example given for
illustration purposes only.
The locations of the following elements may vary:
–
Air filt
er.
–
Engine oil dip
stick.
–
Engine oil filler c
ap.
Petrol engine
Diesel engine
1.Screenwash fluid reservoir.
2.Engine coolant reservoir.
3.Brake fluid reservoir.
4.Battery/Fuses.
5.Remote earth point (-).
6.Fusebox.
7. Air filter.
8.Engine oil filler cap.
9.Engine oil dipstick.
The Diesel fuel system operates under
very high pressure.
All work on this circuit must be carried out only
by a dealer or a qualified workshop.
Electric motor
1. Screenwash fluid reservoir
2. Engine coolant reservoir
3.Brake fluid reservoir
4. Battery / Fuses
5. Remote earth point (-)
6. Fusebox
7. 400 V electrical system
8. Emergency circuit-breaker for firefighters and
maintenance technicians
For more information on the Charging system
(Electric), refer to the corresponding section.
Checking levels
Check all of the following levels regularly in
accordance with the manufacturer's service
schedule. Top them up if required, unless
otherwise indicated.
If a level drops significantly, have the
corresponding system checked by a dealer or a
qualified workshop.
The fluids must comply with the
manufacturer's requirements and with
the vehicle's engine.
Take care when working under the
bonnet, as certain areas of the engine
may be extremely hot (risk of burns) and the
cooling fan could start at any time (even with
the ignition off).
Used products
Avoid prolonged contact of used oil or
fluids with the skin.
Most of these fluids are harmful to health and
very corrosive.
Do not discard used oil or fluids into
sewers or onto the ground.
Empty used oil into the containers reserved
for this purpose at a dealer or a qualified
workshop.
Engine oil
The level is checked, with the engine
having been switched off for at least 30
minutes and on level ground, using the dipstick.
It is normal to top up the oil level between two
services (or oil changes). It is recommended that
you check the level, and top up if necessary, every
3,000 miles (5,000 km).
In order to maintain the reliability of the
engine and emissions control system,
never use additives in the engine oil.
Checking using the dipstick
For the location of the dipstick, please refer
to the illustration of the corresponding engine
compartment.
► Grasp the dipstick by its coloured grip and pull
it out completely.