stop start Citroen DS3 RHD 2016 1.G Owner's Guide
[x] Cancel search | Manufacturer: CITROEN, Model Year: 2016, Model line: DS3 RHD, Model: Citroen DS3 RHD 2016 1.GPages: 380, PDF Size: 10.11 MB
Page 233 of 380

231
12 V battery
The battery is located under the bonnet.
T o gain access to it:
F
o
pen the bonnet using the interior release
l
ever, then the exterior safety catch,
F
s
ecure the bonnet stay,
F
l
ift the plastic cover on the (+) terminal.
Access to the battery
Procedure for starting the engine using another battery or charging a discharged battery.
general points
Lead-acid starter batteries
Batteries contain harmful substances such as sulphuric acid and lead.
They
must be disposed of in
a
ccordance with regulations and must
n
ot,
i
n
a
ny
c
ircumstances,
b
e
d
iscarded
w
ith household waste.
Take
used remote control batteries and
v
ehicle batteries to a special collection
point.
Versions
equipped with Stop &
S
tart are fitted with a 12 V lead-acid
b
attery of specific technology and
s
pecification.
Its
replacement should be carried
o
ut only by a CITROËN dealer or a
q
ualified
w
orkshop. Protect
your eyes and face before
h
andling the battery.
All
operations on the battery must be
c
arried out in a well ventilated area and
a
way from naked flames and sources
o
f sparks, so as to avoid the risk of
e
xplosion or fire.
Wash
your hands after wards.
If
you have an electronic or automatic
g
earbox, never try to start the engine
b
y pushing the vehicle.The
(-) battery terminal is not accessible.
A
remote earthing point is located on the front
l
eft-hand
w
ing
pan
el.
Practical information
Page 234 of 380

Some functions, including Stop & Start, are not available if the battery is not
sufficiently
c
harged.
Never
try
to
start
the
engine
by
c
onnecting
a
battery
charger.
Never
use
a
24
V
or
higher
battery
b
o o s t e r.
First
check
that
the
slave
battery
has
a
n
ominal
voltage
of
12
V
and
a
capacity
a
t
least
equal
to
that
of
the
discharged
b
attery.
The
two
vehicles
must
not
be
in
contact
w
ith
each
other.
Switch
off
the
electrical
consumers
on
b
oth
vehicles
(audio
system,
wipers,
l
ighting,
...
).
Ensure
that
the
jump
lead
cables
do
n
ot
pass
close
to
moving
parts
of
the
e
ngine
(cooling
fan,
belts,
...).
Do
n
ot
d
isconnect
t
he
(
+)
t
erminal
w
hen
t
he
engine
is
running.
Starting using another
battery
When your vehicle's battery is discharged, the e ngine can be started using a slave battery
(
external or on another vehicle) and jump lead
c
ables or a battery booster.
F
R
aise the plastic cover on the (+) terminal,
i
f your vehicle has one.
F
C
onnect the red cable to the positive
t
erminal (+) of the flat battery A (at
t
he metal elbow) then to the positive
t
erminal (+) of the slave battery B or the
b o o s t e r.
F
C
onnect one end of the green or black
c
able to the negative terminal (-) of the
s
lave battery B or the booster (or earth
p
oint on the other vehicle).
F
C
onnect
t
he
o
ther
e
nd
o
f
t
he
g
reen
o
r
b
lack
c
able to the earth point C on the broken
d
own vehicle.F
S tart the engine of the vehicle with the
g
ood battery and leave it running for
a
few minutes.
F
O
perate the starter on the broken down
v
ehicle and let the engine run.
If
the engine does not start straight away,
s
witch off the ignition and wait a few moments
b
efore trying again.
F
W
ait until the engine returns to idle then
d
isconnect the jump lead cables in the
r
everse
o
rder.
F
R
efit the plastic cover to the (+) terminal, if
y
our vehicle has one.
F
A
llow the engine to run for at least
3
0 minutes, by driving or with the vehicle
s
tationary, so that the battery reaches an
adequate
state of charge.
Page 236 of 380

disconnecting the battery
In order to maintain an adequate state of charge for starting the engine, it is
r
ecommended that the battery be disconnected
i
f the vehicle is taken out of service for a long
p
eriod.
Wait
2 minutes after switching off the ignition
b
efore disconnecting the battery:
F
c
lose all openings (doors, boot, windows,
r
oof (for Cabrio versions)),
F
s
witch off all electrical consumers (audio
s
ystem, wipers, lighting, ...),
F
s
witch off the ignition and wait for
f
our minutes.
Having
exposed the battery, it is only
n
ecessary to disconnect the (+) terminal.
Following reconnection of the
battery
After reconnecting the battery, switch on the ignition and wait 1 minute before starting to
a
llow initialisation of the electronic systems.
However,
if minor problems persist following
t
his operation, contact a CITROËN dealer or a
q
ualified
w
orkshop.
Referring
to the corresponding section, you
m
ust yourself reinitialise or reset certain
s
ystems, such as:
-
t
he remote control,
-
t
he electric windows,
-
t
he date and time,
-
t
he radio preset stations.
Quick release terminal
di
sconnecting the (+) terminal
F Raise the lever A fully to release the clamp B.
Reconnecting the (+) terminal
F Position the open clamp B of the cable on
the positive post (+) of the battery.
F
P
ress down on the clamp to position it
c
orrectly on the battery post.
F
L
ock the clamp by lowering the lever A. The
Stop & Start system may not be
o
perational during the trip following the
f
irst engine start.
In
this case, the system will only be
a
vailable again after a continuous
p
eriod of immobilisation of the vehicle,
a
period which depends on the ambient
t
emperature and the state of charge of
t
he battery (up to about 8 hours).
Do
not force the lever as locking
w
ill not be possible if the clamp is
n
ot positioned correctly; start the
p
rocedure again.
Page 237 of 380

235
Load reduction modeSystem which manages the use of certain functions according to the level of charge
r
emaining in the battery.
When
the vehicle is being driven, the load
r
eduction function temporarily deactivates
c
ertain functions, such as the air conditioning,
t
he heated rear screen...
The
deactivated functions are reactivated
a
utomatically as soon as conditions permit.Energy economy modeSystem which manages the period of use of certain functions to conserve a sufficient level of c
harge in the battery.
After
the engine has stopped, you can still use functions such as the audio equipment, windscreen
w
ipers, dipped beam headlamps, courtesy lamps, etc. for a maximum combined period of
t
hirty minutes. This
period may be greatly reduced if
t
he battery is not fully charged.
A
flat battery prevents the engine from
s
tarting.
If
the telephone is being used at the
s
ame time, it will be interrupted after
10
m
inutes.
Switching to economy mode
Once this period has elapsed, a message appears in the screen indicating that the
v
ehicle has switched to economy mode and the
a
ctive functions are put on standby.
Exiting economy mode
These functions are reactivated automatically the next time the vehicle is driven.
F
I
n order to resume the use of these
f
unctions immediately, start the engine and
l
et it run for a few minutes.
The
time available to you will then be double
t
he period for which the engine is left running.
H
owever, this period will always be between
f
ive and thirty minutes.
Practical information
Page 251 of 380

249
Bonnet
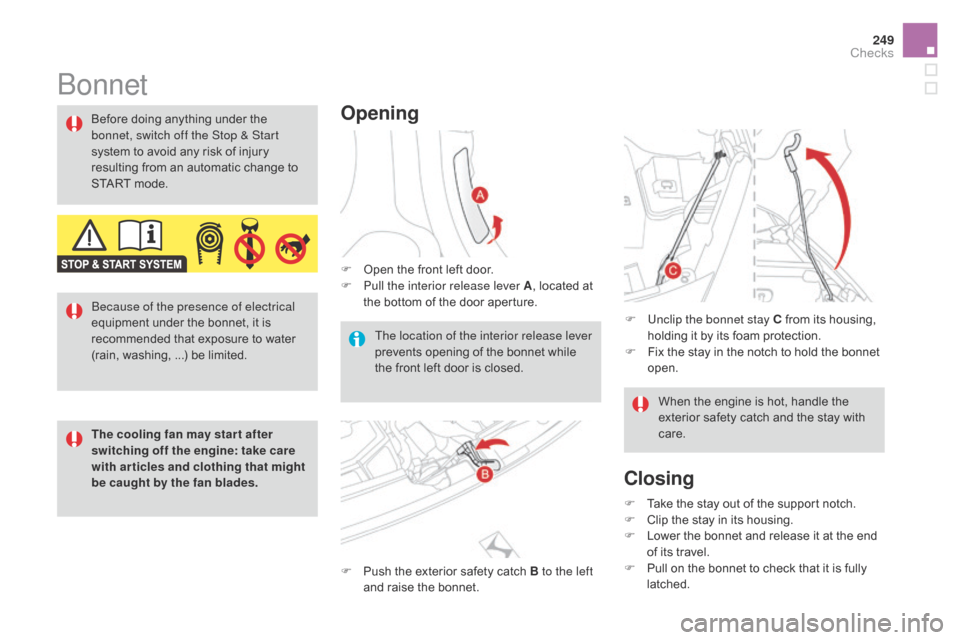
Opening
F Open the front left door.
F P ull the interior release lever A ,
located at
t
he bottom of the door aperture.
F
P
ush the exterior safety catch B to the left
and
raise the bonnet.
Before
doing
anything
under
the
b
onnet, switch off the Stop & Start
system
to
avoid
any
risk
of
injury
r
esulting
from
an
automatic
change
to
S
TART
mode.
The location of the interior release lever
prevents opening of the bonnet while
t
he front left door is closed.F
U
nclip the bonnet stay C from its housing,
h
olding it by its foam protection.
F
F
ix the stay in the notch to hold the bonnet
ope
n.
Closing
F Take the stay out of the support notch.
F C lip the stay in its housing.
F
L
ower the bonnet and release it at the end
o
f its travel.
F
P
ull on the bonnet to check that it is fully
l
atched.When
the engine is hot, handle the
e
xterior safety catch and the stay with
c
are.
Because of the presence of electrical
equipment
under
the
bonnet,
it
is
r
ecommended
that
exposure
to
water
(
rain,
washing, ...)
be
limited.
The cooling fan may star t after
switching off the engine: take care
with articles and clothing that might
be caught by the fan blades.
Checks
Page 258 of 380

Checks
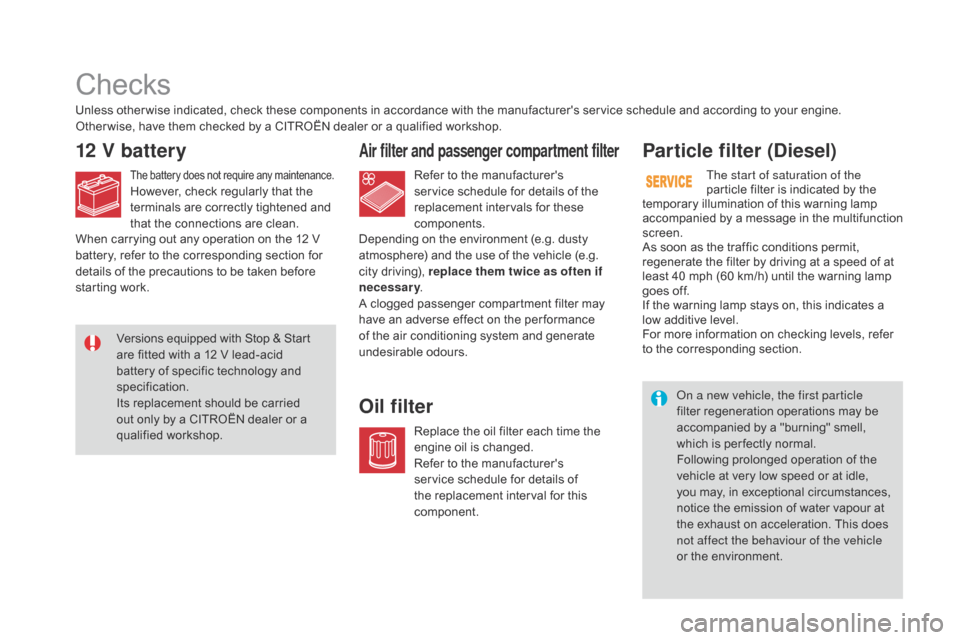
12 V batteryAir filter and passenger compartment filter
Oil filterParticle filter (
di
esel)
Unless other wise indicated, check these components in accordance with the manufacturer's service schedule and according to your engine.
O ther wise, have them checked by a CITROËN dealer or a qualified workshop.
The battery does not require any maintenance.However, check regularly that the terminals are correctly tightened and
t
hat the connections are clean. Refer
to the manufacturer's s
ervice schedule for details of the r
eplacement intervals for these
c
omponents.
Replace
the oil filter each time the
e
ngine oil is changed.
Refer
to the manufacturer's
s
ervice schedule for details of
t
he replacement interval for this
c
omponent.
Versions
equipped with Stop & Start
a
re fitted with a 12 V lead-acid
b
attery of specific technology and
s
pecification.
Its
replacement should be carried
o
ut only by a CITROËN dealer or a
q
ualified
w
orkshop. The start of saturation of the
particle
filter is indicated by the
O
n a new vehicle, the first particle
filter
regeneration operations may be
a
ccompanied by a "burning" smell,
w
hich is per fectly normal.
Following
prolonged operation of the
v
ehicle at very low speed or at idle,
y
ou may, in exceptional circumstances,
n
otice the emission of water vapour at
t
he exhaust on acceleration. This does
n
ot affect the behaviour of the vehicle
or
the environment.
When
carrying out any operation on the 12 V
b
attery,
refer to the corresponding section for
d
etails
of
the precautions to be taken before
s
tarting
work. Depending
on the environment (e.g. dusty
a
tmosphere) and the use of the vehicle (e.g.
c
ity driving), replace them twice as often if
necessary .
A
clogged passenger compartment filter may
h
ave an adverse effect on the per formance
o
f the air conditioning system and generate
u
ndesirable
o
dours.temporary
illumination of this warning lamp
a
ccompanied by a message in the multifunction
sc
reen.
As
soon as the traffic conditions permit,
r
egenerate the filter by driving at a speed of at
l
east 40 mph (60 km/h) until the warning lamp
g
oes off.
If
the warning lamp stays on, this indicates a
l
ow additive level.
For
more information on checking levels, refer
t
o the corresponding section.
Page 268 of 380

diesel enginese-H d i 90 BlueH d i 75BlueH d i 100 S&SBlueH d i 120 S&S
BlueH d i 115
S&S**
ge
arbox ETG6
(6 -speed
e
lectronic)Manual
(
5-speed) Manual
(
5-speed)ETG6
(6 -speed
e
lectronic)Manual
(
6-speed)
Model code:
SA... 9HP8/PS
BHW6BHY6/SBHYM/PS BHZM/S
BHXM/S**
Cubic
capacity (cc) 1 5601 560 1 5601 560
Bore
x stroke (mm) 75
x 88.3 75 x 88.375
x 88.375
x 88.3
Max
power: EU standard (kW)* 6855 7388
85**
Max
power engine speed (rpm) 4 0003
5003
7503
500
Max
torque: EU standard (Nm) 230233 254300
Max
torque engine speed (rpm) 1 7501 750 1 7501 750
Fuel DieselDiesel DieselDiesel
Catalytic converter Ye sYe s Ye sYe s
Particle
filter (FAP) Ye sYe s Ye sYe s
Engine
oil capacity (in litres) (with filter
r
eplacement) 3.75
3.75 3.753.75
*
T
he maximum power corresponds to the value type-approved on a test bed, under conditions defined in European legislation
(Directive
1
999/99/EC).
**
For Belgium.
Diesel engines
.../S: model fitted with Stop & Start
Page 285 of 380

283
Level 1Level 2 Level 3 Comments
na
vigation
Settings
na
vigation Enter destination
Display
recent destinations.
Route settings Fastest
Choose
the navigation criteria.
The
map displays the route chosen according to
t
hese
c
riteria.
Shortest
Time/distance
Ecological
To l l s
Ferries
Tr a f f i c
Close-Strict
Show
route on map Display the map and start navigation.
Confirm Save
the options.
Save current location Save
the current address.
Stop navigation Delete
the navigation information.
Voice synthesis Choose
the volume for voice and announcement
o
f street names.
di
version Detour
from your initial route by a determined
di
stance.
na
vigation Display
in text mode.
Zoom
in.
Zoom
out.
Display
in full screen mode.
Use
the arrows to move the map.
Switch
to 2D map.
Audio and Telematics
Page 292 of 380

1
2
10
Navigation - Guidance
Choosing a new destination
Select "Enter destination ". Select "
Save" to save the address
e
ntered as a contact entry.
The system allows up to 200 entries.
Select " Confirm ".
Press " Show route on map " to start
navigation.
Select "
Address ".
Select the " Country:"
from the
l
ist offered, then in the same
w
ay the "City:" or its post
code,
the "Road: ", the
"
n°:".
C
onfirm each time. Select "n
avigate to
".
Choose the restriction criteria:
"T
o l l s", "Ferries ", "Tr a f f i c ", "Strict ",
" Close ".
Choose
the navigation criteria:
"F
astest" or "Shortest " or "Time/
distance " or "Ecological". To
delete navigation information, press
"
S
ettings
".
Press " Stop navigation ".
To resume navigation press "Settings ".
Press " Resume guidance ".
Press on
n
a
vigation
to display the
p
rimary
pag
e.
Press on the secondary page.
Towards a new destination
Or
Page 335 of 380

1
1
1
19
20
21
22
23
24
25
26
333
Level 1Level 2 Level 3 Comments
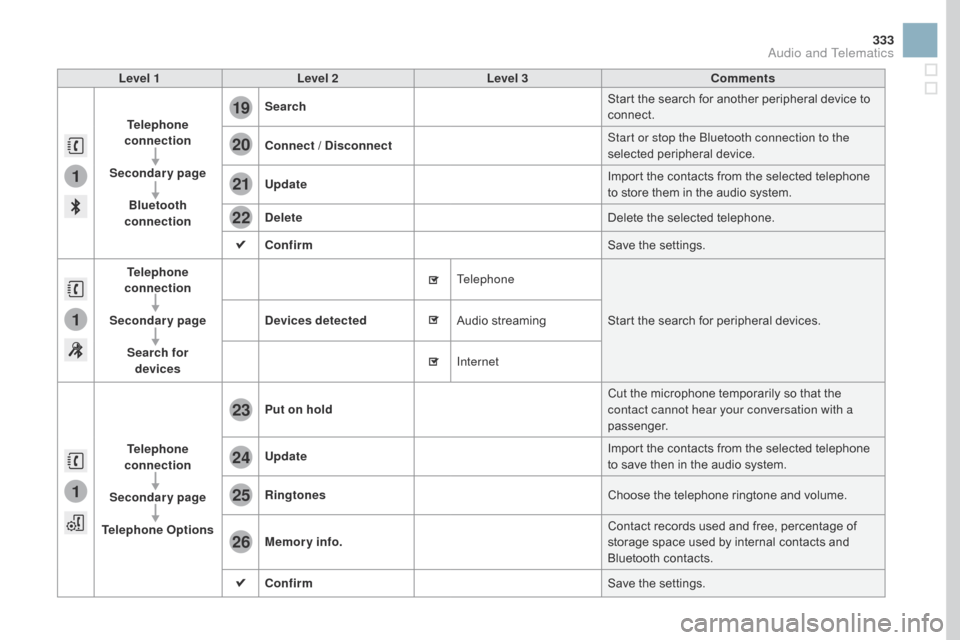
Telephone
connection
Secondary page Bluetooth
connection Search
Start
the search for another peripheral device to
c
onnect.
Connect /
d isconnect Start or stop the Bluetooth connection to the
selected
pe
ripheral
d
evice.
Update Import
the contacts from the selected telephone
t
o store them in the audio system.
de
lete Delete
the selected telephone.
Confirm Save
the settings.
Telephone
conn ection
Secondary page Search for devices
de
vices detected Telephone
Start
the search for peripheral devices.
Audio
s
treaming
Internet
Telephone
connection
Secondary page
Telephone Options Put on hold
Cut
the microphone temporarily so that the
c
ontact cannot hear your conversation with a
passenger.
Update Import
the contacts from the selected telephone
t
o save then in the audio system.
Ringtones Choose
the telephone ringtone and volume.
Memory info. Contact
records used and free, percentage of
s
torage space used by internal contacts and
Bl
uetooth
c
ontacts.
Confirm Save
the settings.
Audio and Telematics