engine Citroen DS3 RHD 2016 1.G Manual PDF
[x] Cancel search | Manufacturer: CITROEN, Model Year: 2016, Model line: DS3 RHD, Model: Citroen DS3 RHD 2016 1.GPages: 380, PDF Size: 10.11 MB
Page 240 of 380

F On the front bumper, unclip the access flap b
y pulling successively on the two lugs,
u
sing a screwdriver.
F
R
otate the flap.
F
C
ompletely remove the flap, by
c
ompressing the plastic diamond shape
l
ocated in the lower section.
F
S
tore the flap in the boot.
F
S
crew the towing eye in fully.
F
I
nstall the towing arm. F
O n the rear bumper, unclip the cover by p
ressing at the bottom.
F
S
crew the towing eye in fully.
F
I
nstall the towing arm.
F
S
witch on the hazard warning lamps on
b
oth vehicles.
F
M
ove off gently and drive for a short
d
istance
o
nly.
Towing your vehicleTowing another vehicle
Failure to observe this instruction could r
esult in damage to certain components
(
braking, transmission...) and the
a
bsence of braking assistance the next
t
ime the engine is started.
F
U
nlock the steering by turning the key one
n
otch in the ignition switch and release the
par
king
b
rake.
F
S
witch on the hazard warning lamps on
b
oth vehicles.
F
M
ove off gently and drive for a short
d
istance
o
nly.
F
P
lace the gear lever in neutral (position n
for an electronic or automatic gearbox).
Page 241 of 380

239
distribution of loads
F Distribute the load in the trailer so that the h
eaviest items are as close as possible to
t
he axle and the nose weight approaches
t
he maximum permitted without
e
xceeding it.
Air
density decreases with altitude, thus
r
educing engine per formance. Above
1 0
00 metres, the maximum towed load must
b
e reduced by 10 % for every 1 000 metres of
al
titude. Refer
to the "Technical data" section for
d
etails of the weights and towed loads
w
hich apply to your vehicle.
Towing a trailer
Your vehicle is primarily designed for transporting people and luggage, but it may
a
lso be used for towing a trailer. We
recommend the use of genuine
C
ITROËN towbars and their harnesses
t
hat have been tested and approved
f
rom the design stage of your vehicle,
a
nd that the fitting of the towbar is
e
ntrusted to a CITROËN dealer or a
q
ualified
w
orkshop.
If the towbar is not fitted by a
C
ITROËN dealer, it must still be
f
itted in accordance with the vehicle
m
anufacturer's
i
nstructions.
Driving with a trailer places greater
d
emands on the towing vehicle and the
d
river must take particular care.
driving advice
Practical information
Page 242 of 380

Towing with the gT RACIn g version
Your vehicle cannot be fitted with a t
owbar. The space occupied by the
s
port diffuser prevents this.
Side wind
F Take into account the increased sensitivity t
o side wind.
Cooling
Towing a trailer on a slope increases the temperature of the coolant.
As
the fan is electrically controlled, its cooling
c
apacity is not dependent on the engine speed.
F
T
o lower the engine speed, reduce your
s
peed.
The
maximum towed load on a long incline
d
epends on the gradient and the ambient
t
emperature.
In
all cases, keep a check on the coolant
t
emperature. F
I
f the warning lamp and the
S
TOP
warning lamp come on,
s
top the vehicle and switch off
t
he engine as soon as possible.
Braking
Towing a trailer increases the braking distance.
T o avoid overheating of the brakes on a long
m
ountain type of descent, the use of engine
b
raking is recommended.
Ty r e s
F Check the tyre pressures of the towing v
ehicle and of the trailer, observing the
re
commended
p
ressures.
Lighting
F Check the electrical lighting and signalling o
n the trailer.
The
rear parking sensors will be
d
eactivated automatically if a genuine
C
ITROËN towbar is used.
Page 250 of 380

A dYnAMIC PARTnERSHIP,
dI
RECTE d TOWAR
dS T
HE
FUTURE.
For more than 45 years, TOTAL and DS have s
hared common values: excellence, creativity and
t
echnological innovation.
It
is in this same spirit that TOTAL has developed a
r
ange of TOTAL QUARTZ lubricants adapted to DS
e
ngines,
making
them even more fuel efficient and protective
o
f the environment.
Choose TOTAL QUARTZ lubricants
for servicing your vehicle,
this is your assurance of optimum
durability and performance from
your engine.
Page 251 of 380
249
Bonnet
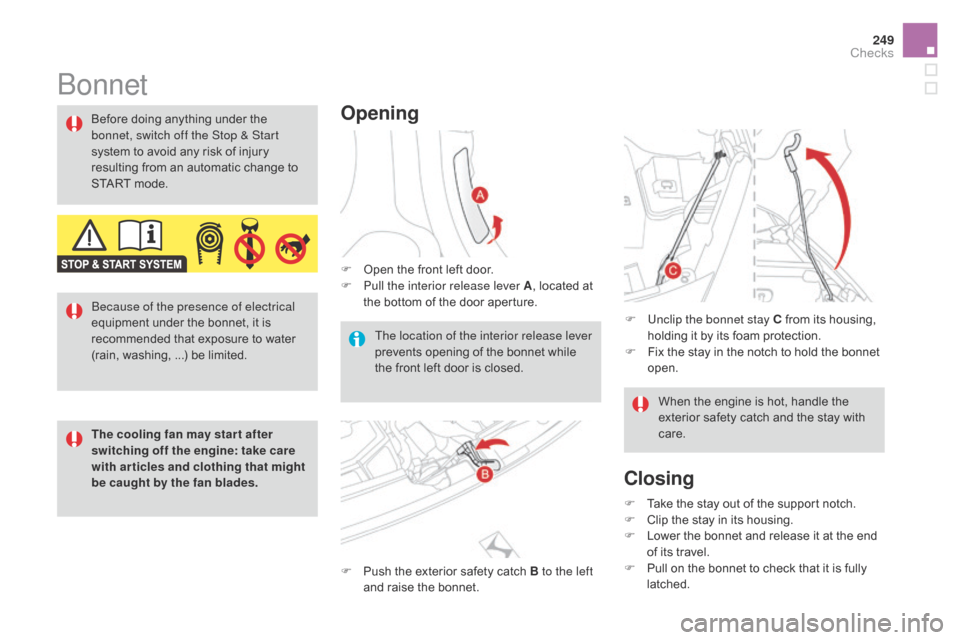
Opening
F Open the front left door.
F P ull the interior release lever A ,
located at
t
he bottom of the door aperture.
F
P
ush the exterior safety catch B to the left
and
raise the bonnet.
Before
doing
anything
under
the
b
onnet, switch off the Stop & Start
system
to
avoid
any
risk
of
injury
r
esulting
from
an
automatic
change
to
S
TART
mode.
The location of the interior release lever
prevents opening of the bonnet while
t
he front left door is closed.F
U
nclip the bonnet stay C from its housing,
h
olding it by its foam protection.
F
F
ix the stay in the notch to hold the bonnet
ope
n.
Closing
F Take the stay out of the support notch.
F C lip the stay in its housing.
F
L
ower the bonnet and release it at the end
o
f its travel.
F
P
ull on the bonnet to check that it is fully
l
atched.When
the engine is hot, handle the
e
xterior safety catch and the stay with
c
are.
Because of the presence of electrical
equipment
under
the
bonnet,
it
is
r
ecommended
that
exposure
to
water
(
rain,
washing, ...)
be
limited.
The cooling fan may star t after
switching off the engine: take care
with articles and clothing that might
be caught by the fan blades.
Checks
Page 252 of 380
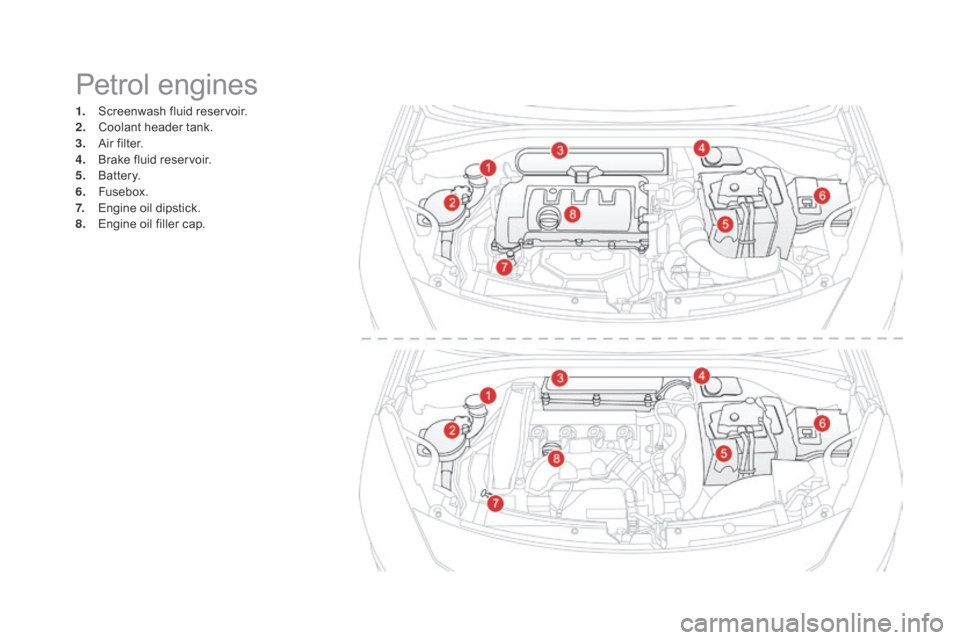
Petrol engines
1. Screenwash fluid reservoir.
2. C oolant header tank.
3.
A
ir filter.
4.
B
rake fluid reservoir.
5.
B
attery.
6.
F
usebox.
7.
E
ngine oil dipstick.
8.
E
ngine oil filler cap.
Page 253 of 380
251
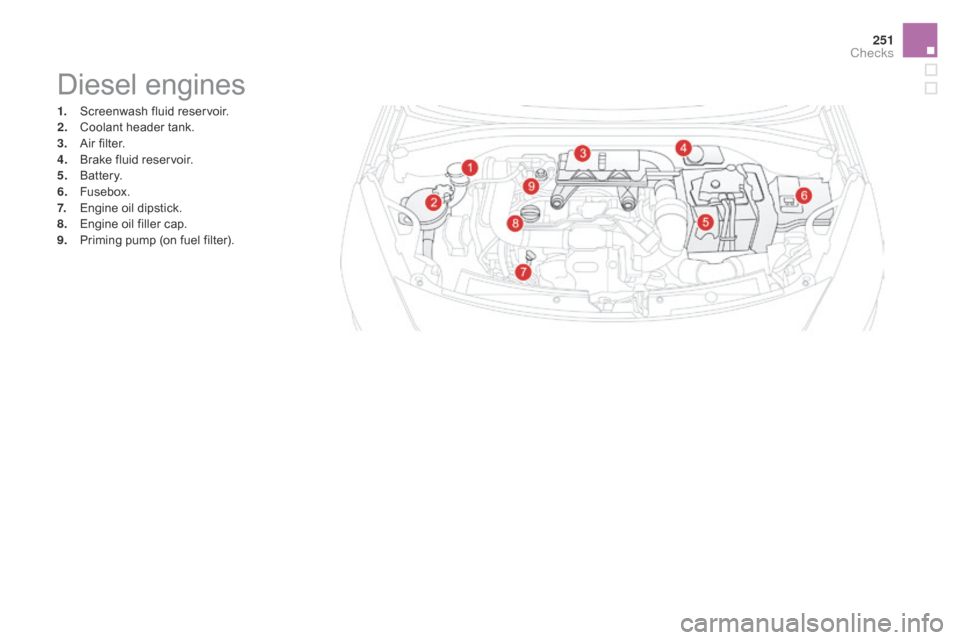
Diesel engines
1. Screenwash fluid reservoir.
2. C oolant header tank.
3.
A
ir filter.
4.
B
rake fluid reservoir.
5.
B
attery.
6.
F
usebox.
7.
E
ngine oil dipstick.
8.
E
ngine oil filler cap.
9.
P
riming pump (on fuel filter).
Checks
Page 254 of 380
Checking levels
Check all of these levels regularly, in line with the manufacturer's service schedule. Top them up if necessary, unless other wise indicated.
I f a level drops significantly, have the corresponding system checked by a CITROËN dealer or a qualified workshop.
Engine oil level
It is normal to top up the oil level between two services (or oil changes). CITROËN
r
ecommends that you check the level, and top
u
p if necessary, every 3 000 miles (5 000 kms).
The
check is carried out either when
t
he ignition is switched on using the
o
il level indicator in the instrument
p
anel for vehicles so equipped, or
u
sing the dipstick.
To ensure that the reading is correct,
y
our vehicle must be parked on a level
s
ur face with the engine having been off
f
or more than 30 minutes.
Take care when working under the
b
onnet, as certain areas of the engine
m
ay be extremely hot (risk of burns)
a
nd the cooling fan could start at any
t
ime (even with the ignition off).
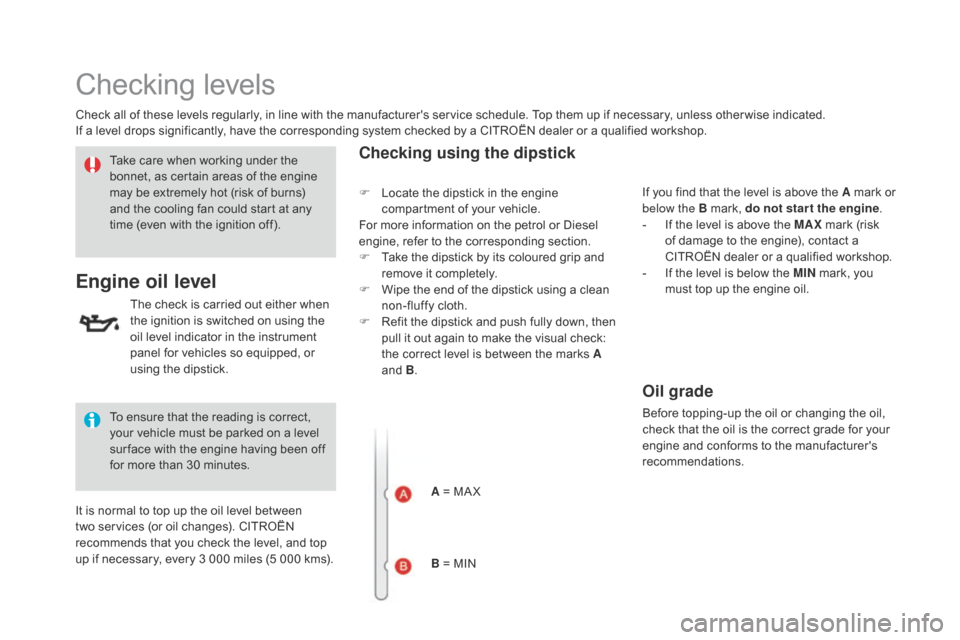
Checking using the dipstick
A = MA X
B = MIN If
you find that the level is above the A mark or
belo
w the B mark, do not star t the engine
.
-
I
f the level is above the MAX
mark (risk
o
f damage to the engine), contact a
C
ITROËN dealer or a qualified workshop.
-
I
f the level is below the MI n
mark, you
m
ust top up the engine oil.
F
L
ocate
the dipstick in the engine
c
ompartment of your vehicle.
For
more
information on the petrol or Diesel
e
ngine,
refer
to the corresponding section.
F
T
ake
the
dipstick by its coloured grip and
r
emove
it completely.
F
W
ipe
the
end of the dipstick using a clean
n
on-fluffy cloth.
F
R
efit
the
dipstick and push fully down, then
p
ull
it
out again to make the visual check:
t
he
correct level is between the marks A
and
B
.
Oil grade
Before topping-up the oil or changing the oil, c
heck that the oil is the correct grade for your
e
ngine and conforms to the manufacturer's
r
ecommendations.
Page 255 of 380
253
Brake fluid level
Changing the fluid
Refer to the manufacturer's service schedule for details of the interval for this operation.
Fluid specification
The brake fluid must conform to the manufacturer's r ecommendations.
The
brake fluid level should be close
t
o the "MA X" mark. If it is not, check
t
he brake pad wear.
After
topping-up
the
oil,
the
check
when
s
witching
on
the
ignition
with
the
oil
level
i
ndicator
in
the
instrument
panel
is
not
valid
d
uring
the
30
minutes
after
topping
up.
Topping-up the engine oil level
F Locate the oil filler cap in the engine c
ompartment of your vehicle.
For
more information on the petrol or Diesel
e
ngine, refer to the corresponding section.
F
U
nscrew the oil filler cap to reveal the filler
aperture.
F
A
dd oil in small quantities, avoiding any
s
pills on engine components (risk of fire).
F
W
ait a few minutes before checking the
l
evel again using the dipstick.
F
A
dd more oil if necessary.
F
A
fter checking the level, carefully refit the
o
il filler cap and the dipstick in its tube.
Engine oil change
Refer to the manufacturer's service schedule for details of the interval for this operation.
In
order to maintain the reliability of the engine
a
nd emission control system, never use
a
dditives in the engine oil.
Checks
Page 256 of 380
Fluid specification
The coolant must conform to the manufacturer's r ecommendations.
Coolant level
The coolant level should be close to the "MA X" mark but should never
e
xceed it.
In
addition, as the cooling system is
p
ressurised, wait at least one hour after
s
witching
off the engine before carrying out any
wo
rk.
To
avoid
any risk of scalding, unscrew the cap
b
y
two
turns to allow the pressure to drop.
W
hen
the
pressure has dropped, remove the
c
ap
and
top up the level.
When
the
engine is warm, the temperature of
t
he
coolant is regulated by the fan.
The cooling fan may star t after
switching off the engine: take care
with articles and clothing that might
be caught by the fan blades.
Screenwash fluid level
Fluid specification
For optimum cleaning and to avoid freezing, t his fluid must not be topped up or replaced
w
ith plain water.
In
w
intry
c
onditions,
i
t
i
s
r
ecommended
t
hat
y
ou
u
se an ethyl alcohol or methanol based fluid.
Top
up the level when necessary.