engine Citroen DS3 RHD 2016 1.G Repair Manual
[x] Cancel search | Manufacturer: CITROEN, Model Year: 2016, Model line: DS3 RHD, Model: Citroen DS3 RHD 2016 1.GPages: 380, PDF Size: 10.11 MB
Page 201 of 380

199
In the event of a fault with the SCR emissions control system
If it is a temporary fault, the alert disappears during the next journey,
a
fter self-diagnosis of the SCR system.
A
system that prevents engine starting is activated automatically from 650 miles (1 100 km) after confirmation of a fault with the SCR emissions
c
ontrol system. Have the system checked by a CITROËN dealer or a qualified workshop as soon as possible.
In the event of the detection of a fault
du
ring an authorised driving phase (between
650 miles and 0 miles) (1 100 km and 0 km)
The
UREA, SERVICE and diagnostic warning
l
amps
comes on, accompanied by an audible
s
ignal
and the display of the message
"
Emissions
f
ault".
The
alert is triggered when driving when the
f
ault
is detected for the first time, then when
s
witching on the ignition for subsequent
j
ourneys, while the fault persists. If a fault with the SCR system is confirmed (after
3
0 miles (50 km) covered with the permanent
d
isplay of the message signalling a fault), the
S
ERVICE and engine diagnostic warning lamps
c
ome on and the UREA warning lamp flashes,
a
ccompanied by an audible signal and the
d
isplay of a message (e.g.: "Emissions fault:
S
tarting prevented in 150 miles") indicating the
r
emaining range express in miles or kilometres.
While driving, the message is displayed every
3
0 seconds while the fault with the SCR system
p
ersists.
The alert is repeated when switching on the ig
nition.
You
should go to a CITROËN dealer or a
q
ualified workshop as soon as possible.
Other wise, you will not be able to restart your
engine. You
have exceeded the authorised
d
riving limit: the starting prevention
s
ystem inhibits engine starting.
Every
time the ignition is switched on, the SERVICE a
nd engine diagnostic warning lamps come on and t
he UREA warning lamp flashes, accompanied by
a
n audible signal and the display of the message
"
Emissions fault: Starting prevented".
Starting prevented
To
be able to start the engine, you must call on
a
CITROËN dealer or a qualified workshop.
Practical information
Page 204 of 380

Important: if your vehicle's Ad
Blue® tank is completely empty - w
hich
is
confirmed by the alert
m
essages and the impossibility of
s
tarting
the engine, you must add at
l
east
3.8 litres (so two 1.89 litre bottles).If
any additive is split or splashed, wash
i
mmediately with cold water or wipe
w
ith a damp cloth.
If the additive has crystallised, clean it
o
ff using a sponge and hot water.Important:
i
n the event of a top-up after
a breakdown because of a lack of
additive , signalled by the message "Top
u
p emissions additive: Starting prevented",
y
ou must wait around 5 minutes before
s
witching
o
n
t
he
i
gnition,
w
ithout opening
the driver's door, locking the vehicle
or introducing the key into the ignition
switch .
Switch on the ignition, then, after
1
0 seconds, start the engine.
F
O
btain
a
bottle of AdBlue
®. After first c
hecking
the
use-by
date,
read carefully
t
he instructions on use on the label before
pouring
the
contents
of
the bottle into your
v
ehicle's
Ad
Blue
® tank. N ever dispose of AdBlue
® additive b
ottles
in
the
household
waste. Place
t
hem
in
a
special
container provided
t
his
purpose
or
take
them
to your
d
ealer.
F
A
fter
emptying
the
bottle,
wipe
away
any
s
pillage
around
the
tank
filler
using
a
damp
c
loth.
F
R
efit
the
blue
cap
to
the
tank
and
turn
it
a
6
th of a turn clockwise, to its stop.
F
R
efit the black cap and turn it a quarter of
a
turn clockwise without pressing. Ensure
t
hat
the indicator on the cap lines up with
t
he
indicator on the support.
F
D
epending on equipment, return the spare
w
heel and/or the storage box to the bottom
o
f
the boot.
F
R
efit the boot carpet and close the tailgate.
Page 228 of 380

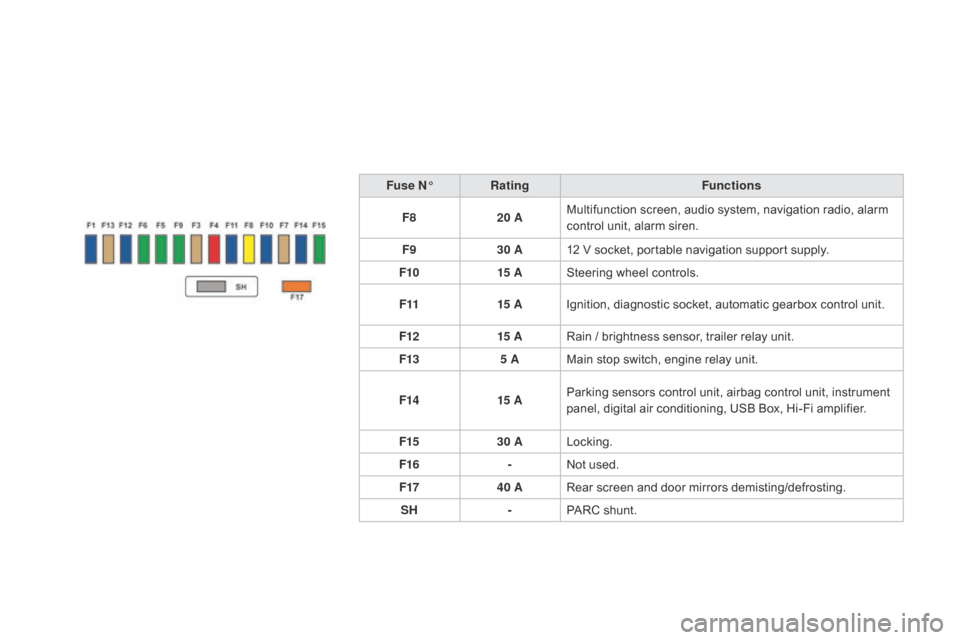
Fuse n°R ating Functions
F8 20 AMultifunction
screen, audio system, navigation radio, alarm
c
ontrol unit, alarm siren.
F9 30 A12
V socket, portable navigation support supply.
F10 15 ASteering
wheel controls.
F11 15 AIgnition,
diagnostic socket, automatic gearbox control unit.
F12 15 ARain
/ brightness sensor, trailer relay unit.
F13 5 AMain
stop switch, engine relay unit.
F14 15 AParking
sensors control unit, airbag control unit, instrument
p
anel, digital air conditioning, USB Box, Hi-Fi amplifier.
F15 30 ALocking.
F16 -Not
used.
F17 40 ARear
screen and door mirrors demisting/defrosting.
SH -PARC
shunt.
Page 229 of 380

227
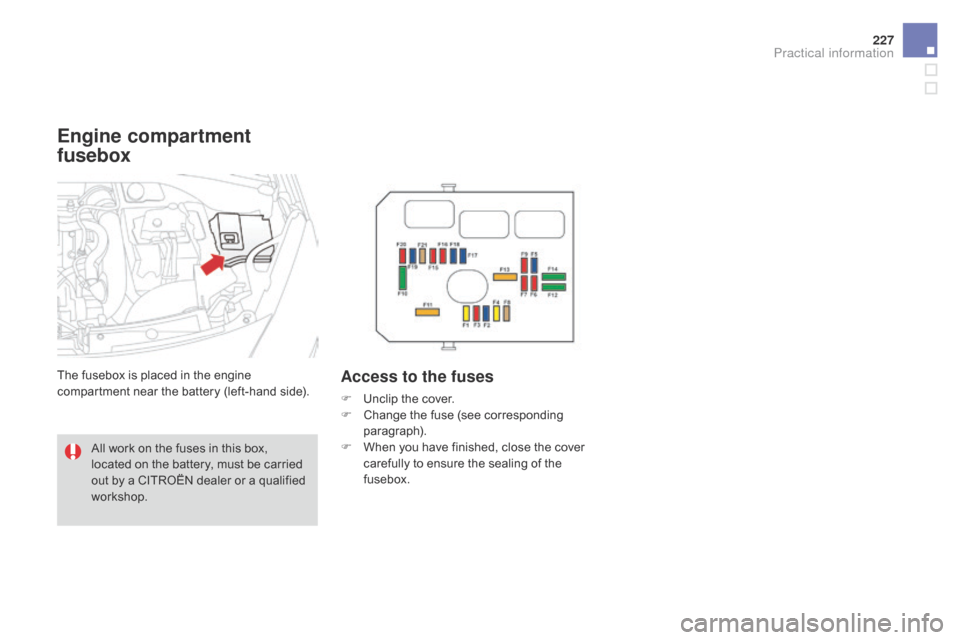
Engine compartment
fusebox
The fusebox is placed in the engine compartment near the battery (left-hand side).Access to the fuses
F Unclip the cover.
F C hange the fuse (see corresponding
par
agraph).
F
W
hen you have finished, close the cover
c
arefully to ensure the sealing of the
f
usebox.
All
work
on
the
fuses
in
this
box,
l
ocated
on
the
battery,
must
be
carried
o
ut
by
a
CITROËN
dealer
or
a
qualified
w
orkshop.
Practical information
Page 230 of 380

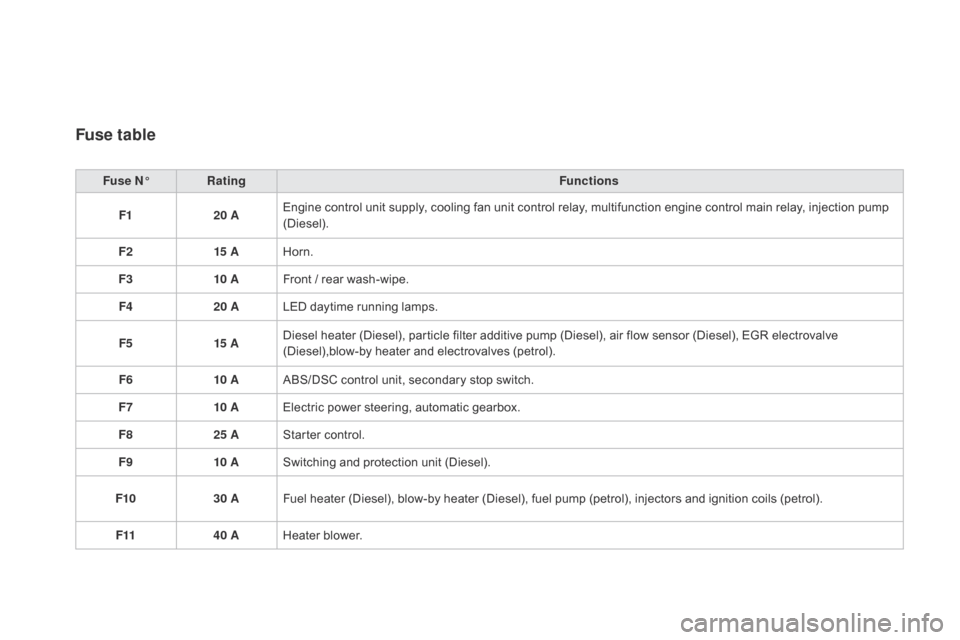
Fuse table
Fuse n°R ating Functions
F1 20 AEngine
control unit supply, cooling fan unit control relay, multifunction engine control main relay, injection pump
(
Diesel).
F2 15 AHorn.
F3 10 AFront
/ rear wash-wipe.
F4 20 ALED
daytime running lamps.
F5 15 ADiesel
heater (Diesel), particle filter additive pump (Diesel), air flow sensor (Diesel), EGR electrovalve
(
Diesel),blow-by heater and electrovalves (petrol).
F6 10 AABS/DSC
control unit, secondary stop switch.
F7 10 AElectric
power steering, automatic gearbox.
F8 25 AStarter
control.
F9 10 ASwitching
and protection unit (Diesel).
F10 30 AFuel
heater (Diesel), blow-by heater (Diesel), fuel pump (petrol), injectors and ignition coils (petrol).
F11 40 AHeater
b
lower.
Page 233 of 380

231
12 V battery
The battery is located under the bonnet.
T o gain access to it:
F
o
pen the bonnet using the interior release
l
ever, then the exterior safety catch,
F
s
ecure the bonnet stay,
F
l
ift the plastic cover on the (+) terminal.
Access to the battery
Procedure for starting the engine using another battery or charging a discharged battery.
general points
Lead-acid starter batteries
Batteries contain harmful substances such as sulphuric acid and lead.
They
must be disposed of in
a
ccordance with regulations and must
n
ot,
i
n
a
ny
c
ircumstances,
b
e
d
iscarded
w
ith household waste.
Take
used remote control batteries and
v
ehicle batteries to a special collection
point.
Versions
equipped with Stop &
S
tart are fitted with a 12 V lead-acid
b
attery of specific technology and
s
pecification.
Its
replacement should be carried
o
ut only by a CITROËN dealer or a
q
ualified
w
orkshop. Protect
your eyes and face before
h
andling the battery.
All
operations on the battery must be
c
arried out in a well ventilated area and
a
way from naked flames and sources
o
f sparks, so as to avoid the risk of
e
xplosion or fire.
Wash
your hands after wards.
If
you have an electronic or automatic
g
earbox, never try to start the engine
b
y pushing the vehicle.The
(-) battery terminal is not accessible.
A
remote earthing point is located on the front
l
eft-hand
w
ing
pan
el.
Practical information
Page 234 of 380

Some functions, including Stop & Start, are not available if the battery is not
sufficiently
c
harged.
Never
try
to
start
the
engine
by
c
onnecting
a
battery
charger.
Never
use
a
24
V
or
higher
battery
b
o o s t e r.
First
check
that
the
slave
battery
has
a
n
ominal
voltage
of
12
V
and
a
capacity
a
t
least
equal
to
that
of
the
discharged
b
attery.
The
two
vehicles
must
not
be
in
contact
w
ith
each
other.
Switch
off
the
electrical
consumers
on
b
oth
vehicles
(audio
system,
wipers,
l
ighting,
...
).
Ensure
that
the
jump
lead
cables
do
n
ot
pass
close
to
moving
parts
of
the
e
ngine
(cooling
fan,
belts,
...).
Do
n
ot
d
isconnect
t
he
(
+)
t
erminal
w
hen
t
he
engine
is
running.
Starting using another
battery
When your vehicle's battery is discharged, the e ngine can be started using a slave battery
(
external or on another vehicle) and jump lead
c
ables or a battery booster.
F
R
aise the plastic cover on the (+) terminal,
i
f your vehicle has one.
F
C
onnect the red cable to the positive
t
erminal (+) of the flat battery A (at
t
he metal elbow) then to the positive
t
erminal (+) of the slave battery B or the
b o o s t e r.
F
C
onnect one end of the green or black
c
able to the negative terminal (-) of the
s
lave battery B or the booster (or earth
p
oint on the other vehicle).
F
C
onnect
t
he
o
ther
e
nd
o
f
t
he
g
reen
o
r
b
lack
c
able to the earth point C on the broken
d
own vehicle.F
S tart the engine of the vehicle with the
g
ood battery and leave it running for
a
few minutes.
F
O
perate the starter on the broken down
v
ehicle and let the engine run.
If
the engine does not start straight away,
s
witch off the ignition and wait a few moments
b
efore trying again.
F
W
ait until the engine returns to idle then
d
isconnect the jump lead cables in the
r
everse
o
rder.
F
R
efit the plastic cover to the (+) terminal, if
y
our vehicle has one.
F
A
llow the engine to run for at least
3
0 minutes, by driving or with the vehicle
s
tationary, so that the battery reaches an
adequate
state of charge.
Page 236 of 380

disconnecting the battery
In order to maintain an adequate state of charge for starting the engine, it is
r
ecommended that the battery be disconnected
i
f the vehicle is taken out of service for a long
p
eriod.
Wait
2 minutes after switching off the ignition
b
efore disconnecting the battery:
F
c
lose all openings (doors, boot, windows,
r
oof (for Cabrio versions)),
F
s
witch off all electrical consumers (audio
s
ystem, wipers, lighting, ...),
F
s
witch off the ignition and wait for
f
our minutes.
Having
exposed the battery, it is only
n
ecessary to disconnect the (+) terminal.
Following reconnection of the
battery
After reconnecting the battery, switch on the ignition and wait 1 minute before starting to
a
llow initialisation of the electronic systems.
However,
if minor problems persist following
t
his operation, contact a CITROËN dealer or a
q
ualified
w
orkshop.
Referring
to the corresponding section, you
m
ust yourself reinitialise or reset certain
s
ystems, such as:
-
t
he remote control,
-
t
he electric windows,
-
t
he date and time,
-
t
he radio preset stations.
Quick release terminal
di
sconnecting the (+) terminal
F Raise the lever A fully to release the clamp B.
Reconnecting the (+) terminal
F Position the open clamp B of the cable on
the positive post (+) of the battery.
F
P
ress down on the clamp to position it
c
orrectly on the battery post.
F
L
ock the clamp by lowering the lever A. The
Stop & Start system may not be
o
perational during the trip following the
f
irst engine start.
In
this case, the system will only be
a
vailable again after a continuous
p
eriod of immobilisation of the vehicle,
a
period which depends on the ambient
t
emperature and the state of charge of
t
he battery (up to about 8 hours).
Do
not force the lever as locking
w
ill not be possible if the clamp is
n
ot positioned correctly; start the
p
rocedure again.
Page 237 of 380

235
Load reduction modeSystem which manages the use of certain functions according to the level of charge
r
emaining in the battery.
When
the vehicle is being driven, the load
r
eduction function temporarily deactivates
c
ertain functions, such as the air conditioning,
t
he heated rear screen...
The
deactivated functions are reactivated
a
utomatically as soon as conditions permit.Energy economy modeSystem which manages the period of use of certain functions to conserve a sufficient level of c
harge in the battery.
After
the engine has stopped, you can still use functions such as the audio equipment, windscreen
w
ipers, dipped beam headlamps, courtesy lamps, etc. for a maximum combined period of
t
hirty minutes. This
period may be greatly reduced if
t
he battery is not fully charged.
A
flat battery prevents the engine from
s
tarting.
If
the telephone is being used at the
s
ame time, it will be interrupted after
10
m
inutes.
Switching to economy mode
Once this period has elapsed, a message appears in the screen indicating that the
v
ehicle has switched to economy mode and the
a
ctive functions are put on standby.
Exiting economy mode
These functions are reactivated automatically the next time the vehicle is driven.
F
I
n order to resume the use of these
f
unctions immediately, start the engine and
l
et it run for a few minutes.
The
time available to you will then be double
t
he period for which the engine is left running.
H
owever, this period will always be between
f
ive and thirty minutes.
Practical information
Page 239 of 380

237
Towing the vehicleProcedure for having your vehicle towed or for towing another vehicle using a removable towing eye.
T he towing eye is installed in the boot under
t
he floor.
To
gain access to it:
F
o
pen the boot,
F
r
aise the floor,
F
r
emove the polystyrene storage box,
F
r
emove the towing eye from the holder.
Access to the tools
ge
neral recommendations
Observe the legislation in force in your country.
E nsure that the weight of the towing vehicle is higher than that of the towed vehicle.
The
driver must remain at the wheel of the towed vehicle and must have a valid driving licence.
When
towing a vehicle with all four wheels on the ground, always use an approved towing
a
rm; rope and straps are prohibited.
The
towing vehicle must move off gently.
When
towing a vehicle with the engine off, there is no longer any power assistance for
b
raking or steering.
In
the following cases, you must always call on a professional recovery service:
-
v
ehicle broken down on a motor way or fast road,
-
f
our-wheel drive vehicle,
-
w
hen it is not possible to put the gearbox into neutral, unlock the steering, or release
t
he parking brake,
-
t
owing with only two wheels on the ground,
-
w
here there is no approved towing arm available...
Practical information