bonnet Citroen DS3 RHD 2016 1.G Owner's Manual
[x] Cancel search | Manufacturer: CITROEN, Model Year: 2016, Model line: DS3 RHD, Model: Citroen DS3 RHD 2016 1.GPages: 380, PDF Size: 10.11 MB
Page 7 of 380

CHECKSTECHn ICAL dA TAAUdI O An d
TELEMATICS
249 Bonnet
250 Pe trol engines
251
D
iesel
eng
ines
252
C
hecking levels
256
C
hecks 260 Pe
trol engines
263 Pe trol weights
266
D
iesel
eng
ines
267
D
iesel weights
268
D
imensions
270
I
dentification
ma
rkings2 74 E
mergency or assistance
277 7 -inch touch screen tablet
345
A
udio system
010011
009
Page 41 of 380

39
On vehicles fitted with an electric oil level indicator, information on the oil level is
d
isplayed in the instrument panel for a few
s
econds when the ignition is switched on, after
t
he service information.
Engine oil level indicator*
The level shown will only be correct
if the vehicle is on level ground and
t
he engine has been off for more than
3
0 minutes.
Oil level correct
Oil level low
This is indicated by the flashing of " O I L" ,
a ccompanied by illumination of the service
w
arning lamp, an audible signal and a
m
essage.
If
the low oil level is confirmed by a check using
t
he dipstick, the level must be topped up to
p
revent damage to the engine.
Refer
to the "Checking levels" section.
Oil level indicator fault
This is signaled by the flashing of "OIL- -".
C ontact a CITROËN dealer or a qualified
w
orkshop.
In the event of a fault with the electric oil level
indicator,
the engine oil level is no longer
mon
itored.
While
the system is faulty, you should check
t
he engine oil level using the manual dipstick
l
ocated under the bonnet.
Refer
to the "Checking levels" section.
*
Depending on version.
Monitoring
Page 128 of 380

Stop & Start requires a 12 V battery with a special specification and
t
echnology.
All
work on this type of battery must
o
nly be done by a CITROËN dealer or
a
qualified workshop.
For
more information on the 12 V
b
attery, please see the corresponding
s
ection.
Operating fault
In the event of a fault with the system, the "ECO OFF" switch warning lamp flashes for a
f
ew moments then comes on continuously.
Have
it checked by a CITROËN dealer or a
q
ualified
w
orkshop.
In
the event of a fault in STOP mode, the
v
ehicle may stall. All of the instrument panel
w
arning lamps come on. It is then necessary
t
o switch off the ignition and start the engine
a
gain using the key.
Press
this
switch
to
deactivate
the
system.
The
deactivation
is
confirmed
by
the
switch
w
arning
lamp
coming
on
accompanied
by
a
m
essage.
Pressing
this
switch
again
reactivates
the
f
unction.
The
switch
warning
lamp
goes
off,
a
ccompanied
by
a
message.
In
certain
circumstances,
such
as
maintaining
a
comfortable
temperature
in
the
passenger
c
ompartment,
it
may
be
useful
to
deactivate
S
top
&
Start.
You
can
request
deactivation
at
any
time,
once
t
he
ignition
is
switched
on.
If
the
engine
is
in
STOP
mode,
it
restarts
i
mmediately.
Stop
&
Start
reactivates
automatically
each
t
ime
the
ignition
is
switched
on.
deactivation / Manual
reactivation
Opening the bonnet
dr
iving on flooded roads
Before
driving through a flooded road,
i
t is strongly recommended that you
d
eactivate the Stop & Start system.
For
more advice on driving,
p
articularly on flooded roads, refer to
t
he corresponding section.
Before
doing anything under the bonnet,
d
eactivate the Stop & Start system to
a
void the risk of injury related to an
a
utomatic change to START mode.
Page 145 of 380

143
Travelling abroad
LEd / Xenon front lamps
For motoring in countries that drive on the other s
ide of the road, it is necessary to adjust the
d
ipped beams so as to not dazzle the drivers of
a
pproaching
v
ehicles.
F
R
aise the bonnet for access to the adjuster
(
one adjuster per headlamp).
F
I
nsert a suitable allen key (not supplied)
i
nto the hexagonal head of the adjuster.
F
T
urn the allen key half a turn clockwise.
Headlamp height adjustment
To avoid causing a nuisance to other road users, the height of the headlamps should be
a
djusted in relation to the load in the vehicle.
0.
D
river only or driver + front passenger.
-.
I
ntermediate
s
etting.
1.
5
people.
-.
5
people + load in the boot.
2.
D
river only + maximum authorised load in
t
he boot.
This
position is sufficient to avoid causing
d
azzle.
Higher
settings may limit the spread of light
f
rom the headlamps.
The
initial setting is position "0". On
your return, don't forget to
a
djust your headlamps back to their
i
nitial setting, by carrying out these
o
perations in reverse order.
Visibility
Page 149 of 380

147
Operating fault
If an automatic wiping fault occurs, the wipers will operate in intermittent mode.
Have
it checked by a CITROËN dealer or a
q
ualified
w
orkshop.
To retain the effectiveness of the flat
wiper
blades, it is advisable to:
-
h
andle them with care,
-
c
lean them regularly using soapy
w
ater,
-
n
ot use them to hold a sheet of
c
ardboard against the windscreen,
-
r
eplace them at the first signs of
w
e a r.
Do
not cover the rain sensor, linked
w
ith the sunshine sensor and located in
t
he centre of the windscreen behind the
r
ear view mirror.
Switch
off the automatic wiping when
u
sing an automatic car wash.
In
winter, it is advisable to wait until the
w
indscreen is completely clear of ice
b
efore activating the automatic wiping.This
position allows the wiper blades to
b
e lifted for winter parking, cleaning or
r
eplacement without damaging the bonnet.
In
the minute following switching off of the
i
gnition, any action on the wiper stalk positions
t
he wipers vertically.
To
park the wipers after this has been done,
s
witch on the ignition and operate the wiper stalk.
Vertical windscreen wiper
position
Visibility
Page 166 of 380

Operating faults
In the event of an impact to the windscreen at the sensor, deactivate
t
he system and contact a CITROËN
d
ealer or a qualified workshop to have
y
our windscreen replaced.
Never
try to remove, adjust or test the
sen
sor.
Only
a CITROËN dealer or a qualified
w
orkshop is able to work on the system.
When
towing a trailer or when the
v
ehicle is being towed, the system must
b
e deactivated.
Do
not
stick
or
other wise
fix
any
object o
n
the
windscreen
in
front
of
the
sensor.
Sensor fault
The operation of the laser sensor may suffer i
nter ference from accumulations of dirt or
m
isting of the windscreen. In this case you are
w
arned by the display of a message.
Use
the windscreen demisting and regularly
c
lean the area of the windscreen in front of the
sen
sor.
System fault
In the event of a malfunction of the system, you are warned by an audible signal and the display
o
f the message Automatic braking system
fault .
Have
the system checked by a CITROËN
d
ealer or a qualified workshop.
In
difficult
weather
conditions
(very
h
eavy
rain,
snow,
fog,
hail...),
braking
d
istances
increase,
which
can
reduce
t
he
ability
of
the
system
to
avoid
a
c
ollision.
The
driver
must
therefore
remain
par
ticularly
v
igilant.
Never
leave
accumulations
of
snow
or
a
ny
object
projecting
above
the
bonnet
o
r
in
front
of
the
roof:
this
might
fall
into
t
he
field
of
vision
of
the
sensor
and
g
enerate
a
detection.
Page 197 of 380

195
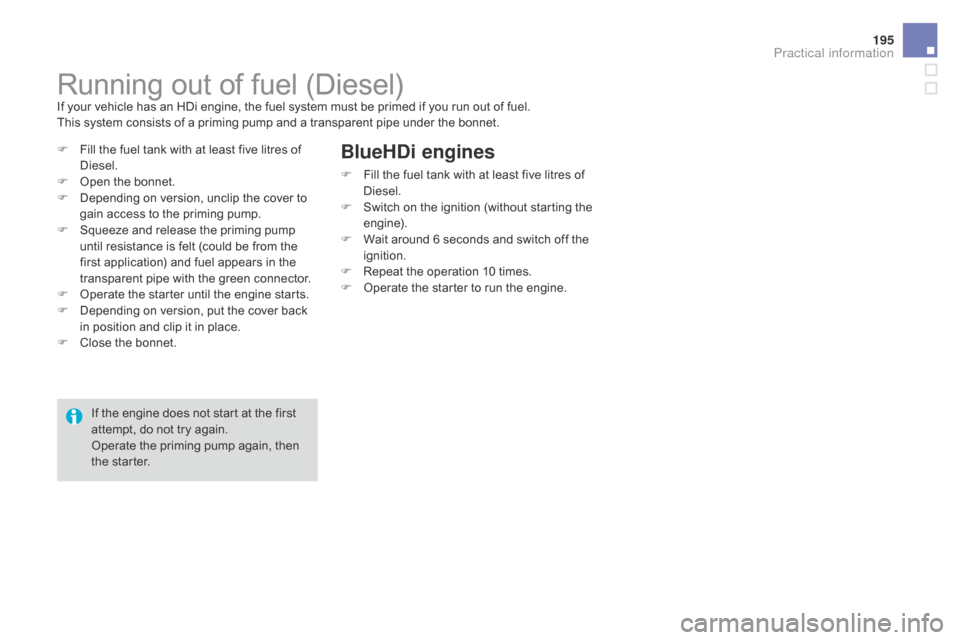
Running out of fuel (Diesel)If your vehicle has an HDi engine, the fuel system must be primed if you run out of fuel.
T his system consists of a priming pump and a transparent pipe under the bonnet.
F
F
ill the fuel tank with at least five litres of
D
iesel.
F
O
pen the bonnet.
F
D
epending on version, unclip the cover to
g
ain access to the priming pump.
F
S
queeze and release the priming pump
u
ntil resistance is felt (could be from the
f
irst application) and fuel appears in the
t
ransparent pipe with the green connector.
F
O
perate the starter until the engine starts.
F
D
epending on version, put the cover back
i
n position and clip it in place.
F
C
lose the bonnet.
BlueHdi engines
F Fill the fuel tank with at least five litres of D
iesel.
F
S
witch on the ignition (without starting the
e
ngine).
F
W
ait around 6 seconds and switch off the
ig
nition.
F
R
epeat the operation 10 times.
F
O
perate the starter to run the engine.
If
the
engine
does
not
start
at
the
first
a
ttempt,
do
not
try
again.
Operate
the
priming
pump
again,
then
t
he
starter.
Practical information
Page 233 of 380

231
12 V battery
The battery is located under the bonnet.
T o gain access to it:
F
o
pen the bonnet using the interior release
l
ever, then the exterior safety catch,
F
s
ecure the bonnet stay,
F
l
ift the plastic cover on the (+) terminal.
Access to the battery
Procedure for starting the engine using another battery or charging a discharged battery.
general points
Lead-acid starter batteries
Batteries contain harmful substances such as sulphuric acid and lead.
They
must be disposed of in
a
ccordance with regulations and must
n
ot,
i
n
a
ny
c
ircumstances,
b
e
d
iscarded
w
ith household waste.
Take
used remote control batteries and
v
ehicle batteries to a special collection
point.
Versions
equipped with Stop &
S
tart are fitted with a 12 V lead-acid
b
attery of specific technology and
s
pecification.
Its
replacement should be carried
o
ut only by a CITROËN dealer or a
q
ualified
w
orkshop. Protect
your eyes and face before
h
andling the battery.
All
operations on the battery must be
c
arried out in a well ventilated area and
a
way from naked flames and sources
o
f sparks, so as to avoid the risk of
e
xplosion or fire.
Wash
your hands after wards.
If
you have an electronic or automatic
g
earbox, never try to start the engine
b
y pushing the vehicle.The
(-) battery terminal is not accessible.
A
remote earthing point is located on the front
l
eft-hand
w
ing
pan
el.
Practical information
Page 238 of 380

Changing a front or rear wiper bladeProcedure for replacing a worn wiper blade with a new one without the use of tools.
Before removing a front
wiper blade
F Within one minute after switching off the i
gnition, operate the wiper stalk to position
t
he wiper blades in the vertical position.
This
position must be used in order to avoid
d
amaging the wiper blade and the bonnet.
Removal
F Raise the corresponding wiper arm.
F U nclip the wiper blade and remove it.
Fitting
F At the front, check the size of the wiper b
lade as the shorter blade is fitted to the
p
assenger side of the vehicle.
F
P
ut the corresponding new wiper blade in
p
lace and clip it.
F
F
old down the wiper arm carefully.
After fitting a front wiper
blade
F Switch on the ignition.
F O perate the wiper stalk again to park the
w
iper blades.
Page 251 of 380

249
Bonnet
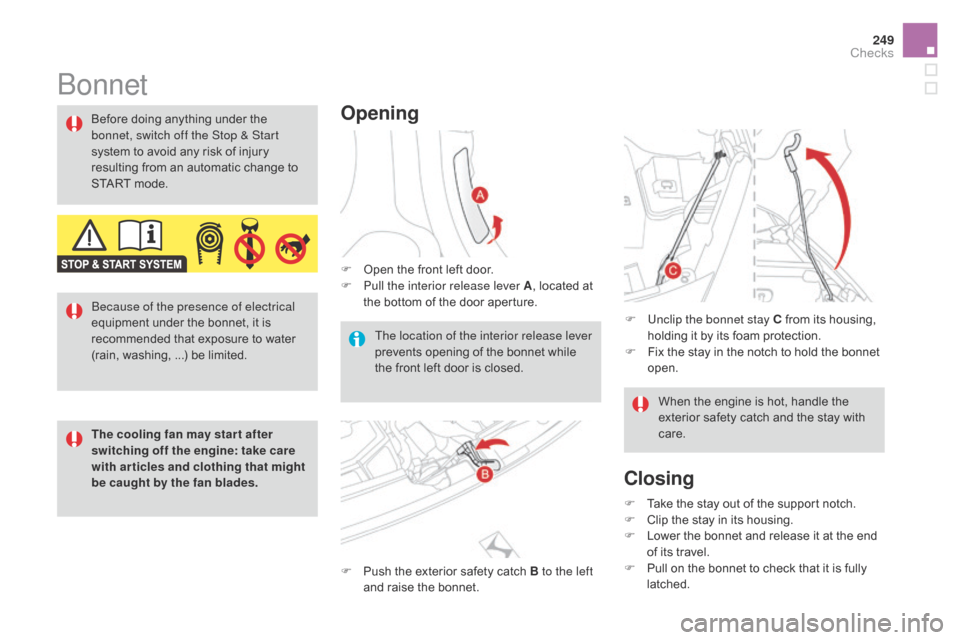
Opening
F Open the front left door.
F P ull the interior release lever A ,
located at
t
he bottom of the door aperture.
F
P
ush the exterior safety catch B to the left
and
raise the bonnet.
Before
doing
anything
under
the
b
onnet, switch off the Stop & Start
system
to
avoid
any
risk
of
injury
r
esulting
from
an
automatic
change
to
S
TART
mode.
The location of the interior release lever
prevents opening of the bonnet while
t
he front left door is closed.F
U
nclip the bonnet stay C from its housing,
h
olding it by its foam protection.
F
F
ix the stay in the notch to hold the bonnet
ope
n.
Closing
F Take the stay out of the support notch.
F C lip the stay in its housing.
F
L
ower the bonnet and release it at the end
o
f its travel.
F
P
ull on the bonnet to check that it is fully
l
atched.When
the engine is hot, handle the
e
xterior safety catch and the stay with
c
are.
Because of the presence of electrical
equipment
under
the
bonnet,
it
is
r
ecommended
that
exposure
to
water
(
rain,
washing, ...)
be
limited.
The cooling fan may star t after
switching off the engine: take care
with articles and clothing that might
be caught by the fan blades.
Checks