steering Citroen DS4 2011 1.G Owner's Guide
[x] Cancel search | Manufacturer: CITROEN, Model Year: 2011, Model line: DS4, Model: Citroen DS4 2011 1.GPages: 396, PDF Size: 31.05 MB
Page 190 of 396
For the airbags to be fully effective, observe the following safety rules:
Front airbags
Do not drive holding the steering wheel by its
spokes or resting your hands on the centre
part of the wheel.
Passengers must not place their feet on the
dashboard.
If possible, do not smoke as deployment of
the airbags can cause burns or the risk of
injury from a cigarette or pipe.
Never remove or pierce the steering wheel or
hit it violently.
Lateral airbags
Use only approved covers on the seats,
compatible with the deployment the lateral
airbags. For information on the range of seat
covers suitable for your vehicle, you can
contact a CITROËN dealer (see "Practical
information - § Accessories").
Do not fix or attach anything to the seat
backs (clothing...). This could cause injury
to the chest or arms if the lateral airbag is
deployed.
Do not sit with the upper par t of the body any
nearer to the door than necessary.
Curtain airbags
Do not fix or attach anything to the roof.
This could cause injury to the head if the
cur tain airbag is deployed.
If fitted on your vehicle, do not remove the
grab handles installed on the roof, they play
a par t in securing the cur tain airbags.
Sit in a normal upright position.
Wear a correctly adjusted seat belt.
Do not leave anything between the occupants
and the airbags (a child, pet, object...). This
could hamper the operation of the airbags or
injure the occupants.
After an accident or if the vehicle has been
stolen or broken into, have the airbag
systems checked.
All work on the airbag system must be carried
out by a CITROËN dealer or a qualified
workshop.
Even if all of the precautions mentioned
are obser ved, a risk of injury or of minor
burns to the head, chest or arms when an
airbag is deployed cannot be ruled out. The
bag inflates almost instantly (within a few
milliseconds) then deflates within the same
time discharging the hot gas via openings
provided for this purpose.
Page 205 of 396
203Driving
Six-speed electronic gearbox system which
offers a choice between the comfor t of fully
automatic operation or the pleasure of manual
gear changing.
There are two driving modes:
- automatic
mode for automatic control of
the gears by the gearbox,
- manual
mode for sequential gear changing
by the driver.
In automatic mode, it remains possible to
change gear manually by using the steering
mounted control paddles, when overtaking, for
example.
6-speed electronic gearbox system
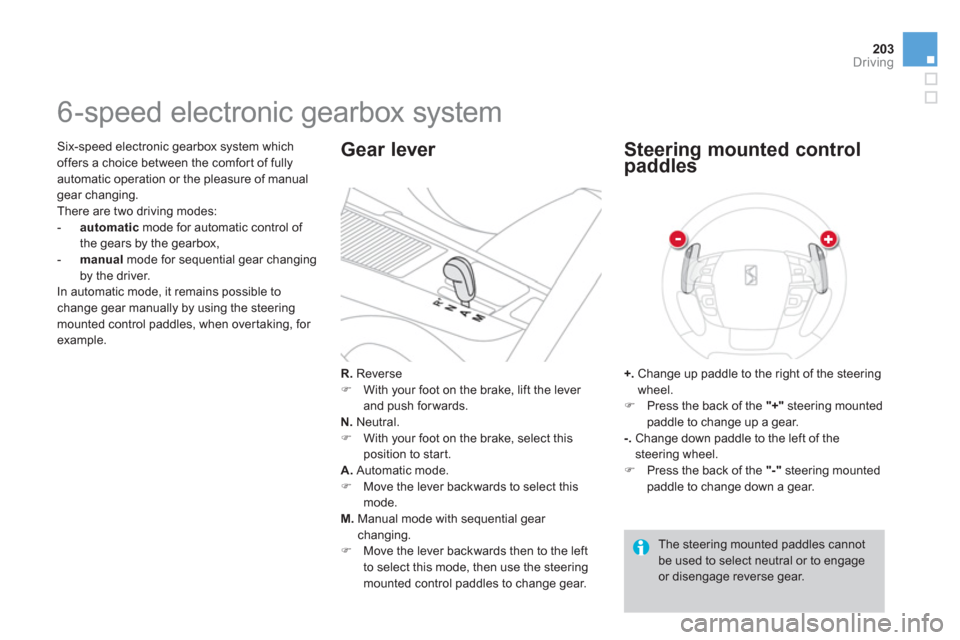
R.
Reverse
�)
With your foot on the brake, lift the lever
and push forwards.
N.
Neutral.
�)
With your foot on the brake, select this
position to start.
A.
Automatic mode.
�)
Move the lever backwards to select this
mode.
M.
Manual mode with sequential gear
changing.
�)
Move the lever backwards then to the left
to select this mode, then use the steering
mounted control paddles to change gear.
Gear lever
+.
Change up paddle to the right of the steering
wheel.
�)
Press the back of the "+"
steering mounted
paddle to change up a gear.
-.
Change down paddle to the left of the
steering wheel.
�)
Press the back of the "-"
steering mounted
paddle to change down a gear.
Steering mounted control
paddles
The steering mounted paddles cannot
be used to select neutral or to engage
or disengage reverse gear.
Page 207 of 396
205Driving
For optimum acceleration, for example
when over taking another vehicle, press
the accelerator pedal firmly past the
point of resistance.
Manual gear changing
This selective gear change mode enables you
to over take, for example, while still remaining in
automatic mode.
�)
Operate the +
or -
steering mounted control
paddle.
The gearbox engages the gear requested if the
engine speed permits. AUTO
is still displayed
in the instrument panel.
After a few moments without any action on
the controls, the gearbox resumes automatic
control of the gears.
Manual mode
�)
After star ting the vehicle, select position A
for enter automatic mode.
Automatic mode
AUTO
and the gear engaged
appear in the instrument panel
screen.
The gearbox is then operating in auto-active
mode, without any action on the par t of the
driver. It continuously selects the most suitable
gear, depending on the:
- style of driving,
- profile of the road.
�)
When the vehicle has moved off, select
position M
to change to manual mode.
AUTO
disappears and the gears
engaged appear in succession in
the instrument panel screen. The gear change requests are only carried out
if the engine speed permits.
It is not necessary to release the accelerator
during gear changes.
When braking or slowing down, the gearbox
changes down automatically to allow the
vehicle to accelerate in the correct gear.
At very low speed, if reverse gear is
requested, this will only be taken into
account when the vehicle is immobilised.
The Foot on brake
warning lamp may
flash in the instrument panel to prompt
you to brake.
On sharp acceleration, the gearbox will
not change up unless the driver acts on
the gear lever or the steering mounted
paddles.
Never select neutral N
while the vehicle
is moving.
Only engage reverse gear R
when the
vehicle is immobilised with the brake
pedal pressed.
Page 214 of 396
Stop & Start
The Stop & Start system puts the engine temporarily into standby - STOP mode - during stops in the traffic (red lights, traffic jams, or other...). The
engine restarts automatically - START mode - as soon as you want to move off. The restart takes place instantly, quickly and silently.
Per fect for urban use, the Stop & Start system reduces fuel consumption and exhaust emissions as well as the noise level when stationary.
Operation
Going into engine STOP mode
With the electronic gearbox system,
for your comfort during parking
maoeuvres, STOP mode is not
available for a few seconds after
coming out of reverse gear.
STOP mode does not affect the
functionality of the vehicle, such as
braking, power steering, for example.
Never refuel with the engine in STOP
mode; you must switch off the ignition
with the key. The "ECO"
warning lamp comes
on in the instrument panel and the
engine goes into standby:
- with a manual gearbox
, at speeds below
12 mph (20 km/h), when you put the gear
lever into neutral and release the clutch
pedal,
- with the 6-speed electronic gearbox
system
, at a speed below 5 mph (8 km/h),
when you press the brake pedal or put the
gear lever into position N
.
If your vehicle is fitted with the
system, a time counter calculates
the sum of the periods in STOP
mode during a journey. It resets
itself to zero every time the ignition
is switched on with the key. STOP mode is not invoked when:
- the driver's door is open,
- the driver's seat belt is not fastened,
- the vehicle has not exceeded 6 mph
(10 km/h) since the last engine star t
using the key,
- the electric parking brake is applied or
being applied,
- the engine is needed to maintain a
comfor table temperature in the passenger
compartment,
- demisting is active,
- some special conditions (battery charge,
engine temperature, braking assistance,
ambient temperature...) where the engine is
needed to assure control of a system.
Special cases: STOP mode
unavailable
In this case, the "ECO"
warning lamp
flashes for a few seconds, then goes
off.
This operation is per fectly normal.
Page 221 of 396
219Driving
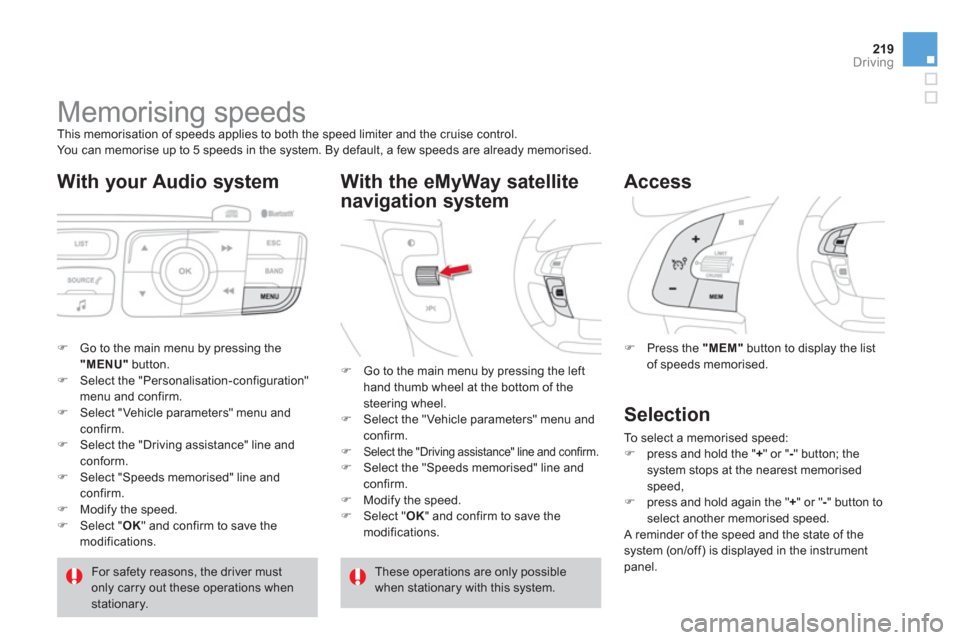
Memorising speeds
This memorisation of speeds applies to both the speed limiter and the cruise control.
You can memorise up to 5 speeds in the system. By default, a few speeds are already memorised.
With your Audio system
�)
Go to the main menu by pressing the
"MENU"
button.
�)
Select the "Personalisation-configuration"
menu and confirm.
�)
Select "Vehicle parameters" menu and
confirm.
�)
Select the "Driving assistance" line and
conform.
�)
Select "Speeds memorised" line and
confirm.
�)
Modify the speed.
�)
Select " OK
" and confirm to save the
modifications.
With the eMyWay satellite
navigation system
�)
Press the "MEM"
button to display the list
of speeds memorised.
Access
For safety reasons, the driver must
only carry out these operations when
stationary.
�)
Go to the main menu by pressing the left
hand thumb wheel at the bottom of the
steering wheel.
�)
Select the "Vehicle parameters" menu and
confirm.
�)
Select the "Driving assistance" line and confirm.
�)
Select the "Speeds memorised" line and
confirm.
�)
Modify the speed.
�)
Select " OK
" and confirm to save the
modifications.
These operations are only possible
when stationary with this system.
Selection
To select a memorised speed:
�)
press and hold the " +
" or " -
" button; the
system stops at the nearest memorised
speed,
�)
press and hold again the " +
" or " -
" button to
select another memorised speed.
A reminder of the speed and the state of the
system (on/off) is displayed in the instrument
panel.
Page 222 of 396
System which prevents the vehicle from
exceeding the speed programmed by the driver.
When the programmed speed limit is reached,
pressing the accelerator pedal no longer has
any effect.
Speed limiter
The speed limiter cannot, in any
circumstances, replace the need to
respect speed limits, nor can it replace
the need for vigilance and responsibility
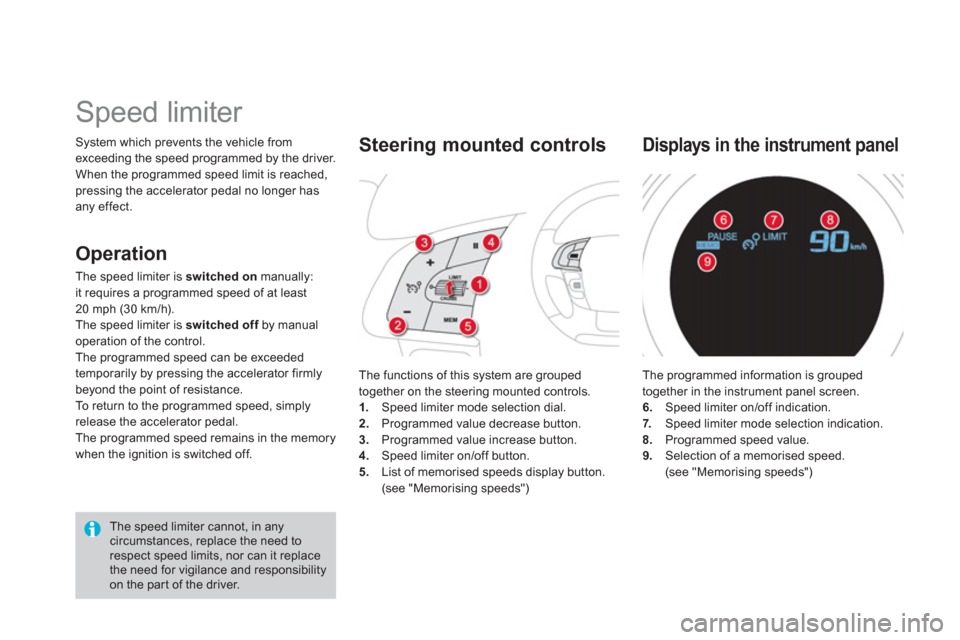
on the par t of the driver. The functions of this system are grouped
together on the steering mounted controls.
1.
Speed limiter mode selection dial.
2.
Programmed value decrease button.
3.
Programmed value increase button.
4.
Speed limiter on/off button.
5.
List of memorised speeds display button.
(see "Memorising speeds")
Steering mounted controls
The programmed information is grouped
together in the instrument panel screen.
6.
Speed limiter on/off indication.
7.
Speed limiter mode selection indication.
8.
Programmed speed value.
9.
Selection of a memorised speed.
(see "Memorising speeds")
Displays in the instrument panel
Operation
The speed limiter is switched on
manually:
it requires a programmed speed of at least
20 mph (30 km/h).
The speed limiter is switched off
by manual
operation of the control.
The programmed speed can be exceeded
temporarily by pressing the accelerator firmly
beyond the point of resistance.
To return to the programmed speed, simply
release the accelerator pedal.
The programmed speed remains in the memory
when the ignition is switched off.
Page 224 of 396
Cruise control
System which automatically maintains the
speed of the vehicle at the value programmed
by the driver, without any action on the
accelerator pedal.
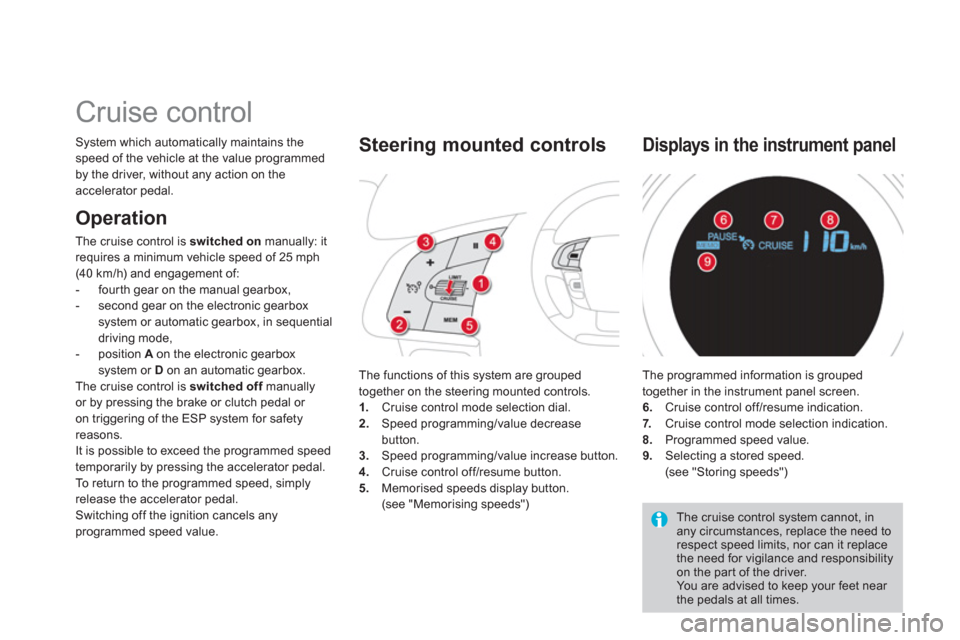
The functions of this system are grouped
together on the steering mounted controls.
1.
Cruise control mode selection dial.
2.
Speed programming/value decrease
button.
3.
Speed programming/value increase button.
4.
Cruise control off/resume button.
5.
Memorised speeds display button.
(see "Memorising speeds")
Steering mounted controls
The cruise control system cannot, in
any circumstances, replace the need to
respect speed limits, nor can it replace
the need for vigilance and responsibility
on the par t of the driver.
You are advised to keep your feet near
the pedals at all times. The programmed information is grouped
together in the instrument panel screen.
6.
Cruise control off/resume indication.
7.
Cruise control mode selection indication.
8.
Programmed speed value.
9.
Selecting a stored speed.
(see "Storing speeds")
Displays in the instrument panel
Operation
The cruise control is switched on
manually: it
requires a minimum vehicle speed of 25 mph
(40 km/h) and engagement of:
- four th gear on the manual gearbox,
- second gear on the electronic gearbox
system or automatic gearbox, in sequential
driving mode,
- position A
on the electronic gearbox
system or D
on an automatic gearbox.
The cruise control is switched off
manually
or by pressing the brake or clutch pedal or
on triggering of the ESP system for safety
reasons.
It is possible to exceed the programmed speed
temporarily by pressing the accelerator pedal.
To return to the programmed speed, simply
release the accelerator pedal.
Switching off the ignition cancels any
programmed speed value.
Page 235 of 396
233Checks
Petrol engines
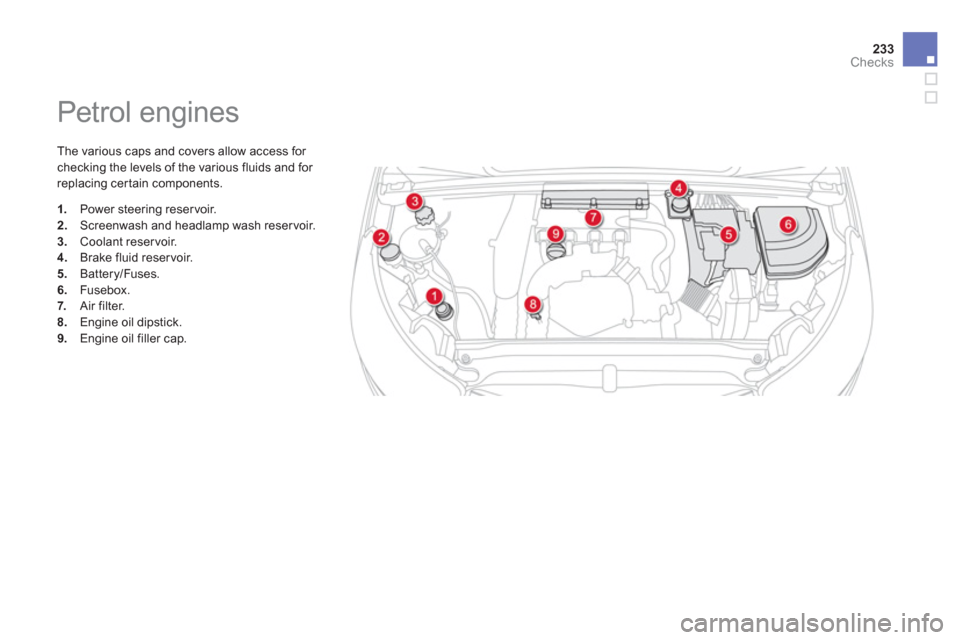
The various caps and covers allow access for
checking the levels of the various fluids and for
replacing cer tain components.
1.
Power steering reservoir.
2.
Screenwash and headlamp wash reser voir.
3.
Coolant reser voir.
4.
Brake fluid reser voir.
5.
Battery/Fuses.
6.
Fusebox.
7.
Air filter.
8.
Engine oil dipstick.
9.
Engine oil filler cap.
Page 236 of 396
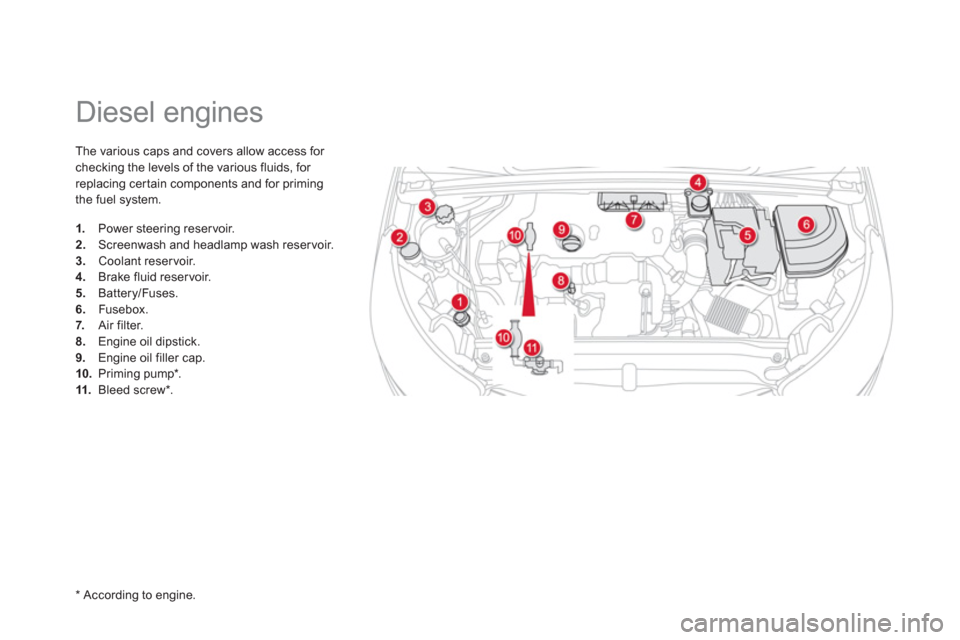
Diesel engines
The various caps and covers allow access for
checking the levels of the various fluids, for
replacing cer tain components and for priming
the fuel system.
1.
Power steering reservoir.
2.
Screenwash and headlamp wash reser voir.
3.
Coolant reser voir.
4.
Brake fluid reser voir.
5.
Battery/Fuses.
6.
Fusebox.
7.
Air filter.
8.
Engine oil dipstick.
9.
Engine oil filler cap.
10.
Priming pump * .
11.
Bleed screw * .
*
According to engine.
Page 238 of 396
Changing the coolant
The coolant does not have to be changed.
Coolant specifi cation
The coolant must conform to the
manufacturer's recommendations.
Coolant level
The coolant level should be close
to the "MA X" mark but should never
exceed it.
When the engine is warm, the
temperature of the coolant is regulated by the
fan. This can operate with the ignition off.
On vehicles which are fitted with a par ticle
emission filter, the fan may operate after
the vehicle has been switched off, even if
the engine is cold.
In addition, as the cooling system is pressurised,
wait at least one hour after switching off the engine
before carrying out any work.
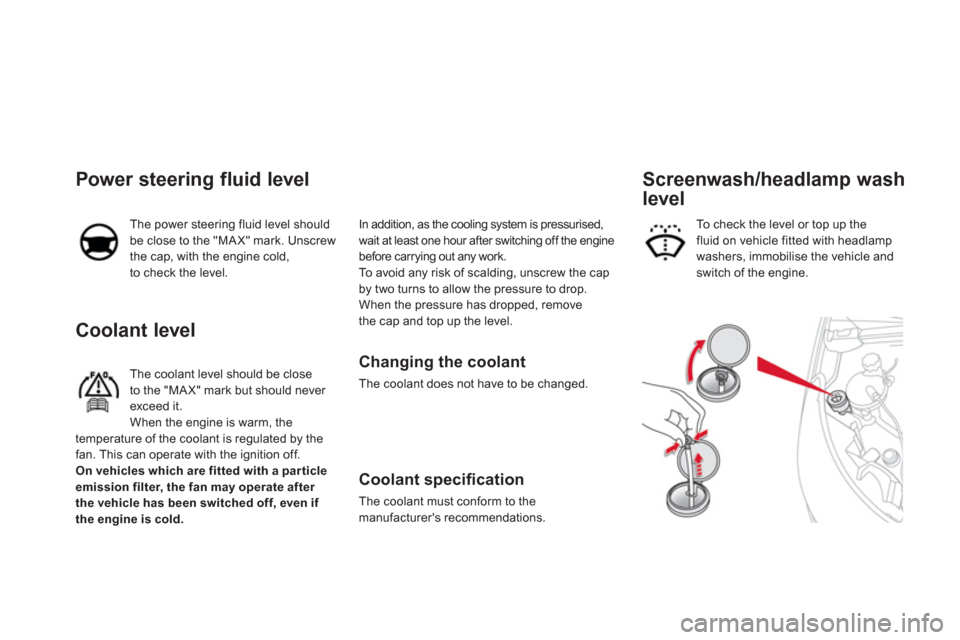
To avoid any risk of scalding, unscrew the cap
by two turns to allow the pressure to drop.
When the pressure has dropped, remove
the cap and top up the level.
Power steering fluid level
The power steering fluid level should
be close to the "MA X" mark. Unscrew
the cap, with the engine cold,
to check the level. To check the level or top up the
fluid on vehicle fitted with headlamp
washers, immobilise the vehicle and
switch of the engine.
Screenwash/headlamp wash
level