steering Citroen DS4 2012 1.G Owner's Guide
[x] Cancel search | Manufacturer: CITROEN, Model Year: 2012, Model line: DS4, Model: Citroen DS4 2012 1.GPages: 396, PDF Size: 12.14 MB
Page 207 of 396
205
Driving
Six-speed electronic gearbox system which
offers a choice between the comfor t of fully
automatic operation or the pleasure of manual gear changing.
There are two driving modes:
-
automatedmode for automatic control
of the gears by the gearbox, without anyaction on the par t of the driver -manualmode for sequential gear changing by the driver using the steering mountedpaddles.
In automated mode, you can temporarily take
over control of gear changing.
6-speed electronic gearbox system
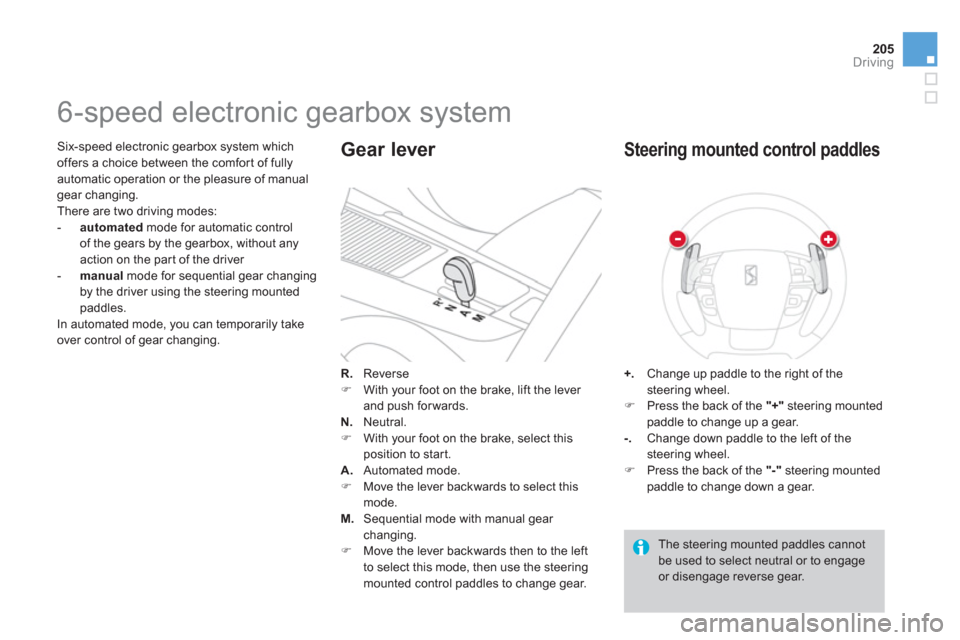
R.
Reverse �)
With your foot on the brake, lift the lever
and push forwards.
N.Neutral.
�) With your foot on the brake, select this
position to start.
A.
Automated mode.�)
Move the lever backwards to select this
mode. M.Sequential mode with manual gear changing. �)
Move the lever backwards then to the left
to select this mode, then use the steering
mounted control paddles to change gear.
Gear lever
+.Change up paddle to the right of the steering wheel.�)
Press the back of the "+"
steering mounted paddle to change up a gear.
-.
Change down paddle to the left of the steering wheel.�)
Press the back of the "-"
steering mounted paddle to change down a gear.
Steering mounted control paddles
The steering mounted paddles cannotbe used to select neutral or to engage or disengage reverse gear.
Page 209 of 396
Driving
For optimum acceleration, for example when overtaking another vehicle, press the accelerator pedal firmly past the point of resistance.
Te m p o r a ry control of gear changing
You can temporarily take over control of gear changing using the "+"
and "-"steeringmounted paddles: if the engine speed allows,
the request to change gear is acted on.
This function allows you to anticipate cer tain
situations such as overtaking a vehicle or theapproach to a corner.
After a few moments without any action on
the control paddles, the gearbox resumesautomatic control of the gears.
Manual mode
�)Select position A .
Automated mode
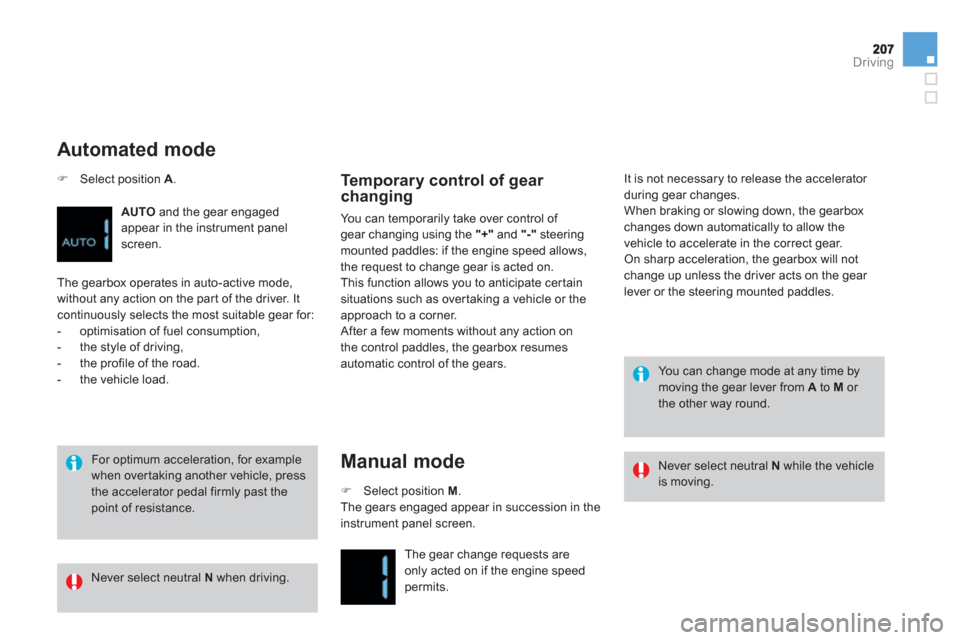
AUTOand the gear engaged
appear in the instrument panel
screen.
The gearbox operates in auto-active mode,
without an
y action on the par t of the driver. Itcontinuously selects the most suitable gear for:
- optimisation of fuel consumption,
- the st
yle of driving,
- the profile of the road.
- t
he vehicle load.
�)
Select position M .
The gears engaged appear in succession in theinstrument panel screen.
The
gear change requests areonly acted on if the engine speedpermits.
It is not necessary to release the accelerator during gear changes.
When braking or slowing down, the gearbox changes down automatically to allow the
vehicle to accelerate in the correct gear.
On sharp acceleration, the gearbox will not change up unless the driver acts on the gear
lever or the steering mounted paddles.
Never select neutral N
when driving.
Never select neutral N
while the vehicleis moving.
You can change mode at any time by moving the gear lever from A
to Mor the other way round.
Page 216 of 396
Stop & Start The Stop & Start system puts the engine temporarily into standby - STOP mode - during stops in the traffic (red lights, traffic jams, or other...). The engine restar ts automatically - START mode - as soon as you want to move off. The restar t takes place instantly, quickly and silently.
Per
fect for urban use, the Stop & Star t system reduces fuel consumption and exhaust emissions as well as the noise level when stationary.
Operation
Going into engine STOP mode
With the electronic gearbox system, for your comfor t during parking maoeuvres, STOP mode is not available for a few seconds after coming out of reverse gear.STOP mode does not affect the functionality of the vehicle, such asbraking, power steering, for example.
Never refuel with the engine in STOPmode; you must switch off the ignition with the key. Th
e "ECO"warning lamp comes on
in the instrument panel and the engine goes into standby automatically:
-with a manual gearbox , at speeds below
12 mph (20 km/h), when you put the gear lever into neutral and release the clutchpedal,
- with the 6-speed electronic gearbox
system, at a speed below 5 mph (8 km/h),
when you press the brake pedal or put thegear lever into position N.
If your vehicle is fitted with the system, a time counter calculates
the sum o
f the periods in STOP
mode during a journey. It resets
itself to zero every time the ignition
is switched on with the key.
STOP mode is not invoked when:
- the driver's door is open,
- the driver's seat belt is not
fastened,
- the vehicle has not exceeded 6 mph (10 km/h)since the last engine star t using the key,
- the electric parking brake is applied or
bein
g applied,
- the engine is needed to maintain acomfortable temperature in the passenger compartment,
- demisting is active,
- some special conditions (battery charge, engine temperature, braking assistance,ambient temperature...) where the engine isneeded to assure control of a system.
Special cases: STOP modeunavailable
In this case, the "ECO"warning lamp
flashes for a few seconds, then goes off.
This operation is per fectly normal.
Page 223 of 396

221Driving
Memorising speeds
This memorisation of speeds applies to both the speed limiter and the cruise control.
You can memorise up to 5 speeds in the system. By default, a few speeds are already memorised.
With your Audio system
�)Go to the main menu by pressing the"MENU"
button.�)Select the "Personalisation-configuration" menu and confirm. �)Select "Vehicle parameters" menu andconfirm. �)Select the "Driving assistance" line andconform. �)Select "Speeds memorised" line and confirm. �)Modify the speed.�)Select "OK
" and confirm to save themodifications.
With the eMyWay satellite
navi
gation system
�) Press the "MEM"button to display the list
of speeds memorised.
Access
For safety reasons, the driver must only carry out these operations whenstationary.
�)
Go to the main menu by pressing the left
hand thumb wheel at the bottom of the steering wheel. �) Select the "Vehicle parameters" menu andconfirm.�)Select the "Driving assistance" line and confirm.�)
Select the "Speeds memorised" line andconfirm.�)
Modify the speed. �)
Select " OK" and confirm to save the
modifications.
These operations are only possiblewhen stationary with this system.
Selection
To select a memorised speed: �)
press and hold the " +" or "- " button; the system stops at the nearest memorised speed, �)
press and hold again the "+
" or " -
" button toselect another memorised speed.
A reminder of the speed and the state of thesystem (on/off) is displayed in the instrument
panel.
Page 224 of 396

System which prevents the vehicle fromexceeding the speed programmed by the driver.
When the programmed speed limit is reached, pressing the accelerator pedal no longer has any effect.
Speed limiter
The speed limiter cannot, in any circumstances, replace the need to respect speed limits, nor can it replace the need for vigilance and responsibility on the par t of the driver.
The functions of this system are grouped
together on the steering mounted controls.
1
.Speed limiter mode selection wheel.
2. Programmed value decrease button. 3.
Programmed value increase button. 4.Speed limiter on/off button.
5.List of memorised speeds display button.
(see "Memorising speeds")
Steering mounted controls
The programmed information is grouped
together in the instrument panel screen.
6
.Speed limiter on/off indication.
7. Speed limiter mode selection indication. 8.Programmed speed value.9.
Selection of a memorised speed.
(see "Memorising speeds")
Displays in the instrument panel
Operation
The speed limiter is switched onmanually:
it requires a programmed speed of at least
20 mph (30 km/h). The speed limiter is switched off by manual foperation of the control. The programmed speed can be exceeded
temporarily by pressing the accelerator firmly
beyond the point of resistance.
To return to the programmed speed, simply release the accelerator pedal.
The programmed speed remains in the memorywhen the ignition is switched off.
Page 226 of 396

Cruise control
System which automatically maintains thespeed of the vehicle at the value programmed
by the driver, without any action on the accelerator pedal.
The
functions of this system are grouped
together on the steering mounted controls.
1.Cruise control mode selection dial.
2. Speed programming/value decrease button. 3.
Speed programming/value increase button.4.Cruise control off/resume button.
5.Memorised speeds display button.
(see "Memorising speeds")
Steering mounted controls
The cruise control system cannot, in anycircumstances, replace the need to respect speed limits, nor can it replace the need for vigilance and responsibility on the par t of the driver.
You are advised to keep your feet near the pedals at all times.
The programmed information is grouped
together in the instrument panel screen.
6.Cruise control off/resume indication.
7. Cruise control mode selection indication.8.Programmed speed value.9.
Selecting a stored speed.
(see "Storing speeds")
Displays in the instrument panel
Operation
The cruise control is switched on
manually: itrequires a minimum vehicle speed of 25 mph(40 km/h) and engagement of:
- fourth gear on the manual gearbox,
- second gear on the electronic gearbox
system or automatic gearbox, in sequential
drivin
g mode,
- position A
on the electronic gearbox
system or D on an automatic gearbox.
The cruise control is switched offmanuallyfor by pressing the brake or clutch pedal or
on triggering of the ESP system for safety reasons. It is possible to exceed the programmed speed
temporarily by pressing the accelerator pedal.
To return to the pro
grammed speed, simply release the accelerator pedal.
Switching off the ignition cancels any programmed speed value.
Page 237 of 396
235
Checks
Petrol engines
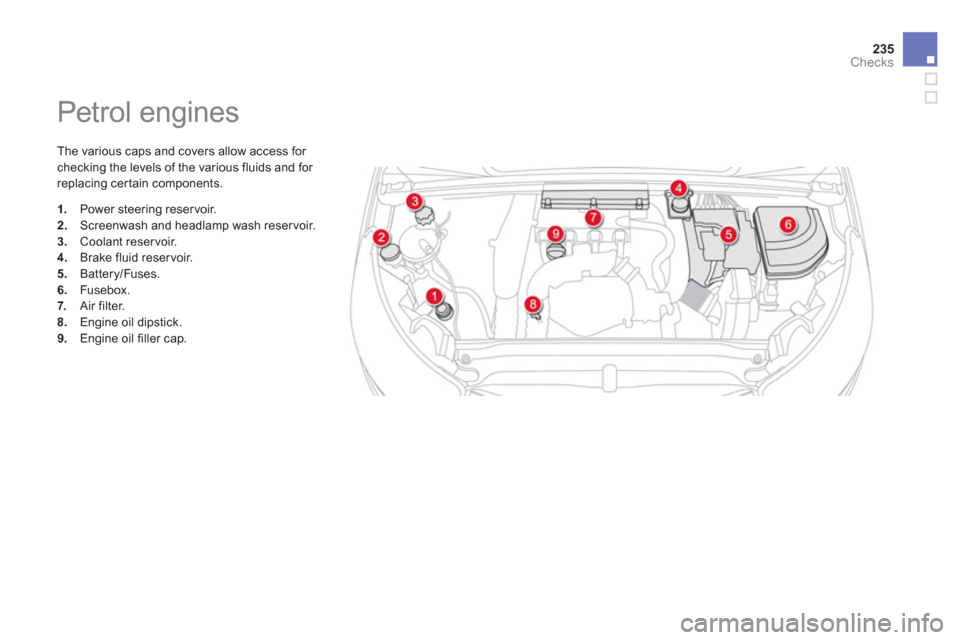
The various caps and covers allow access for
checking the levels of the various fluids and for
replacing cer tain components.
1. Power steering reservoir.2.Screenwash and headlamp wash reservoir.3.Coolant reservoir.4.
Brake fluid reservoir.
5. Battery/Fuses.
6.Fusebox.
7. Air filter.8.Engine oil dipstick.9.
Engine oil filler cap.
Page 238 of 396
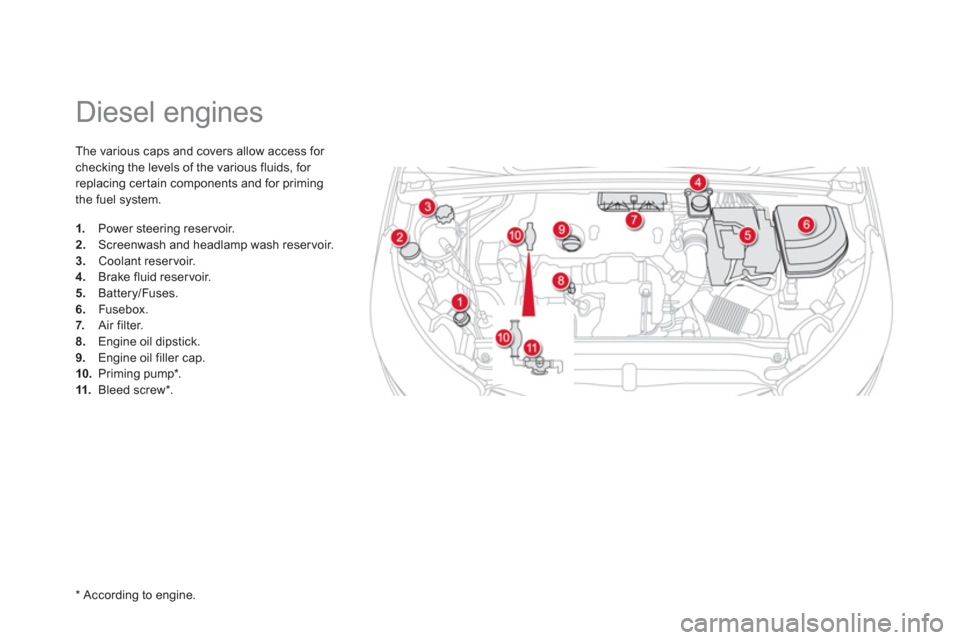
Diesel engines
The various caps and covers allow access for
checking the levels of the various fluids, for replacing cer tain components and for primingthe fuel system.
1.
Power steering reservoir.2.
Screenwash and headlamp wash reservoir.3.
Coolant reser voir. 4.
Brake fluid reservoir.5.
Battery/Fuses.
6.Fusebox.7. Air filter.8.Engine oil dipstick. 9.
Engine oil filler cap.10.Priming pump *
. 11.
Bleed screw *
.
*
Accordin
g to engine.
Page 240 of 396
Changing the coolant
The coolant does not have to be changed.
Coolant specifi cation
The coolant must conform to the
manufacturer's recommendations.
Coolant level
The coolant level should be close
to the "MA X" mark but should never exceed it. When the engine is warm, the
temperature of the coolant is regulated by the fan. This can operate with the ignition off.
On vehicles which are fitted with a par ticle
emission filter, the fan may operate after
the vehicle has been switched off, even if
the en
gine is cold.
In addition, as the cooling system is pressurised,
wait at least one hour after switching off the engine before carrying out any work.
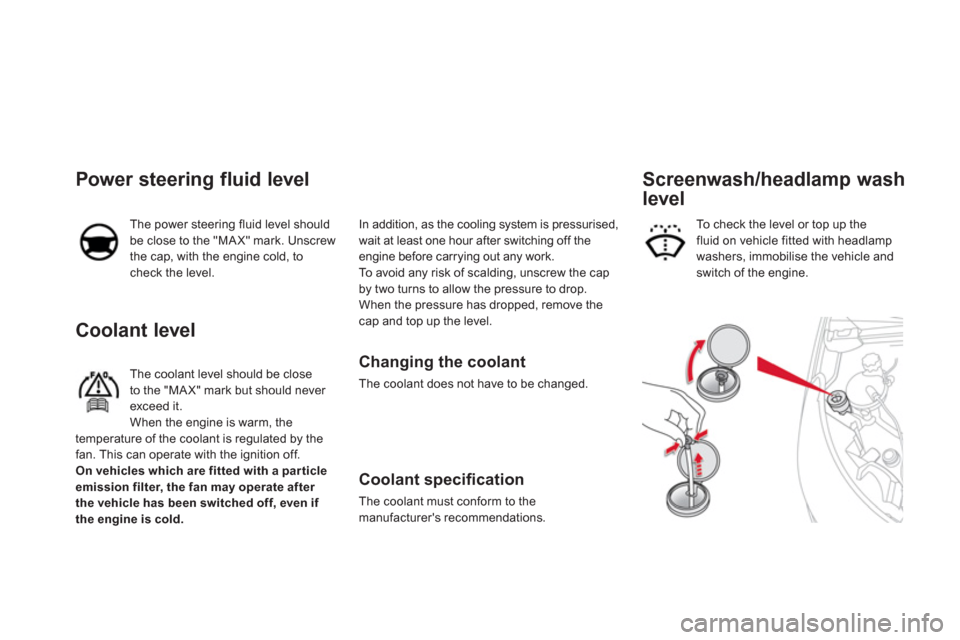
To a v o i d a ny risk of scalding, unscrew the cap by two turns to allow the pressure to drop. When the pressure has dropped, remove the cap and top up the level.
Power steering fluid level
The power steering fluid level should
be close to the "MA X" mark. Unscrew
the cap, with the engine cold, tocheck the level. To check the level or top up the
fluid on vehicle fitted with headlamp
washers
, immobilise the vehicle and switch of the engine.
Screenwash/headlamp wash
level
Page 248 of 396
Temporary puncture repair kit
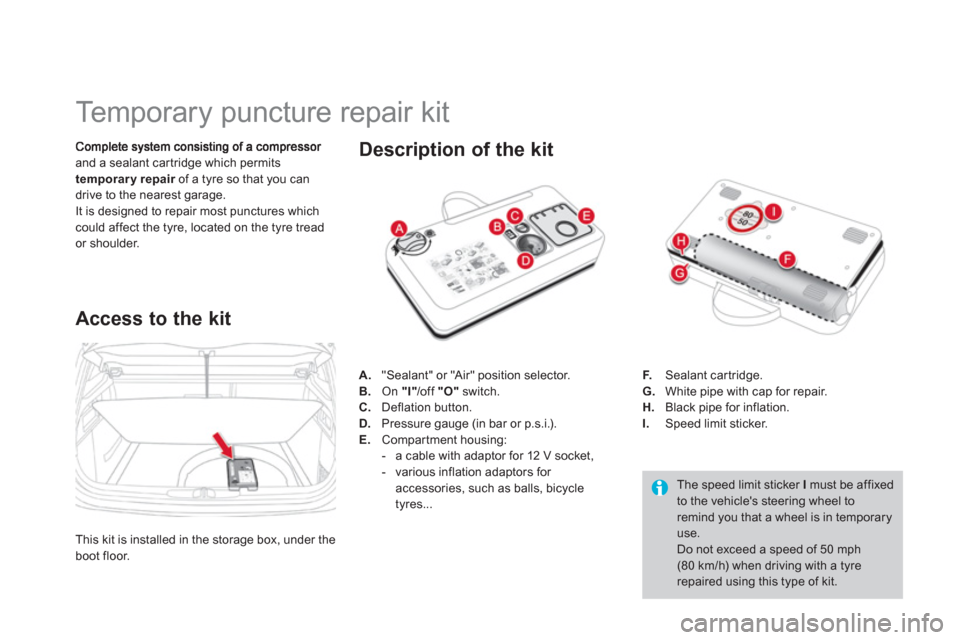
and a sealant car tridge which permits
temporary repair of a tyre so that you can rdrive to the nearest garage.
It is designed to repair most punctures which
could affect the tyre, located on the tyre tread or shoulder.
Access to the kit
The speed limit sticker Imust be affixed to the vehicle's steering wheel to remind you that a wheel is in temporaryuse.
Do not exceed a speed of 50 mph(80 km/h) when driving with a tyre repaired using this type of kit.
Description of the kit
A.
"Sealant" or "Air" position selector.
B. On "I"/off "O"
switch. C.
Deflation button. D.Pressure gauge (in bar or p.s.i.).
E.Compartment housing:
- a cable with adaptor for 12 V socket,
- various in
flation adaptors for
accessories, such as balls, bicycle
tyres...F
.Sealant cartridge.G. White pipe with cap for repair.
H. Black pipe for inflation.I.
Speed limit sticker.
This kit is installed in the stora
ge box, under the boot floor.