bonnet CITROEN DS4 2018 Owners Manual
[x] Cancel search | Manufacturer: CITROEN, Model Year: 2018, Model line: DS4, Model: CITROEN DS4 2018Pages: 296, PDF Size: 9.91 MB
Page 6 of 296
4
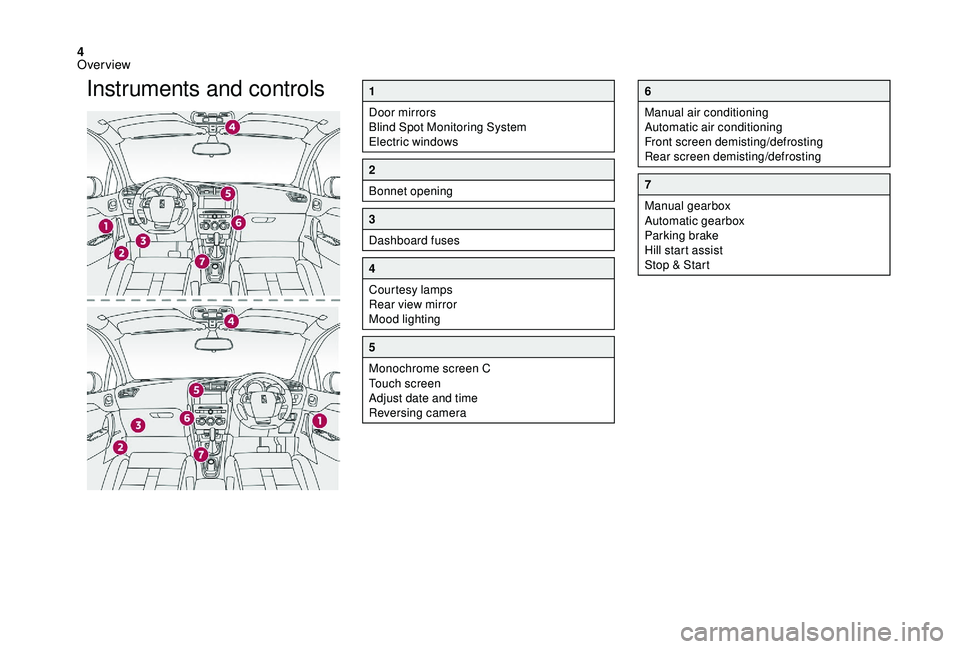
Instruments and controls1
Door mirrors
Blind Spot Monitoring System
Electric windows
2
Bonnet opening
3
Dashboard fuses
4
Courtesy lamps
Rear view mirror
Mood lighting
5
Monochrome screen C
Touch screen
Adjust date and time
Reversing camera
6
Manual air conditioning
Automatic air conditioning
Front screen demisting/defrosting
Rear screen demisting/defrosting
7
Manual gearbox
Automatic gearbox
Parking brake
Hill start assist
Stop & Start
Over view
Page 35 of 296
33
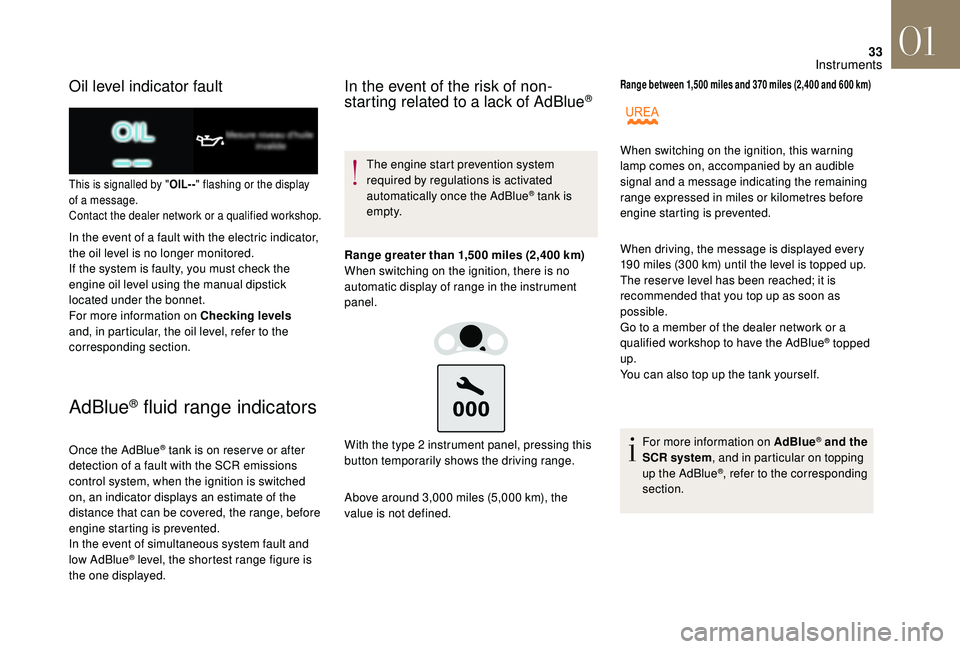
Oil level indicator fault
This is signalled by "OIL- -" flashing or the display
of a message.
Contact the dealer network or a qualified workshop.
In the event of a fault with the electric indicator,
the oil level is no longer monitored.
If the system is faulty, you must check the
engine oil level using the manual dipstick
located under the bonnet.
For more information on Checking levels
and, in particular, the oil level, refer to the
corresponding section.
AdBlue® fluid range indicators
Once the AdBlue® tank is on reser ve or after
detection of a fault with the SCR emissions
control system, when the ignition is switched
on, an indicator displays an estimate of the
distance that can be covered, the range, before
engine starting is prevented.
In the event of simultaneous system fault and
low AdBlue
® level, the shortest range figure is
the one displayed.
In the event of the risk of non-
starting related to a lack of AdBlue®
The engine start prevention system
required by regulations is activated
automatically once the AdBlue
® tank is
e m pt y.
Range greater than 1,500 miles (2,400 km)
When switching on the ignition, there is no
automatic display of range in the instrument
panel.
Above around 3,000 miles (5,000 km), the
value is not defined. With the type 2 instrument panel, pressing this
button temporarily shows the driving range.
Range between 1,500 miles and 370 miles (2,400 and 600 km)
When driving, the message is displayed every
190 miles (300 km) until the level is topped up.
The reser ve level has been reached; it is
recommended that you top up as soon as
possible.
Go to a member of the dealer network or a
qualified workshop to have the AdBlue
® topped
up.
You can also top up the tank yourself.
For more information on AdBlue
® and the
SCR system , and in particular on topping
up the AdBlue
®, refer to the corresponding
section.
When switching on the ignition, this warning
lamp comes on, accompanied by an audible
signal and a message indicating the remaining
range expressed in miles or kilometres before
engine starting is prevented.
01
Instruments
Page 59 of 296
57
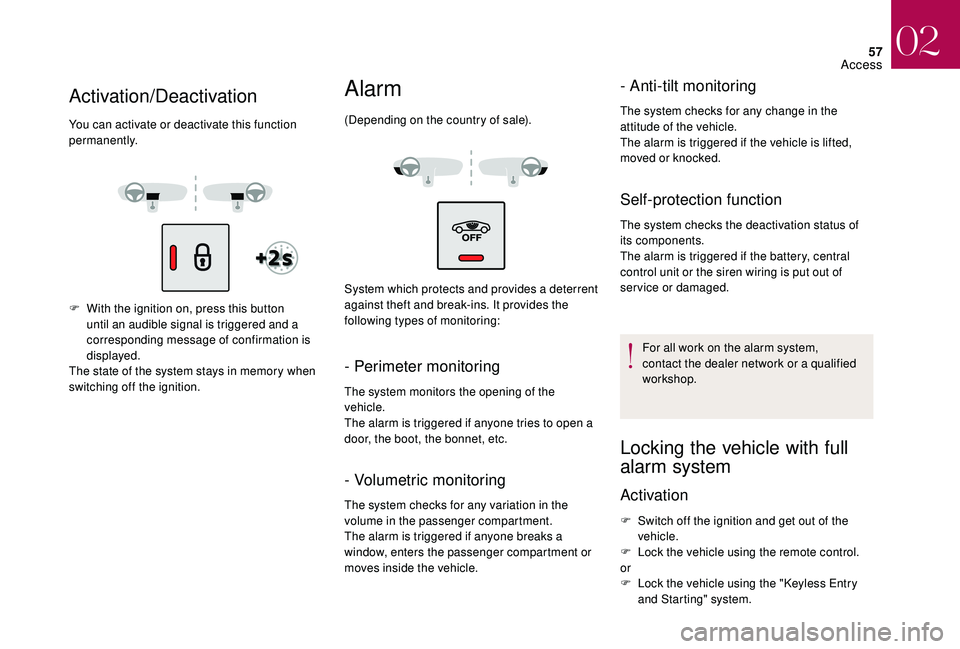
F With the ignition on, press this button until an audible signal is triggered and a
corresponding message of confirmation is
displayed.
The state of the system stays in memory when
switching off the ignition.
Alarm
(Depending on the country of sale).
System which protects and provides a deterrent
against theft and break-ins. It provides the
following types of monitoring:
- Perimeter monitoring
The system monitors the opening of the
vehicle.
The alarm is triggered if anyone tries to open a
door, the boot, the bonnet, etc.
- Volumetric monitoring
The system checks for any variation in the
volume in the passenger compartment.
The alarm is triggered if anyone breaks a
window, enters the passenger compartment or
moves inside the vehicle.
- Anti-tilt monitoring
The system checks for any change in the
attitude of the vehicle.
The alarm is triggered if the vehicle is lifted,
moved or knocked.
Self-protection function
The system checks the deactivation status of
its components.
The alarm is triggered if the battery, central
control unit or the siren wiring is put out of
service or damaged.
For all work on the alarm system,
contact the dealer network or a qualified
workshop.
Locking the vehicle with full
alarm system
Activation
F Switch off the ignition and get out of the vehicle.
F
L
ock the vehicle using the remote control.
or
F
L
ock the vehicle using the "Keyless Entry
and Starting" system.
Activation/Deactivation
You can activate or deactivate this function
permanently.
02
Access
Page 102 of 296
100
Malfunction
If a fault occurs with the automatic rain sensitive
wipers, the wipers will operate in intermittent mode.
Contact the dealer network or a qualified workshop.
Do not cover the rain sensor, linked with
the sunshine sensor and located in the top
centre of the windscreen, behind the rear
view mirror.
When using an automatic car wash, switch
off the automatic rain sensitive wipers.
In winter, it is advisable to wait until the
windscreen is completely clear of ice before
activating the automatic rain sensitive wipers.
Windscreen and headlamp
wash
Front screenwashHeadlamp wash
To reduce the fluid consumption of the
headlamp wash, it operates only with
every seventh use of the screenwash or
every 25 miles (40 km) during a given
j o u r n ey.
Low screenwash/headlamp wash
fluid
level
Checking and topping up this fluid should be
done with the engine off.
The fluid level should be checked
regularly, particularly during winter.
For more information on Checking levels and,
in particular, the screenwash/headlamp wash,
refer to the corresponding section.
Special position of the
windscreen wipers
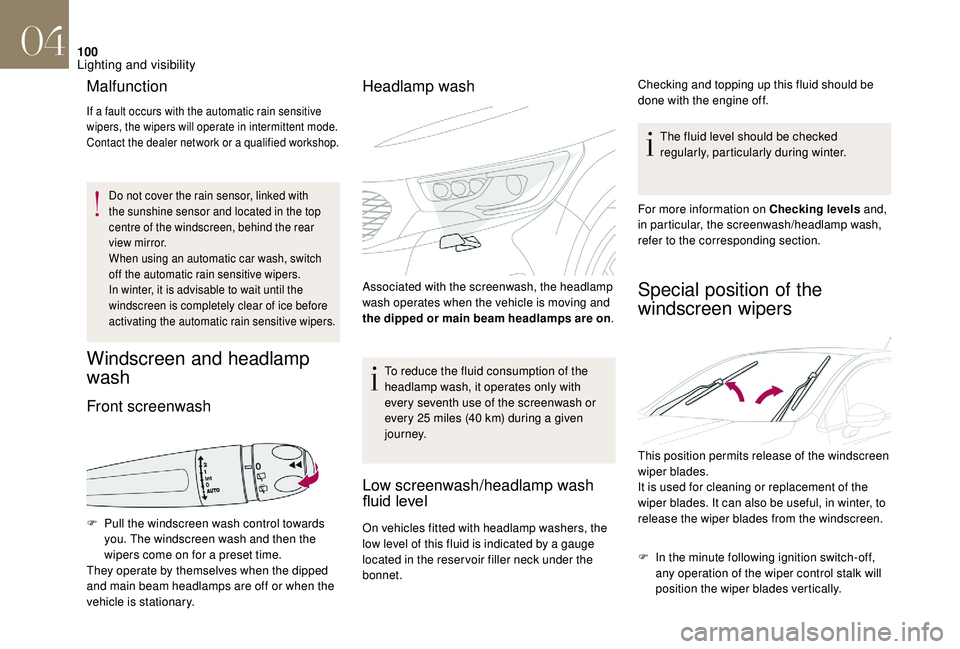
This position permits release of the windscreen
wiper blades.
It is used for cleaning or replacement of the
wiper blades. It can also be useful, in winter, to
release the wiper blades from the windscreen.
F
P
ull the windscreen wash control towards
you. The windscreen wash and then the
wipers come on for a preset time.
They operate by themselves when the dipped
and main beam headlamps are off or when the
vehicle is stationary. Associated with the screenwash, the headlamp
wash operates when the vehicle is moving and
the dipped or main beam headlamps are on
.
On vehicles fitted with headlamp washers, the
low level of this fluid is indicated by a gauge
located in the reser voir filler neck under the
bonnet. F
I
n the minute following ignition switch-off,
any operation of the wiper control stalk will
position the wiper blades vertically.
04
Lighting and visibility
Page 151 of 296
149
The Stop & Start system requires a
12 V battery of specific technology and
specification.
All work on this type of battery must only
be carried out in the dealer network or by
a qualified workshop.
For more information on the 12 V batter y ,
refer to the corresponding section.
Opening the bonnet
Driving on flooded roads
Before driving in a flooded area, it is
strongly recommended that you deactivate
the Stop & Start system.
For more information on Driving advice ,
particularly on flooded roads, refer to the
corresponding section. Before doing anything under the bonnet,
deactivate the Stop & Start system to
avoid any risk of injury resulting from an
automatic change to START mode.Hill start assist
System which keeps your vehicle immobilised
temporarily (approximately 2 seconds) when
starting on a gradient, the time it takes to
move your foot from the brake pedal to the
accelerator pedal.
This system only operates when:
-
t
he vehicle is completely stationary, with
your foot on the brake pedal,
-
c
ertain slope conditions are met,
-
w
ith the driver’s door closed.
The hill start assist function cannot be
deactivated.
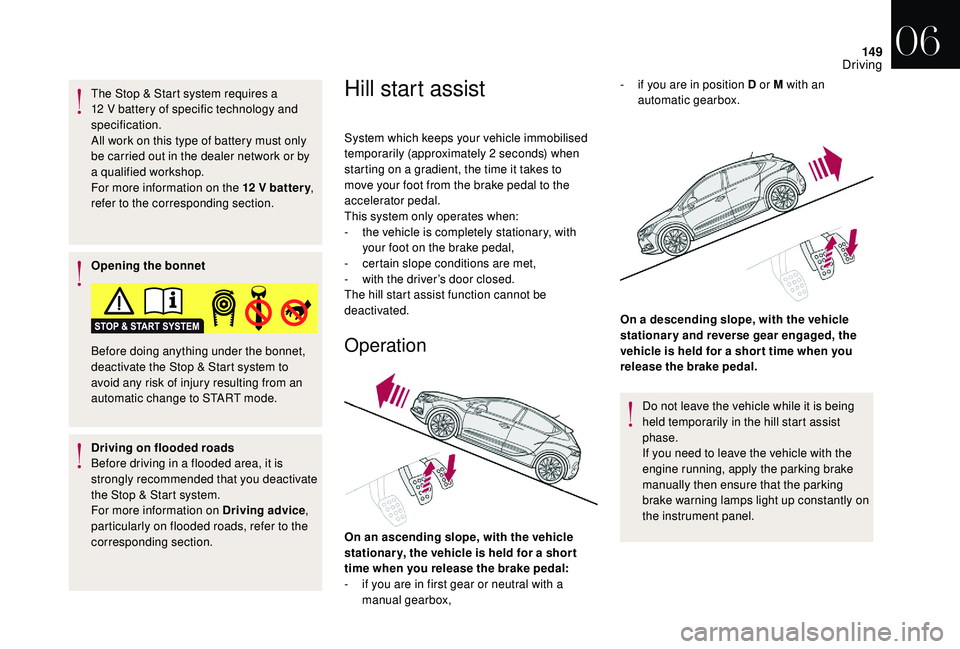
Operation
On an ascending slope, with the vehicle
stationar y, the vehicle is held for a shor t
time when you release the brake pedal:
-
i
f you are in first gear or neutral with a
manual gearbox, On a descending slope, with the vehicle
stationary and reverse gear engaged, the
vehicle is held for a shor t time when you
release the brake pedal.
Do not leave the vehicle while it is being
held temporarily in the hill start assist
phase.
If you need to leave the vehicle with the
engine running, apply the parking brake
manually then ensure that the parking
brake warning lamps light up constantly on
the instrument panel.
-
i
f you are in position D or M with an
automatic gearbox.
06
Driving
Page 179 of 296

177
Maximum authorised load distributed
over the roof bars, for a load height not
exceeding 40 cm (with the exception of
bicycle carriers):
-
f
or roof bars with 90 mm pads: 50 kg ,
-
f
or roof bars with 15 0 mm pads: 80 kg.
For more information, contact the dealer
network or a qualified workshop.
If the height exceeds 40 cm, adapt the
speed of the vehicle to the profile of the
road to avoid damaging the roof bars and
the mountings on the vehicle.
Please refer to local legislation in order
to comply with the regulations related to
transporting objects which are longer than
the vehicle.
Bonnet
The cooling fan may star t after
switching off the engine: take care
with articles and clothing that might be
caught by the fan blades.
Opening
F Open the left-hand front door.
F
P
ull the interior bonnet release lever A ,
located at the bottom of the door aperture. F
P
ush the exterior safety catch B to the left
and raise the bonnet.
F
U
nclip the stay C from its housing on the
back of the bonnet.
F
F
ix the stay in the slot to hold the bonnet
open.
Before doing anything under the bonnet,
deactivate the Stop & Start system to
avoid the risk of injury related to an
automatic change to START mode.
07
Practical information
Page 180 of 296

178
The location of the interior bonnet release
lever prevents opening of the bonnet when
the left-hand front door is shut.
Do not open the bonnet when there is a
very strong wind.
When the engine is hot, handle the
exterior safety catch and the stay with
care (risk of burns).
Closing
F Take the stay out of the support slot.
F C lip the stay in its housing on the back of
the bonnet.
F
L
ower the bonnet and release it near the
end of its travel.
F
P
ull on the bonnet to check that it is fully
latched.
Because of the presence of electrical
equipment under the bonnet, it is
recommended that exposure to water
(rain, washing, etc.) be limited.
Engines
Petrol
Diesel
These engines are examples provided as a
guide.
The locations of the following elements may
vary:
-
A
ir filter.
-
E
ngine oil dipstick.
-
E
ngine oil filler cap.
-
P
riming pump. 1.
Power steering fluid reservoir.
2. Screenwash and headlamp wash
reservoir.
3. Engine coolant reservoir.
4. Brake fluid tank.
5. Battery/Fuses.
6. Fusebox.
7. Remote earth point.
8. A i r f i l t e r.
9. Engine oil dipstick.
10. Engine oil filler cap.
11. Priming pump*
The Diesel circuit is under very high
pressure.
All work on this circuit must be carried out
only in the dealer network or a qualified
workshop.
*
D
epending on engine.
07
Practical information
Page 181 of 296
179
Checking levels
Check all of these levels regularly, in line with
the manufacturer's service schedule. Top them
up if necessary, unless other wise indicated.
If a level drops significantly, have the
corresponding system checked by the dealer
network or a qualified workshop.The fluid must comply with the
manufacturer's recommendations and with
the vehicle's engine.
Take care when working under the
bonnet, as certain areas of the engine
may be extremely hot (risk of burns) and
the cooling fan could start at any time
(even
with the ignition off).
Used products
Avoid prolonged contact of used oil or
fluids with the skin.
Most of these fluids are harmful to health
or indeed very corrosive. Do not discard used oil or fluids into
sewers or onto the ground.
Return used oil to the dealer network or
a qualified workshop and dispose of it in
the containers reser ved for this purpose.
Engine oil level
The check is carried out either when
the ignition is switched on using the
oil level indicator in the instrument
panel for vehicles equipped with an
electric gauge, or using the dipstick.
To ensure that the reading is correct, your
vehicle must be parked on a level sur face
with the engine stopped for more than
30
minutes.
It is normal to top up the oil level between two
ser vices (or oil changes). We recommend that
you check the level, and top up if necessary,
every 3,000 miles (5,000 km).
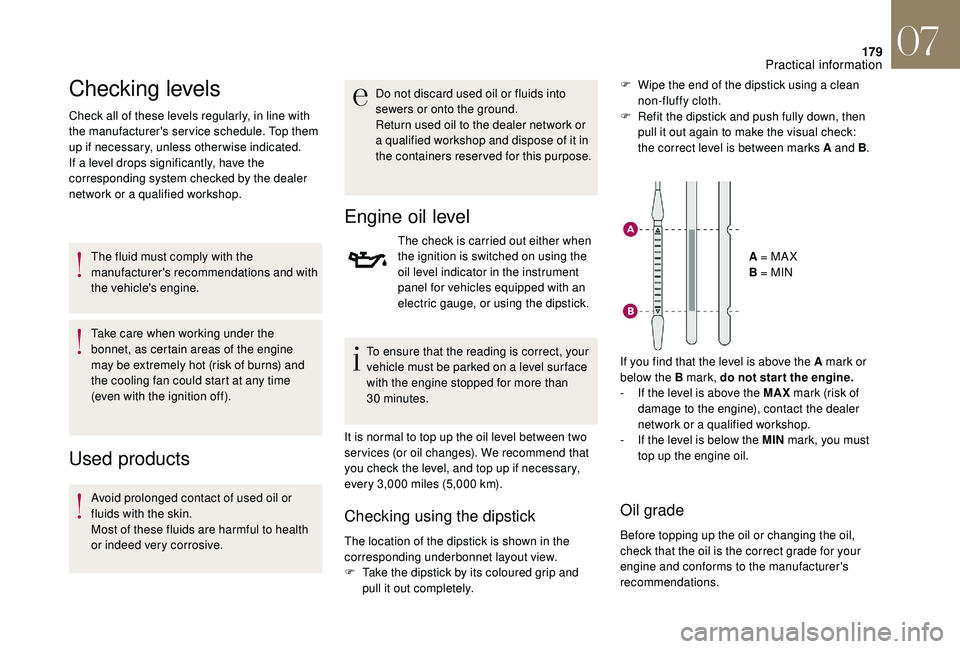
Checking using the dipstick
The location of the dipstick is shown in the
corresponding underbonnet layout view.
F
T
ake the dipstick by its coloured grip and
pull it out completely. A = MA X
B = MIN
If you find that the level is above the A mark or
below the B mark, do not star t the engine.
-
I
f the level is above the MAX
mark (risk of
damage to the engine), contact the dealer
network or a qualified workshop.
-
I
f the level is below the MIN
mark, you must
top up the engine oil.
Oil grade
Before topping up the oil or changing the oil,
check that the oil is the correct grade for your
engine and conforms to the manufacturer's
recommendations. F
W
ipe the end of the dipstick using a clean
non-fluffy cloth.
F
R
efit the dipstick and push fully down, then
pull it out again to make the visual check:
the correct level is between marks A and B .
07
Practical information
Page 183 of 296
181
Screenwash/headlamp wash
level
To check the level or top up the fluid
on vehicles fitted with headlamp
washers, immobilise the vehicle and
switch off the engine.
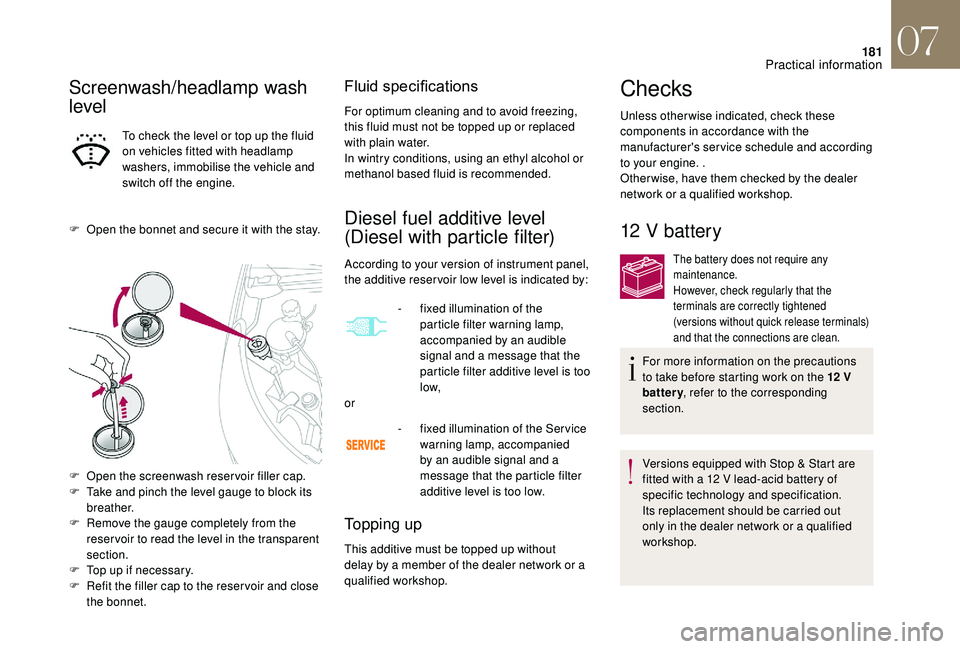
F
O
pen the bonnet and secure it with the stay.
F
O
pen the screenwash reservoir filler cap.
F
T
ake and pinch the level gauge to block its
breather.
F
R
emove the gauge completely from the
reser voir to read the level in the transparent
section.
F
T
op up if necessary.
F
R
efit the filler cap to the reser voir and close
the bonnet.
Fluid specifications
For optimum cleaning and to avoid freezing,
this fluid must not be topped up or replaced
with plain water.
In wintry conditions, using an ethyl alcohol or
methanol based fluid is recommended.
Diesel fuel additive level
(Diesel with particle filter)
According to your version of instrument panel,
the additive reser voir low level is indicated by:
Topping up
This additive must be topped up without
delay by a member of the dealer network or a
qualified workshop. -
f
ixed illumination of the
particle filter warning lamp,
accompanied by an audible
signal and a message that the
particle filter additive level is too
low,
or
-
f
ixed illumination of the Ser vice
warning lamp, accompanied
by an audible signal and a
message that the particle filter
additive level is too low.
Checks
Unless otherwise indicated, check these
components in accordance with the
manufacturer's service schedule and according
to your engine. .
Otherwise, have them checked by the dealer
network or a qualified workshop.
12 V battery
The battery does not require any
maintenance.
However, check regularly that the
terminals are correctly tightened
(versions without quick release terminals)
and that the connections are clean.
For more information on the precautions
to take before starting work on the 12 V
battery , refer to the corresponding
section.
Versions equipped with Stop & Start are
fitted with a 12 V lead-acid battery of
specific technology and specification.
Its replacement should be carried out
only in the dealer network or a qualified
workshop.
07
Practical information
Page 201 of 296
199
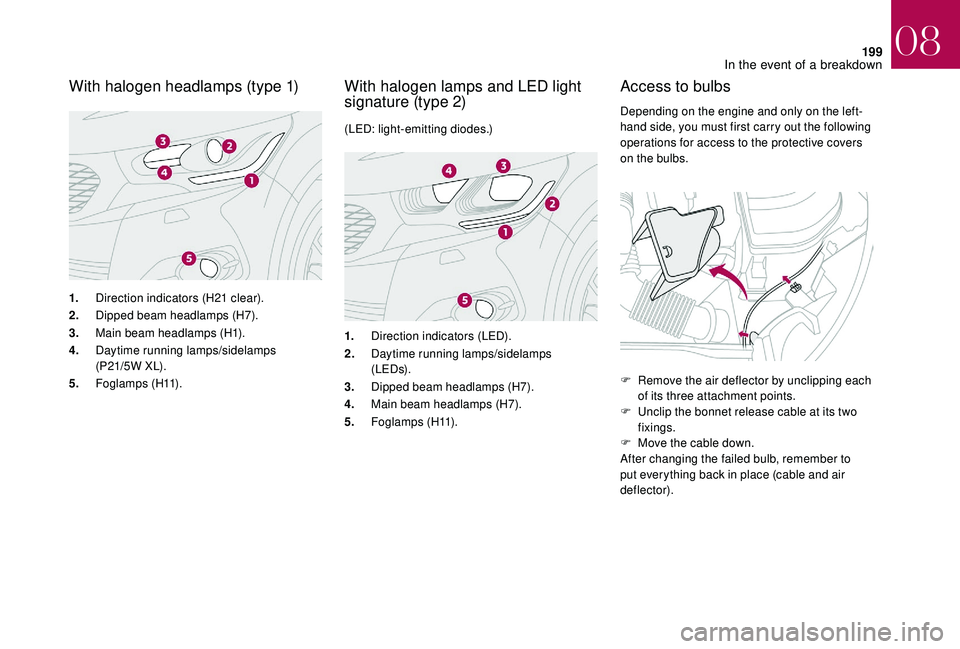
With halogen headlamps (type 1)
1.Direction indicators (H21 clear).
2. Dipped beam headlamps (H7).
3. Main beam headlamps (H1).
4. Daytime running lamps/sidelamps
(P 21/5 W X L).
5. Foglamps (H11).
With halogen lamps and LED light
signature (type 2)
(LED: light-emitting diodes.)
1. Direction indicators (LED).
2. Daytime running lamps/sidelamps
(LEDs).
3. Dipped beam headlamps (H7).
4. Main beam headlamps (H7).
5. Foglamps (H11).
Access to bulbs
Depending on the engine and only on the left-
hand side, you must first carry out the following
operations for access to the protective covers
on the bulbs.
F
R
emove the air deflector by unclipping each
of its three attachment points.
F
U
nclip the bonnet release cable at its two
fixings.
F
M
ove the cable down.
After changing the failed bulb, remember to
put everything back in place (cable and air
deflector).
08
In the event of a breakdown