remote start CITROEN DS4 2023 Owners Manual
[x] Cancel search | Manufacturer: CITROEN, Model Year: 2023, Model line: DS4, Model: CITROEN DS4 2023Pages: 296, PDF Size: 9.91 MB
Page 19 of 296
17
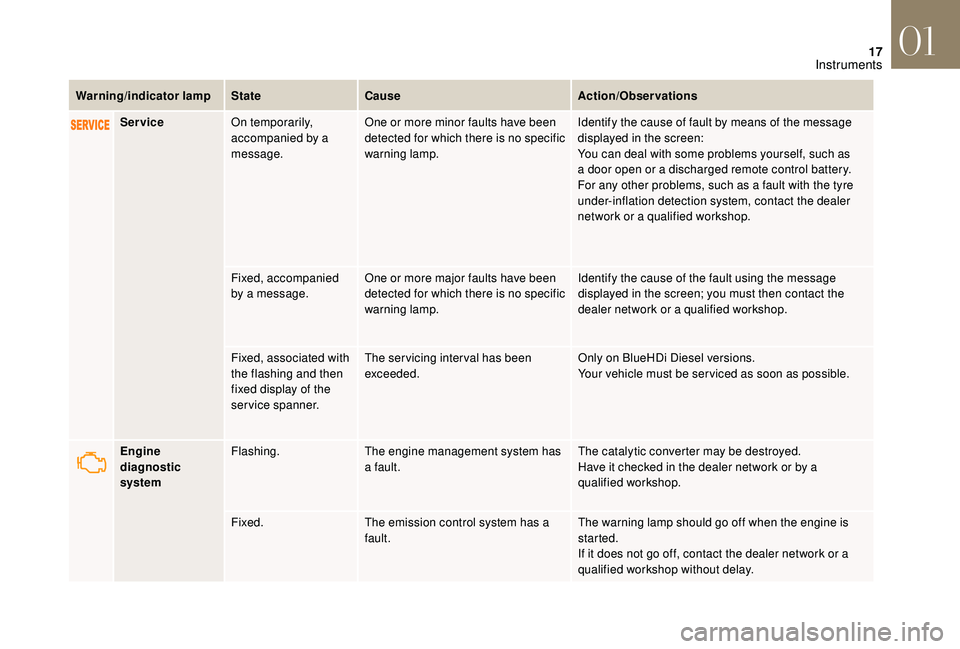
Warning/indicator lampStateCause Action/Observations
Service On temporarily,
accompanied by a
message. One or more minor faults have been
detected for which there is no specific
warning lamp. Identify the cause of fault by means of the message
displayed in the screen:
You can deal with some problems yourself, such as
a
door open or a discharged remote control battery.
For any other problems, such as a fault with the tyre
under-inflation detection system, contact the dealer
network or a qualified workshop.
Fixed, accompanied
by a message. One or more major faults have been
detected for which there is no specific
warning lamp. Identify the cause of the fault using the message
displayed in the screen; you must then contact the
dealer network or a qualified workshop.
Fixed, associated with
the flashing and then
fixed display of the
service spanner. The servicing interval has been
exceeded.
Only on BlueHDi Diesel versions.
Your vehicle must be ser viced as soon as possible.
Engine
diagnostic
system Flashing.
The engine management system has
a fault. The catalytic converter may be destroyed.
Have it checked in the dealer network or by a
qualified workshop.
Fixed. The emission control system has a
fault. The warning lamp should go off when the engine is
started.
If it does not go off, contact the dealer network or a
qualified workshop without delay.
01
Instruments
Page 49 of 296
47
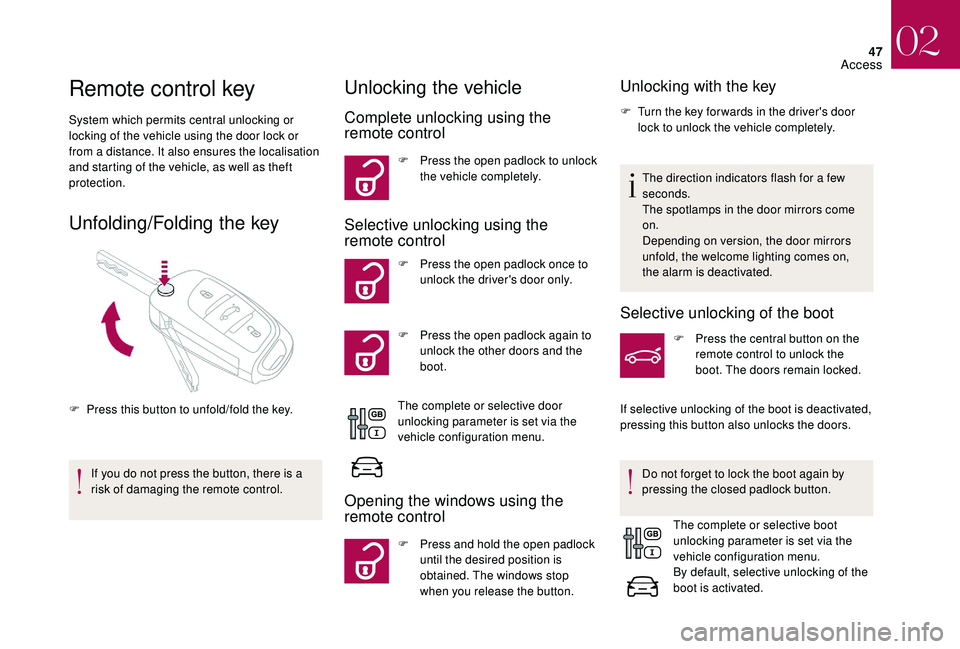
Remote control key
System which permits central unlocking or
locking of the vehicle using the door lock or
from a distance. It also ensures the localisation
and starting of the vehicle, as well as theft
protection.
Unfolding/Folding the key
F Press this button to unfold/fold the key.If you do not press the button, there is a
risk of damaging the remote control.
Unlocking the vehicle
Complete unlocking using the
remote control
F Press the open padlock to unlock the vehicle completely.
Selective unlocking using the
remote control
F Press the open padlock once to unlock the driver's door only.
F
P
ress the open padlock again to
unlock the other doors and the
boot.
The complete or selective door
unlocking parameter is set via the
vehicle configuration menu.
Opening the windows using the
remote control
F Press and hold the open padlock until the desired position is
obtained. The windows stop
when you release the button.
Unlocking with the key
F Turn the key for wards in the driver's door lock to unlock the vehicle completely.
The direction indicators flash for a few
seconds.
The spotlamps in the door mirrors come
on.
Depending on version, the door mirrors
unfold, the welcome lighting comes on,
the alarm is deactivated.
Selective unlocking of the boot
F Press the central button on the remote control to unlock the
boot. The doors remain locked.
If selective unlocking of the boot is deactivated,
pressing this button also unlocks the doors.
Do not forget to lock the boot again by
pressing the closed padlock button. The complete or selective boot
unlocking parameter is set via the
vehicle configuration menu.
By default, selective unlocking of the
boot is activated.
02
Access
Page 52 of 296

50
Unlocking the passenger doors
F Pull the interior door opening control.
Fault with the remote control
In the event of a malfunction with the remote
control, you can no longer unlock, lock or
locate your vehicle.
F
F
irst of all, use the key in the door lock to
unlock or lock your vehicle.
F
T
hen reinitialise the remote control.
Reinitialisation
F Switch the ignition off and remove the key from the switch.
F
I
mmediately press the closed padlock
button for a few seconds.
F
T
urn the key back to position 2 (ignition
on) .
F
S
witch the ignition off and remove the key
from the switch.
The remote control is now fully operational
again.
Changing the battery
Battery type: CR2032/3 volts.
If the battery is dead, you are
informed by illumination of this
warning lamp, an audible signal and
a message in the screen.
F
U
nclip the cover using a small screwdriver
at the two cut-outs.
F
R
emove the cover.
F
R
emove the discharged battery from its
compartment.
F
F
it the new battery into its compartment
observing the original fitting direction.
F
C
lip the cover onto the casing.
If the problem persists, contact the dealer
network as soon as possible.
Keyless Entry and
Starting
System that allows the unlocking, locking
and starting of the vehicle, while keeping the
electronic key on your person.
The electronic key can also be used as a
remote control.
For more information on the Remote
control key , refer to the corresponding
section.
02
Access
Page 54 of 296
52
In order to preser ve the battery in the
electronic key and the vehicle's battery,
the "hands-free" functions are put into
long-term standby after 21 days without
use. To restore these functions, press
one of the remote control buttons or start
the engine with the electronic key in the
reader.
For more information on starting with
Keyless Entr y and Star ting, refer to the
corresponding section.
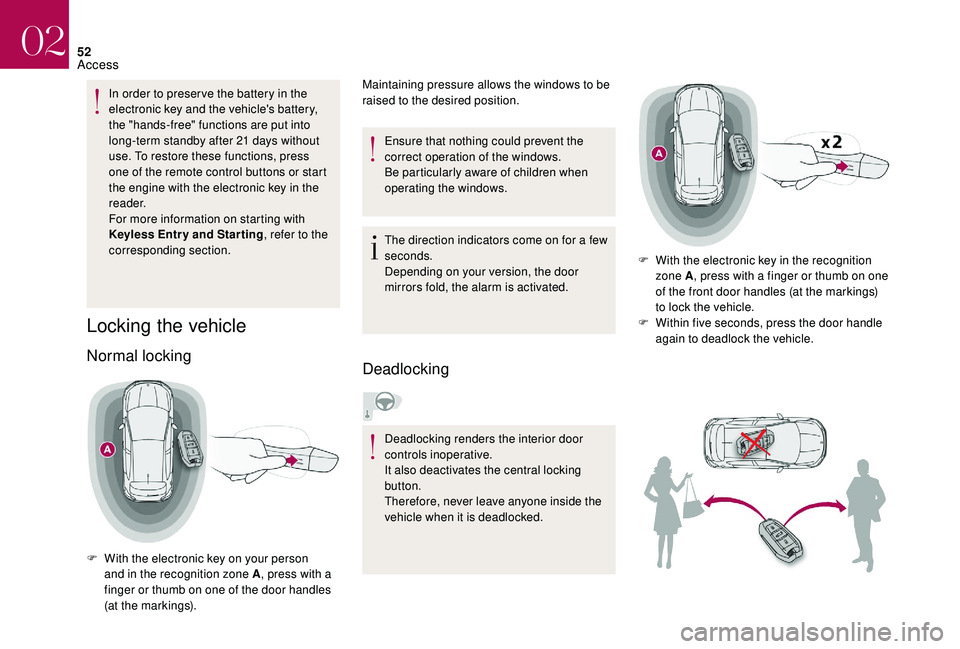
Locking the vehicle
Normal locking
F With the electronic key on your person and in the recognition zone A , press with a
finger or thumb on one of the door handles
(at the markings). Ensure that nothing could prevent the
correct operation of the windows.
Be particularly aware of children when
operating the windows.
Maintaining pressure allows the windows to be
raised to the desired position.
The direction indicators come on for a few
seconds.
Depending on your version, the door
mirrors fold, the alarm is activated.
Deadlocking
Deadlocking renders the interior door
controls inoperative.
It also deactivates the central locking
button.
Therefore, never leave anyone inside the
vehicle when it is deadlocked. F
W
ith the electronic key in the recognition
zone A , press with a finger or thumb on one
of the front door handles (at the markings)
to lock the vehicle.
F
W
ithin five seconds, press the door handle
again to deadlock the vehicle.
02
Access
Page 55 of 296

53
Accumulations (water, dust, grime, salt...)
on the inner sur face of the door handle
may affect detection.
If cleaning the inner sur face of the door
handle using a cloth does not restore
detection, contact a network dealer or a
qualified workshop.
A sudden splash of water (stream of water,
high pressure jet washer, etc.) may be
identified by the system as the desire to
open the vehicle.
Locating your vehicle
This function allows you to identify your vehicle
from a distance, particularly in poor light. Your
vehicle must be locked.F
P
ress this button.
This will switch on the courtesy lamps and the
direction indicators will flash for around ten
seconds.
Back-up key integrated in the
Keyless Entry and Starting
The integral key is used to lock and unlock the
vehicle when the electronic key cannot operate:
-
c
ell battery flat, vehicle battery discharged
or disconnected, etc.
-
v
ehicle located in an area with strong
electromagnetic signals.
F
P
ull and hold button 1 , to extract the integral
key 2 .
If the alarm is activated, the audible signal
triggered on opening a door with the key
(integral with the remote control) will stop
when the ignition is switched on.
For reasons of safety and theft protection,
do not leave your electronic key in the
vehicle, even when you are close to it.
It is recommended that you keep it on your
person.
Locking the driver's door
F Insert the integral key in the door lock, then
turn it to the rear.
Unlocking the driver's door
F Insert the integral key in the door lock, then turn it to the front.
02
Access
Page 57 of 296
55
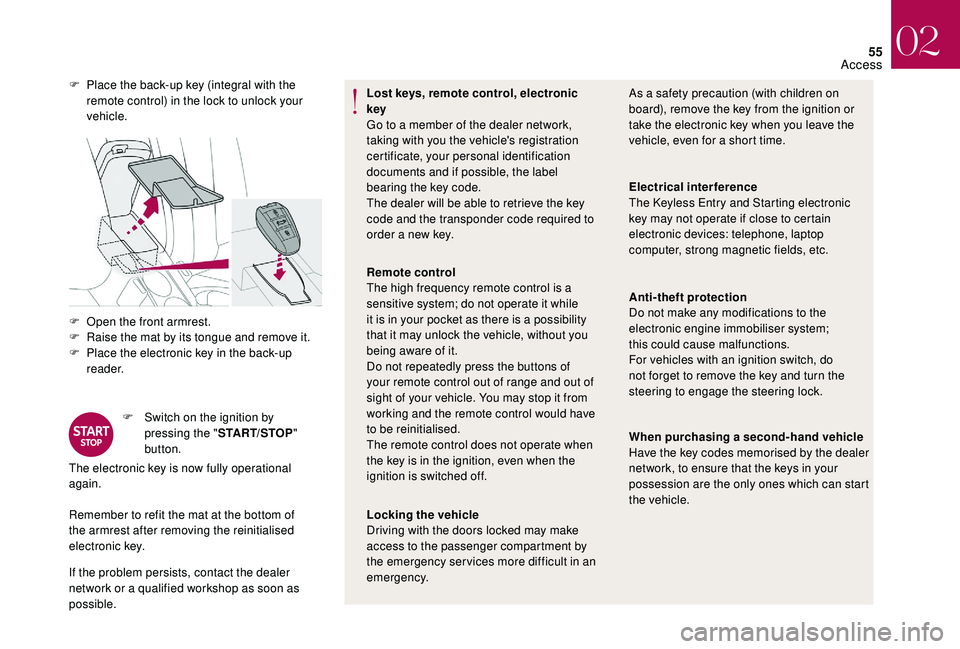
F Open the front armrest.
F R aise the mat by its tongue and remove it.
F
P
lace the electronic key in the back-up
reader.
F
S
witch on the ignition by
pressing the " START/STOP "
button.
Remember to refit the mat at the bottom of
the armrest after removing the reinitialised
electronic key.
If the problem persists, contact the dealer
network or a qualified workshop as soon as
possible. Lost keys, remote control, electronic
key
Go to a member of the dealer network,
taking with you the vehicle's registration
certificate, your personal identification
documents and if possible, the label
bearing the key code.
The dealer will be able to retrieve the key
code and the transponder code required to
order a new key.
The electronic key is now fully operational
again. F
P
lace the back-up key (integral with the
remote control) in the lock to unlock your
vehicle. As a safety precaution (with children on
board), remove the key from the ignition or
take the electronic key when you leave the
vehicle, even for a short time.
Remote control
The high frequency remote control is a
sensitive system; do not operate it while
it is in your pocket as there is a possibility
that it may unlock the vehicle, without you
being aware of it.
Do not repeatedly press the buttons of
your remote control out of range and out of
sight of your vehicle. You may stop it from
working and the remote control would have
to be reinitialised.
The remote control does not operate when
the key is in the ignition, even when the
ignition is switched off.
Locking the vehicle
Driving with the doors locked may make
access to the passenger compartment by
the emergency ser vices more difficult in an
emergency. Electrical interference
The Keyless Entry and Starting electronic
key may not operate if close to certain
electronic devices: telephone, laptop
computer, strong magnetic fields, etc.
Anti-theft protection
Do not make any modifications to the
electronic engine immobiliser system;
this
could cause malfunctions.
For vehicles with an ignition switch, do
not forget to remove the key and turn the
steering to engage the steering lock.
When purchasing a second-hand vehicle
Have the key codes memorised by the dealer
network, to ensure that the keys in your
possession are the only ones which can start
the vehicle.
02
Access
Page 59 of 296

57
F With the ignition on, press this button until an audible signal is triggered and a
corresponding message of confirmation is
displayed.
The state of the system stays in memory when
switching off the ignition.
Alarm
(Depending on the country of sale).
System which protects and provides a deterrent
against theft and break-ins. It provides the
following types of monitoring:
- Perimeter monitoring
The system monitors the opening of the
vehicle.
The alarm is triggered if anyone tries to open a
door, the boot, the bonnet, etc.
- Volumetric monitoring
The system checks for any variation in the
volume in the passenger compartment.
The alarm is triggered if anyone breaks a
window, enters the passenger compartment or
moves inside the vehicle.
- Anti-tilt monitoring
The system checks for any change in the
attitude of the vehicle.
The alarm is triggered if the vehicle is lifted,
moved or knocked.
Self-protection function
The system checks the deactivation status of
its components.
The alarm is triggered if the battery, central
control unit or the siren wiring is put out of
service or damaged.
For all work on the alarm system,
contact the dealer network or a qualified
workshop.
Locking the vehicle with full
alarm system
Activation
F Switch off the ignition and get out of the vehicle.
F
L
ock the vehicle using the remote control.
or
F
L
ock the vehicle using the "Keyless Entry
and Starting" system.
Activation/Deactivation
You can activate or deactivate this function
permanently.
02
Access
Page 60 of 296

58
The monitoring system is active: the indicator
lamp in the button flashes once per second
and the direction indicators come on for about
2 seconds.
Following a vehicle locking request, the
perimeter monitoring is activated after 5
seconds and the interior volumetric and anti-tilt
monitoring after 45 seconds.
If an opening (door, boot...) is not fully closed,
the vehicle will not be locked but the exterior
perimeter monitoring will be activated after
45 seconds, at the same time as the interior
volumetric and anti-tilt monitoring.
Deactivation
F Press the unlocking button on the remote control.
or
F
U
nlock the vehicle with the "Keyless Entry
and Starting" system.
The monitoring system is deactivated: the
indicator lamp in the button goes off and the
direction indicators flash for about 2 seconds. If the vehicle locks itself again
automatically (which occurs 30 seconds
after unlocking, if a door or the boot is
not opened), the monitoring system is not
reactivated automatically. To reactivate it,
the vehicle must be unlocked and locked
again, using the remote control or the
"Keyless Entry and Starting" system.
Locking the vehicle with
exterior perimeter monitoring
only
Deactivate the interior volumetric and anti-tilt
monitoring to avoid unwanted triggering of the
alarm in certain cases such as:
-
l
eaving a pet in the vehicle,
-
l
eaving a window partially open,
-
w
ashing your vehicle,
-
c
hanging a wheel,
-
h
aving your vehicle towed,
-
t
ransportation by sea.
Deactivating the interior volumetric
and anti-tilt monitoring
F Switch off the ignition and within ten seconds, press the button until the indicator
lamp is on continuously.
F
G
et out of the vehicle.
F
I
mmediately lock the vehicle using the
remote control or the Keyless Entry and
Starting system.
The exterior perimeter monitoring alone is
activated: the indicator lamp in the button
flashes once per second.
To be effective, this deactivation must
be carried out each time the ignition is
switched off.
02
Access
Page 61 of 296
59
Reactivating the interior volumetric
and anti-tilt monitoring
F Deactivate the perimeter monitoring by unlocking the vehicle with the remote
control or the "Keyless Entry and Starting"
system.
The indicator lamp in the button goes off.
F
R
eactivate all monitoring by locking the
vehicle with the remote control or the
"Keyless Entry and Starting" system.
The indicator lamp in the button flashes once per second again.
Triggering the alarm
This results in sounding the siren and flashing
the direction indicators for thirty seconds.
The monitoring functions remain active until
the alarm has been triggered eleven times in
succession.
When the vehicle is unlocked using the remote
control or the "Keyless Entry and Starting"
system, rapid flashing of the indicator lamp
in the button informs you that the alarm was
triggered during your absence. Upon ignition,
this flashing stops immediately.
Remote control failure
To deactivate the monitoring functions:
F u nlock the vehicle using the key (integral to
the remote control) in the driver's door lock,
F
o
pen the door; the alarm is triggered,
F
s
witch on the ignition; the alarm stops; the
indicator lamp in the button goes off.
Locking the vehicle without
activating the alarm
F Lock or deadlock the vehicle using the key (integral to the remote control) in the driver's
door lock.
Malfunction
When the ignition is switched on, fixed
illumination of the indicator lamp indicates a
fault in the system.
Have it checked in the dealer network or by a
qualified workshop.
Doors
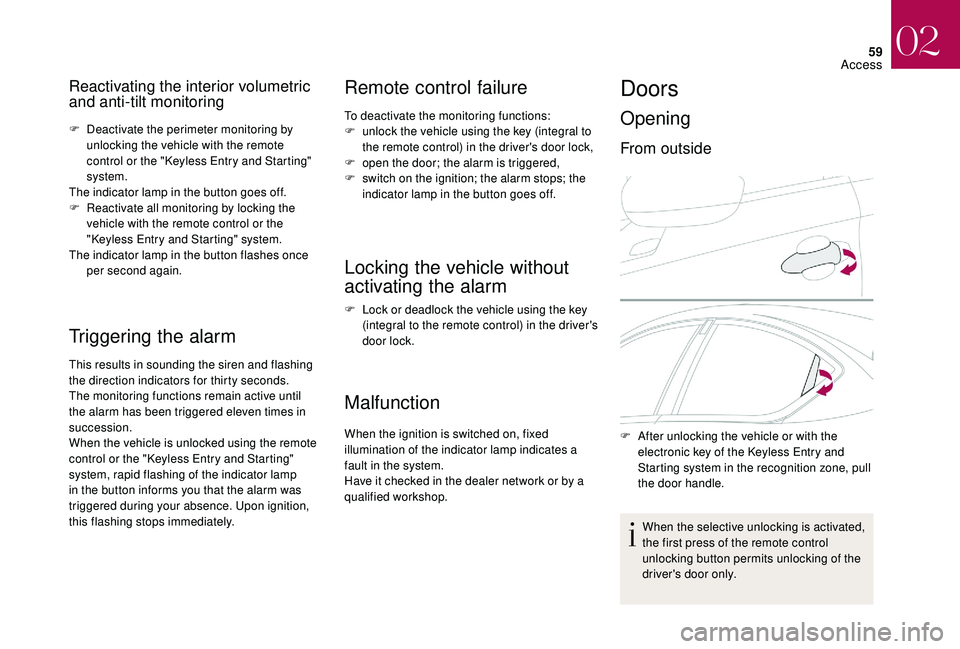
Opening
From outside
F After unlocking the vehicle or with the electronic key of the Keyless Entry and
Starting system in the recognition zone, pull
the door handle.
When the selective unlocking is activated,
the first press of the remote control
unlocking button permits unlocking of the
driver's door only.
02
Access
Page 98 of 296

96
Switching on
F Press the open padlock on the remote control or one of
the front door handles with the
"Keyless Entry and Starting"
system.
The sidelamps and dipped beam headlamps,
as well as the side spotlamps, located under
the door mirrors, come on; your vehicle is also
unlocked.
Switching off
The welcome lighting switches off automatically
after a programmed time, when the ignition is
switched on or on locking the vehicle.
Programming
Activation or deactivation, as well
as the duration of the welcome
lighting can be set via the vehicle
configuration menu.
Headlamp adjustment
Manual adjustment of the
halogen headlamps
To avoid causing a nuisance to other road
users, the height of the halogen headlamp
beams should be adjusted according to the
load in the vehicle.
0. 1 or 2 people in the front seats.
-. 3 people.
1. 5 people.
-. Intermediate setting.
2. 5 people + maximum authorised load.
-. Intermediate setting.
3. Driver + maximum authorised load.
Automatic adjustment
of xenon and full-LED
headlamps
The initial setting is position " 0".
This system adjusts the height of the xenon
headlamp beams automatically and when
stationary, according to the vehicle's load, so as
to avoid causing a nuisance to other road users.
If a malfunction occurs, this warning
lamp is displayed in the instrument
panel, accompanied by an audible
signal and a message in the screen.
The system then places your headlamps in the
lowest position. In the event of a fault, do not touch the
xenon bulbs.
Have them checked in the dealer network
or by a qualified workshop.
04
Lighting and visibility