window CITROEN DS4 2023 Owners Manual
[x] Cancel search | Manufacturer: CITROEN, Model Year: 2023, Model line: DS4, Model: CITROEN DS4 2023Pages: 296, PDF Size: 9.91 MB
Page 4 of 296
2
01
02
0304
05
10 Instrument panels
12
R
ev counter
13
W
arning and indicator lamps
27
E
lectric parking brake
30
I
ndicators
37
M
onochrome screen C
40
T
ouch screen
41
T
rip computer
45
D
ate and time adjustment
47
R
emote control key
50
K
eyless Entry and Starting
57
Alarm
59
Doors
60
Boot
61
E
lectric windows 64
F
ront seats
69
R
ear seats
70
S
teering wheel adjustment
70
M
irrors
72
M
anual air conditioning
74 D ual-zone automatic air conditioning
78 R ecommendations for ventilation and air
conditioning
79
F
ront demist – defrost
79
R
ear screen demist – defrost
80
P
anoramic windscreen
81 Front
fittings
83
C
ourtesy lamps
84
I
nterior mood lighting
84
C
entre consoles
85
Fr
ont armrest
87
St
orage drawers
88 Rear
fi
ttings
88 Boot
fittings92
L
ighting controls
94
D
irection indicators
95
A
utomatic illumination of headlamps
96
H
eadlamp adjustment
97
D
irectional lighting
97 C ornering lighting
99
W
iper control stalk
103
G
eneral safety recommendations
104
H
azard warning lamps
104
Horn
104
E
mergency or assistance call
108
E
lectronic stability control (ESC)
110
Se
at belts
113
Airbags
116
Ch
ild seats
118
D
eactivating the passenger's front airbag
124
I
SOFIX mountings and child seats
129
M
anual child lock
130
E
lectric child lock
Over view
Instruments
Access Ease of use and comfort
Safety Lighting and visibility
Eco-driving
7 4
4 Instruments and controls
Contents
Page 6 of 296

4
Instruments and controls1
Door mirrors
Blind Spot Monitoring System
Electric windows
2
Bonnet opening
3
Dashboard fuses
4
Courtesy lamps
Rear view mirror
Mood lighting
5
Monochrome screen C
Touch screen
Adjust date and time
Reversing camera
6
Manual air conditioning
Automatic air conditioning
Front screen demisting/defrosting
Rear screen demisting/defrosting
7
Manual gearbox
Automatic gearbox
Parking brake
Hill start assist
Stop & Start
Over view
Page 9 of 296
7
Eco-driving
Eco-driving is a range of everyday practices
that allow the motorist to optimise their fuel
consumption and CO
2 emissions.
Optimise the use of your gearbox
With a manual gearbox, move off gently
and change up without waiting. During
acceleration, change up early.
With an automatic gearbox, give preference
to automatic mode and avoid pressing the
accelerator pedal heavily or suddenly.
The gear efficiency indicator invites you to
engage the most suitable gear: as soon as the
indication is displayed in the instrument panel,
follow it straight away.
For vehicles fitted with an automatic gearbox,
this indicator appears only in manual mode.
Drive smoothly
Maintain a safe distance between vehicles,
use engine braking rather than the
brake pedal, and press the accelerator
progressively. These practices contribute
towards a reduction in fuel consumption and
CO
2 emissions and also help reduce the
background traffic noise.
If your vehicle has cruise control, make use of
the system at speeds above 25 mph (40 km/h)
when the traffic is flowing well.
Control the use of your electrical
equipment
Before moving off, if the passenger
compartment is too warm, ventilate it by
opening the windows and air vents before
using the air conditioning.
Above around 30 mph (50 km/h), close the
windows and leave the air vents open.
Consider using equipment that can help
keep the temperature in the passenger
compartment down (sunroof blind and window
blinds...).
Unless it has automatic regulation, switch off
the air conditioning as soon as the desired
temperature has been reached. Switch off the headlamps and front foglamps
when the ambient light level does not require
their use.
Avoid running the engine before moving off,
particularly in winter; your vehicle will warm up
much faster while driving. Switch off the demisting and defrosting
controls, if these are not automatically
managed.
Switch off the heated seat as soon as possible.
As a passenger, if you avoid connecting your
multimedia devices (film, music, video game
etc.), you will contribute towards limiting the
consumption of electrical energy, and so of
fuel.
Disconnect your portable devices before
leaving the vehicle.
Eco-driving
Page 45 of 296
43
- The current information display with:• t he range,
•
t
he current fuel consumption,
•
t
he Stop & Start time counter.
-
T
rip display " 1" with:
•
t
he distance travelled,
•
t
he average fuel consumption,
•
a
verage speed for the first trip.
-
T
rip display " 2" with:
•
t
he distance travelled,
•
t
he average fuel consumption,
•
a
verage speed for the second trip.
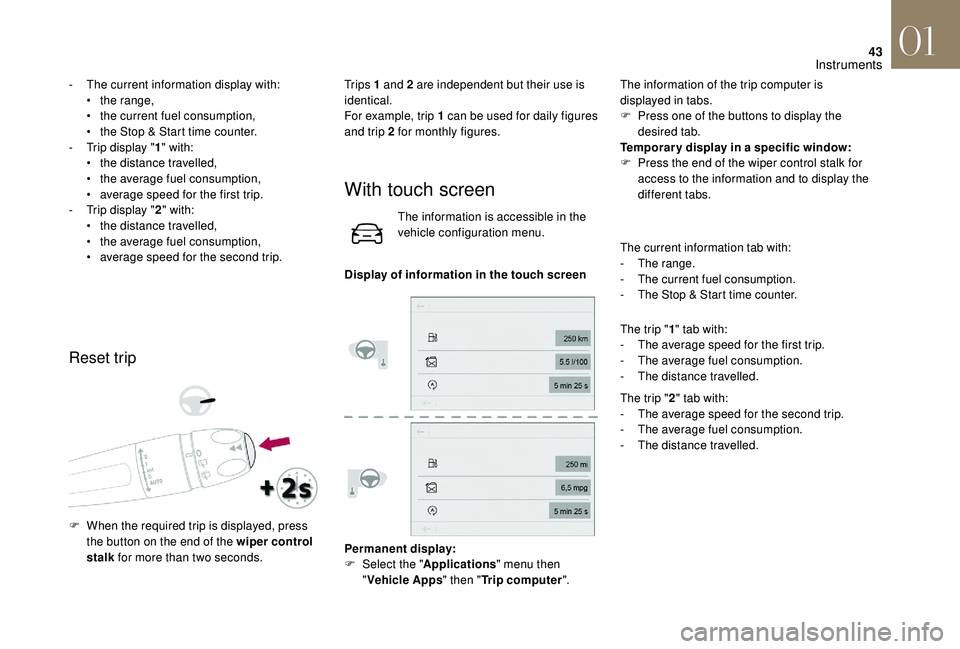
Reset trip
Tr i p s 1 and 2 are independent but their use is
identical.
For example, trip 1 can be used for daily figures
and trip 2 for monthly figures.
F
W
hen the required trip is displayed, press
the button on the end of the wiper control
stalk for more than two seconds.
With touch screen
The information is accessible in the
vehicle configuration menu.
Display of information in the touch screen
Permanent display:
F
Sel
ect the " Applications " menu then
" Vehicle Apps " then "Trip computer ".The information of the trip computer is
displayed in tabs.
F
P
ress one of the buttons to display the
desired tab.
Temporar y display in a specific window:
F
P
ress the end of the wiper control stalk for
access to the information and to display the
different tabs.
The current information tab with:
- T he range.
-
T
he current fuel consumption.
-
T
he Stop & Start time counter.
The trip " 1" tab with:
- T he average speed for the first trip.
-
T
he average fuel consumption.
-
T
he distance travelled.
The trip " 2" tab with:
-
T
he average speed for the second trip.
-
T
he average fuel consumption.
-
T
he distance travelled.
01
Instruments
Page 49 of 296
47
Remote control key
System which permits central unlocking or
locking of the vehicle using the door lock or
from a distance. It also ensures the localisation
and starting of the vehicle, as well as theft
protection.
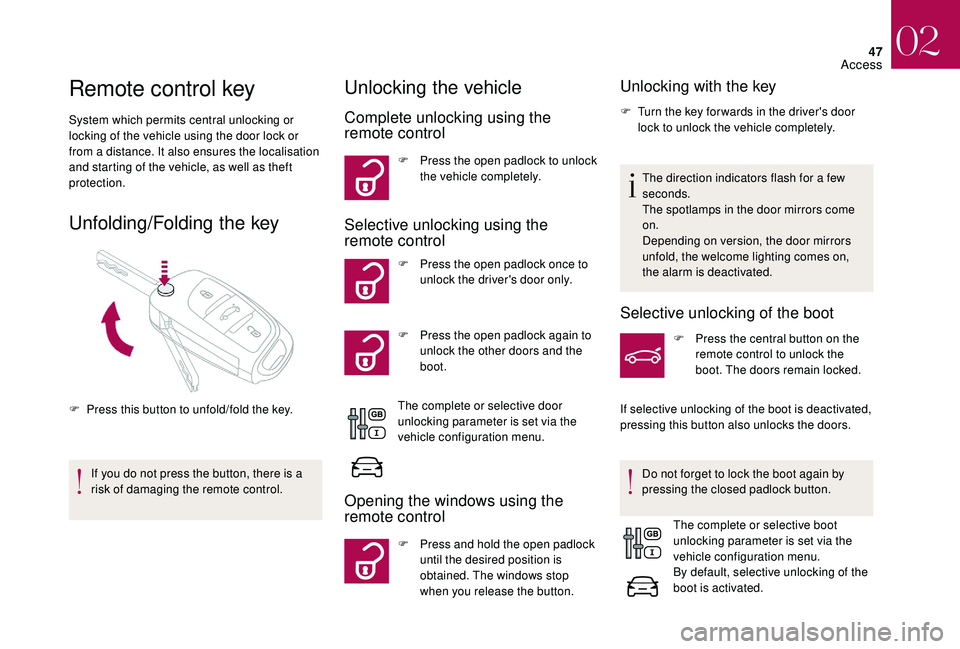
Unfolding/Folding the key
F Press this button to unfold/fold the key.If you do not press the button, there is a
risk of damaging the remote control.
Unlocking the vehicle
Complete unlocking using the
remote control
F Press the open padlock to unlock the vehicle completely.
Selective unlocking using the
remote control
F Press the open padlock once to unlock the driver's door only.
F
P
ress the open padlock again to
unlock the other doors and the
boot.
The complete or selective door
unlocking parameter is set via the
vehicle configuration menu.
Opening the windows using the
remote control
F Press and hold the open padlock until the desired position is
obtained. The windows stop
when you release the button.
Unlocking with the key
F Turn the key for wards in the driver's door lock to unlock the vehicle completely.
The direction indicators flash for a few
seconds.
The spotlamps in the door mirrors come
on.
Depending on version, the door mirrors
unfold, the welcome lighting comes on,
the alarm is deactivated.
Selective unlocking of the boot
F Press the central button on the remote control to unlock the
boot. The doors remain locked.
If selective unlocking of the boot is deactivated,
pressing this button also unlocks the doors.
Do not forget to lock the boot again by
pressing the closed padlock button. The complete or selective boot
unlocking parameter is set via the
vehicle configuration menu.
By default, selective unlocking of the
boot is activated.
02
Access
Page 50 of 296

48
Locking the vehicle
Normal locking using the remote
control
F Press the closed padlock button to lock the vehicle.
Normal locking using the key
F Turn the key towards the rear in the driver's door lock to lock the vehicle.
The direction indicators come on for a few
seconds.
Depending on your version, the door mirrors
fold, the alarm is activated. If one of the doors or the boot is still open,
the central locking does not take place.
However, the alarm (if fitted) will be fully
activated after about 45 seconds.
If the vehicle is unlocked inadvertently and
with no action on the doors or boot, the
vehicle will lock itself again automatically
after about 30 seconds.
If the alarm had previously been activated,
it will not be reactivated automatically. The folding and unfolding of the door
mirrors using the remote control can be
deactivated in the dealer network or by
a
qualified workshop.
Deadlocking using the remote
control
Deadlocking using the key
Deadlocking is confirmed by fixed illumination
of the direction indicators for approximately two
seconds.
Depending on version, the door mirrors fold in
at the same time.
In low light, deadlocking also switches on
the guide-me-home lighting (see "Visibility"
section).
Deadlocking renders the exterior and
interior door controls inoperative.
It also deactivates the central locking
button.
Therefore, never leave anyone inside the
vehicle when it is deadlocked.
Closing the windows using the
remote control
F Press and hold the closed padlock until the desired position
is obtained. The windows stop
when you release the button.
F
T
urn the key to the rear in the driver's door
lock to lock the vehicle completely.
F
T
urn the key to the rear again within five
seconds to deadlock the vehicle. F
P
ress the closed padlock to lock
the vehicle completely.
F
P
ress the closed padlock again
within five seconds to deadlock
the vehicle.
02
Access
Page 51 of 296

49
This will switch on the courtesy lamps and the
direction indicators will flash for around ten
seconds.
Back-up control
System allowing mechanical door locking and
unlocking in the event of a malfunction of the
central locking system or battery failure.
Locking the driver's door
F Insert the key in the door lock, then turn it to the rear.
You can also apply this procedure for the
passenger doors.
Unlocking the driver's door
F Insert the key in the door lock, then turn it to the front.
Locking the passenger doors
F Open the doors.
F O n the rear doors, check that the child lock
is not on.
For more information on the Child lock , refer
to the corresponding section.
When closing the windows using the
remote control you must ensure that
nothing prevents them from closing
c o r r e c t l y.
If you want to leave the windows partly
open, you must deactivate the volumetric
alarm monitoring.
Locating your vehicle
This function allows you to identify your vehicle
from a distance, particularly in poor light. Your
vehicle must be locked.
F
P
ress this button. F
R
emove the black cap on the edge of the
door, using the key.
F
W
ithout forcing, insert the key into the
aperture; then, without turning it, move the
latch sideways towards the inside of the
d o o r.
F
R
emove the key and refit the cap.
F
C
lose the doors and check from the outside
that the vehicle is locked.
In the event of a fault with the central
locking system, it is essential to
disconnect the battery to lock the boot and
so ensure complete locking of the vehicle.
02
Access
Page 54 of 296
52
In order to preser ve the battery in the
electronic key and the vehicle's battery,
the "hands-free" functions are put into
long-term standby after 21 days without
use. To restore these functions, press
one of the remote control buttons or start
the engine with the electronic key in the
reader.
For more information on starting with
Keyless Entr y and Star ting, refer to the
corresponding section.
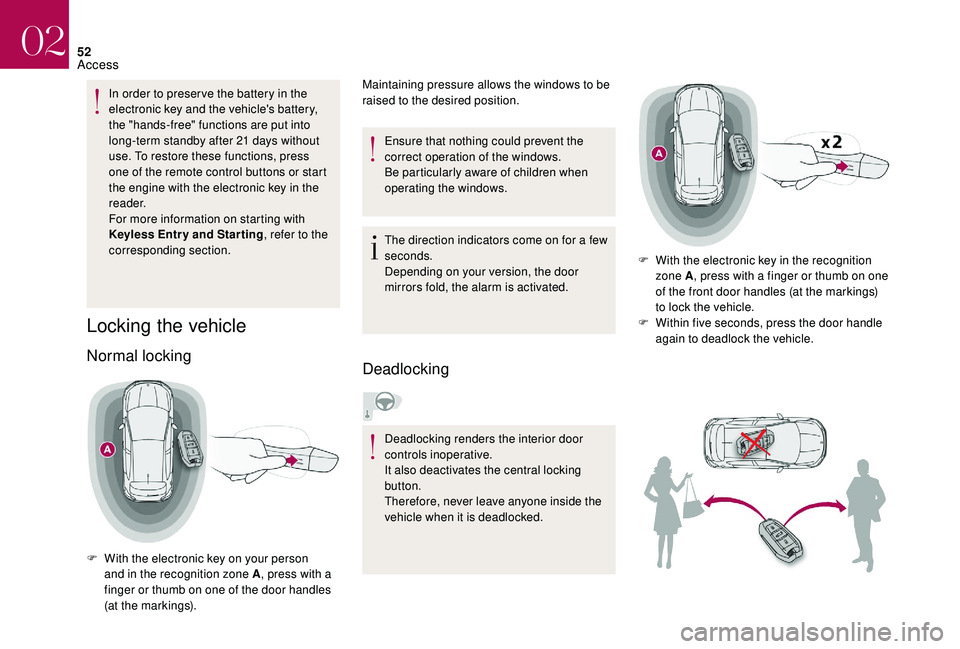
Locking the vehicle
Normal locking
F With the electronic key on your person and in the recognition zone A , press with a
finger or thumb on one of the door handles
(at the markings). Ensure that nothing could prevent the
correct operation of the windows.
Be particularly aware of children when
operating the windows.
Maintaining pressure allows the windows to be
raised to the desired position.
The direction indicators come on for a few
seconds.
Depending on your version, the door
mirrors fold, the alarm is activated.
Deadlocking
Deadlocking renders the interior door
controls inoperative.
It also deactivates the central locking
button.
Therefore, never leave anyone inside the
vehicle when it is deadlocked. F
W
ith the electronic key in the recognition
zone A , press with a finger or thumb on one
of the front door handles (at the markings)
to lock the vehicle.
F
W
ithin five seconds, press the door handle
again to deadlock the vehicle.
02
Access
Page 59 of 296

57
F With the ignition on, press this button until an audible signal is triggered and a
corresponding message of confirmation is
displayed.
The state of the system stays in memory when
switching off the ignition.
Alarm
(Depending on the country of sale).
System which protects and provides a deterrent
against theft and break-ins. It provides the
following types of monitoring:
- Perimeter monitoring
The system monitors the opening of the
vehicle.
The alarm is triggered if anyone tries to open a
door, the boot, the bonnet, etc.
- Volumetric monitoring
The system checks for any variation in the
volume in the passenger compartment.
The alarm is triggered if anyone breaks a
window, enters the passenger compartment or
moves inside the vehicle.
- Anti-tilt monitoring
The system checks for any change in the
attitude of the vehicle.
The alarm is triggered if the vehicle is lifted,
moved or knocked.
Self-protection function
The system checks the deactivation status of
its components.
The alarm is triggered if the battery, central
control unit or the siren wiring is put out of
service or damaged.
For all work on the alarm system,
contact the dealer network or a qualified
workshop.
Locking the vehicle with full
alarm system
Activation
F Switch off the ignition and get out of the vehicle.
F
L
ock the vehicle using the remote control.
or
F
L
ock the vehicle using the "Keyless Entry
and Starting" system.
Activation/Deactivation
You can activate or deactivate this function
permanently.
02
Access
Page 60 of 296

58
The monitoring system is active: the indicator
lamp in the button flashes once per second
and the direction indicators come on for about
2 seconds.
Following a vehicle locking request, the
perimeter monitoring is activated after 5
seconds and the interior volumetric and anti-tilt
monitoring after 45 seconds.
If an opening (door, boot...) is not fully closed,
the vehicle will not be locked but the exterior
perimeter monitoring will be activated after
45 seconds, at the same time as the interior
volumetric and anti-tilt monitoring.
Deactivation
F Press the unlocking button on the remote control.
or
F
U
nlock the vehicle with the "Keyless Entry
and Starting" system.
The monitoring system is deactivated: the
indicator lamp in the button goes off and the
direction indicators flash for about 2 seconds. If the vehicle locks itself again
automatically (which occurs 30 seconds
after unlocking, if a door or the boot is
not opened), the monitoring system is not
reactivated automatically. To reactivate it,
the vehicle must be unlocked and locked
again, using the remote control or the
"Keyless Entry and Starting" system.
Locking the vehicle with
exterior perimeter monitoring
only
Deactivate the interior volumetric and anti-tilt
monitoring to avoid unwanted triggering of the
alarm in certain cases such as:
-
l
eaving a pet in the vehicle,
-
l
eaving a window partially open,
-
w
ashing your vehicle,
-
c
hanging a wheel,
-
h
aving your vehicle towed,
-
t
ransportation by sea.
Deactivating the interior volumetric
and anti-tilt monitoring
F Switch off the ignition and within ten seconds, press the button until the indicator
lamp is on continuously.
F
G
et out of the vehicle.
F
I
mmediately lock the vehicle using the
remote control or the Keyless Entry and
Starting system.
The exterior perimeter monitoring alone is
activated: the indicator lamp in the button
flashes once per second.
To be effective, this deactivation must
be carried out each time the ignition is
switched off.
02
Access