Citroen DS4 RHD 2015.5 1.G Owner's Manual
Manufacturer: CITROEN, Model Year: 2015.5, Model line: DS4 RHD, Model: Citroen DS4 RHD 2015.5 1.GPages: 436, PDF Size: 10.13 MB
Page 261 of 436
259
Energy economy modeSystem which manages the period of use of certain functions to conserve a sufficient level of
charge in the battery.
After the engine has stopped, you can still use functions such as the audio equipment, windscreen
wipers, dipped beam headlamps, courtesy lamps, etc. for a maximum combined period of
thirty
m
inutes.
This period may be greatly reduced if
the battery is not fully charged.
A flat battery prevents the engine from
starting (refer to the corresponding
paragraph).
If the telephone is being used at the
same time on the navigation system,
it will be interrupted after 10 minutes.
Switching to economy mode
Once this period has elapsed, a message
appears in the screen indicating that the
vehicle has switched to economy mode and the
active functions are put on standby.
Exiting economy mode
These functions are reactivated automatically
the next time the vehicle is driven.
F
I
n order to resume the use of these
functions immediately, start the engine and
let it run for a few minutes.
The time available to you will then be double
the period for which the engine is left running.
However, this period will always be between
five and thirty minutes.
Load reduction modeSystem which manages the use of certain
functions according to the level of charge
remaining in the battery.
When the vehicle is being driven, the load
reduction function temporarily deactivates
certain functions, such as the air conditioning,
the heated rear screen...
The deactivated functions are reactivated
automatically as soon as conditions permit.
Practical information
Page 262 of 436
Changing a wiper blade
Before removing a front
wiper blade
F Within one minute after switching off the ignition, operate the wiper stalk to
position the wiper blades vertically on the
windscreen.
Removing
F Raise the corresponding wiper arm.
F U nclip the wiper blade and remove it.
Fitting
F Put the corresponding new wiper blade in place and clip it.
F
F
old down the wiper arm carefully.
After fitting a front wiper
blade
F Switch on the ignition.
F O perate the wiper stalk again to park the
wiper blades.
Very cold climate screen*
Fitting
F Offer up the very cold climate screen to the front of the lower section of the front
b u m p e r.
F
P
ress around its edge to engage its fixing
clips one by one.
Removal
F Use a screwdriver as a lever to release each fixing clip in turn.
Do not forget to remove the very cold
climate screen when:
-
the ambient temperature exceeds 10 °C,- towing,- driving at speeds above 75 mph
(120 km/h).
Removable protective screen which prevents
the accumulation of snow at the radiator
cooling fan.
*
Depending on the country of sale.
Page 263 of 436

261
Fitting roof bars
As a safety measure and to avoid damaging the
roof, it is essential to use the transverse bars
approved for your vehicle.When fitting roof bars, use only the four fixing
points located in the roof frame. The points are
masked by the vehicle doors when closed.
Remove the protective covers, levering them
off with a screwdriver. Take care not to scratch
the paint.
The roof bar fixings include a stud to be fitted to
the hole at each fixing point.
Observe the fitting instructions and the
conditions of use in the guide supplied with the
bars.
Keep the protective covers safe so that they
can be refitted after removing the roof bars. Maximum load distributed over the roof
bars, for a load height not exceeding
40
cm (except bicycle carriers):
-
f
or roof bars with pads at 90 mm:
50 kg
-
f
or roof bars with pads at 15 0 mm:
80 kg .
For more information, contact a
CITROËN dealer or a qualified
workshop.
If the height exceeds 40 cm, adapt the
speed of the vehicle to the profile of the
road to avoid damaging the roof bars
and the fixings on the vehicle.
Be sure to refer to national legislation in
order to comply with the regulations for
transporting objects which are longer
than the vehicle. Longitudinal roof bars are fitted as
original equipment to certain versions.
These play a purely aesthetic role and
transverse roof bars must not be fitted
to these longitudinal bars.
Practical information
Page 264 of 436

Towing the vehicleProcedure for having your vehicle towed or for towing another vehicle using a removable towing eye.
The towing eye is installed in the boot under
the floor.
To gain access to it:
F
o
pen the boot,
F
r
aise the floor,
F
s
ecure it by hooking its cord on the hook
on the rear parcel shelf support,
F
r
emove the towing eye from the holder.
Access to the tools
general recommendations
Observe the legislation in force in your
c o unt r y.
Ensure that the weight of the towing
vehicle is higher than that of the towed
vehicle.
The driver must remain at the wheel
of the towed vehicle and must have a
valid driving licence.
When towing a vehicle with all four
wheels on the ground, always use an
approved towing arm; rope and straps
are prohibited.
The towing vehicle must move off
g e nt l y.
When towing a vehicle with the engine
off, there is no longer any power
assistance for braking or steering. In the following cases, you must always call
on a professional recovery service:
-
v
ehicle broken down on a motor way or
fast road,
-
f
our-wheel drive vehicle,
-
w
hen it is not possible to put the gearbox
into neutral, unlock the steering, or
release the parking brake,
-
t
owing with only two wheels on the
ground,
-
w
here there is no approved towing arm
available...
Page 265 of 436

263
F On the front bumper, unclip the cover by pressing on the left.
F
S
crew the towing eye in fully.
F
I
nstall the towing arm.
Towing your vehicle Towing another
vehicle
F Place the gear lever in neutral
(position n on an automatic
gearbox).
F
ailure to observe this instruction
could result in damage to
certain components (braking,
transmission...) and the absence
of braking assistance the next time
the engine is started.
F
U
nlock the steering and release the
parking brake.
F
S
witch on the hazard warning lamps on
both vehicles.
F
M
ove off gently, drive slowly and for a short
distance. F
O
n the rear bumper, unclip the cover by
pressing at the top.
F
S
crew the towing eye in fully.
F
I
nstall the towing arm.
F
S
witch on the hazard warning lamps on
both vehicles.
F
M
ove off gently, drive slowly and for a short
distance.
Practical information
Page 266 of 436
Towing a trailer
We recommend the use of genuine
CITROËN towbars and their harnesses
that have been tested and approved
from the design stage of your vehicle,
and that the fitting of the towbar is
entrusted to a CITROËN dealer or a
qualified workshop.
If the towbar is not fitted by a
CITROËN dealer, it must still be
fitted in accordance with the vehicle
manufacturer's instructions.
Your vehicle is primarily designed for
transporting people and luggage, but it may
also be used for towing a trailer. Driving with a trailer places greater
demands on the towing vehicle and the
driver must take particular care.
For more advice on driving when
towing, refer to the corresponding
section.
For more information on weights (and
the towed loads which apply to your
vehicle) refer to the corresponding
section.
Page 267 of 436
265
Towbar with quickly detachable towball
For information on the maximum trailer
weight and the recommended nose
weight, refer to the "Technical data"
section.
For information on safely towing a
trailer, refer to the "Towing a trailer"
section.
Observe the legislation in force in the
country in which you are driving.
Presentation
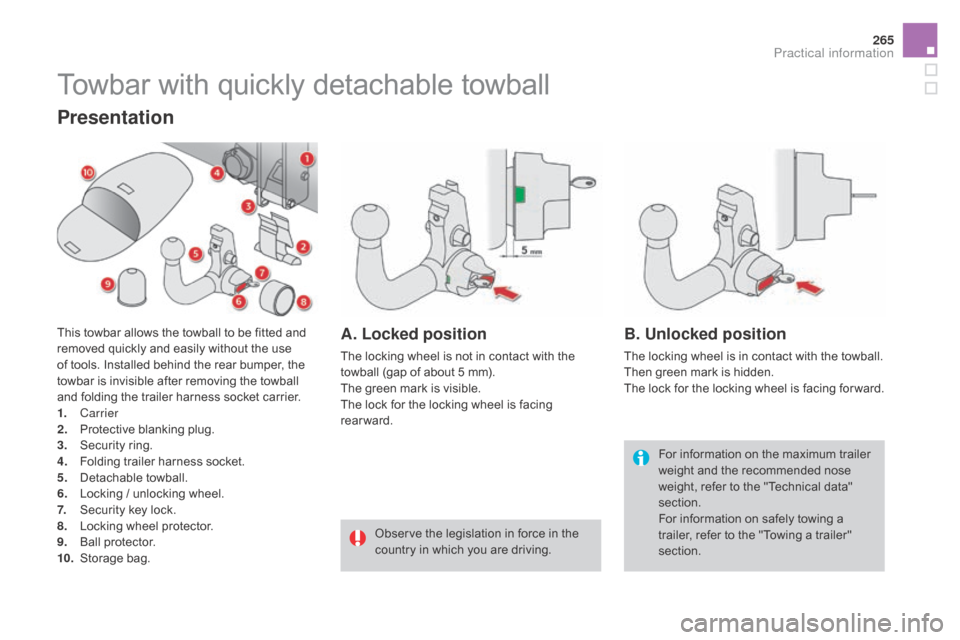
This towbar allows the towball to be fitted and
removed quickly and easily without the use
of tools. Installed behind the rear bumper, the
towbar is invisible after removing the towball
and folding the trailer harness socket carrier.
1.
Carrier
2.
P
rotective blanking plug.
3.
S
ecurity ring.
4.
F
olding trailer harness socket.
5.
D
etachable towball.
6.
L
ocking / unlocking wheel.
7.
S
ecurity key lock.
8.
L
ocking wheel protector.
9.
Ba
ll protector.
10.
St
orage bag.A. Locked position
The locking wheel is not in contact with the
towball (gap of about 5 mm).
The green mark is visible.
The lock for the locking wheel is facing
rearward.
B. Unlocked position
The locking wheel is in contact with the towball.
Then green mark is hidden.
The lock for the locking wheel is facing for ward.
Practical information
Page 268 of 436
Before each use
Check that the towball is correctly fitted by verifying the following points:
- t he towball is correctly locked in place (position A ),
-
t
he security key lock is on and the key removed; the locking wheel can no longer be
operated,
-
t
he towball must no longer move at all in its carrier; try to shake it by hand.
during use
Never unlock the device when a trailer or load carrier is fitted to the towball.
Never exceed the maximum authorised weight for the vehicle plus trailer (Gross Train
Weight - GTW).
Before driving, check the adjustment of the headlamp beam height.
For more information on adjusting the headlamps, refer to the corresponding section.
After use
For journeys made without a trailer or load carrier, the trailer harness socket must be folded
away, the towball removed and the blanking plug inserted in the carrier. This measure
applies particularly if the towball could hinder visibility of the number plate or lighting.
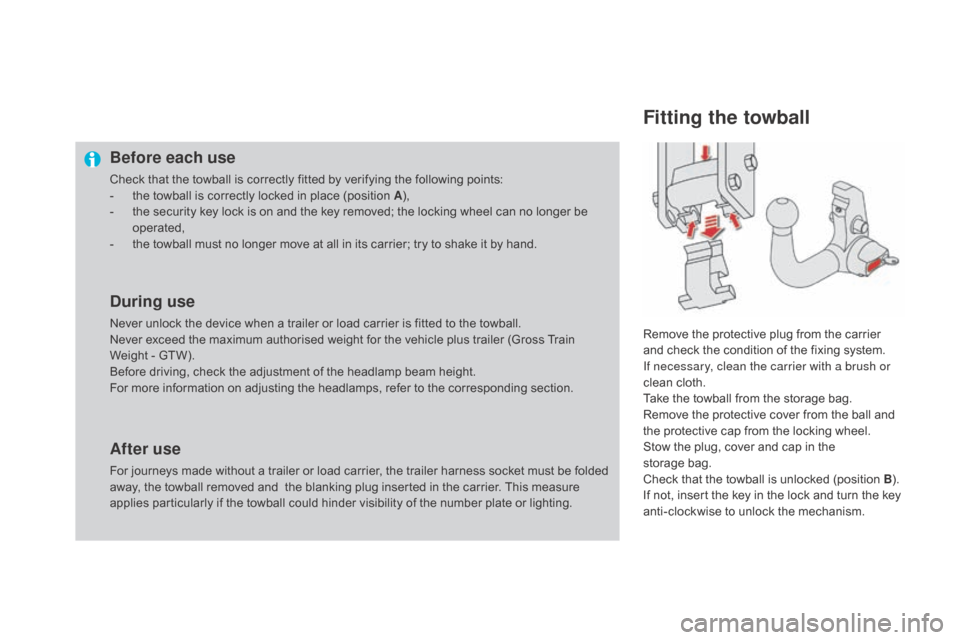
Fitting the towball
Remove the protective plug from the carrier
and check the condition of the fixing system.
If necessary, clean the carrier with a brush or
clean cloth.
Take the towball from the storage bag.
Remove the protective cover from the ball and
the protective cap from the locking wheel.
Stow the plug, cover and cap in the
storage
bag.
Check that the towball is unlocked (position B ).
If not, insert the key in the lock and turn the key
anti-clockwise to unlock the mechanism.
Page 269 of 436
267
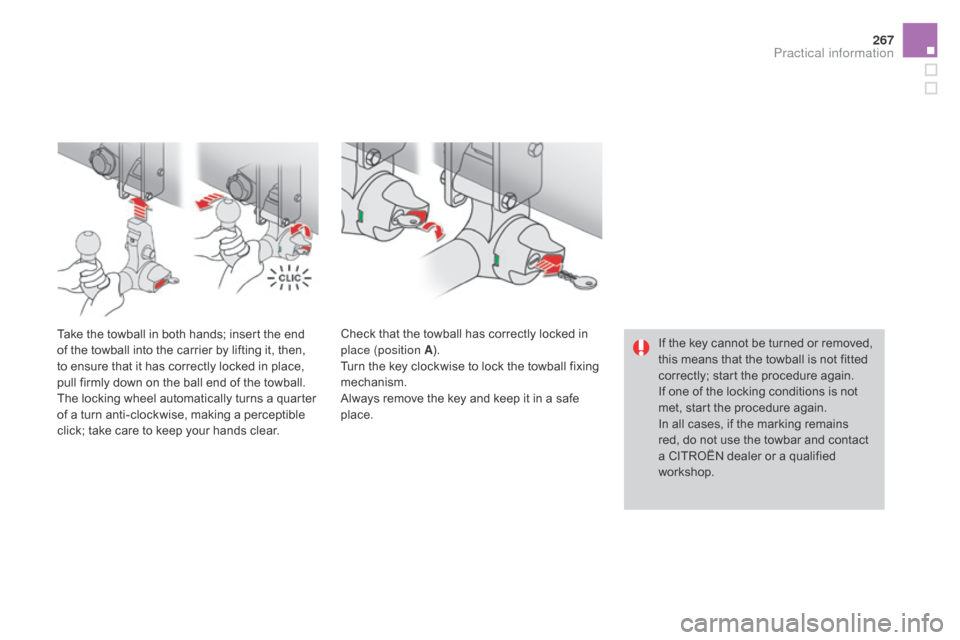
If the key cannot be turned or removed,
this means that the towball is not fitted
correctly; start the procedure again.
If one of the locking conditions is not
met, start the procedure again.
In all cases, if the marking remains
red, do not use the towbar and contact
a CITROËN dealer or a qualified
workshop.
Take the towball in both hands; insert the end
of the towball into the carrier by lifting it, then,
to ensure that it has correctly locked in place,
pull firmly down on the ball end of the towball.
The locking wheel automatically turns a quarter
of a turn anti-clockwise, making a perceptible
click; take care to keep your hands clear.
Check that the towball has correctly locked in
place (position A
).
Turn the key clockwise to lock the towball fixing
mechanism.
Always remove the key and keep it in a safe
place.
Practical information
Page 270 of 436
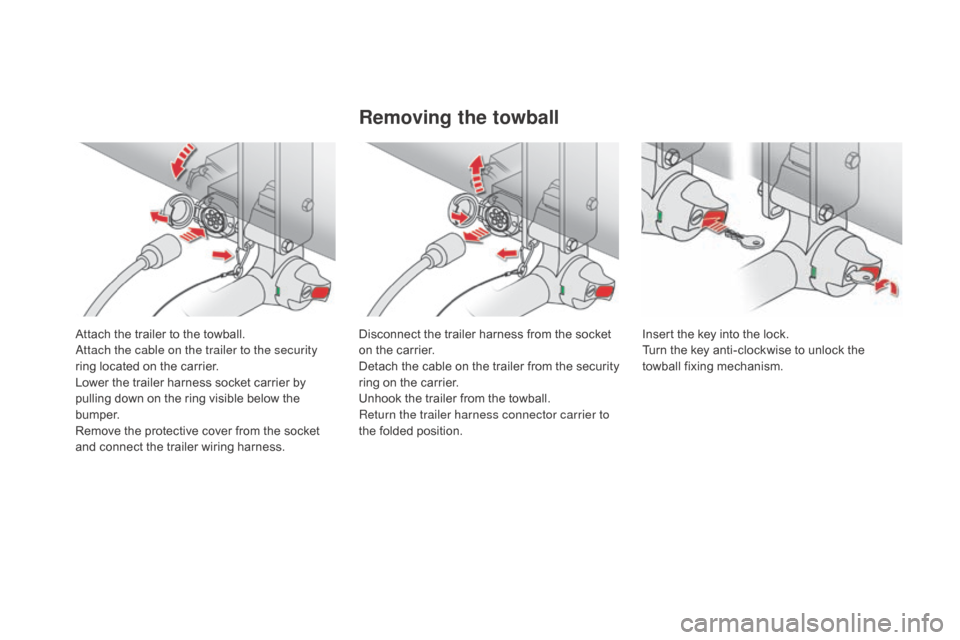
Attach the trailer to the towball.
Attach the cable on the trailer to the security
ring located on the carrier.
Lower the trailer harness socket carrier by
pulling down on the ring visible below the
b u m p e r.
Remove the protective cover from the socket
and connect the trailer wiring harness.
Removing the towball
Disconnect the trailer harness from the socket
on the carrier.
Detach the cable on the trailer from the security
ring on the carrier.
Unhook the trailer from the towball.
Return the trailer harness connector carrier to
the folded position.Insert the key into the lock.
Turn the key anti-clockwise to unlock the
towball fixing mechanism.