ESP Citroen DS5 HYBRID 2016 1.G Owner's Guide
[x] Cancel search | Manufacturer: CITROEN, Model Year: 2016, Model line: DS5 HYBRID, Model: Citroen DS5 HYBRID 2016 1.GPages: 376, PDF Size: 12.57 MB
Page 122 of 376
DS5_en_Chap04_conduite_ed02-2015
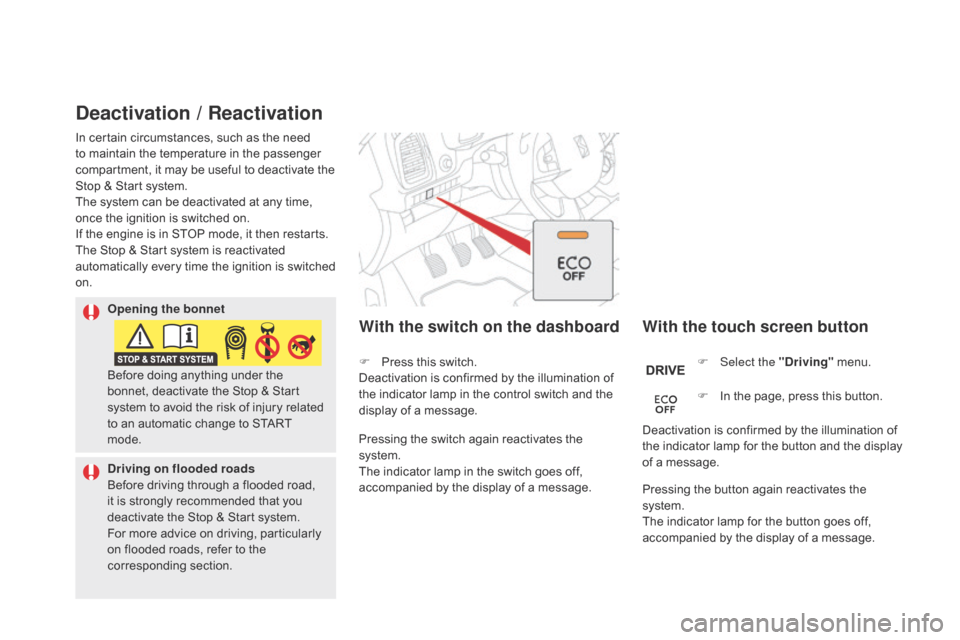
deactivation / Reactivation
With the touch screen button
With the switch on the dashboard
F Select the "dri ving" menu.
F
In t
he page, press this button.
Deactivation is confirmed by the illumination of
the indicator lamp for the button and the display
of a message.
Pressing the switch again reactivates the
system.
The indicator lamp in the switch goes off,
accompanied by the display of a message. F Pr
ess this switch.
Deactivation is confirmed by the illumination of
the indicator lamp in the control switch and the
display of a message.
Pressing the button again reactivates the
system.
The indicator lamp for the button goes off,
accompanied by the display of a message.
Opening the bonnet
dri
ving on flooded roads
Before driving through a flooded road,
it is strongly recommended that you
deactivate the Stop & Start system.
For more advice on driving, particularly
on flooded roads, refer to the
corresponding section.
In certain circumstances, such as the need
to maintain the temperature in the passenger
compartment, it may be useful to deactivate the
Stop & Start system.
The system can be deactivated at any time,
once the ignition is switched on.
If the engine is in STOP mode, it then restarts.
The Stop & Start system is reactivated
automatically every time the ignition is switched
on.
Before doing anything under the
bonnet, deactivate the Stop & Start
system to avoid the risk of injury related
to an automatic change to START
mode.
Page 123 of 376
121
DS5_en_Chap04_conduite_ed02-2015
Operating fault
In the event of a fault in STOP mode, the
vehicle may stall.
All of the instrument panel warning lamps
come on.
It is then necessary to switch off the ignition
and start the engine again using the "S TA R T/
STOP " button.
In the event of a fault with the system, the
button in the "E
cO OF
F" switch flashes for a
few moments, then remains on.
Have it checked by a CITROËN dealer or a
qualified workshop. The Stop & Start system requires a
12
V b
attery of specific technology and
specification.
All work on this type of battery must be
carried out only by a CITROËN dealer
or a qualified workshop.
For more information on the 12 V
battery, refer to the corresponding
section.
driving
Page 125 of 376
123
DS5_en_Chap04_conduite_ed02-2015
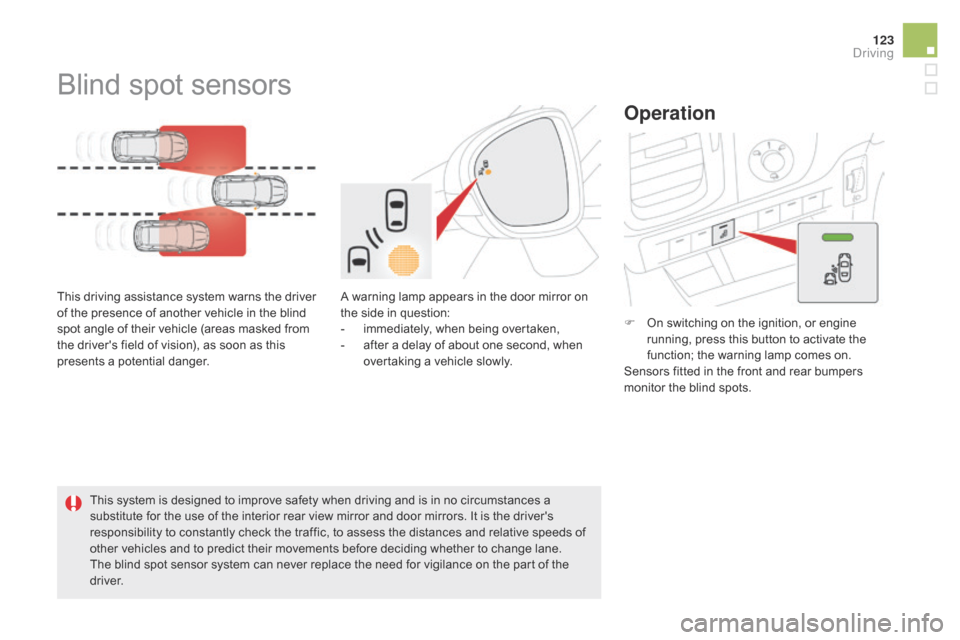
Blind spot sensors
This driving assistance system warns the driver
of the presence of another vehicle in the blind
spot angle of their vehicle (areas masked from
the driver's field of vision), as soon as this
presents a potential danger.This system is designed to improve safety when driving and is in no circumstances a
substitute for the use of the interior rear view mirror and door mirrors. It is the driver's
responsibility to constantly check the traffic, to assess the distances and relative speeds of
other vehicles and to predict their movements before deciding whether to change lane.
The blind spot sensor system can never replace the need for vigilance on the part of the
driver.
Operation
A warning lamp appears in the door mirror on
the side in question:
-
im
mediately, when being overtaken,
-
af
ter a delay of about one second, when
overtaking a vehicle slowly. F
On s
witching on the ignition, or engine
running, press this button to activate the
function; the warning lamp comes on.
Sensors fitted in the front and rear bumpers
monitor the blind spots.
driving
Page 131 of 376
129
DS5_en_Chap04_conduite_ed02-2015
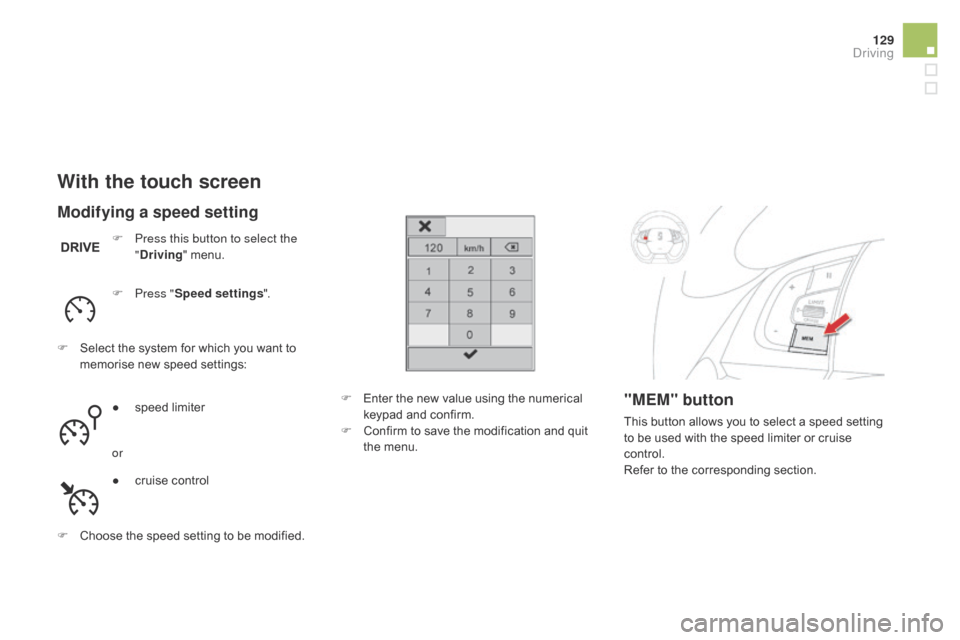
With the touch screen
F Press this button to select the
"driving" menu.
F
Pr
ess "Speed settings ".
F
Se
lect the system for which you want to
memorise new speed settings:
F
Ch
oose the speed setting to be modified. F
En
ter the new value using the numerical
keypad and confirm.
F
Co
nfirm to save the modification and quit
the menu.
"MEM" button
This button allows you to select a speed setting
to be used with the speed limiter or cruise
control.
Refer to the corresponding section.
Modifying a speed setting
● speed limiter
or
●
cr
uise control
driving
Page 133 of 376
131
DS5_en_Chap04_conduite_ed02-2015
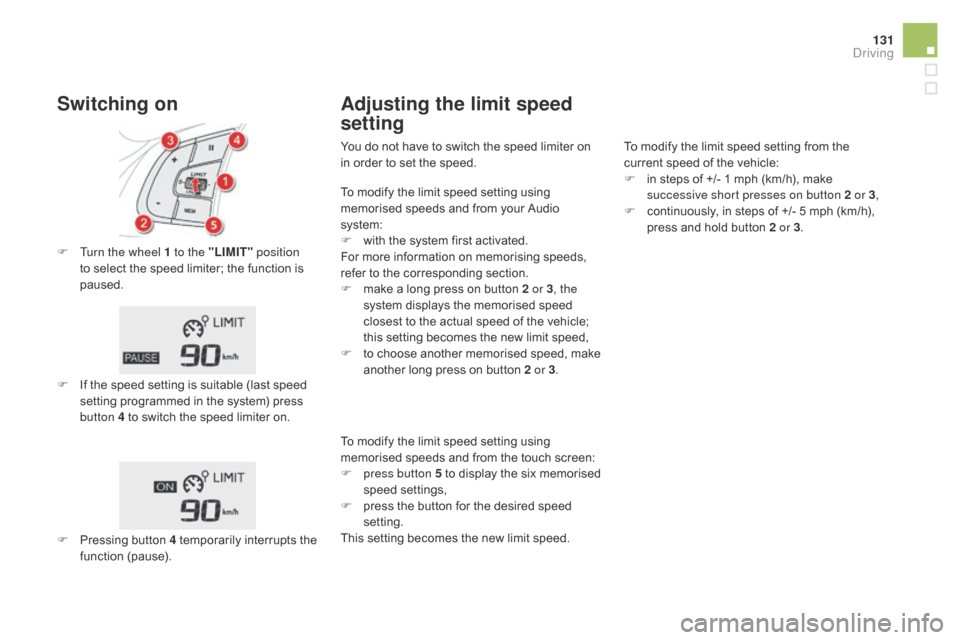
F Turn the wheel 1 to the "LIMIT" p osition
to select the speed limiter; the function is
paused.
F
If t
he speed setting is suitable (last speed
setting programmed in the system) press
button 4 to switch the speed limiter on.
Switching on Adjusting the limit speed
setting
F Pressing button 4 temporarily interrupts the
f
unction (pause). You do not have to switch the speed limiter on
in order to set the speed.
To modify the limit speed setting from the
current speed of the vehicle:
F
in s
teps of +/- 1 mph (km/h), make
successive short presses on button 2 or 3 ,
F
co
ntinuously, in steps of +/- 5 mph (km/h),
press and hold button 2 or 3 .
To modify the limit speed setting using
memorised speeds and from your Audio
system:
F
wi
th the system first activated.
For more information on memorising speeds,
refer to the corresponding section.
F
ma
ke a long press on button 2 or 3
, the
system displays the memorised speed
closest to the actual speed of the vehicle;
this setting becomes the new limit speed,
F
to c
hoose another memorised speed, make
another long press on button 2 or 3.
To modify the limit speed setting using
memorised speeds and from the touch screen:
F
pr
ess button 5 to display the six memorised
speed settings,
F
pr
ess the button for the desired speed
setting.
This setting becomes the new limit speed.
driving
Page 136 of 376
DS5_en_Chap04_conduite_ed02-2015
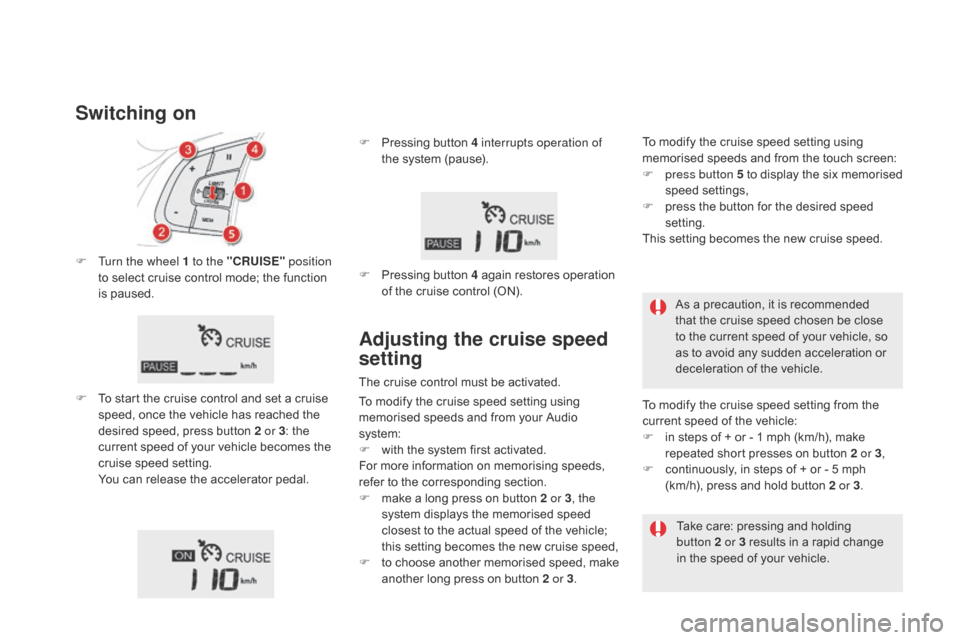
F Turn the wheel 1 to the "cRUISE" position
to select cruise control mode; the function
is paused.
F
To s
tart the cruise control and set a cruise
speed, once the vehicle has reached the
desired speed, press button 2 or 3 : the
current speed of your vehicle becomes the
cruise speed setting.
Yo
u can release the accelerator pedal.
Switching on
F Pressing button 4 interrupts operation of
the system (pause).
F
Pr
essing button 4 again restores operation
of the cruise control (ON).
Adjusting the cruise speed
setting
The cruise control must be activated. As a precaution, it is recommended
that the cruise speed chosen be close
to the current speed of your vehicle, so
as to avoid any sudden acceleration or
deceleration of the vehicle.
To modify the cruise speed setting from the
current speed of the vehicle:
F
in s
teps of + or - 1 mph (km/h), make
repeated short presses on button 2 or 3 ,
F
co
ntinuously, in steps of + or - 5 mph
(km/h), press and hold button 2 or 3 .
Take care: pressing and holding
button
2
or 3
r
esults in a rapid change
in the speed of your vehicle.
To modify the cruise speed setting using
memorised speeds and from your Audio
system:
F
wi
th the system first activated.
For more information on memorising speeds,
refer to the corresponding section.
F
ma
ke a long press on button 2 or 3 , the
system displays the memorised speed
closest to the actual speed of the vehicle;
this setting becomes the new cruise speed,
F
to c
hoose another memorised speed, make
another long press on button 2 or 3. To modify the cruise speed setting using
memorised speeds and from the touch screen:
F
pr
ess button 5 to display the six memorised
speed settings,
F
pr
ess the button for the desired speed
setting.
This setting becomes the new cruise speed.
Page 145 of 376
143
DS5_en_Chap05_visibilite_ed02-2015
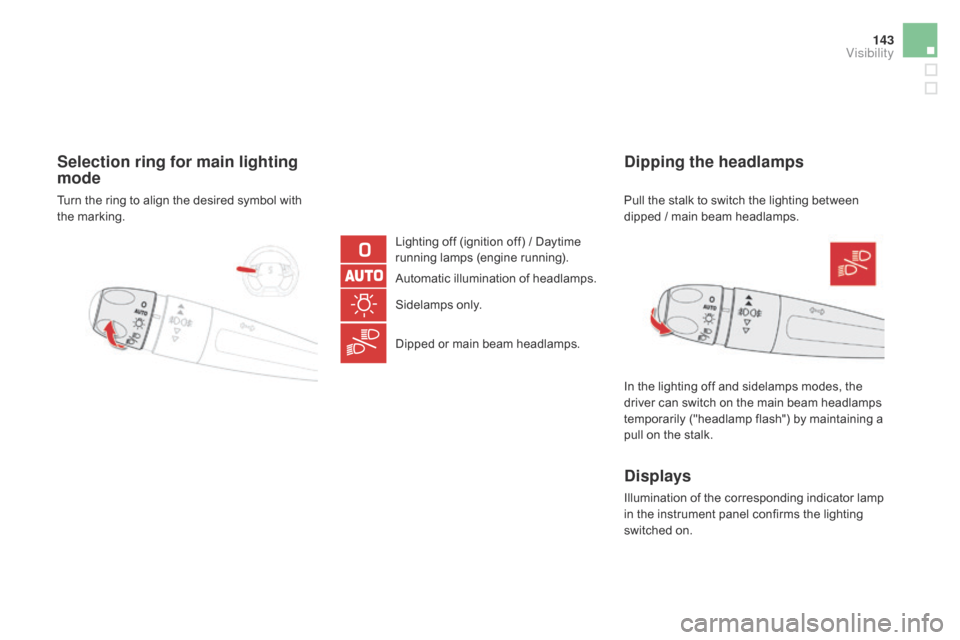
Selection ring for main lighting
mode
Lighting off (ignition off) / Daytime
running lamps (engine running).
Automatic illumination of headlamps.
Sidelamps only.
Dipped or main beam headlamps.
dipping the headlamps
In the lighting off and sidelamps modes, the
driver can switch on the main beam headlamps
temporarily ("headlamp flash") by maintaining a
pull on the stalk.
displays
Illumination of the corresponding indicator lamp
in the instrument panel confirms the lighting
switched on. Pull the stalk to switch the lighting between
dipped / main beam headlamps.
Turn the ring to align the desired symbol with
the marking.
visibility
Page 149 of 376
147
DS5_en_Chap05_visibilite_ed02-2015
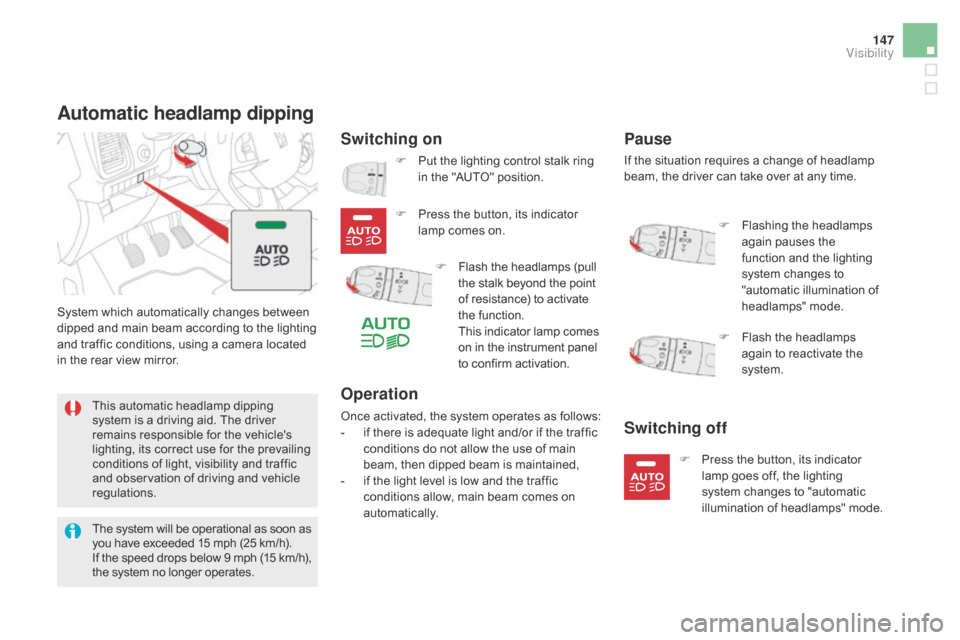
Automatic headlamp dipping
Switching on
System which automatically changes between
dipped and main beam according to the lighting
and traffic conditions, using a camera located
in the rear view mirror.F
Pu
t the lighting control stalk ring
in the "AUTO" position.
This automatic headlamp dipping
system is a driving aid. The driver
remains responsible for the vehicle's
lighting, its correct use for the prevailing
conditions of light, visibility and traffic
and observation of driving and vehicle
regulations. F
Fl
ash the headlamps (pull
the stalk beyond the point
of resistance) to activate
the function.
Th
is indicator lamp comes
on in the instrument panel
to confirm activation.
F
Pr
ess the button, its indicator
lamp comes on.
Switching off
F Press the button, its indicator
l amp goes off, the lighting
system changes to "automatic
illumination of headlamps" mode.
Pause
F Flashing the headlamps
a gain pauses the
function and the lighting
system changes to
"automatic illumination of
headlamps" mode.
F
Fl
ash the headlamps
again to reactivate the
system.
The system will be operational as soon as
you have exceeded 15 mph (25 km/h).
If the speed drops below 9 mph (15 km/h),
the system no longer operates.
Operation
If the situation requires a change of headlamp
beam, the driver can take over at any time.
Once activated, the system operates as follows:
-
if t
here is adequate light and/or if the traffic
conditions do not allow the use of main
beam, then dipped beam is maintained,
-
if t
he light level is low and the traffic
conditions allow, main beam comes on
automatically.
visibility
Page 150 of 376
DS5_en_Chap05_visibilite_ed02-2015
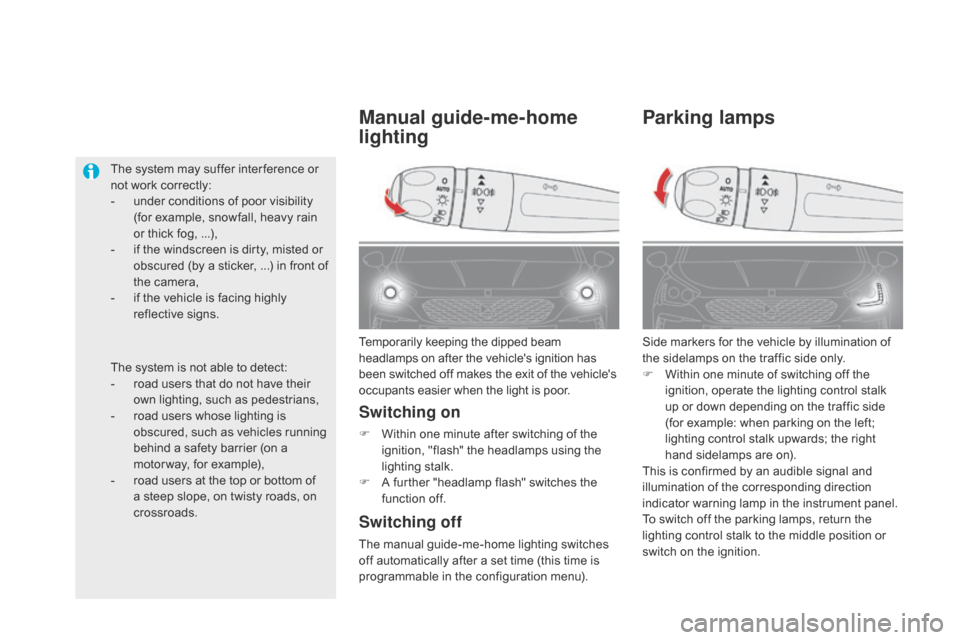
Parking lamps
Side markers for the vehicle by illumination of
the sidelamps on the traffic side only.
F
Wi
thin one minute of switching off the
ignition, operate the lighting control stalk
up or down depending on the traffic side
(for example: when parking on the left;
lighting control stalk upwards; the right
hand sidelamps are on).
This is confirmed by an audible signal and
illumination of the corresponding direction
indicator warning lamp in the instrument panel.
To switch off the parking lamps, return the
lighting control stalk to the middle position or
switch on the ignition.
Temporarily keeping the dipped beam
headlamps on after the vehicle's ignition has
been switched off makes the exit of the vehicle's
occupants easier when the light is poor.
Manual guide-me-home
lighting
Switching on
F Within one minute after switching of the
i
gnition, "flash" the headlamps using the
lighting stalk.
F
A fu
rther "headlamp flash" switches the
function off.
Switching off
The manual guide-me-home lighting switches
off automatically after a set time (this time is
programmable in the configuration menu).
The system may suffer inter ference or
not work correctly:
-
un
der conditions of poor visibility
(for example, snowfall, heavy rain
or thick fog, ...),
-
if t
he windscreen is dirty, misted or
obscured (by a sticker, ...) in front of
the camera,
-
if t
he vehicle is facing highly
reflective signs.
The system is not able to detect:
-
ro
ad users that do not have their
own lighting, such as pedestrians,
-
ro
ad users whose lighting is
obscured, such as vehicles running
behind a safety barrier (on a
motor way, for example),
-
ro
ad users at the top or bottom of
a steep slope, on twisty roads, on
crossroads.
Page 154 of 376
DS5_en_Chap05_visibilite_ed02-2015
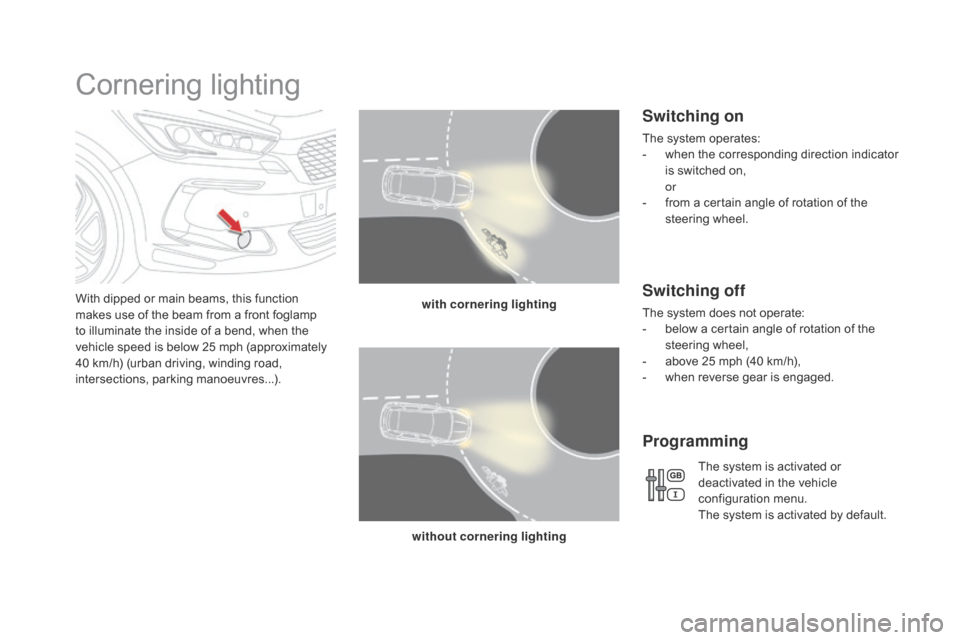
Cornering lighting
With dipped or main beams, this function
makes use of the beam from a front foglamp
to illuminate the inside of a bend, when the
vehicle speed is below 25 mph (approximately
40 km/h) (urban driving, winding road,
intersections, parking manoeuvres...).with cornering lighting
without cornering lighting
Switching on
The system operates:
- wh en the corresponding direction indicator
is switched on,
or
- fr
om a certain angle of rotation of the
steering wheel.
Switching off
The system does not operate:
- be low a certain angle of rotation of the
steering wheel,
-
ab
ove 25 mph (40 km/h),
-
wh
en reverse gear is engaged.
Programming
The system is activated or
deactivated in the vehicle
configuration menu.
The system is activated by default.