light Citroen DS5 HYBRID4 2015.5 1.G User Guide
[x] Cancel search | Manufacturer: CITROEN, Model Year: 2015.5, Model line: DS5 HYBRID4, Model: Citroen DS5 HYBRID4 2015.5 1.GPages: 400, PDF Size: 23.96 MB
Page 43 of 400
41
- "Driving assistance":● " Parking brake automatic" (Automatic
electric parking brake; see the "Driving"
section),
●
"
Rear wipe in reverse gear" (Rear
wiper coupled to reverse gear; see the
"Visibility" section),
●
"
Speeds memorised" (Memorising
speeds; see the "Driving" section).
-
"
Vehicle lighting" (see the " Visibility"
section):
●
"
Directional headlamps" (Main /
additional directional lighting),
-
"
Interior lighting" (see the " Visibility"
section):
●
"
Follow-me-home headlamps"
(Automatic operation of headlamps after
switching off the ignition),
●
"
Welcome lighting" (Exterior welcome
lighting),
●
"
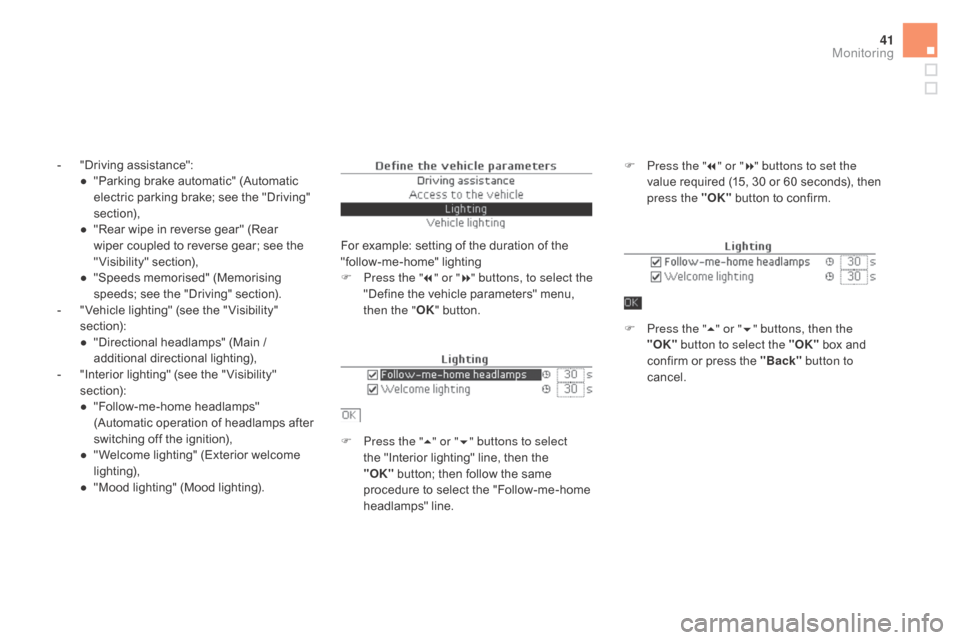
Mood lighting" (Mood lighting). For example: setting of the duration of the
"follow-me-home" lighting
F
P
ress the "7" or " 8" buttons, to select the
"Define the vehicle parameters" menu,
then the " OK" button.
F
P
ress the "5" or " 6" buttons to select
the "Interior lighting" line, then the
"OK"
button; then follow the same
procedure to select the "Follow-me-home
headlamps" line. F
P ress the "7" or " 8" buttons to set the
value required (15, 30 or 60 seconds), then
press the "OK" button to confirm.
F
P
ress the "5" or " 6" buttons, then the
"OK" button to select the "OK" box and
confirm or press the "Back" button to
cancel.
Monitoring
Page 47 of 400

45
"driving" menu
The systems with settings that can be adjusted are detailed in the table below.Button
co
rresponding function
co
mments
Speed settings Memorisation of speeds for use with the speed limiter or cruise control.
Vehicle settings Access to other functions with settings that can be adjusted:
-
A
utomatic parking brake (Automatic electric parking brake; see the "Driving" section),
-
A
utomatic rear wiper in reverse (Activation of rear wiper coupled to reverse gear; see the
"Visibility" section).
-
G
uide-me-home lighting (Automatic guide me home lighting; see the " Visibility" section),
-
W
elcome lighting (Exterior welcome lighting; see the " Visibility" section),
-
M
ood lighting (Mood lighting; see the " Visibility" section),
-
A
daptive lighting (Main / additional directional lighting; see the " Visibility" section).
-
D
river plip action (Selective unlocking of the driver's door; see the "Access" section),
-
U
nlocking boot (Selective unlocking of the boot; see the "Access" section).
Stop & Star t Deactivation of the function.
Function deactivated = indicator lamp on (orange).
Monitoring
Page 57 of 400

55
Locking the vehicle
F With the electronic key on your person in the recognition zone A , press with a finger
or thumb on one of the door handles (at the
markings) to lock the vehicle.
F
M
aintain pressure with your finger or thumb
until the windows close completely.
Locking is confirmed by fixed
lighting of the direction indicators for
approximately two seconds.
The door mirrors fold at the same time. If one of the doors or the boot is still
open or if the key for Keyless Entry and
Starting system has been left inside
the vehicle or if the ignition is on, the
central locking does not take place.
When the vehicle is locked, if it is
unlocked inadvertently, it will lock itself
again automatically after about thirty
seconds unless a door is opened.
If the alarm was previously activated, it
will not be reactivated automatically.
The folding and unfolding of the door
mirrors by the remote control can be
deactivated by a CITROËN dealer or a
qualified workshop.
As a safety measure (children on
board), never leave the vehicle without
taking the key for the Keyless Entry and
Starting system, even for a short period.
Guard against theft when the key for the
Keyless Entry and Starting system is
in the recognition zone with the vehicle
unlocked.
In order to preserve the charge of the
cell battery in the remote control, the
"hands-free" functions go into extended
stand-by after 21 days of non-use. To
restore these functions, press one of
the remote control buttons or start the
engine with the electronic key in the
reader.
Ensure that nothing and no person
prevents the correct operation of the
windows.
Be particularly aware of children when
operating the windows.
This function allows you to identify
your vehicle from a distance,
particularly in poor light. Your vehicle
must be locked.
Locating your vehicle
F Press the closed padlock on the remote
control.
This will switch on the courtesy lamps and
the direction indicators will flash for around
ten
se
conds.
Access
Page 70 of 400
Cockpit glass roof
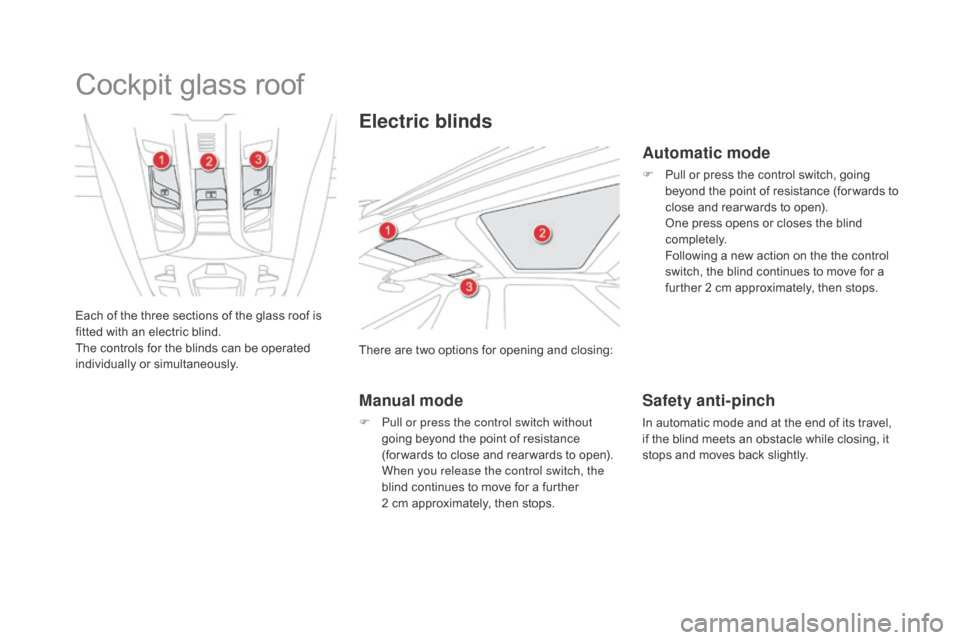
Each of the three sections of the glass roof is
fitted with an electric blind.
The controls for the blinds can be operated
individually or simultaneously.There are two options for opening and closing:
Electric blinds
Automatic mode
F Pull or press the control switch, going
beyond the point of resistance (for wards to
close and rear wards to open).
O
ne press opens or closes the blind
completely.
F
ollowing a new action on the the control
switch, the blind continues to move for a
further 2 cm approximately, then stops.
Manual mode
F Pull or press the control switch without going beyond the point of resistance
(for wards to close and rear wards to open).
W
hen you release the control switch, the
blind continues to move for a further
2 cm approximately, then stops.
Safety anti-pinch
In automatic mode and at the end of its travel,
if the blind meets an obstacle while closing, it
stops and moves back slightly.
Page 71 of 400
69
Reinitialisation
If the blind meets an obstacle during
operation, you must reverse the
movement of the blind. To do this,
press the control switch for the blind in
question.
When the driver operates the blind
control switch, they must ensure that
no one is preventing correct closing of
the blind.
The driver must ensure that passengers
use the blind correctly.
Be particularly aware of children when
operating the blind.
If the blind opens again on its own
during a closing movement or soon
after stopping:
F
o
perate the control switch until the
blind is fully open,
F
t
hen operate the control switch until
the blind is fully closed.
The safety anti-pinch function is not
operational during these operations.
In the event of a failure or battery disconnection
while a blind is moving or soon after it stops,
the safety anti-pinch must be reinitialised.
For each blind control switch:
F
o
perate the control until the blind is fully
closed,
F
c
ontinue to press for at least 3 seconds.
A slight movement of the blind will then be
noticeable, confirming the reinitialisation.
Access
Page 81 of 400
79
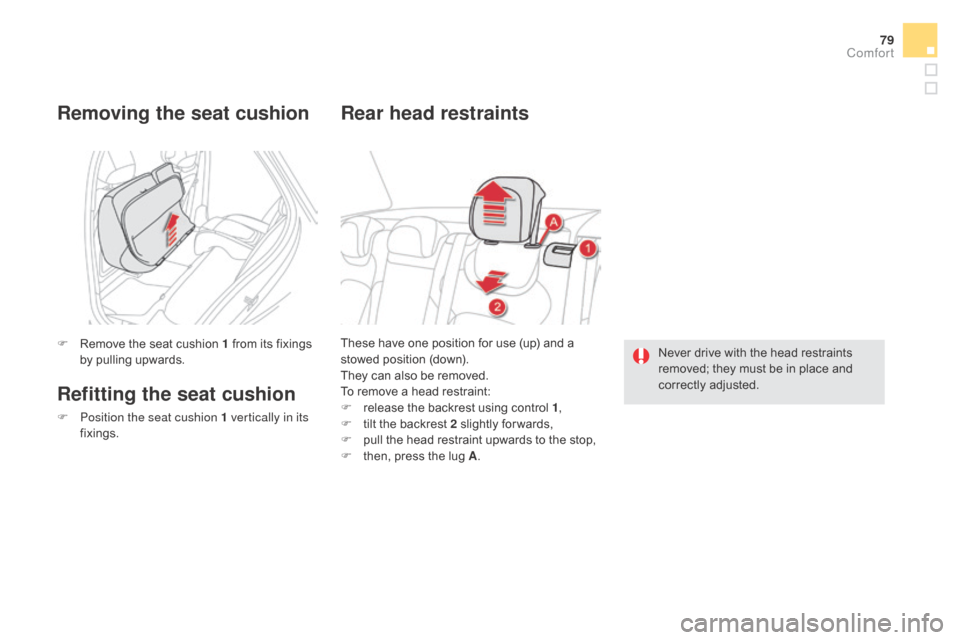
These have one position for use (up) and a
stowed position (down).
They can also be removed.
To remove a head restraint:
F
r
elease the backrest using control 1 ,
F
t
ilt the backrest 2 slightly for wards,
F
p
ull the head restraint upwards to the stop,
F
t
hen, press the lug A .
Rear head restraints
Never drive with the head restraints
removed; they must be in place and
correctly adjusted.
F
R
emove the seat cushion 1 from its fixings
by pulling upwards.
Removing the seat cushion
Refitting the seat cushion
F Position the seat cushion 1 vertically in its fixings.
comfort
Page 83 of 400
81
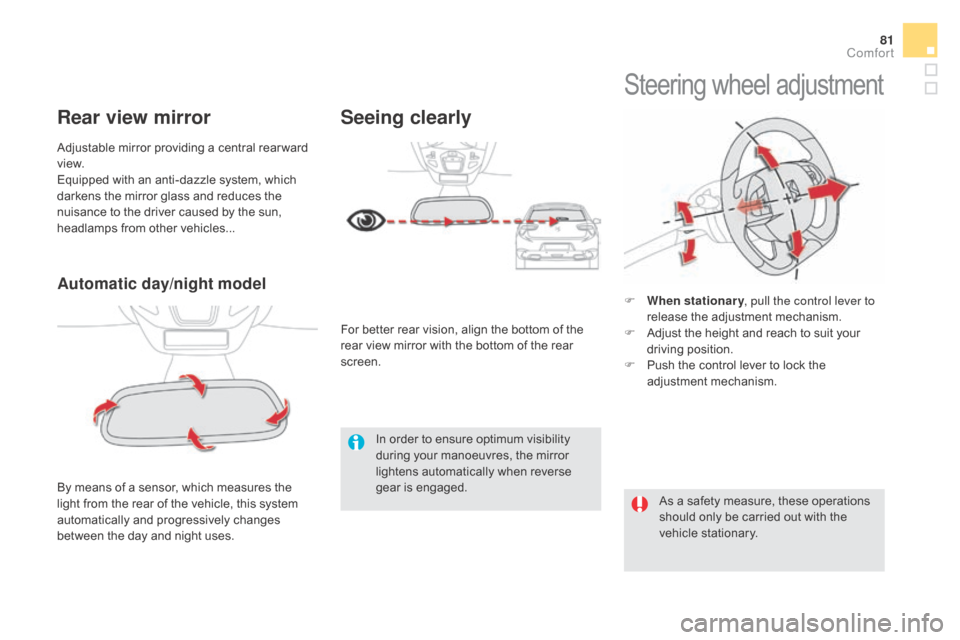
Automatic day/night model
By means of a sensor, which measures the
light from the rear of the vehicle, this system
automatically and progressively changes
between the day and night uses. Adjustable mirror providing a central rear ward
view.
Equipped with an anti-dazzle system, which
darkens the mirror glass and reduces the
nuisance to the driver caused by the sun,
headlamps from other vehicles...
Rear view mirror
In order to ensure optimum visibility
during your manoeuvres, the mirror
lightens automatically when reverse
gear is engaged.
Steering wheel adjustment
F When stationary, pull the control lever to
release the adjustment mechanism.
F
A
djust the height and reach to suit your
driving position.
F
P
ush the control lever to lock the
adjustment mechanism.
As a safety measure, these operations
should only be carried out with the
vehicle stationary.
Seeing clearly
For better rear vision, align the bottom of the
rear view mirror with the bottom of the rear
screen.
comfort
Page 85 of 400
83
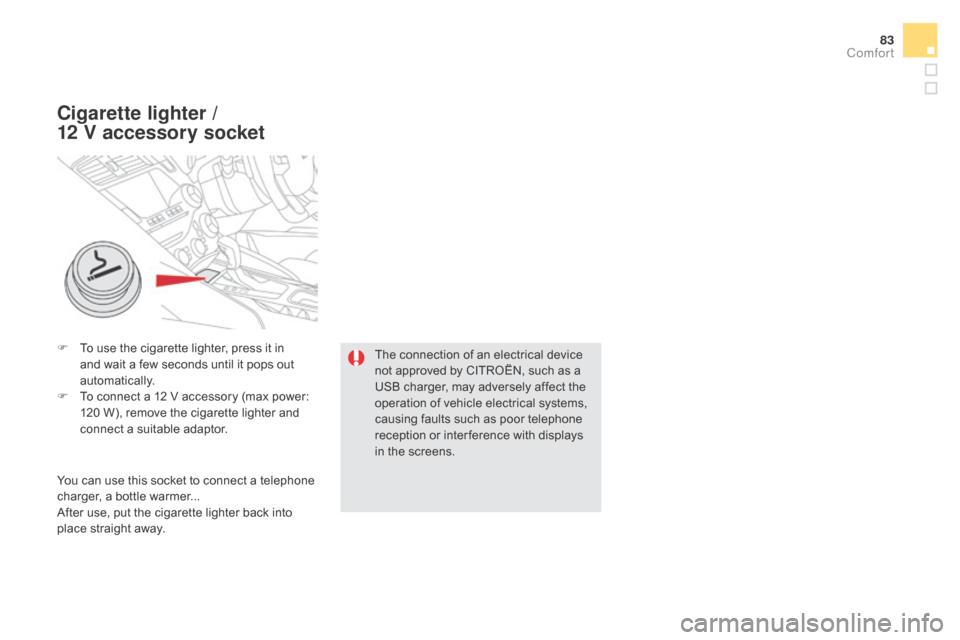
F To use the cigarette lighter, press it in and wait a few seconds until it pops out
automatically.
F
T
o connect a 12 V accessory (max power:
120 W), remove the cigarette lighter and
connect a suitable adaptor.
cigarette lighter /
12
V
accessory socket
The connection of an electrical device
not approved by CITROËN, such as a
USB charger, may adversely affect the
operation of vehicle electrical systems,
causing faults such as poor telephone
reception or inter ference with displays
in the screens.
You can use this socket to connect a telephone
charger, a bottle warmer...
After use, put the cigarette lighter
back into
place straight away.
comfort
Page 91 of 400
89
Heating and Ventilation
controls
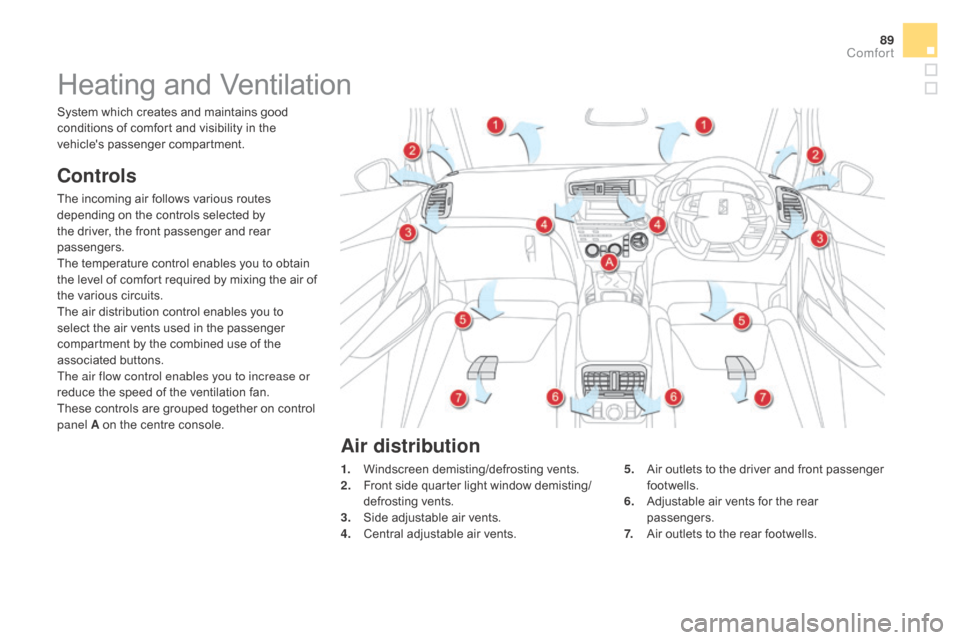
The incoming air follows various routes
depending on the controls selected by
the driver, the front passenger and rear
passengers.
The temperature control enables you to obtain
the level of comfort required by mixing the air of
the various circuits.
The air distribution control enables you to
select the air vents used in the passenger
compartment by the combined use of the
associated buttons.
The air flow control enables you to increase or
reduce the speed of the ventilation fan.
These controls are grouped together on control
panel A on the centre console.1.
W
indscreen demisting/defrosting vents.
2.
F
ront side quarter light window demisting/
defrosting vents.
3.
S
ide adjustable air vents.
4.
C
entral adjustable air vents.
System which creates and maintains good
conditions of comfort and visibility in the
vehicle's passenger compartment.
5.
A
ir outlets to the driver and front passenger
footwells.
6.
A
djustable air vents for the rear
passengers.
7.
A
ir outlets to the rear footwells.
Air distribution
comfort
Page 96 of 400
9. Maximum air conditioning
F If you want to quickly cool the air in the passenger
compartment, press this button;
"LO" is displayed.
To return to the previous settings, press the
button again. F
T
urn the air flow control to the
left until all of the indicator
lamps go off.
Switching the system off
This action switches off the air conditioning and
the ventilation.
Temperature related comfort is no longer
assured but a slight flow of air, due to the
movement of the vehicle, can still be felt.
F
M
odify the settings (temperature, air flow
or air distribution) or press the "AUTO"
button to reactivate the system with the
values set before it was switched off.