light Citroen DS5 HYBRID4 2015.5 1.G Owner's Guide
[x] Cancel search | Manufacturer: CITROEN, Model Year: 2015.5, Model line: DS5 HYBRID4, Model: Citroen DS5 HYBRID4 2015.5 1.GPages: 400, PDF Size: 23.96 MB
Page 100 of 400
Driving recommendations
Observe the driving regulations and remain vigilant whatever the traffic conditions.
Pay close attention to the traffic and keep your hands on the wheel so that you are ready to react at
any time to any eventuality.
On a long journey, a break every two hours is strongly recommended.
In difficult weather, drive smoothly, anticipate the need to brake and increase the distance from
other vehicles.
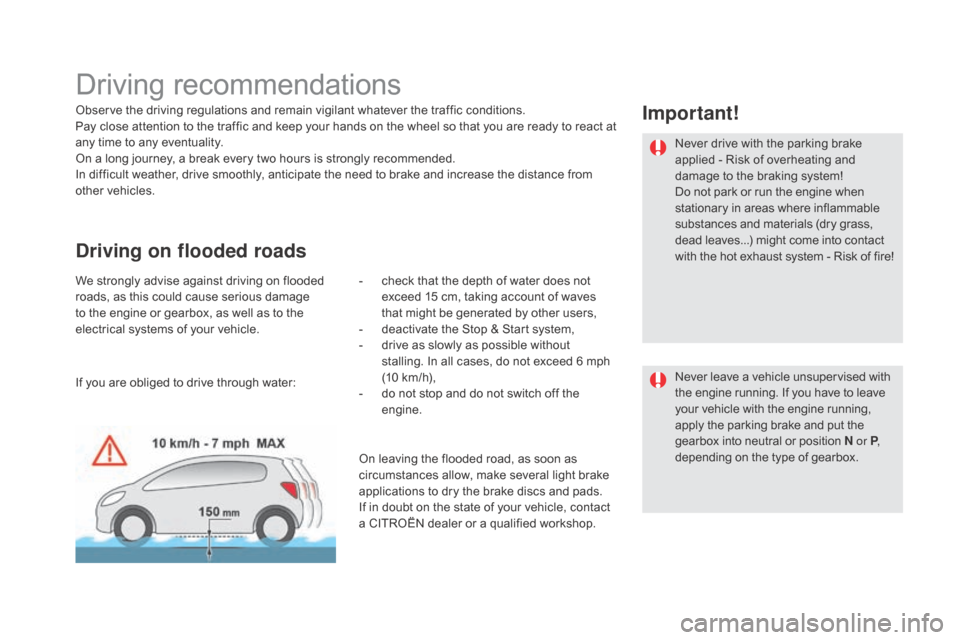
driving on flooded roads
We strongly advise against driving on flooded
roads, as this could cause serious damage
to the engine or gearbox, as well as to the
electrical systems of your vehicle.-
c heck that the depth of water does not
exceed 15 cm, taking account of waves
that might be generated by other users,
-
d
eactivate the Stop & Start system,
-
d
rive as slowly as possible without
stalling. In all cases, do not exceed 6 mph
(10
km/h),
-
d
o not stop and do not switch off the
engine.
Important!
Never drive with the parking brake
applied - Risk of overheating and
damage to the braking system!
Do not park or run the engine when
stationary in areas where inflammable
substances and materials (dry grass,
dead leaves...) might come into contact
with the hot exhaust system - Risk of fire!
Never leave a vehicle unsupervised with
the engine running. If you have to leave
your vehicle with the engine running,
apply the parking brake and put the
gearbox into neutral or position
n
o
r P,
depending on the type of gearbox.
If you are obliged to drive through water:
On leaving the flooded road, as soon as
circumstances allow, make several light brake
applications to dry the brake discs and pads.
If in doubt on the state of your vehicle, contact
a CITROËN dealer or a qualified workshop.
Page 101 of 400
99
When towing
distribution of loads
F Distribute the load in the trailer so that the heaviest items are as close as possible to
the axle and the nose weight approaches
the maximum permitted without
exceeding
it.
Air density decreases with altitude, thus
reducing engine per formance. Above
1
000 metres, the maximum towed load must
be reduced by 10
% for every 1 000 metres of
altitude.
Side wind
F Take into account the increased sensitivity to side wind.
cooling
Towing a trailer on a slope increases the
temperature of the coolant.
As the fan is electrically controlled, its cooling
capacity is not dependent on the engine speed.
F
T
o lower the engine speed, reduce your
speed.
The maximum towed load on a long incline
depends on the gradient and the ambient
temperature.
In all cases, keep a check on the coolant
temperature.
F
I
f the warning lamp and the
STOP warning lamp come on,
stop the vehicle and switch off
the engine as soon as possible.
Braking
Towing a trailer increases the braking distance.
To avoid overheating of the brakes, the use of
engine braking is recommended.
Ty r e s
F Check the tyre pressures of the towing vehicle and of the trailer, observing the
recommended pressures.
Lighting
F Check the electrical lighting and signalling on the trailer and the hadlamp beam height
of your vehicle.
For more information on adjusting the
headlamp beam height, refer to the
corresponding section.
For more information on weights (and the
towed loads which apply to your vehicle) refer
to the corresponding section.
The rear parking sensors will be
deactivated automatically if a genuine
CITROËN towbar is used.
driving
Page 102 of 400

Starting / Switching off the engine
F Insert the electronic key in the reader.
F P ress the brake pedal for vehicles with an
automatic gearbox, or fully declutch for
vehicles with a manual gearbox.
Starting using
the electronic key Starting with Keyless Entry
and Starting
If one of the starting conditions is not met, a
reminder message appears in the instrument
panel screen. In some circumstances, it is
necessary to turn the steering wheel slightly
while pressing the "
START/STOP" button to
assist unlocking of the steering; a message
warns you when this is needed.
With a manual gearbox , put the gear lever into neutral.
With an automatic gearbox , place the gear selector at position P or
n.
diesel vehicles
It is not necessary to place the electronic key in
the reader.
F
W
ith the electronic key inside the vehicle,
press the brake pedal for vehicles with an
automatic gearbox, or fully depress the
clutch pedal for vehicles with a manual
gearbox.
F
P
ress the " START/STOP " button
while maintaining pressure on
the pedal until the engine starts. F
P
ress the "START/STOP " button
while maintaining pressure on
the pedal until the engine starts. The "Keyless Entry and Starting"
electronic key must be in the
recognition zone.
For safety reasons, do not leave this
zone with the vehicle running.
If the electronic key is not detected
in the recognition zone, a message
is displayed. Move the electronic key
into the zone so that the engine can be
started.
The steering column unlocks and the engine
starts more or less instantly.
See the advice below for Diesel vehicles. The steering column unlocks and the engine
starts more or less instantly.
See the warning below for Diesel vehicles. In temperatures below zero the engine
will not start until the pre-heater
warning lamp has gone off.
If this warning lamp comes on after
pressing "
START/STOP ", you should
hold the brake or clutch pedal down
until the warning lamp goes off and
do not press the START/STOP button
again.
Page 120 of 400

Stop & Start
Operation
going into engine STOP mode
The "E cO" warning lamp comes on
in the instrument panel and the engine
goes into standby automatically:
-
w
ith a manual gearbox , at speeds below
12 mph (20 km/h) or vehicle stationary with
the THP 210 petrol and BlueHDi 115 and
120 Diesel versions, when you place the
gear lever in neutral and you release the
clutch pedal,
-
w
ith an automatic gearbox , vehicle
stationary, when you press the brake pedal
or put the gear selector in position
n
.I
f your vehicle is fitted with the
system, a time counter calculates
the sum of the periods in STOP
mode during a journey. It resets itself
to zero every time the ignition is
switched on with the START/STOP
button.
Never refuel with the engine in STOP
mode; you must switch off the ignition
with the START/STOP button.
For your comfort, during parking
manoeuvres, STOP mode is not
available for a few seconds after
coming out of reverse gear.
Stop & Start does not affect the
operation of vehicle systems such as
braking, power steering...
The Stop & Start
system puts the engine temporarily into standby - STOP mode - during stops in the traffic (red lights, traffic jams, ...). The engine
restarts automatically - START mode - as soon as you want to move off. The restart takes place instantly, quickly and silently.
Per fect for urban use, the Stop & Start system reduces fuel consumption and exhaust emissions as well as the noise level when stationary.
Page 124 of 400

Lane departure warning system
System which, using a camera which
recognises solid or broken lines, detects the
involuntary crossing of longitudinal traffic lane
markings on the ground.
To provide safe driving, the camera analyses
the image then, if the driver's attention drops,
triggers a warning if the vehicle drifts over
a lane marking (speed higher than 50 mph
(80 km/h)).
This system is particularly useful on motor ways
and main roads.
Activation
F When switching on the ignition or with the engine running, press
this button to activate the system;
the indicator lamp comes on.
The lane departure warning system
cannot, in any circumstances replace
the need for vigilance on the part of the
driver.
deactivation
You are warned by the vibration of the driver's
seat cushion:
-
o
n the right-hand side, if the marking on
the ground has been crossed on the right,
-
o
n the left-hand side, if the marking on the
ground has been crossed on the left.
No warning is transmitted while the direction
indicator is active and for approximately
20
seconds after the direction indicator is
switched off.
detection - Alert Operating fault
The detection may be impeded:
-
i f the markings on the ground are
worn,
-
i
f there is little contrast between the
markings on the ground and the
road sur face,
-
i
f the windscreen is dirty,
-
i
n certain severe weather conditions:
fog, heavy rain, snow, bright sunlight
or direct exposure to the sun (low
sun, leaving a tunnel,
...) and shade.
F
P
ress this button again, the
indicator lamp goes off. In the event of a fault, the indicator lamp in the
button flashes.
Contact a CITROËN dealer or a qualified
workshop.
The status of the system remains in the
memory when the ignition is switched off. It is necessary to observe the driving
regulations and to take a break every
two hours.
Page 126 of 400
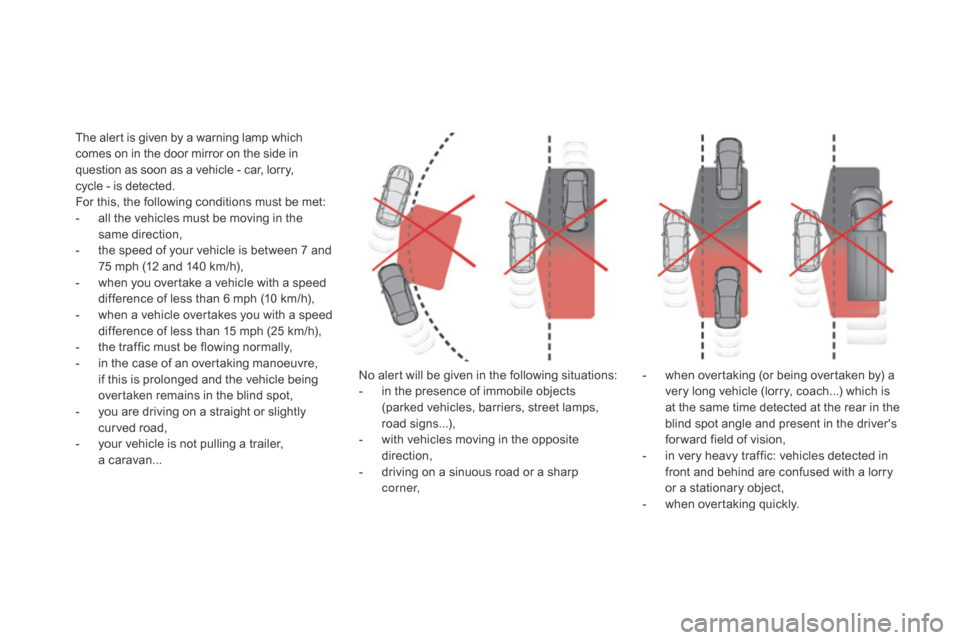
The alert is given by a warning lamp which
comes on in the door mirror on the side in
question as soon as a vehicle - car, lorry,
cycle - is detected.
For this, the following conditions must be met:
-
a
ll the vehicles must be moving in the
same direction,
-
t
he speed of your vehicle is between 7 and
75 mph (12 and 140 km/h),
-
w
hen you overtake a vehicle with a speed
difference of less than 6 mph (10 km/h),
-
w
hen a vehicle overtakes you with a speed
difference of less than 15 mph (25 km/h),
-
t
he traffic must be flowing normally,
-
i
n the case of an overtaking manoeuvre,
if this is prolonged and the vehicle being
overtaken remains in the blind spot,
-
y
ou are driving on a straight or slightly
curved road,
-
y
our vehicle is not pulling a trailer,
a
c
aravan... No alert will be given in the following situations:
-
i
n the presence of immobile objects
(parked vehicles, barriers, street lamps,
road signs...),
-
w
ith vehicles moving in the opposite
direction,
-
d
riving on a sinuous road or a sharp
c o r n e r, -
w
hen overtaking (or being overtaken by) a
very long vehicle (lorry, coach...) which is
at the same time detected at the rear in the
blind spot angle and present in the driver's
for ward field of vision,
-
i
n very heavy traffic: vehicles detected in
front and behind are confused with a lorry
or a stationary object,
-
w
hen overtaking quickly.
Page 144 of 400
Lighting controlsControls for selection and operation of the various front and rear lamps providing the vehicle's lighting and signalling.
Main lighting
There are various lamps on the vehicle:
- s idelamps, to be seen,
-
d
ipped beam headlamps to see without
dazzling other drivers,
-
m
ain beam headlamps to see clearly when
the road is clear,
-
d
irectional headlamps for improved
visibility when cornering.
Additional lighting
Other lamps are installed to fulfil the
requirements of particular driving conditions:
-
r
ear foglamps to better signal the presence
of the vehicle in foggy conditions,
-
f
ront foglamps for better visibility in foggy
conditions and to improve lighting at
intersections and when parking,
-
d
aytime running lamps for better visibility of
the vehicle by day.
Lighting function settings
You can activate or deactivate the following
lighting functions:
-
g
uide-me-home lighting,
-
m
ain additional lighting,
-
s
econdary additional lighting,
-
w
elcome lighting,
-
a
utomatic illumination of headlamps,
-
a
utomatic headlamp dipping.
Page 145 of 400
143
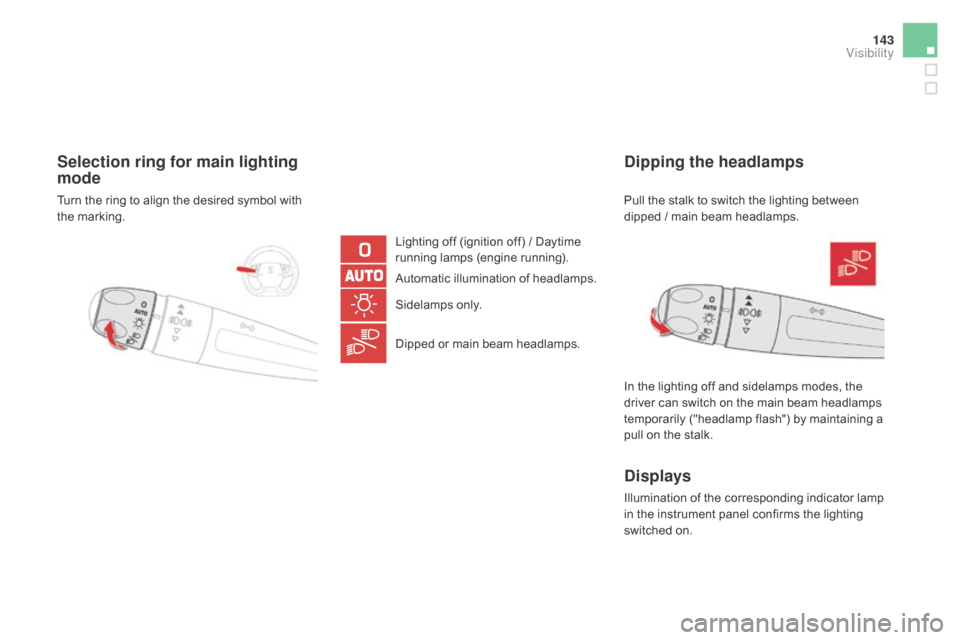
Selection ring for main lighting
mode
Lighting off (ignition off) / Daytime
running lamps (engine running).
Automatic illumination of headlamps.
Sidelamps only.
Dipped or main beam headlamps.
dipping the headlamps
In the lighting off and sidelamps modes, the
driver can switch on the main beam headlamps
temporarily ("headlamp flash") by maintaining a
pull on the stalk.
displays
Illumination of the corresponding indicator lamp
in the instrument panel confirms the lighting
switched on. Pull the stalk to switch the lighting between
dipped / main beam headlamps.
Turn the ring to align the desired symbol with
the marking.
Visibility
Page 146 of 400
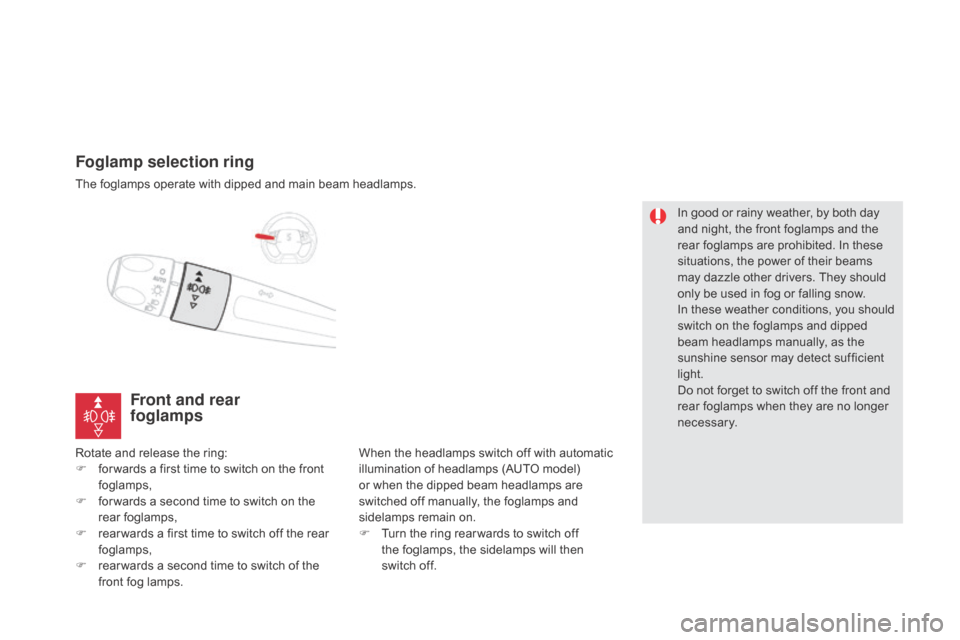
Foglamp selection ring
The foglamps operate with dipped and main beam headlamps.
Rotate and release the ring:
F
f
or wards a first time to switch on the front
foglamps,
F
f
or wards a second time to switch on the
rear foglamps,
F
r
ear wards a first time to switch off the rear
foglamps,
F
r
ear wards a second time to switch of the
front fog lamps. When the headlamps switch off with automatic
illumination of headlamps (AUTO model)
or when the dipped beam headlamps are
switched off manually, the foglamps and
sidelamps remain on.
F
T
urn the ring rear wards to switch off
the foglamps, the sidelamps will then
switch off. In good or rainy weather, by both day
and night, the front foglamps and the
rear foglamps are prohibited. In these
situations, the power of their beams
may dazzle other drivers. They should
only be used in fog or falling snow.
In these weather conditions, you should
switch on the foglamps and dipped
beam headlamps manually, as the
sunshine sensor may detect sufficient
light.
Do not forget to switch off the front and
rear foglamps when they are no longer
necessary.
Front and rear
foglamps
Page 147 of 400
145
Switching off the lighting
when switching off the ignition
When the ignition is switched off, all of the
lamps switch off immediately, except for
the dipped beam headlamps if automatic
guide-me-home lighting is activated.In some weather conditions (e.g. low
temperature or humidity), the presence
of misting on the internal sur face of the
glass of the headlamps and rear lamps
is normal; it disappears after the lamps
have been on for a few minutes.
Switching on the lighting when
switching on the ignition
To reactivate the lighting control stalk,
turn the ring A to position "0"
- lighting
off, then to the position of your choice.
When the driver's door is opened, a
temporary audible signal warns you that
the vehicle's lighting is on.
They switch off automatically after a
period which depends on the state of
charge of the battery (entry to energy
economy mode).
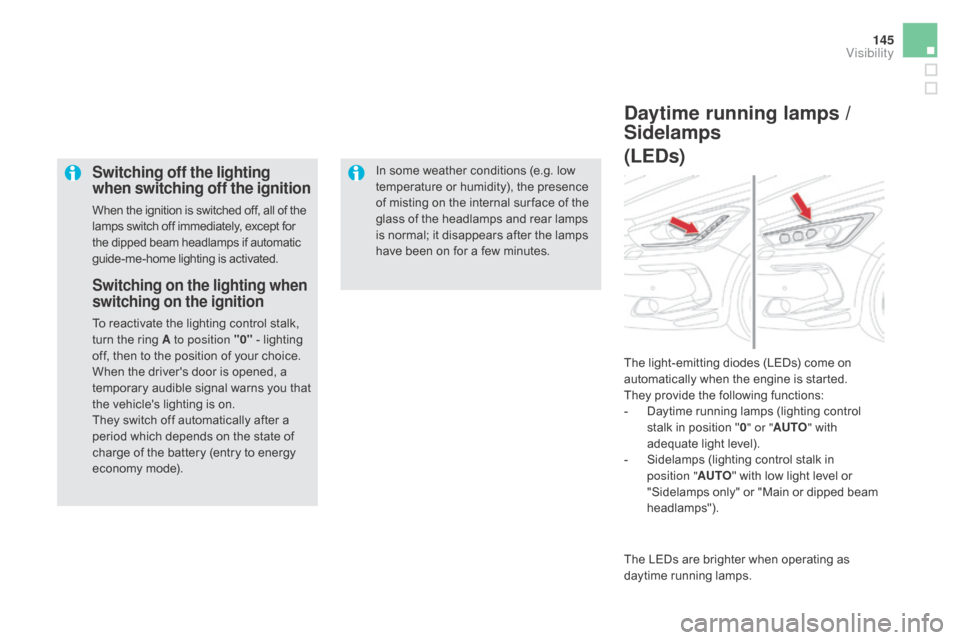
daytime running lamps /
Sidelamps
(LE
ds)
The light-emitting diodes (LEDs) come on
automatically when the engine is started.
They provide the following functions:
-
D
aytime running lamps (lighting control
stalk in position " 0" or " AUTO " with
adequate light level).
-
S
idelamps (lighting control stalk in
position " AUTO" with low light level or
"Sidelamps only" or "Main or dipped beam
headlamps").
The LEDs are brighter when operating as
daytime running lamps.
Visibility