boot Citroen DS5 HYBRID4 RHD 2011.5 1.G Owner's Guide
[x] Cancel search | Manufacturer: CITROEN, Model Year: 2011.5, Model line: DS5 HYBRID4 RHD, Model: Citroen DS5 HYBRID4 RHD 2011.5 1.GPages: 358, PDF Size: 10.77 MB
Page 125 of 358
123Driving
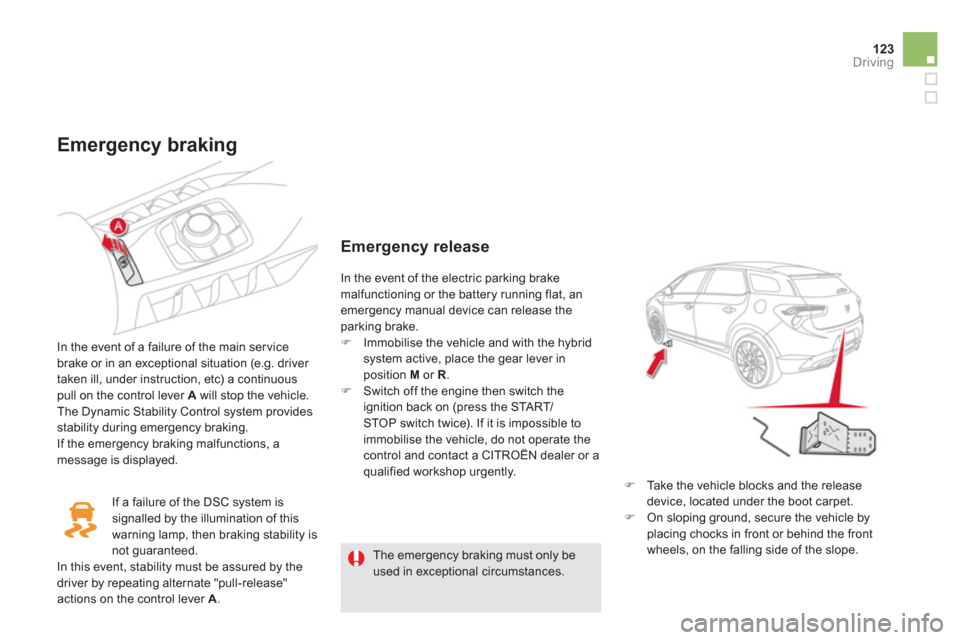
Emergency braking
In the event of a failure of the main servicebrake or in an exceptional situation (e.g. driver
taken ill, under instruction, etc) a continuouspull on the control lever A will stop the vehicle.
The Dynamic Stability Control system provides stability during emergency braking.
If the emer
gency braking malfunctions, amessage is displayed.
Emergency release
�)
Ta k e the vehicle blocks and the release device, located under the boot carpet. �)
On sloping ground, secure the vehicle by
placing chocks in front or behind the front
wheels, on the falling side of the slope. In the event of the electric parkin
g brake
malfunctioning or the battery running flat, an
emergency manual device can release theparking brake. �) Immobilise the vehicle and with the hybridsystem active, place the gear lever in
position M or R
. �)
Switch off the engine then switch the
ignition back on (press the START/STOP switch twice). If it is impossible to immobilise the vehicle, do not operate the control and contact a CITROËN dealer or a qualified workshop urgently.
The emergency braking must only be used in exceptional circumstances. I
f a failure of the DSC system is
signalled by the illumination of this warning lamp, then braking stability isnot guaranteed.
In this event, stability must be assured by the
driver by repeating alternate "pull-release" actions on the control lever A.
Page 126 of 358
For safety reasons, you must contact a
CITROËN dealer as soon as possible to replace the protective cover. Ta k e care not to allow moisture or dust in the proximity of the protective cover.
Following an emergency unlocking, immobilisation of the vehicle is no longer guaranteed once the manualemergency release has been deployed and the manual control does not allow the re-application of your parking brake. Take no action, either on the controllever A, or stopping or star ting the engine while the release device is engaged.
To r e - e ngage the electric parking brake(after correction of the fault or battery problem), make a long pull on the control lever A
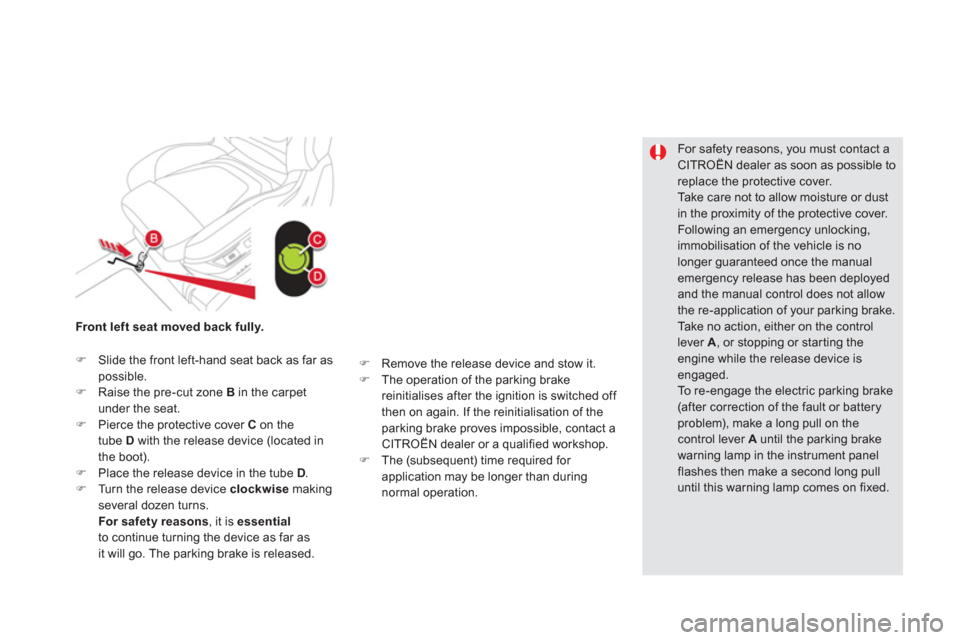
until the parking brake warning lamp in the instrument panel flashes then make a second long pulluntil this warning lamp comes on fixed. Front left seat moved back full
y.
�)Slide the front left-hand seat back as far aspossible. �)Raise the pre-cut zone B in the carpetunder the seat.�)Pierce the protective cover Con the
tube D with the release device (located in
the boot).�)Place the release device in the tube D.�)Turn the release device clockwisemaking several dozen turns.
For safety reasons, it is essential
to continue turning the device as far as it will go. The parking brake is released.
�)
Remove the release device and stow it. �)
The operation of the parking brake
reinitialises after the ignition is switched off
then on again. If the reinitialisation of the
parking brake proves impossible, contact a
CITROËN dealer or a qualified workshop.�) The (subsequent) time required for
application may be longer than during
normal operation.
Page 156 of 358
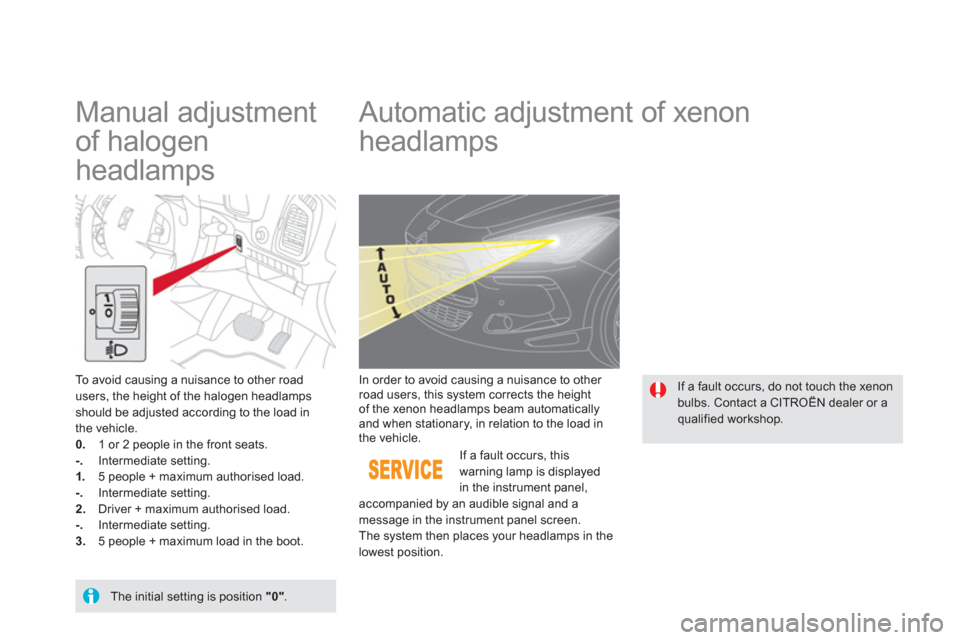
Manual adjustment
of halogen
headlamps
Automatic adjustment of xenon
headlamps
To avoid causing a nuisance to other road
users, the height of the halogen headlampsshould be adjusted according to the load in
the vehicle.0.1 or 2 people in the front seats. -.Intermediate setting. 1. 5 people + maximum authorised load. -.Intermediate setting. 2.
Driver + maximum authorised load. -.Intermediate setting. 3.
5 people + maximum load in the boot.
The initial setting is position "0".
If a fault occurs, this warning lamp is displayedin the instrument panel,
accompanied by an audible signal and a
message in the instrument panel screen.
The s
ystem then places your headlamps in the lowest position.
In order to avoid causing a nuisance to other road users, this system corrects the height
of the xenon headlamps beam automaticallyand when stationary, in relation to the load in
the vehicle.
If a fault occurs, do not touch the xenonbulbs. Contact a CITROËN dealer or aqualified workshop.
Page 160 of 358
If a significant accumulation of snowor ice is present, or when using a bicycle carrier on the boot, deactivatethe automatic rear wiper via theconfiguration menu.
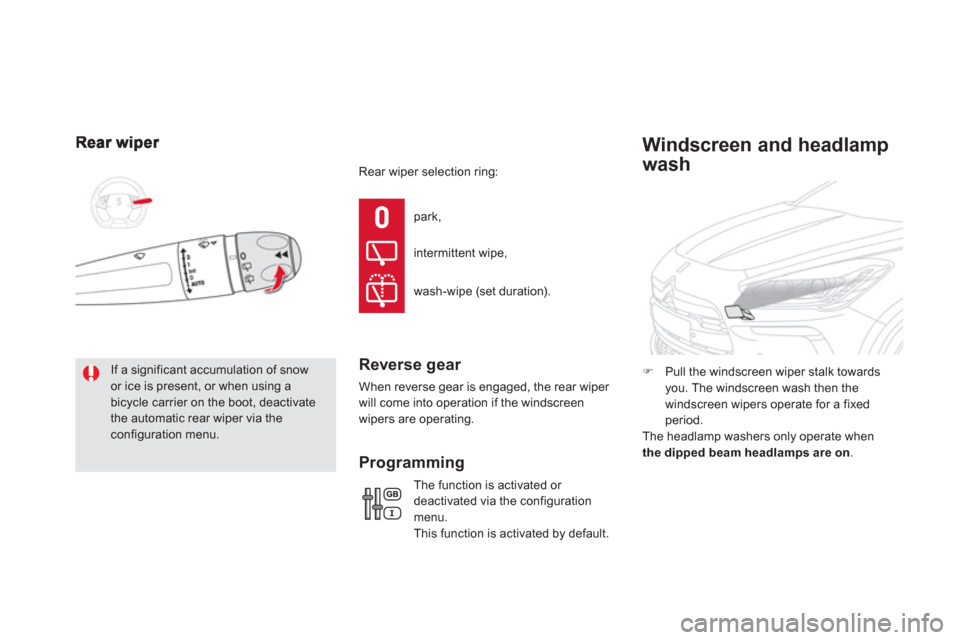
park,
intermittent wipe,
wash-wipe
(set duration).
Reverse gear
When reverse gear is engaged, the rear wiper
will come into operation if the windscreen
wipers are operating.
Th
e function is activated or
deactivated via the configuration menu.
This function is activated by default.
Programming
�)Pull the windscreen wiper stalk towards you. The windscreen wash then the
windscreen wipers operate for a fixed
period.
The headlamp washers only operate when
the dipped beam headlamps are on.
Windscreen and headlamp
wash
Rear wiper selection ring:
Page 196 of 358
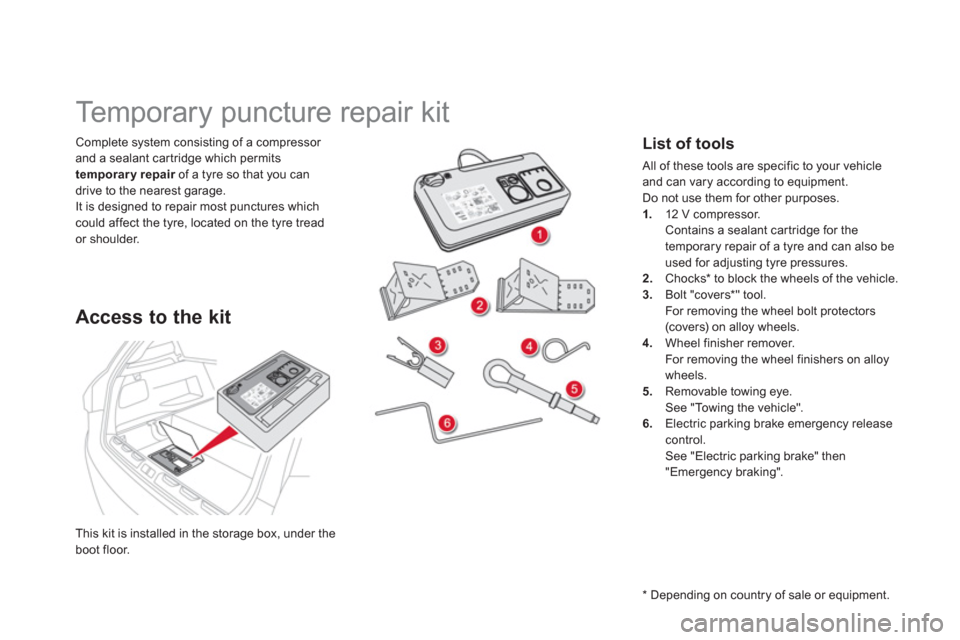
This kit is installed in the storage box, under the boot floor.
Complete system consisting of a compressor
and a sealant car tridge which permits
temporary repair of a tyre so that you can rdrive to the nearest garage.
It is designed to repair most punctures which could affect the tyre, located on the tyre tread
or shoulder.
Temporary puncture repair kit
Access to the kit
List of tools
All of these tools are specific to your vehicle
and can vary according to equipment.
Do not use them for other purposes.
1. 12 V compressor.
Contains a sealant cartridge for the
temporary repair of a tyre and can also be
used for adjusting tyre pressures. 2.Chocks * to block the wheels of the vehicle.3.Bolt "covers *
" tool.
For removing the wheel bolt protectors (covers) on alloy wheels. 4. Wheel finisher remover.
For removing the wheel finishers on alloywheels.
5. Removable towing eye.
See "Towing the vehicle".
6.Electric parking brake emergency releasecontrol.
See "Electric parking brake" then
"Emergency braking".
*
Dependin
g on country of sale or equipment.
Page 202 of 358

Changing a wheel Procedure for changing a faulty wheel for the spare wheel using the tools provided with the vehicle.
Th
e tools are installed in the boot under the floor.
Access to the tools
List of tools
All of these tools are specific to your vehicle and can vary according to the level of equipment.
Do not use them for other purposes.1. Wheelbrace.
For removing the wheel trim and removingthe wheel bolts. 2.Jack with integral handle.
For raising the vehicle.3."Bolt cover" tool.
For removing the bolt protectors (covers)
on alloy wheels.4. Wheel trim remover.
For removing the alloy wheel finishers.
5. Socket for the security bolts (located in
the glove box).
For adapting the wheelbrace to the special"security" bolts.
6.Wheel chocks for blocking the vehicle's
wheels.7. Towing eye.
See "Towing the vehicle". 8.Extension spanner.
For slackening/tightening the spare wheelcarrier nut. 9. Emergency release control for the electric parking brake.
See the "Electric parking brake" section, "Emergency braking".
Tyre under-infl ation detection
The spare wheel is not fitted with a sensor. The punctured wheel must berepaired by a CITROËN dealer or a
qualified workshop.
Before doing any work on your vehicle,switch off the ignition ( Ready
lamp off)to avoid any risk of injury resulting fromautomatic operation of the engine.
When using lifting equipment (a jack
for example), take care to use the jacking points provided, so as to avoiddamaging the high voltage cables.
Page 207 of 358
205
Practical information
Fitting a wheel
Fitting the "space-saver"spare wheel
If your vehicle is fitted with alloy wheels, when tightening the bolts on fitting,it is normal to notice that the washersdo not come into contact with the "space-saver" spare wheel. The wheel is secured by the conical surface of each bolt.
After changing a wheel
To c o r r e c t ly store the punctured wheelin the boot ( not in the location of the space-saver wheel ), first remove the central cover. When using the "space-saver" typespare wheel, do not exceed 50 mph(80 km/h). Have the tightening of the bolts and thepressure of the spare wheel checkedby a CITROËN dealer or a qualified
workshop without delay. Have the punctured wheel repaired and refitted to the vehicle as soon as possible.
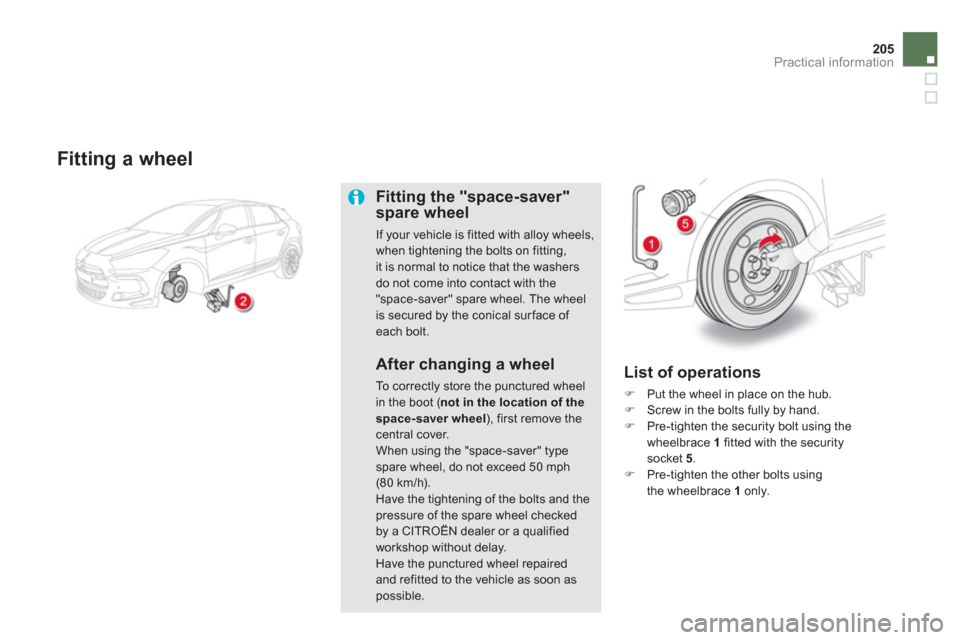
List of operations
�)
Put the wheel in place on the hub. �)
Screw in the bolts fully by hand.�)
Pre-tighten the security bolt using the
wheelbrace 1fitted with the security socket 5.�) Pre-tighten the other bolts using
the wheelbrace 1 only.
Page 214 of 358
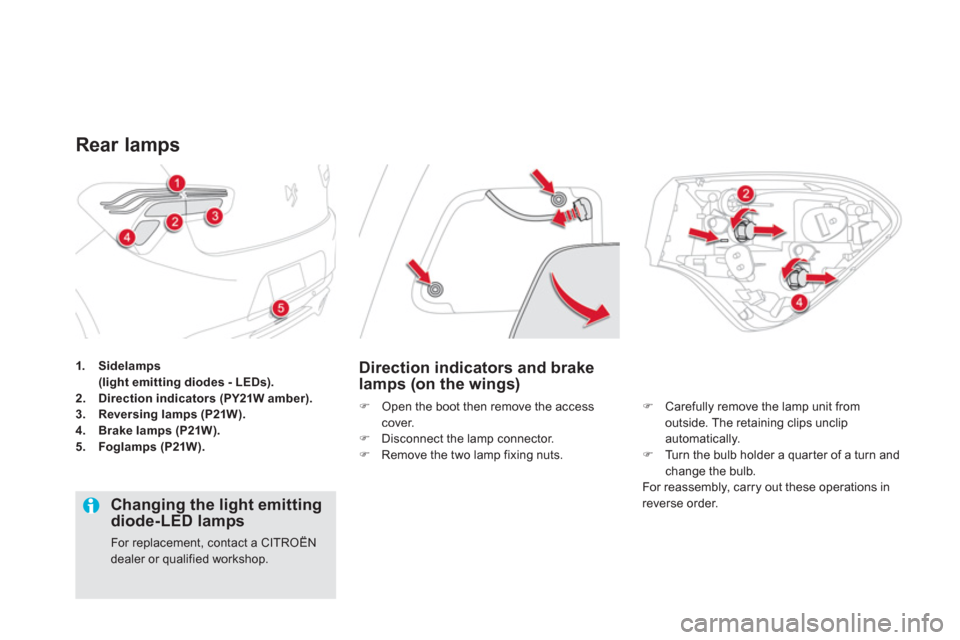
1.Sidelamps(light emitting diodes - LEDs).2.Direction indicators (PY21W amber).3.Reversing lamps (P21W).4. Brake lamps (P21W).5.Foglamps (P21W).
Rear lamps
Direction indicators and brake
lamps (on the wings)
�) Open the boot then remove the access cover.�)
Disconnect the lamp connector. �)
Remove the two lamp fixing nuts.
�)Carefully remove the lamp unit from
outside. The retaining clips unclipautomatically. �)Turn the bulb holder a quarter of a turn andchange the bulb.
For reassembly, carry out these operations in
reverse order.
Changing the light emittingdiode-LED lamps
For replacement, contact a CITROËN dealer or qualified workshop.
Page 225 of 358
223Practical information
From the front
From the rear
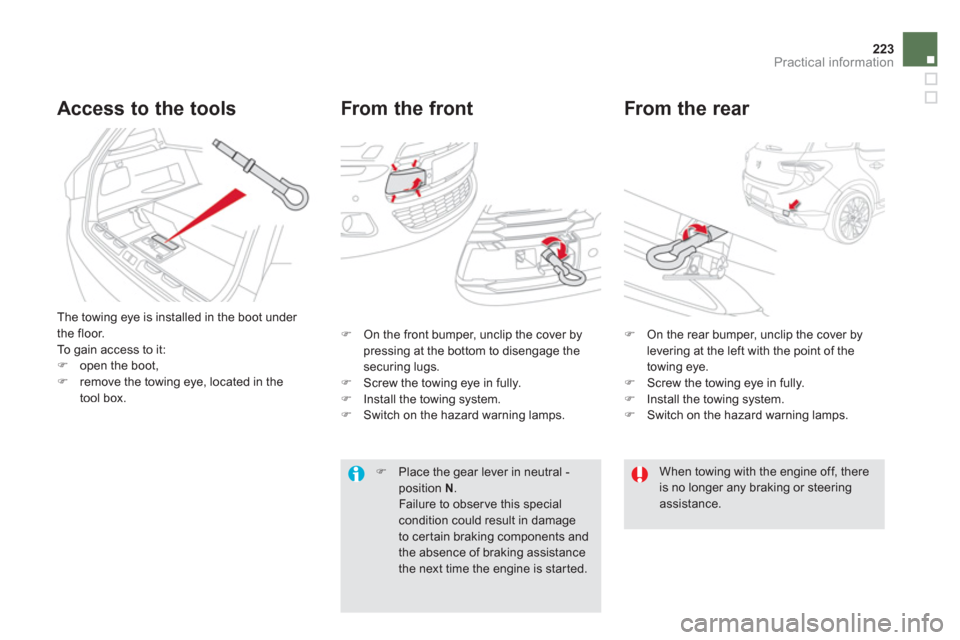
Access to the tools
The towing eye is installed in the boot under
the floor.
To gain access to it: �)open the boot, �)remove the towing eye, located in the
tool box.
�)
On the front bumper, unclip the cover by
pressing at the bottom to disengage thesecuring lugs.�) Screw the towing eye in fully.�)
Install the towing system.�)
Switch on the hazard warning lamps.
�)
On the rear bumper, unclip the cover bylevering at the left with the point of the
towing eye. �) Screw the towing eye in fully. �)
Install the towing system. �)
Switch on the hazard warning lamps.
�)Place the gear lever in neutral -position N.Failure to obser ve this special condition could result in damageto certain braking components and the absence of braking assistancethe next time the engine is started.
When towing with the engine off, there is no longer any braking or steering assistance.
Page 229 of 358
227Practical information
Accessories
A wide range of accessories and genuine par ts is available from the CITROËN dealer network.
These accessories and par ts have been tested and approved for reliability and safety.
They are all adapted to your vehicle and benefit from CITROËN's recommendation and warranty.
"Comfort":
door deflectors, side window blinds, rear screen blind, isotherm module, coat hanger fixed to head restraint, mobile reading lamp, mirror for caravan, parking sensors...
"Transport systems":
child seats and booster cushions, boot carpet,
boot liner, boot net, boot spacers, transverse
roof bars, bic
ycle carrier, ski carrier, roof boxes,
towbars, wiring harnesses...
If a towbar and wiring harness are fitted
outside the CITROËN dealer network, theinstallation must be done using the vehicle's electrical pre-equipment and fitted following the manufacturer's recommendations.
"Styling":
gear lever knobs, aluminium foot rest, alloy wheels, chrome mirror shells, chrome door aperture finishers...
*
To avoid an
y risk of jamming the pedals:
- ensure that mats are correctly positionedand secured,
- never fit one mat on top of another.
"Security and safety":
anti-intrusion alarm, anti-tilt unit, stolen
vehicle tracking system, child seats and
booster cushions, breathalyser, first aid kit, fire
extinguisher, warning triangle, high visibility
vest, wheel security bolts, snow chains,non-slip covers...
"Protection":
mats * , seat covers compatible with lateral
airbags, mud flaps, door protective mouldings,bumper protection strips, vehicle cover...
The rear bodywork has been designedto avoid spray.