touch screen Citroen DS5 RHD 2015.5 1.G Owner's Manual
[x] Cancel search | Manufacturer: CITROEN, Model Year: 2015.5, Model line: DS5 RHD, Model: Citroen DS5 RHD 2015.5 1.GPages: 400, PDF Size: 23.96 MB
Page 7 of 400
009010011cHEcKS TEcHn IcA L dA TAAUdI O An d
TELEMATI
c
S
239 Fuel tank
242
M
isfuel prevention
(Diesel)
243
O
pening the bonnet
244
Pe
trol underbonnet layout
245
D
iesel underbonnet layout
246
R
unning out of fuel (Diesel)
247
C
hecking levels
251
C
hecks
253
Ad
Blue
® additive and SCR
system (BlueHDi Diesel) 264
Pe
trol engines
265
Pe
trol weights
267
D
iesel engines
269
D
iesel weights
273
D
imensions
2 74
I
dentification markings 278
E
mergency or assistance
281
A
udio system
For versions equipped
with a navigation system
in the touch screen, refer
to the supplement in the
handbook pack.
Page 12 of 400
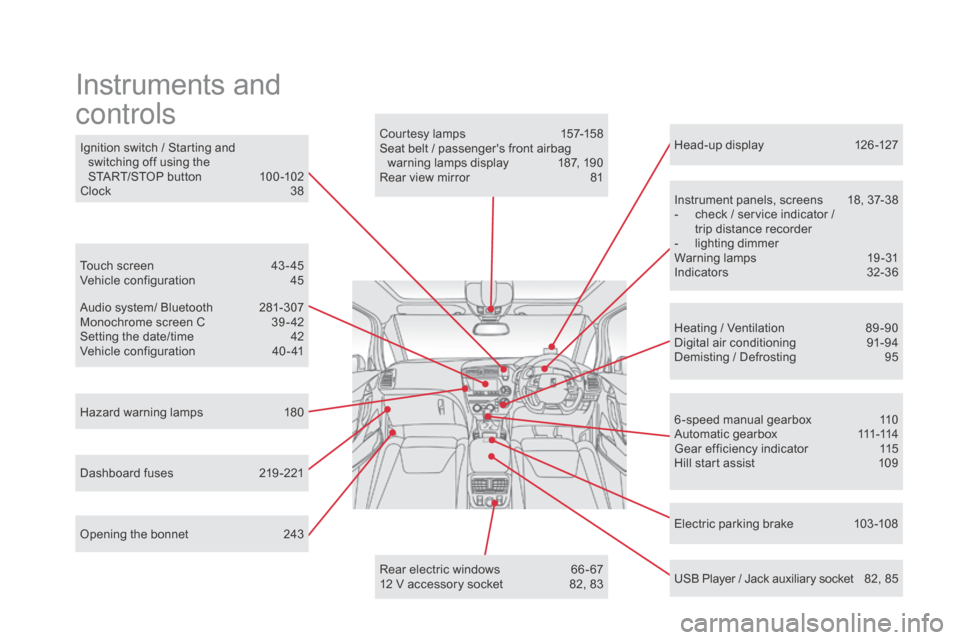
Head-up display 126 -127
Instrument panels, screens
1
8, 37-38
-
c
heck / service indicator /
trip distance recorder
-
l
ighting dimmer
Warning lamps
1
9-31
Indicators
32
-36
Electric parking brake
1
03 -108
Ignition switch / Starting and
switching off using the
START/STOP button
1
00 -102
Clock
3
8
Hazard warning lamps
1
80
Instruments and
controls
Courtesy lamps 1 57-158
Seat belt / passenger's front airbag warning lamps display
1
87, 190
Rear view mirror
8
1
Heating / Ventilation
8
9 -90
Digital air conditioning
9
1-94
Demisting / Defrosting
9
5
USB Player / Jack auxiliary socket
8
2, 85
Dashboard fuses
2
19 -221 6 -speed manual gearbox
1
10
A u t o m a t i c g e a r b o x
111
-114
Gear efficiency indicator
1
15
Hill start assist
1
09
Audio system/ Bluetooth
2
81-307
Monochrome screen C
3
9 - 42
Setting the date/time
4
2
Vehicle configuration
4
0 - 41
Touch screen
4
3 - 45
Vehicle configuration
4
5
Opening the bonnet
2
43 Rear electric windows
6
6 - 67
12 V accessory socket
8
2, 83
Page 40 of 400
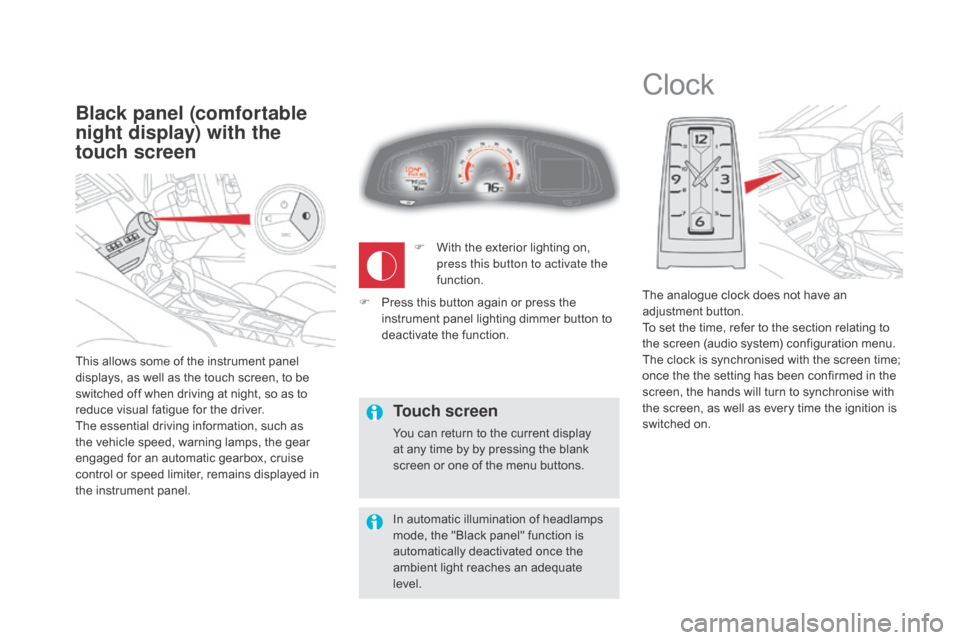
This allows some of the instrument panel
displays, as well as the touch screen, to be
switched off when driving at night, so as to
reduce visual fatigue for the driver.
The essential driving information, such as
the vehicle speed, warning lamps, the gear
engaged for an automatic gearbox, cruise
control or speed limiter, remains displayed in
the instrument panel.
Black panel (comfortable
night display) with the
touch screen
Clock
The analogue clock does not have an
adjustment button.
To set the time, refer to the section relating to
the screen (audio system) configuration menu.
The clock is synchronised with the screen time;
once the the setting has been confirmed in the
screen, the hands will turn to synchronise with
the screen, as well as every time the ignition is
switched on.
F
W
ith the exterior lighting on,
press this button to activate the
function.
Touch screen
You can return to the current display
at any time by by pressing the blank
screen or one of the menu buttons.
In automatic illumination of headlamps
mode, the "Black panel" function is
automatically deactivated once the
ambient light reaches an adequate
level.
F
P
ress this button again or press the
instrument panel lighting dimmer button to
deactivate the function.
Page 45 of 400
43
Touch screen
Associated with the navigation system, this
screen gives access to:
-
m
enus for adjusting settings for vehicle
functions and systems,
-
a
udio and display settings menus,
-
a
udio system and telephone controls and
the display of associated information.
-
t
he controls for the navigation system
and Internet services and the display of
associated information.
It also allows the display of:
-
t
he ambient temperature (a blue snowflake
appears if there is a risk of ice),
-
t
he trip computer,
-
v
isual parking sensor information,
-
t
he image from the reversing camera. As a safety measure, the driver
should only carr y out operations
that require close attention with the
vehicle stationary.
Some functions are not accessible
when driving.general operation
Recommendations
Its use is possible at all temperatures and when
wearing gloves.
Do not use pointed objects on the touch
screen.
Do not touch the touch screen with wet hands.
Uses a soft clean cloth to clean the touch
screen.
Principles
Press the virtual buttons in the touch screen.
Each menu is displayed over one or two pages
(primary page and secondary page).
Use the "Options" button to go to the
secondary page.
After a few moments with no action on
the secondary page, the primary page
is displayed automatically.
Use this button for access to
additional information and to the
settings for certain functions.
Use this button to confirm.
Use this button to quit the current
display and return to the primary
page.
For versions equipped with a navigation
system in the touch screen, refer to the
supplement in the handbook pack.
Monitoring
Page 49 of 400
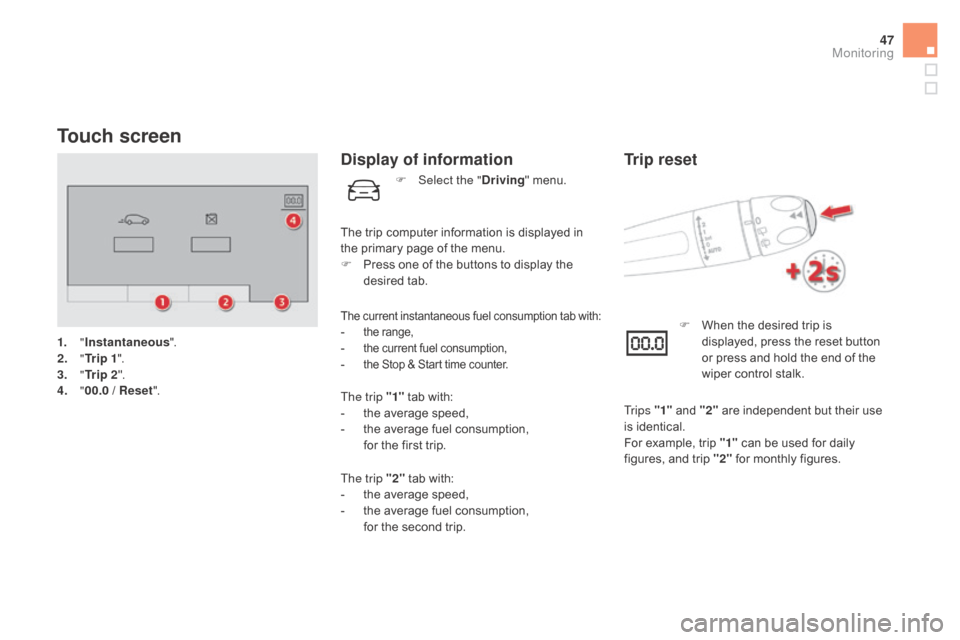
47
Touch screen
1. "Instantaneous ".
2. " T
r i p 1".
3.
"Tr i p 2 ".
4.
" 0
0.0 / Reset ".
display of information
The current instantaneous fuel consumption tab with:- the range,- the current fuel consumption,- the Stop & Start time counter.
The trip "1" tab with:
- t he average speed,
-
t
he average fuel consumption,
f
or the first trip.
The trip "2" tab with:
-
t
he average speed,
-
t
he average fuel consumption,
f
or the second trip. F
W
hen the desired trip is
displayed, press the reset button
or press and hold the end of the
wiper control stalk.
Trip reset
Tr i p s "1" and "2" are independent but their use
is identical.
For example, trip "1" can be used for daily
figures, and trip "2" for monthly figures.
The trip computer information is displayed in
the primary page of the menu.
F
P
ress one of the buttons to display the
desired tab. F
Sel
ect the "
dr
iving
" menu.
Monitoring
Page 87 of 400
85
USB Player
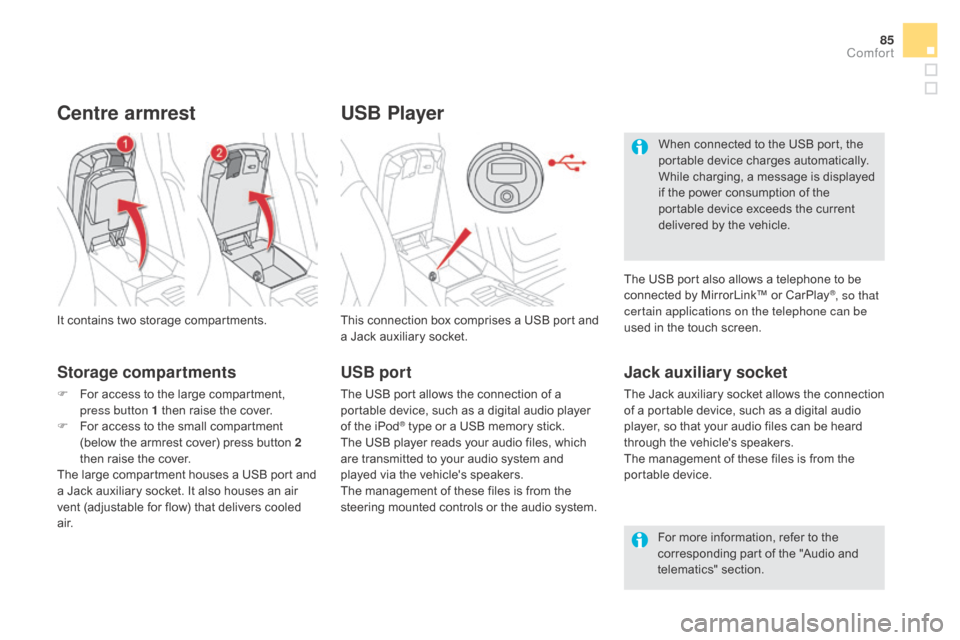
This connection box comprises a USB port and
a Jack auxiliary socket.
Jack auxiliary socket
The Jack auxiliary socket allows the connection
of a portable device, such as a digital audio
player, so that your audio files can be heard
through the vehicle's speakers.
The management of these files is from the
portable device.
It contains two storage compartments.
centre armrest
Storage compartments
F For access to the large compartment,
press button 1 then raise the cover.
F
F
or access to the small compartment
(below the armrest cover) press button 2
then raise the cover.
The large compartment houses a USB port and
a Jack auxiliary socket. It also houses an air
vent (adjustable for flow) that delivers cooled
a i r. For more information, refer to the
corresponding part of the "Audio and
telematics" section.
USB port
The USB port allows the connection of a
portable device, such as a digital audio player
of the iPod
® type or a USB memory stick.
The USB player reads your audio files, which
are transmitted to your audio system and
played via the vehicle's speakers.
The management of these files is from the
steering mounted controls or the audio system. When connected to the USB port, the
portable device charges automatically.
While charging, a message is displayed
if the power consumption of the
portable device exceeds the current
delivered by the vehicle.
The USB port also allows a telephone to be
connected by MirrorLink™ or CarPlay
®, so that
certain applications on the telephone can be
used in the touch screen.
comfort
Page 114 of 400
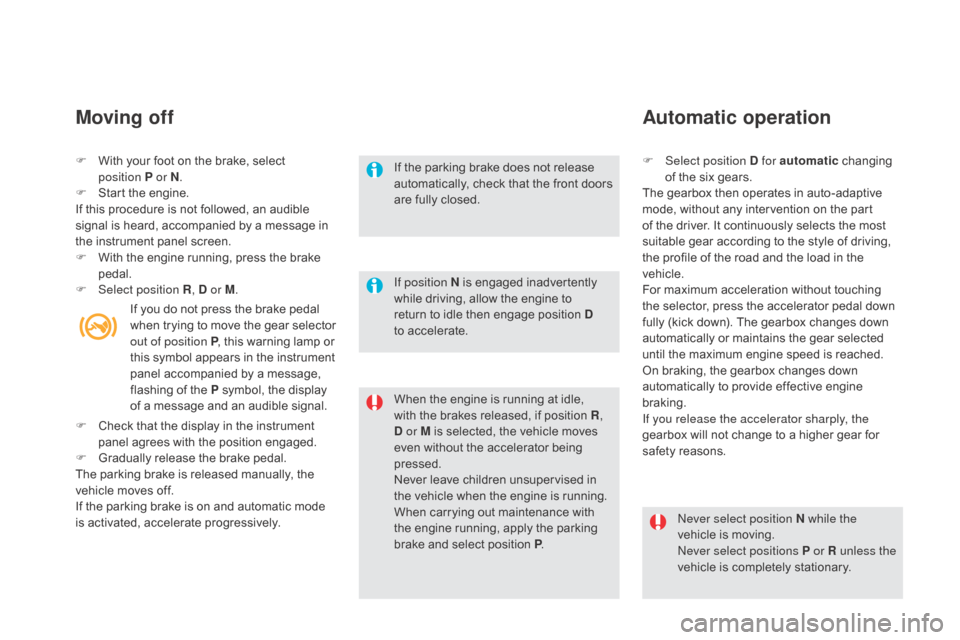
F With your foot on the brake, select position P or n.
F
S
tart the engine.
If this procedure is not followed, an audible
signal is heard, accompanied by a message in
the instrument panel screen.
F
W
ith the engine running, press the brake
pedal.
F
Sel
ect position R ,
d or M.
Moving off
When the engine is running at idle,
with the brakes released, if position R ,
d
or M is selected, the vehicle moves
even without the accelerator being
pressed.
Never leave children unsupervised in
the vehicle when the engine is running.
When carrying out maintenance with
the engine running, apply the parking
brake and select position P .
If the parking brake does not release
automatically, check that the front doors
are fully closed.
Never select position n while the
vehicle is moving.
Never select positions P or R unless the
vehicle is completely stationary.
Automatic operation
F Select position d for automatic changing
of the six gears.
The gearbox then operates in auto-adaptive
mode, without any intervention on the part
of the driver. It continuously selects the most
suitable gear according to the style of driving,
the profile of the road and the load in the
vehicle.
For maximum acceleration without touching
the selector, press the accelerator pedal down
fully (kick down). The gearbox changes down
automatically or maintains the gear selected
until the maximum engine speed is reached.
On braking, the gearbox changes down
automatically to provide effective engine
braking.
If you release the accelerator sharply, the
gearbox will not change to a higher gear for
safety reasons.
If position
n
is engaged inadvertently
while driving, allow the engine to
return to idle then engage position
d
to
accelerate.
If you do not press the brake pedal
when trying to move the gear selector
out of position P
, this warning lamp or
this symbol appears in the instrument
panel accompanied by a message,
flashing of the P symbol, the display
of a message and an audible signal.
F
C
heck that the display in the instrument
panel agrees with the position engaged.
F
G
radually release the brake pedal.
The parking brake is released manually, the
vehicle moves off.
If the parking brake is on and automatic mode
is activated, accelerate progressively.
Page 122 of 400
deactivation / Reactivation
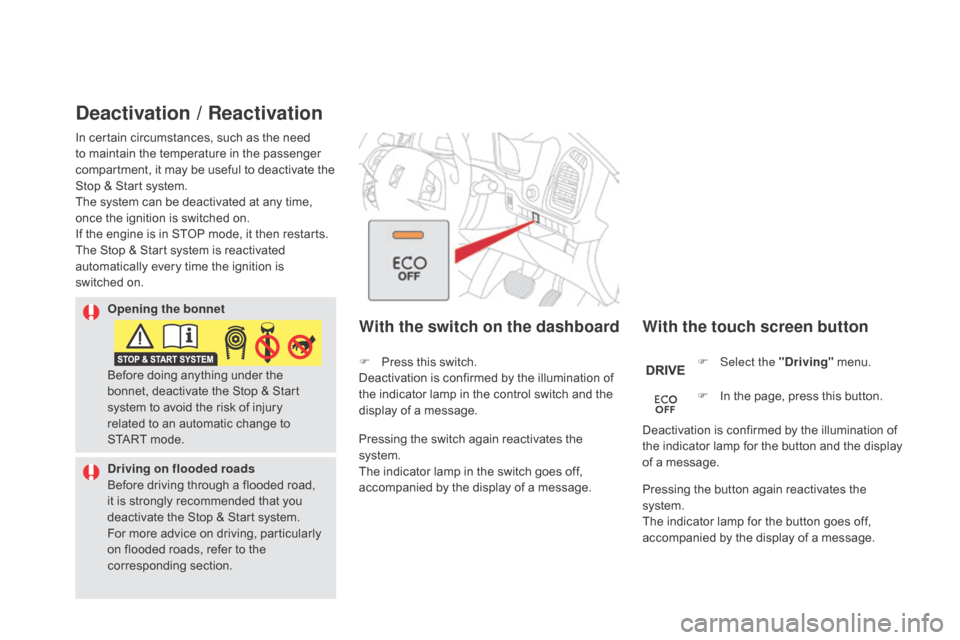
With the touch screen button
With the switch on the dashboard
F Select the "dr iving" menu.
F
I
n the page, press this button.
Deactivation is confirmed by the illumination of
the indicator lamp for the button and the display
of a message.
Pressing the switch again reactivates the
system.
The indicator lamp in the switch goes off,
accompanied by the display of a message. F
P
ress this switch.
Deactivation is confirmed by the illumination of
the indicator lamp in the control switch and the
display of a message.
Pressing the button again reactivates the
system.
The indicator lamp for the button goes off,
accompanied by the display of a message.
Opening the bonnet
dr
iving on flooded roads
Before driving through a flooded road,
it is strongly recommended that you
deactivate the Stop & Start system.
For more advice on driving, particularly
on flooded roads, refer to the
corresponding section.
In certain circumstances, such as the need
to maintain the temperature in the passenger
compartment, it may be useful to deactivate the
Stop & Start system.
The system can be deactivated at any time,
once the ignition is switched on.
If the engine is in STOP mode, it then restarts.
The Stop & Start system is reactivated
automatically every time the ignition is
switched
on.
Before doing anything under the
bonnet, deactivate the Stop & Start
system to avoid the risk of injury
related to an automatic change to
START
mode.
Page 131 of 400
129
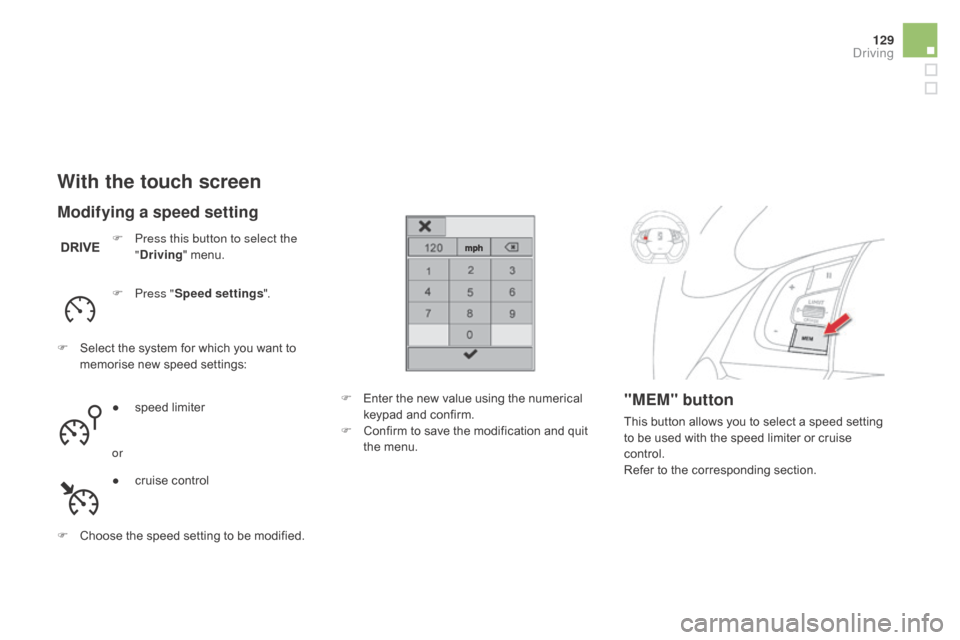
With the touch screen
F Press this button to select the "dr iving" menu.
F
P
ress " Speed settings ".
F
S
elect the system for which you want to
memorise new speed settings:
F
C
hoose the speed setting to be modified. F
E
nter the new value using the numerical
keypad and confirm.
F
C
onfirm to save the modification and quit
the menu.
"MEM" button
This button allows you to select a speed setting
to be used with the speed limiter or cruise
control.
Refer to the corresponding section.
Modifying a speed setting
● speed limiter
or
●
c
ruise control
driving
Page 133 of 400
131
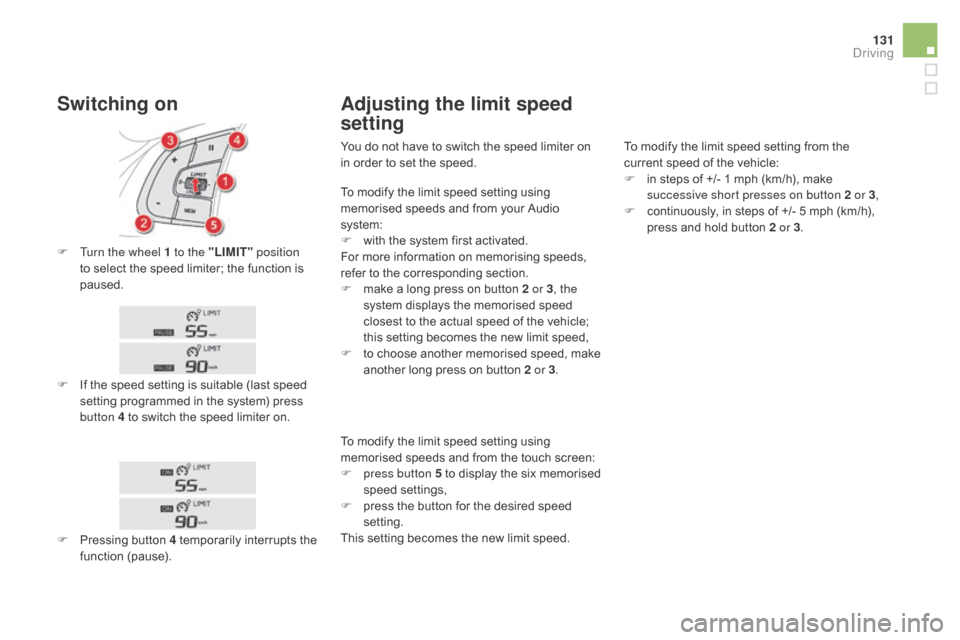
F Turn the wheel 1 to the "LIMIT" position
to select the speed limiter; the function is
paused.
F
I
f the speed setting is suitable (last speed
setting programmed in the system) press
button 4 to switch the speed limiter on.
Switching on Adjusting the limit speed
setting
F Pressing button 4 temporarily interrupts the
function (pause). You do not have to switch the speed limiter on
in order to set the speed.
To modify the limit speed setting from the
current speed of the vehicle:
F
i
n steps of +/- 1 mph (km/h), make
successive short presses on button 2 or 3 ,
F
c
ontinuously, in steps of +/- 5 mph (km/h),
press and hold button 2 or 3 .
To modify the limit speed setting using
memorised speeds and from your Audio
system:
F
w
ith the system first activated.
For more information on memorising speeds,
refer to the corresponding section.
F
m
ake a long press on button 2 or 3
, the
system displays the memorised speed
closest to the actual speed of the vehicle;
this setting becomes the new limit speed,
F
t
o choose another memorised speed, make
another long press on button 2 or 3.
To modify the limit speed setting using
memorised speeds and from the touch screen:
F
p
ress button 5 to display the six memorised
speed settings,
F
p
ress the button for the desired speed
setting.
This setting becomes the new limit speed.
driving